Disclaimer:
I invented nothing
I read A LOT and went by trial and error
__ ** Balancing robot for dummies **__
Part one: sensor, setup and fixed time loop
Reminder, please read http://www.arduino.cc/cgi-bin/yabb2/YaBB.pl?num=1282384853/0
1 - sensor

This is the IMU (Inertial Measurement Unit), 5DOF (5 Degrees Of Freedom) from Sparkfun
This breakboard incorporates a IDG-500 dual-axis gyroscope and a triple axis ADXL335 accelerometer
Datasheets:
We actually need only 3DOF (2 Acc and 1 Gyro axis)
I got an older model with a ADXL330/IDG-300 combo (remember I have been wandering around this project for two years :-[)
2 - Setup

The board setup is rather straight forward
The card needs a 3.3V supply (not 5V :o)
Green wire: IMU pin#4 = GyroY to AI0
blue wire: IMU pin#7 = AccZ to AI1
Yellow wire: IMU pin#9 = AccX to AI2
Also, for better ADC resolution, connect the 3.3V to the Arduino AREF
Position the Arduino supply jumper to "USB"
3 - Fixed timed loop
The main loop duration is critical for the filtering and PID modules
int STD_LOOP_TIME = 9;
int lastLoopTime = STD_LOOP_TIME;
int lastLoopUsefulTime = STD_LOOP_TIME;
unsigned long loopStartTime = 0;

void loop()  {

// your code ...


// *********************** loop timing control **************************
  lastLoopUsefulTime = millis()-loopStartTime;
  if(lastLoopUsefulTime<STD_LOOP_TIME)         delay(STD_LOOP_TIME-lastLoopUsefulTime);
  lastLoopTime = millis() - loopStartTime;
  loopStartTime = millis();
}
This loop runs 100 times per second (100 Hz)
Motor will receive an updated PWM value every 10 milliseconds
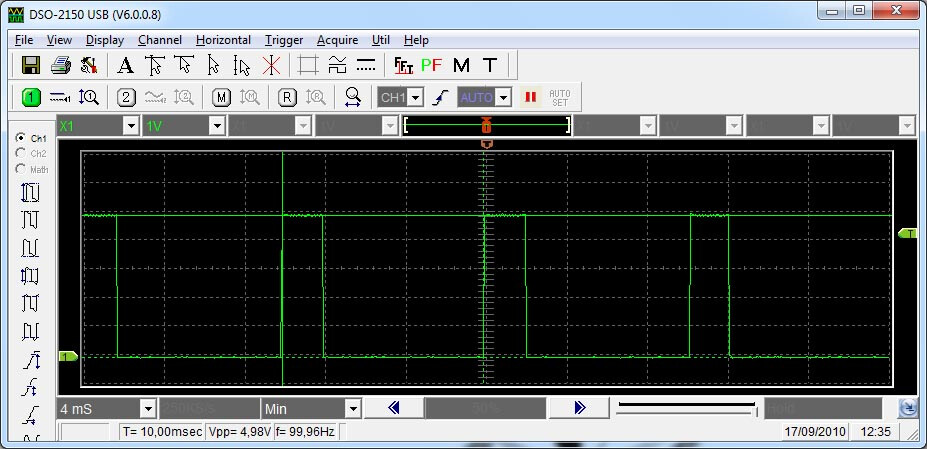
Loop timing is easily checked using a scope
just toggle one Digital Output within the loop:
an easier way: add serialOut_timing() in the loop and watch the serial monitor
void serialOut_timing() {
static int skip=0;
  if(skip++==5) {                         // display every 500 ms (at 100 Hz)
    skip = 0;
    Serial.print(lastLoopUsefulTime);    Serial.print(",");
    Serial.print(lastLoopTime);          Serial.print("\n");
  }
}
You should read "2,10"
The first number is the real time needed to go through the loop
The second one is the final time loop, including the variable added delay
Next Part: data aquisition, zeroing and scaling
This presentation is rather time consuming;
English is not my native language (you may have notice the accent français in my writing)
I will pursue if sufficient interest is shown
also, if I go too slow, too fast or if I am just boring, just let me know ![]()