Difference between ICR1 and OCR1A - in Fast PWM?

Hi there,

I am new to the MCU scene. I am trying to capture pulses of duration 8us. I am not sure what PWM mode to use. CTC maybe?
What do ICR and OCR indicate? Are they used for same or different purposes.
How does one decide what mode to use? Can someone explain?

Best,
A

1 Like

I am trying to capture pulses of duration 8us.

What do you mean by "capture"?

What should your program do when a pulse is "captured"?

Well, I did not literally mean I m going to capture pulses.
I need to read an incoming square wave at 125kHz, at every 8us or less. The data read in the process is put in a buffer for further processing.

/******* Sketch to test Input Capture interrupt handling *********************************
functionality: measure length of pulses on the ICP pin with precision of 0.5 microseconds
Show the min and max pulse widths in microseconds on the serial port

**************************************************************************************************************/
#include <stdio.h>      // for verbose debugging using sprintf 
//#include "TimerOne.h"
#include "Timer.h"

#define icpPin 8        // ICP input pin on arduino
#define outPin 2        // output pin that will shadow the input, can be monitored with a scope 

                       // some variables to help see that something is happening in the interrupt handlers
volatile unsigned int Value;     // this stores the current ICR1 value
volatile unsigned int MinValue;     
volatile unsigned int MaxValue;
volatile unsigned int Overflows;
volatile unsigned int PulseCount;

char buffer[800];
short i;

Timer t;
/* Overflow interrupt vector */
ISR(TIMER1_OVF_vect){                 // here if no input pulse detected 
  Overflows++;                       // incriment overflow count  
}

/* ICR interrupt vector */
ISR(TIMER1_CAPT_vect){
  TCNT1 = 0;                            // reset the counter  
  if( bit_is_set(TCCR1B ,ICES1)){       // was rising edge detected ?   
       digitalWrite(outPin,HIGH );      // yes, set our output pin high to mirror the input
  }
  else {                                // falling edge was detected 
       Value = ICR1;                    // save the input capture value 
       digitalWrite(outPin,LOW );       // set our output pin low to mirror the input  
       PulseCount++;
       if(Value < MinValue)             // update min or max values as appropriate   
           MinValue = Value;
       if (Value > MaxValue)
           MaxValue = Value;    
  }     
  TCCR1B ^= _BV(ICES1);                 // toggle bit value to trigger on the other edge    
}

ISR(TIMER0_COMPA_vect){
  
  if(i<800){
    
    buffer[i] = digitalRead(icpPin);
    }i++;
  
  }

int val = 0;
int ledPin = 11;
int analogPin = 3;

int pwmPin = 9;

void setup() {
 Serial.begin(9600);
 pinMode(outPin, OUTPUT);               // declare the ledPin as an OUTPUT
 pinMode(icpPin, INPUT); // ICP pin (digital pin 8 on arduino) as input
 //Timer1.initialize(8);
 //Timer1.pwm(9,512);
 MinValue =    30000;                   // Initialise with extreme values 
 MaxValue =    0;


 TCCR1A = 0 ;                    // this register set to 0!
 TCCR1B =_BV(WGM13)|_BV(WGM12)|_BV(CS12)|_BV(CS10);      //SET TO CTC MODE        // NORMAL MODE!!, prescaler 8, rising edge ICP1 - this works
 TCCR1B |= _BV(ICES1);           // enable input capture
      

 TIMSK1 =  _BV(ICIE1);                         // enable input capture interrupt for timer 1
 TIMSK1 |= _BV(TOIE1);                         // enable overflow interrupt to detect missing input pulses 
 Serial.print("Finished setup\r\n");
 //t.start(8);
 //t.pwm(9,512);
 //t.pulse(9, 0.008, LOW);
 t.oscillate(9,0.008,LOW);
 //t.every(4, takeReading);
 
 //t.oscillate(9,8, LOW);
 //delayMicroseconds(8);
 //t.oscillate(9,8, HIGH);
 //delayMicroseconds(8);
 //t.every(4000000, takeReading);
}


// this loop prints the number of pulses in the last second, showing min and max pulse widths 
void loop() {
 //char buffer[800];
 // show the captured data, divide pulse widths by 2 to display time in microseconds
 sprintf(buffer,"Got %d pulses: min=%d, max=%d (%d timer overflows)\r\n", PulseCount, MinValue / 2, MaxValue / 2, Overflows);         
 
 val = analogRead(pwmPin);
 //analogWrite(ledPin, val/4);
 //Serial.println(val);
 Serial.print(buffer);    // send the info to the serial port
 /* reset variables ready for the next reading */   
 PulseCount = Overflows = 0; // reset counts
 MinValue =    30000;        // set values to extremes
 MaxValue =    0;       
  
 delay(800);             // wait 1 second for next update  [/font]            
}


/*
void takeReading(){

  Serial.println(analogRead(9));
}*/

I am trying to work on top of this code to do the same. As of now I do not have 125khz source. I would need to generate on one of the pins(and I could not). Total failure!

A

I need to read an incoming square wave at 125kHz

Again, what are you trying to do?

"read an incoming square wave" is a meaningless phrase.

Are you trying to measure a pulse length? If so, it is not a square wave.

I am not trying to measure a pulse length. The code does that(I pulled it out from the forum here). The duration of the square wave peak to peak is 8us. I meant input capture. I am not so clear with the terminology - apologies. Putting that aside, could you show me how to generate a pwm waveform? I am not sure what mode to choose. Maybe once I understand that, I can ask you any further questions.

Best,
A

The timers run continuously. As configured by the Arduino core, they count at about 256kHz in 8bit mode, and wrap around from 255 to 0.

OCR is the "Output Compare Register." When the timer counter value matches the value you've put in the OCR, the module does "something." The core configures an output pin to be set when the counter hits zero, and cleared when the counter matches an OCR value, which gives you PWM. (approximately. There are details...)

ICR is the "Input Capture Register." You can set up the timer so that when the ICRn pin changes, the timer value at that instant is copied (by hardware) to the ICR, where you SW can read it "later." So if you read the ICR at each edge of a pulse on that input pin, you can measure the length of the pulse.

The very similar symbol names are just a coincidence of the English language ("Capture" and "Compare" both start with a "C") - the functions are very different. In particular OCRn are registers that you write, and ICR is a register that you read.

Thank you West. That actually made things a lil clear on when to use what. :smiley:

Hi westfw,

I have one more question. Say, I want to the mcu to capture values via the ICP, Do I have to set both ICR and OCR values? Like if you take CTC mode for example - it had two variants where it uses both ICR and OCR. Could you please check the code below?

/******* Sketch to test Input Capture interrupt handling *********************************
functionality: measure length of pulses on the ICP pin with precision of 0.5 microseconds
Show the min and max pulse widths in microseconds on the serial port

**************************************************************************************************************/
#include <stdio.h>      // for verbose debugging using sprintf 
//#include "TimerOne.h"
#include "Timer.h"

#define icpPin 8        // ICP input pin on arduino
#define outPin 2        // output pin that will shadow the input, can be monitored with a scope 

                       // some variables to help see that something is happening in the interrupt handlers
volatile unsigned int Value;     // this stores the current ICR1 value
volatile unsigned int MinValue;     
volatile unsigned int MaxValue;
volatile unsigned int Overflows;
volatile unsigned int PulseCount;

char buffer[800];
short i;

Timer t;
/* Overflow interrupt vector */
ISR(TIMER1_OVF_vect){                 // here if no input pulse detected 
  Overflows++;                       // incriment overflow count  
}

/* ICR interrupt vector */
ISR(TIMER1_CAPT_vect){
  TCNT1 = 0;                            // reset the counter  
  if( bit_is_set(TCCR1B ,ICES1)){       // was rising edge detected ?   
       digitalWrite(outPin,HIGH );      // yes, set our output pin high to mirror the input
  }
  else {                                // falling edge was detected 
       Value = ICR1;                    // save the input capture value 
       digitalWrite(outPin,LOW );       // set our output pin low to mirror the input  
       PulseCount++;
  }/*if(Value < MinValue)             // update min or max values as appropriate   
           MinValue = Value;
       if (Value > MaxValue)
           MaxValue = Value;    
  }  */   
  TCCR1B ^= _BV(ICES1);                 // toggle bit value to trigger on the other edge    
}

/*ISR(TIMER0_COMPA_vect){
  
  if(i<800){
    
    buffer[i] = digitalRead(icpPin);
    }i++;
  
  }*/

int val = 0;
int ledPin = 11;
int analogPin = 3;

int pwmPin = 9;

void setup() {
 Serial.begin(9600);
 pinMode(outPin, OUTPUT);               // declare the ledPin as an OUTPUT
 //pinMode(icpPin, INPUT); // ICP pin (digital pin 8 on arduino) as input
 //Timer1.initialize(8);
 //Timer1.pwm(9,512);
 //MinValue =    30000;                   // Initialise with extreme values 
 //MaxValue =    0;
 
//CTC Mode

 TCCR1A |= (1<<COM1A1)|(1<<COM1A0) ;                    // this register set to 0!
 TCCR1B |= (1<<WGM12)|(1<<CS12)|(1<<CS10);   //prescaler 1024  //SET TO CTC MODE        // NORMAL MODE!!, prescaler 8, rising edge ICP1 - this works
 TCCR1B |= (1<<ICNC1)|(1<<ICES1);           // enable input capture
 OCR1A = 127;     

 TIMSK1 |= (1<<ICIE1)|(1<<TOIE1);                       // enable input capture interrupt for timer// enable overflow interrupt to detect missing input pulses 
 
 Serial.print("Finished setup\r\n");
 //t.start(8);
 //t.pwm(9,512);
 //t.pulse(9, 0.008, LOW);
 //t.oscillate(9,0.008,LOW);
 //t.every(4, takeReading);
 
 //t.oscillate(9,8, LOW);
 //delayMicroseconds(8);
 //t.oscillate(9,8, HIGH);
 //delayMicroseconds(8);
 //t.every(4000000, takeReading);
}


// this loop prints the number of pulses in the last second, showing min and max pulse widths 
void loop() {
/* //char buffer[800];
 // show the captured data, divide pulse widths by 2 to display time in microseconds
 sprintf(buffer,"Got %d pulses: min=%d, max=%d (%d timer overflows)\r\n", PulseCount, MinValue / 2, MaxValue / 2, Overflows);         
 Serial.println(Value);
 val = analogRead(pwmPin);
 //analogWrite(ledPin, val/4);
 //Serial.println(val);
 Serial.print(buffer);    // send the info to the serial port
 /* reset variables ready for the next reading */   
 /*PulseCount = Overflows = 0; // reset counts
 MinValue =    30000;        // set values to extremes
 MaxValue =    0;      
  
 delay(800);  */           // wait 1 second for next update  [/font]            
}


/*
void takeReading(){

  Serial.println(analogRead(9));
}*/

Best,
A

Also, how does one calculate the ICR and OCR values? For example, if I have to do a toggle for 50% duty cycle, one needs to set an OCR value. How is calculation done?

I know this formula:

Frequency of Timer Interrupt = MCU Clock frequency/(Prescaler x(Compare Match Register Value + 1)

I do not know the OCR value here.
The frequency of the timer interrupt is that my frequency of interest? Like I want to generate a 125kHz square wave from say pin 9. So is that the frequency of the timer?

Best,
A

if I have to do a toggle for 50% duty cycle, one needs to set an OCR value. How is calculation done?

To get 50% duty cycle, you'd set an OCR to half of the top counter value "TOP." TOP is either the maximum counter value limited by hardware (255 or 65535 depending on whether its an 8bit or 16bit timer), OR the value of another OCR register, depending on the timer mode. If you want a 125kHz square wave output, you'd HAVE to use one of the modes with an OCR register as top, because 125kHz*256 is 32MHz, which is faster than the timer on an Uno will go.
You could set the prescaler to /16, OCRA to 7, and OCRB to 3 or prescaler to /1, OCRA to 127 and OCRB to 63; I think those will give you 125kHz...

Do I have to set both ICR and OCR values?

AFAIK, they operate entirely separately. Are you thinking that "Input capture" will capture the state of a pin at particular count values? That's NOT what it does - it captures the counter value when there is a pin state change.

Gathering data from other threads, I gather you're trying to provide clock for some sort of Manchester Data provider?

  • Is 125kHz the "carrier" frequency, or the data rate?
  • In most Manchester encoding examples, there is a clock that is 2x the data rate, but you showed a diagram where you have 32 clocks per bit (or half-bit)?
  • Manchester gets the data bit value from the direction of the data bit transition in the middle of the data period. I'm not sure that using ICR (which gives you time between transitions) is going to be helpful. I guess "long" means the data bit is different than the last bit, while "short" means it's the same.
  • I thought that a point of manchester encoding was that you can derive the clock from the data stream. Why are YOU generating the 125kHz?
  • If you have 8 or 128 clocks per data bits, and are using OCRA to generate that clock, you can certainly use OCRB to check the databit at (or slightly past) the midpoint. (OCRA as top, OCRB as interrupt, read the bit in the ISR. Or poll, except then you don't really need the OCR to help.)

Gathering data from other threads, I gather you're trying to provide clock for some sort of Manchester Data provider?

1)Is 125kHz the "carrier" frequency, or the data rate? - Carrier frequency

  1. In most Manchester encoding examples, there is a clock that is 2x the data rate, but you showed a diagram where you have 32 clocks per bit (or half-bit)? - The diagram was of a BiPhase encoded signal - Where RF/32 represent the data bits. For manchester it is different.

  2. Manchester gets the data bit value from the direction of the data bit transition in the middle of the data period. I'm not sure that using ICR (which gives you time between transitions) is going to be helpful. I guess "long" means the data bit is different than the last bit, while "short" means it's the same.

  3. I thought that a point of manchester encoding was that you can derive the clock from the data stream. Why are YOU generating the 125kHz? Because I don't have an analog front end that does the same. I want to use that 125kHz for my reference, so that I can read values at the mid-bit or rising or falling edges. (hope that made sense ... :confused: ). I could have used Timer1 functions like Timer1.initialize and Timer1.pwm. But it's causing a conflict between libraries. Any suggestions on how to solve that?

  4. If you have 8 or 128 clocks per data bits, and are using OCRA to generate that clock, you can certainly use OCRB to check the databit at (or slightly past) the midpoint. (OCRA as top, OCRB as interrupt, read the bit in the ISR. Or poll, except then you don't really need the OCR to help.) - I will try that and keep posted.

Thanks a ton for your time.

Best,

Azim

Hello westfw,
One more question : How did you decide the OCRA and OCRB values - the 7 and 3 in first case and 127 and 63 in the second? Are there any calculations involved?

Best,
A

I don't quite understand your application, or how you expect the internal clocking to work, and I don't have any manchester-encoded devices lying around to test with, so I don't think I can help any more in that area.

I guess "long" means the data bit is different than the last bit, while "short" means it's the same.

Huh. I looked at some of the hardware circuits that are used actually seem to implement something like this.
There's a flip flop (holds "last bit") and an XOR gate (does conditional "invert") Sort of.


Interesting page (doesn't talk about SW, though): https://www.allaboutcircuits.com/technical-articles/how-to-decode-manchester-encoded-data-using-hardware/

How did you decide the OCRA and OCRB values - the 7 and 3 in first case and 127 and 63 in the second? Are there any calculations involved?

This I can answer...
The Timers have "prescalers" that determine their counting rate. clk/1, clk/8, clk/64 (and some more, slower ones.) (clk is the cpu clock rate: 16MHz.)
This will determine the resolution of the ICR/OCR values. WIth clk/64, each clock tick will be 1/250000 s long, and 125kHz would need to transition the output every clock, which I think is impractical. With clk/1, a 1/125k period needs 128 clocks for the full cycle, and a transition half-way through. Taking into account "starting at 0", that means the you need to count to 127, with a transition halfway there (63) The same applies to using the /8 prescaler:

Tclk = 16e6/8 = 2e6
OCRtop = 2e6/125e3 - 1 = 15 (Hmm. Did I say 7? oops; it looks like I though 1/16 was a prescaler option.)
OCRpwm = (2e6/125e3)/2 -1 = 7

There are complications I did not notice before: Timer0 and Timer1 apparently share the prescaler, and Timer0 has to operate with the 1/64 prescaler for millis() and etc to work right. And Timer2 apparently has some other possible prescaler options. (and also: if you're using this as a "sample clock" for your incoming manchester signal, you probably want it to be a much higher-frequency than the data frequency. The "clk" in the above hardware diagram is a "system" or synchonization clock that doesn't have anything to do with the data frequency. I think.

Thank for you clarfiying the same _west. Btw what's OCR_pwm? is that the PWM frequency? :zipper_mouth_face:

/******* Sketch to test Input Capture interrupt handling *********************************
functionality: measure length of pulses on the ICP pin with precision of 0.5 microseconds
Show the min and max pulse widths in microseconds on the serial port

**************************************************************************************************************/
#include <stdio.h>      // for verbose debugging using sprintf 
//#include "TimerOne.h"
//#include "Timer.h"
#include "PWM.h"

#define icpPin 8        // ICP input pin on arduino
//#define outPin 9        // output pin that will shadow the input, can be monitored with a scope 
#define outPin 9
                       
volatile uint8_t rising;                      


// some variables to help see that something is happening in the interrupt handlers
volatile unsigned int Value;     // this stores the current ICR1 value
volatile unsigned int MinValue;     
volatile unsigned int MaxValue;
volatile unsigned int Overflows;
volatile unsigned int PulseCount;


unsigned long duration;

//int32_t frequency = 125000

char buffer[800];
short i;

//Timer t;
/* Overflow interrupt vector */
ISR(TIMER2_OVF_vect){                 // here if no input pulse detected 
  Overflows++;                       // incriment overflow count  
}

/* ICR interrupt vector */
ISR(TIMER2_CAPT_vect){
  TCNT1 = 0;                            // reset the counter
  catchRisingEdge();
  /*if( bit_is_set(TCCR1B ,ICES1)){       // was rising edge detected ?   
       digitalWrite(outPin,HIGH );      // yes, set our output pin high to mirror the input
  }
  else {                                // falling edge was detected 
       Value = ICR1;                    // save the input capture value 
       digitalWrite(outPin,LOW );       // set our output pin low to mirror the input  
       PulseCount++;
  }/*if(Value < MinValue)             // update min or max values as appropriate   
           MinValue = Value;
       if (Value > MaxValue)
           MaxValue = Value;    
  }  */   
  TCCR1B ^= (1<<ICES1);                 // toggle bit value to trigger on the other edge
   
  /*if(bit_is_set(TCCR1B, ICES1)){
    digitalWrite(OUT, HIGH);
    }
   else{
    Value = ICR1;
    digitalWrite(OUT, LOW);
    PulseCount++;
    
   }*/
 /* static byte lastEdge;
  byte thisEdge = ICR1;
  byte difference = lastEdge - thisEdge;
  if (difference
  
  lastEdge = thisEdge;  */ 
}

/*ISR(TIMER0_COMPA_vect){
  
  if(i<800){
    
    buffer[i] = digitalRead(icpPin);
    }i++;
  
  }*/
//int val = 0;
//int ledPin = 11;
//int analogPin = 3;

//int pwmPin = 9;

//const int16_t TOGGLE_TIME = 8;

void setup() {
 Serial.begin(9600);
 //pinMode(outPin, OUTPUT);               // declare the ledPin as an OUTPUT
 //pinMode(icpPin, INPUT); // ICP pin (digital pin 8 on arduino) as input
 
 //MinValue =    30000;                   // Initialise with extreme values 
 //MaxValue =    0;
 //SetPinFrequency(9, 125000);
 pinMode(9, OUTPUT);//125kHz carrier to be generated here
 //Timer1.initialize(8);
 //Timer1.pwm(9, 512);
 
 /*digitalWrite(9, HIGH);
 delayMicroseconds(8);
 digitalWrite(9, LOW);
 delayMicroseconds(8);*/

 //USE FAST MODE TO ENABLE DOUBLE BUFFERING - GIVES A GLITCH FREE OUTPUT


 //TCCR1A |= (0<<COM1A1)|(1<<COM1A0) ;        //Toggle on reaching OCRA            // this register set to 0!
 //TCCR1A |= (1<<WGM10);
 
 TCCR1A |= (1<<COM1A1)|(1<<COM1A0)|(1<<COM1B1)|(1<<COM1B0)|(1<<WGM11)|(1<<WGM10);
 TCCR1B |= (1<<ICNC1)|(1<<WGM13)|(1<<WGM12)|(1<<CS11);  //prescaler 8  //SET TO Fast PWM MODE        // NORMAL MODE!!, prescaler 8, rising edge ICP1 - this works
            // enable input capture
 OCR1A = 127;
 OCR1B = 63;    

 TIMSK1 |= (1<<ICIE1)|(1<<TOIE1);                       // enable input capture interrupt for timer// enable overflow interrupt to detect missing input pulses 

/*
 TCCR2A |= (1<<WGM21);
 TCCR2B |= (1<<CS22)|(1<<CS21);
 OCR2A = 1;

 TCCR0A |= (1<<WGM01);
 TCCR0B |= (1<<CS02) | (1<<CS00);
 OCR0A = 1;*/
 Serial.print("Finished setup\r\n");
 //duration = pulseIn(9,HIGH);
 //Serial.println(duration);

 //t.start(8);
 //t.pwm(9,512);
 //t.pulse(9, 0.008, LOW);
 //t.oscillate(9,0.008,LOW);
 //t.every(4, takeReading);
 
 //t.oscillate(9,8, LOW);
 //delayMicroseconds(8);
 //t.oscillate(9,8, HIGH);
 //delayMicroseconds(8);
 //t.every(4000000, takeReading);
}


/*
// Turn the frequency on
void on()
{
  TCNT1H = 0;
  TCNT1L = 0;  
  TCCR1A |= (1 << COM1A0);
}

// Turn the frequency off and turn of the IR LED
void off()
{
  TCCR1A &= ~(1 << COM1A0);
}
*/

long lastTime;
int dataState = 0;


void catchRisingEdge()   {TCCR1B |= (1<<ICES1); TIFR1 |= (1<<ICF1); rising = 1;}
void catchFallingEdge()  {TCCR1B &= ~(1<<ICES1); TIFR1 |= (1<<ICF1); rising = 0;}

// this loop prints the number of pulses in the last second, showing min and max pulse widths 
void loop() {
 //char buffer[800];
 // show the captured data, divide pulse widths by 2 to display time in microseconds
 //sprintf(buffer,"Got %d pulses: min=%d, max=%d (%d timer overflows)\r\n", PulseCount, MinValue / 2, MaxValue / 2, Overflows);         

 
 //SetPinFrequency(9, 125000);
 //on();
 // digitalWrite(OUT, HIGH);
 // delay(8);
 // digitalWrite(OUT, LOW);
 // delay(8);
 //off();
 
 //int val = digitalRead(9);
 /*uint8_t state = 0;
 while(1) {
    if(state == 0) {
      digitalWrite(9, LOW);
      state = 1;
      delay(8);
      catchRisingEdge();
      //Serial.println(state);
      //Serial.println(rising);
    } 
    else {
      digitalWrite(9, HIGH);
      state = 0;
      delay(8);
      catchFallingEdge();
      //Serial.println(state);
      //Serial.println(rising);
    }} */
  //Serial.println(rising);

  //duration = pulseInLong(9, HIGH);
  //Serial.println(duration);
  //value = pulseIn(9, HIGH);

/*
  int analogValue = analogRead(9);
  int newdataState = (analogValue > 600);//need to check, hoping boolean will evaluate to 1 when true

  if(dataState == 0 && newdataState == 1){//if the led was off, but will be turned on, start the stop watch
    lastTime = millis();//store the current time
    dataState = newdataState;
  }

  if(dataState == 1 && newdataState == 0){//if the led was on, but will be turned off, get the difference between the last time we started counting time
    long difference = millis() - lastTime; //get the current time, but subtract the last stored time
    dataState = newdataState;
    Serial.println(difference);
  }

  digitalWrite(9,dataState);*/
  
/*
 while(1){
  if
  
 }*/
/*/////////////////////////////////////////////*/

 /*static uint16_t last_toggle;

    if ((uint16_t) micros() - last_toggle >= TOGGLE_TIME) {
        PINB = _BV(PB1);             // invert pin state
        last_toggle += TOGGLE_TIME;
    }

   Serial.println(last_toggle); */
/*///////////////////////////////////////////////////////*/ 
 //Serial.println(val);
 //val = analogRead(pwmPin);
 //analogWrite(ledPin, val/4);
 //Serial.println(val);
 //Serial.print(buffer);    // send the info to the serial port
 /* reset variables ready for the next reading */   
 /*PulseCount = Overflows = 0; // reset counts
 MinValue =    30000;        // set values to extremes
 MaxValue =    0;      
  
 delay(800);  */           // wait 1 second for next update  [/font]            
}


/*
void takeReading(){
  int val = digitalRead(9);
  val++;
  Serial.println(val);
}
*/

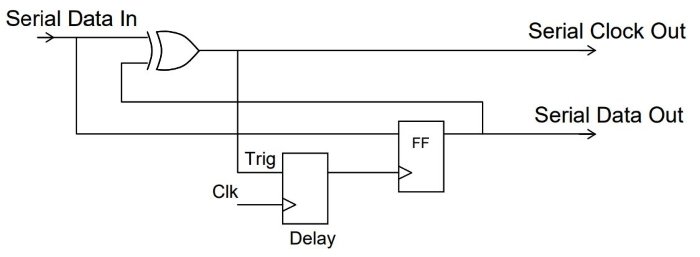
west, I changed the settings as directed but all I get on the Serial monitor is trash values. Not sure if I y algorithm is right. Could you take a look? Most of it is commented as I have been working on the same code.

Best,
A

What's the difference between OCRtop and OCRpwm?

What's the difference between OCRtop and OCRpwm?

There are two Output Compare registers. To do arbitrary-frequency PWM, you use one of them to set the overall PWM frequency (OCRtop) and the second to set the "on" time (OCRpwm)
They actually have to be particular registers OCRnA and OCRnB; I just haven't looked up which one has to be which, and gave them "generic" names.