I was really missing the Auto-Reset Feature for the Arduino-BT, therefore I did it myself. It can be added to existing V06 boards but it would be nice to have it in future versions of the Arduino-BT.
It can be easily done by setting the iWRAP parameters to configure a WT-11 GPIO pin as DTR (e.g. PIO7) and connecting it to the ATmega reset pin using a little curcuit. The curcuit is needed because the WT-11 DTR signal is not inverted (this could be configured) and because the WT-11 uses 3,3V logic.
The auto-reset should be configurable via a jumper to disable it because for normal operation you don't want that the ATmega resets every time you open a bluetooth connection.
This is the iWRAP command for PIO7:
SET CONTROL MSC DCE 00 80 00 00 00 00
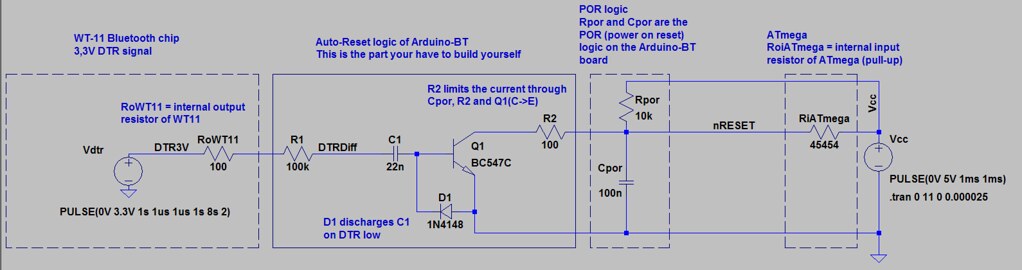
The curcuit and its connections has to look like this:
To make the Auto-Reset actually work, you need to avoid the reset of the WT-11 bluetooth chip when the Arduino bootloader starts, because the reset kills the bluetooth connection.
Simple solution
The easiest way is to connect the reset pin of the WT-11 (PIN 1 on SV2) to GND. The Arduino is connected using a 2k2 resistor so this doesn't hurt it.
With this modification it will no longer be possible to enter the iWRAP command mode other than using the escape sequence (SET CONTROL ESCAPE).
Advanced Solution
A more advanced way is using the WT-11 PIO6 pin to switch to command mode without resetting it.
Here the instructions for the advanced solution:
Enable the hardware escape pin by executing the following iWrap command:
SET CONTROL ESCAPE - 40 1
You can use the "Init Bluetooth Module" sketch as a base for this. I will make such a sketch if anybody is interested.
Cut the connection to the WT-11 reset line directly beneath the WT11.
Connect the signal which was previously connected to the RESET pin to the PIO6 pin of the WT11 (the next pin) . This way it is possible to switch very fast to command mode without resetting the WT-11 and loosing all connections. This is also compatible with existing applications and the original bootloader.
Optionally use an Arduino bootloader which is very close to the Duemilanove bootloader (see next posting)
Here the description of the modified bootloader for the Arduino-BT. It is very close to the Arduino Duemilanove bootloader. It doesn't reset the WT-11 and doesn't send the unnecessary initialization commands to the WT-11. It best works together with the "Advanced solution" from above.
I used the current bootloader of arduino-0016 and adapted it to the Arduino-BT. Here are the changes:
Set the Arduino pin PD7 to low
// first clear the output before setting the DDR to avoid even a short
// pulse on the WT-11 reset line
PORTD &= ~PD7;
DDRD |= PIND7;
B) Use a baud rate of 115200 baud (can be set in the Makefile)
C) The calculation of the baud rate registers has to be taken from HardwareSerial::begin (identical to the formula of the original Arduino-BT bootloader) because the standard formula doesn't work with the WT-11. The difference between the nominal and real baud rate is too high (125000 baud instead of possible 111111 baud for a nominal baud rate of 115200). This formula does some rounding (+ BAUD_RATE /2 before dividing by BAUD_RATE) instead of just using floor() for the remainder of the division:
To make the Auto-Reset work multiple times in a row, also a patched version of avrdude is necessary because the one delivered with arduino-017 sets the DTR signal, but it doesn't reset it on closing the serial connection.
for Linux / Mac OS X it's easy. You might need to install some required packages, if you don't already have them: subversion bison flex automake libusb-dev.
For Windows it's really a pain setting up a working build environment with MinGW, msys, svn. I wouldn't recommend compiling it yourself. You can download it here: http://www.5dot1.de/arduino/avrdude_svn_878.zip
The archive also contains the updated avrdude.conf and boards.txt for the Arduino IDE
To download and compile avrdude yourself:
svn co svn://svn.savannah.nongnu.org/avrdude/trunk/avrdude
cd avrdude
./bootstrap
./configure
make all
I don't have a Mac, at least not yet. Maybe I get one when they bring out an iMac 21,5" with a Core i7 CPU, USB 3.0 and SATA.
subversion, bison, flex and automake are tools which are needed to compile avrdude. libusb-dev is a library for specific USB devices, I'm not sure if it is needed on OS X.
On Linux you use the package manager of your system (e.g. dpkg or aptitude on Debian systems) and select the named packages.
Mike, when you added the auto reset to your arduino BT, did it work once and then stop working? Did the avrdude patch fix the problem completely? I'm getting an issue where 9 times out of 10, an upload errors out, with a statement relating to resource busy. The first upload isn't always the one that works.
I actually don't have an Arduino BT. It is just a bunch of components on a proto board. The weird thing is that sometimes it will program a couple times in a row. Sometimes I'll try 10 times before it works. There is no consistent situation where it only works the first time.
About the patch, I'm a mechanical engineer and only have very basic programming skills. I can download and compile the code, but would not really know if what I was doing was wrong, or if the code isn't the answer. I guess I'll just try it this weekend.
Can you describe your hardware and the cabling (especially the reset pins of the ATMega and the Bluetooth chip). Do you use a normal Arduino Duemilanove or just a ATMega with the Arduino bootloader? Which bootloader do you use?
Mike, I have an arduino pro mini and bluesmirf gold with an rn41 from Roving networks. I have added a wire to the bluesmirf to get the DTR pin, and configured the module to use it. From the pin, I trigger an NPN transistor which pulls the DTR pin on the mini to ground. Then I have a 10k resistor between the DTR and +3.3V to discharge C2 on the mini so I can use it again. I am using the pro mini bootloader, but changed the baud to 19200. Everything is running at 19200.
So this wiring scheme actually consistently resets the arduino (bootloader blinks), and once in a while, I actually get a successful program. I have a scope I can borrow. It seems maybe the timing is off just a tad and the bootloader begins looking for the program too late (perhaps the reset takes too long). If I lengthen the bootloader wait time like you showed my a while back, it still does not work.
You can also connect your arduinobt an another arduino:
Set a jumper between pins 5+6 (Reset+GND) of the ICSP connector on the Arduino Duemilanove. This puts the TX line of the ATmega to a high impedance state.
Set a jumper between pins 5+6 (Reset+GND+Reset) of the ICSP connector on the Arduino-BT
Connect some pins between the two Arduinos:
Arduino-BT Duemilanove
RX (PD0) => TX (PD1)
TX (PD1) <= RX (PD0)
GND = GND
Connect the power cable to the Arduino-BT
Connect the USB cable between the Arduino Duemilanove and your PC
Start a terminal programmme (I use putty, you can also use Hyperterminal) and set the baud rate to the baud rate of your Arduino-BT which is normally 115200 but in your case it is 9600. Type the command (you won't see what you type):
Code:
SET
to see if your connection is working. It shows the most important settings.
Type the following commands in the terminal window:
Code:
SET CONTROL BAUD 115200,8n1
Now you have to switch the baud rate of ther terminal programme to 115200.
Optionally: Define a pin to restore some default settings.
On a low-high edge on the WT-11 pin PIO5 (bit 5 = mask 0x20), all these commands are executed and restore the default config:
Code:
SET CONTROL BIND 1 20 RISE SET BT AUTH * 12345
SET CONTROL BIND 2 20 RISE SET CONTROL BAUD 115200,8n1
SET CONTROL BIND 3 20 RISE SET BT PAGEMODE 3 2000 1
SET CONTROL BIND 4 20 RISE SET BT ROLE 0 f 7d00
SET CONTROL BIND 5 20 RISE SET CONTROL ECHO 0
SET CONTROL BIND 6 20 RISE SET CONTROL ESCAPE - 00 1
SET CONTROL BIND 7 20 RISE SET CONTROL CONFIG 102D
Optionally you can send the following command to enable the Over-The-Air provisioning via Bluetooth. This means you don't need a cable for sending commands, but you can open a second serial bluetooth connection to the Arduino-BT command channel:
Code:
SET PROFILE OTA on
To disable it, use
Code:
SET PROFILE OTA
When you are finished, don't forget to remove the jumpers