groundfungus:
<...>
The link posted by mrburnette is the one that I have used, successfully, many times.
I think some of our noobies are just getting too much "low quality" information from all the published posts. Some of the "old core files" may be unusable or problematic with the very latest ArduinoIDE version - so it is critically important that noobies do some homework to ensure their instructions and files are up-to-date.
The other thing that just annoys the hell out if me is the noobie cry that they have followed the directions "to the letter." Instructions can be wrong and tutorials can become "stale"; that is, not updated by the author to match the current IDE. So this statement is for noobies: Look at the article date and if specified in the article the IDE version. Arduino.cc keeps available for download older IDE versions here. If you noobie are having problems, you need to verify that your build environment is viable to perform properly.
Now to a pet peeve: If you are going to use naked microprocessors and install bootloaders, your test environment must be better than a cheap breadboard and long jumperwires. You need something like this:
If you do not want to buy, then build it. It provides a stable environment for programming and a proper reset and clock environment.
sarouje:
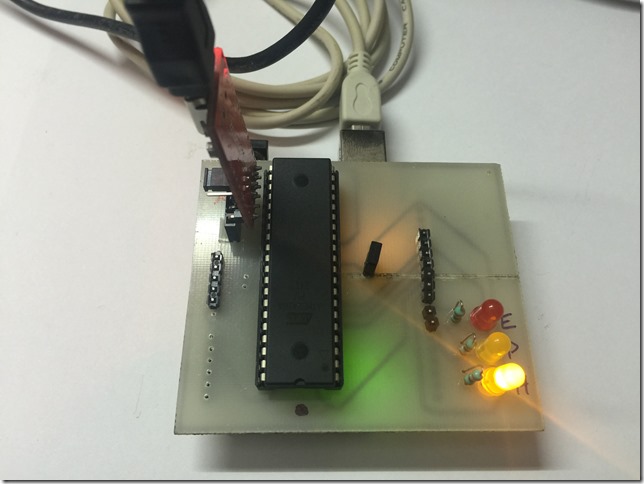
Recently I designed and got it done a PCB to bootload and program. As @ray said, I used a breadboard setup earlier and was very unreliable.
I think the "breadboard builds" often hurt noobies (and some experts) because unless one has a degree in EE the concept of stray capacitance, inductance, hum pickup, and timing skews simply do not come to mind. I suspect this is the reason that so many have reported success in the past and failure the next time they try.
A good quality, stable build is the key to consistent programming. I admit that I've done the wire-nest thing once or twice and succeeded but I could have just as easily have failed. Good quality tools are required if you wish to be successful in the study and use of microcontrollers and other electronics. Much of what is needed can be built or can be purchased for no more than the price of a genuine UNO.
I have an old UNO and the Adafruit shield and it has never failed me. I modified it to allow me to also do tiny85 by using a jumper - see the 8-pins marked on the ZIF socket: ATmega Modified Adafruit Programmer by Rayburne, on Flickr
I did my first few boot loaders with a breadboard and jumpers to an Uno. Really had no trouble. Made my own board with a ZIF socket, cap for reset and indicator LED mostly because I got tired of wiring and unwiring the breadboard setup. Using Nick's programs it takes minutes to bootload a 328. I have since made a Tiny 85 programmer, too.
I went a little further, took a collection of stuff that Nick Gammon had wired up and made it into a battery powered standalone programmer for 3.3V and 5V boards with the to-be-programmed .hex file on the SD card. I have a customer in Africa/Australia that uses them to program cards in the field. http://www.crossroadsfencing.com/BobuinoRev17/
I made an Adafruit 'copy' and used the ICSP header on the Proto board and wired it the the SPI port, aided power and ground and I connect it to the AT-PA board found on Tindie.
I can program ANY chip with 28 or less pins.
I also used a 3 color LED and It really looks nice in operation.[/color]
I use the Adafruit programming code. So I can fully program virtually Any board with an ISP connector.
Sorry to jump in here and thread jack. I am using the exact same chip on a AVR ISP shield and can take a fresh Atmega328p-pu with nothing on it. Put it in the AVR ISP Shield and upload the atmega328 on a breadboard (8mhz internal clock) bootloader and it will go right on the chip and complete fine.
After that I can't do anyting else with the chip. I can't write a new sketch to it. I can't write a new bootloader nothing. I can put it on a breadboard and hook up an LED and it will work just fine so I know the chip is working as intended.
If I put it back into my AVR ISP shield and try to do anything I keep getting this
Arduino: 1.6.9 (Windows 7), Board: "Arduino/Genuino Uno"
Warning: Board breadboard:avr:atmega328bb doesn't define a 'build.board' preference. Auto-set to: AVR_ATMEGA328BB
Sketch uses 1,066 bytes (3%) of program storage space. Maximum is 32,256 bytes.
Global variables use 9 bytes (0%) of dynamic memory, leaving 2,039 bytes for local variables. Maximum is 2,048 bytes.
C:\Special Projects\Arduino\hardware\tools\avr/bin/avrdude -CC:\Special Projects\Arduino\hardware\tools\avr/etc/avrdude.conf -v -patmega328p -cstk500v1 -PCOM3 -b19200 -Uflash:w:C:\Users\Uva\AppData\Local\Temp\build99ac4d5ebe121648fce34a28f1ee5de3.tmp/Blink.ino.hex:i
avrdude: Version 6.0.1, compiled on Apr 15 2015 at 19:59:58
Copyright (c) 2000-2005 Brian Dean, http://www.bdmicro.com/
Copyright (c) 2007-2009 Joerg Wunsch
System wide configuration file is "C:\Special Projects\Arduino\hardware\tools\avr/etc/avrdude.conf"
Using Port : COM3
Using Programmer : stk500v1
Overriding Baud Rate : 19200
avrdude: stk500_recv(): programmer is not responding
avrdude: stk500_getsync() attempt 1 of 10: not in sync: resp=0x03
avrdude: stk500_recv(): programmer is not responding
avrdude: stk500_getsync() attempt 2 of 10: not in sync: resp=0x03
avrdude: stk500_recv(): programmer is not responding
avrdude: stk500_getsync() attempt 3 of 10: not in sync: resp=0x03
avrdude: stk500_recv(): programmer is not responding
avrdude: stk500_getsync() attempt 4 of 10: not in sync: resp=0x03
avrdude: stk500_recv(): programmer is not responding
avrdude: stk500_getsync() attempt 5 of 10: not in sync: resp=0x03
avrdude: stk500_recv(): programmer is not responding
avrdude: stk500_getsync() attempt 6 of 10: not in sync: resp=0x03
avrdude: stk500_recv(): programmer is not responding
avrdude: stk500_getsync() attempt 7 of 10: not in sync: resp=0x03
avrdude: stk500_recv(): programmer is not responding
avrdude: stk500_getsync() attempt 8 of 10: not in sync: resp=0x03
avrdude: stk500_recv(): programmer is not responding
avrdude: stk500_getsync() attempt 9 of 10: not in sync: resp=0x03
avrdude: stk500_recv(): programmer is not responding
avrdude: stk500_getsync() attempt 10 of 10: not in sync: resp=0x03
i' have tried doing that tutorial that mr burnette added at gammon.com/breadboard, is it possible to do it with the nano as the board with sketch? because i double checked the wiring and the program says that something is wromg