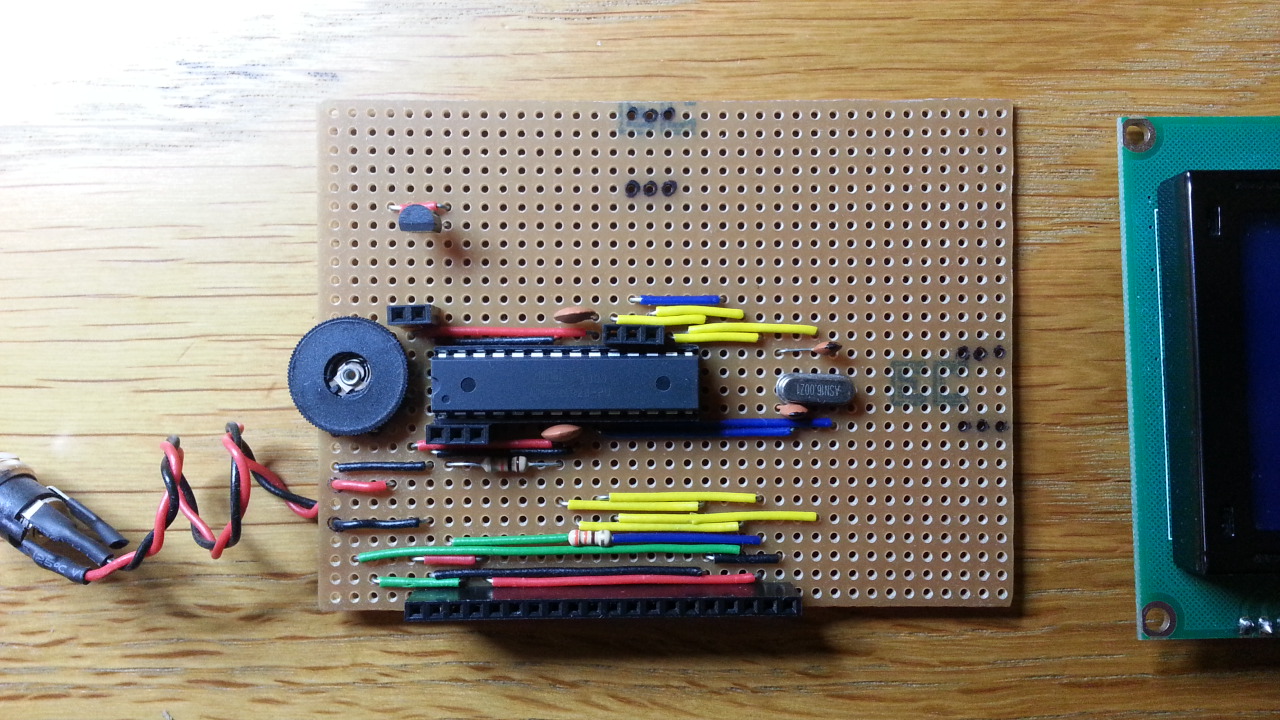
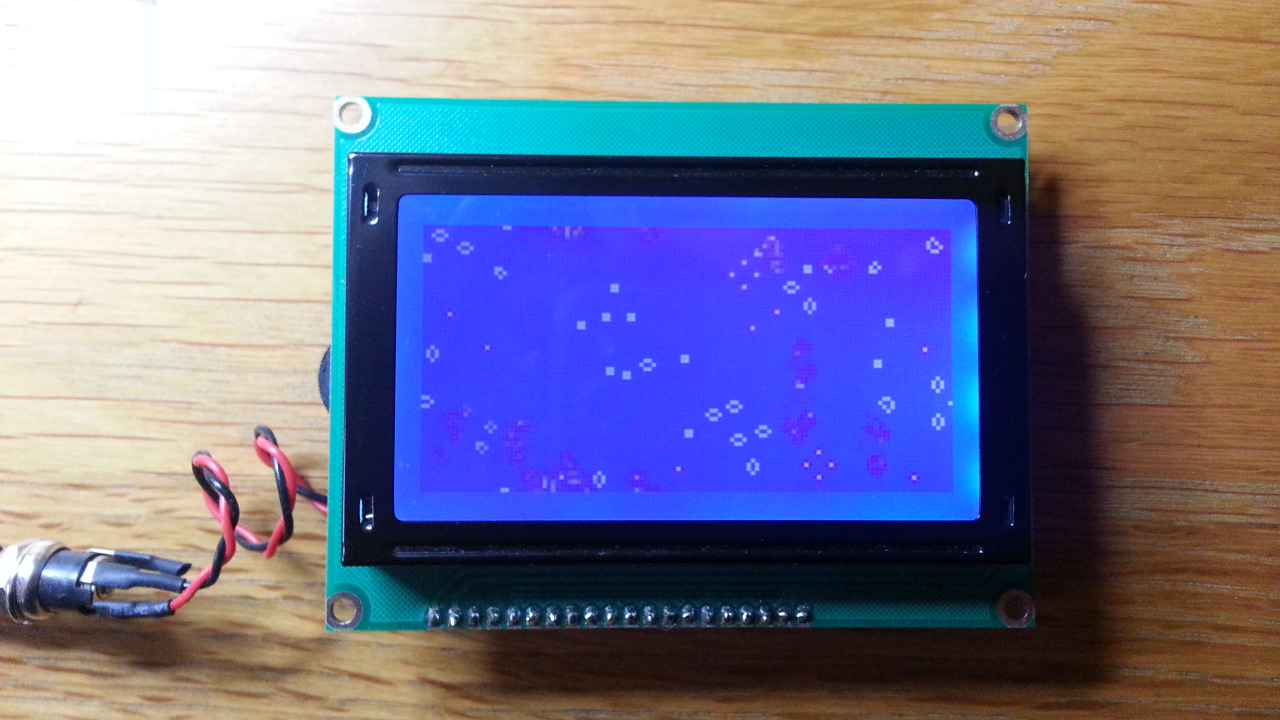
// Conway's Game Of Life 128x64
// PaulRB
// Jun 2013
// Sept 2013 updated to use digitalWriteFast

#include <digitalWriteFast.h>

//Pins controlling KS0108 Graphic LCD
const byte GLCD_RS = 12; // H = data, L = instruction
const byte GLCD_E = 8;
const byte GLCD_DATA0 = 7;
const byte GLCD_DATA1 = 6;
const byte GLCD_DATA2 = 5;
const byte GLCD_DATA3 = 9;
const byte GLCD_DATA4 = 10;
const byte GLCD_DATA5 = 11;
const byte GLCD_DATA6 = 13;
const byte GLCD_DATA7 = 4;
const byte GLCD_CS1 = 3; // left half of screen
const byte GLCD_CS2 = 2; // right half of screen

const byte GLCDDelay = 3; // Enable GLCD to keep up with Arduino
const int redrawMethodBoundary = 320;
const byte SpeedPot = A6;

unsigned long Matrix[129][2]; // Cell data in ram

void setup() {

  pinModeFast(GLCD_CS1, OUTPUT);
  pinModeFast(GLCD_CS2, OUTPUT);
  pinModeFast(GLCD_RS, OUTPUT);
  pinModeFast(GLCD_E, OUTPUT);
  pinModeFast(GLCD_DATA0, OUTPUT);
  pinModeFast(GLCD_DATA1, OUTPUT);
  pinModeFast(GLCD_DATA2, OUTPUT);
  pinModeFast(GLCD_DATA3, OUTPUT);
  pinModeFast(GLCD_DATA4, OUTPUT);
  pinModeFast(GLCD_DATA5, OUTPUT);
  pinModeFast(GLCD_DATA6, OUTPUT);
  pinModeFast(GLCD_DATA7, OUTPUT);

  digitalWriteFast(GLCD_CS1, HIGH);
  digitalWriteFast(GLCD_CS2, HIGH);
  digitalWriteFast(GLCD_RS, LOW);
  digitalWriteFast(GLCD_E, LOW);

  sendGLCD(B00111111); // Enable display
  sendGLCD(B11000000); // Set Scroll Position = 0

  randomiseMatrix();
  outputMatrix();

  //Serial.begin(38400);

}

void loop() {
  generateMatrix();
  //delay(analogRead(SpeedPot));
}

void sendGLCD(byte b) { //Send a byte to the GLCD

  static byte oldb; // static variables keep their value between calls

  digitalWriteFast(GLCD_E, HIGH);
  delayMicroseconds(GLCDDelay);

  if (b != oldb) { // do we need to change the pins?
    if (b & B00000001) digitalWriteFast(GLCD_DATA0, HIGH); else digitalWriteFast(GLCD_DATA0, LOW);
    if (b & B00000010) digitalWriteFast(GLCD_DATA1, HIGH); else digitalWriteFast(GLCD_DATA1, LOW);
    if (b & B00000100) digitalWriteFast(GLCD_DATA2, HIGH); else digitalWriteFast(GLCD_DATA2, LOW);
    if (b & B00001000) digitalWriteFast(GLCD_DATA3, HIGH); else digitalWriteFast(GLCD_DATA3, LOW);
    if (b & B00010000) digitalWriteFast(GLCD_DATA4, HIGH); else digitalWriteFast(GLCD_DATA4, LOW);
    if (b & B00100000) digitalWriteFast(GLCD_DATA5, HIGH); else digitalWriteFast(GLCD_DATA5, LOW);
    if (b & B01000000) digitalWriteFast(GLCD_DATA6, HIGH); else digitalWriteFast(GLCD_DATA6, LOW);
    if (b & B10000000) digitalWriteFast(GLCD_DATA7, HIGH); else digitalWriteFast(GLCD_DATA7, LOW);
    oldb = b;
  }

  digitalWriteFast(GLCD_E, LOW); // data is read by glcd on falling edge
  delayMicroseconds(GLCDDelay);

}

void outputMatrix() {

  //Send matrix data for display on GLCD
  for (byte x = 0; x <= 7; x++) {

    byte col = x >> 2;
    byte b = (x & 3) << 3;
    digitalWriteFast(GLCD_CS1, HIGH);
    digitalWriteFast(GLCD_CS2, HIGH);
    digitalWriteFast(GLCD_RS, LOW);
    sendGLCD(B01000000); // Set Y = 0
    sendGLCD(B10111000 | x); // set X
    digitalWriteFast(GLCD_RS, HIGH);
    digitalWriteFast(GLCD_CS1, HIGH);
    digitalWriteFast(GLCD_CS2, LOW);
    for (byte row = 0; row <= 127; row++) {
      sendGLCD(Matrix[row][col] >> b);
      if (row == 63) {
        digitalWriteFast(GLCD_CS1, LOW);
        digitalWriteFast(GLCD_CS2, HIGH);
      }
    }
  }
}

void randomiseMatrix() {

  //Set up initial cells in matrix
  randomSeed(analogRead(0));
  for (byte row = 0; row <= 127; row++) {
    for (byte col = 0; col <= 1; col++) {
      Matrix[row][col] = random(0xffff) << 16 | random(0xffff);
    }
  }
}

void injectGlider() {

  byte col = random(127);
  byte row = random(1);
  Matrix[col++][row] |= B0000111;
  Matrix[col++][row] |= B0000001;
  Matrix[col++][row] |= B0000010;

}

int generateMatrix() {

  //Variables holding data on neighbouring cells
  unsigned long NeighbourN[2], NeighbourNW[2], NeighbourNE[2], CurrCells[2], NeighbourW[2], NeighbourE[2], NeighbourS[2], NeighbourSW[2], NeighbourSE[2];

  //Variables used in calculating new cells
  unsigned long tot1[2], carry[2], tot2[2], tot4[2], NewCells[2];

  int changes = 0; // counts the changes in the matrix
  static int prevChanges = 256; // counts the changes in the matrix on prev generation
  static int staleCount = 0; // counts the consecutive occurrances of the same number of changes in the matrix

  //set up N, NW, NE, W & E neighbour data
  for (byte b = 0; b <= 1; b++) {
    NeighbourN[b] = Matrix[127][b];
    CurrCells[b] = Matrix[0][b];
    Matrix[128][b] = CurrCells[b];  // copy row 0 to location after last row to remove need for wrap-around code in the loop
  }

  for (byte b = 0; b <= 1; b++) {
    NeighbourNW[b] = NeighbourN[b] >> 1;
    bitWrite(NeighbourNW[b], 31, bitRead(NeighbourN[1-b], 0));
    NeighbourNE[b] = NeighbourN[b] << 1;
    bitWrite(NeighbourNE[b], 0, bitRead(NeighbourN[1-b], 31));

    NeighbourW[b] = CurrCells[b] >> 1;
    bitWrite(NeighbourW[b], 31, bitRead(CurrCells[1-b], 0));
    NeighbourE[b] = CurrCells[b] << 1;
    bitWrite(NeighbourE[b], 0, bitRead(CurrCells[1-b], 31));

  }

  digitalWriteFast(GLCD_CS1, HIGH);
  digitalWriteFast(GLCD_CS2, LOW);

  //Process each row of the matrix
  for (byte row = 0; row <= 127; row++) {

    //Pick up new S, SW & SE neighbours
    for (byte b = 0; b <= 1; b++) {
      NeighbourS[b] = Matrix[row + 1][b];
      }

    for (byte b = 0; b <= 1; b++) {
      NeighbourSW[b] = NeighbourS[b] >> 1;
      bitWrite(NeighbourSW[b], 31, bitRead(NeighbourS[1-b], 0));
      NeighbourSE[b] = NeighbourS[b] << 1;
      bitWrite(NeighbourSE[b], 0, bitRead(NeighbourS[1-b], 31));

      //Any live cells at all in this region?
      if (CurrCells[b] | NeighbourN[b] | NeighbourS[b] | NeighbourE[b] | NeighbourW[b] | NeighbourNE[b] | NeighbourNW[b] | NeighbourSE[b] | NeighbourSW[b] > 0) {

        //Count the live neighbours (in parallel) for the current row of cells
        //However, if total goes over 3, we don't care (see below), so counting stops at 4
        tot1[b] = NeighbourN[b];
        tot2[b] = tot1[b] & NeighbourNW[b]; tot1[b] = tot1[b] ^ NeighbourNW[b];
        carry[b] = tot1[b] & NeighbourNE[b]; tot1[b] = tot1[b] ^ NeighbourNE[b]; tot4[b] = tot2[b] & carry[b]; tot2[b] = tot2[b] ^ carry[b];
        carry[b] = tot1[b] & NeighbourW[b]; tot1[b] = tot1[b] ^ NeighbourW[b]; tot4[b] = tot2[b] & carry[b] | tot4[b]; tot2[b] = tot2[b] ^ carry[b];
        carry[b] = tot1[b] & NeighbourE[b]; tot1[b] = tot1[b] ^ NeighbourE[b]; tot4[b] = tot2[b] & carry[b] | tot4[b]; tot2[b] = tot2[b] ^ carry[b];
        carry[b] = tot1[b] & NeighbourS[b]; tot1[b] = tot1[b] ^ NeighbourS[b]; tot4[b] = tot2[b] & carry[b] | tot4[b]; tot2[b] = tot2[b] ^ carry[b];
        carry[b] = tot1[b] & NeighbourSW[b]; tot1[b] = tot1[b] ^ NeighbourSW[b]; tot4[b] = tot2[b] & carry[b] | tot4[b]; tot2[b] = tot2[b] ^ carry[b];
        carry[b] = tot1[b] & NeighbourSE[b]; tot1[b] = tot1[b] ^ NeighbourSE[b]; tot4[b] = tot2[b] & carry[b] | tot4[b]; tot2[b] = tot2[b] ^ carry[b];

        //Calculate the updated cells:
        // <2 or >3 neighbours, cell dies
        // =2 neighbours, cell continues to live
        // =3 neighbours, new cell born
        NewCells[b] = (CurrCells[b] | tot1[b]) & tot2[b] & ~ tot4[b];

        //Have any cells changed?
        if (NewCells[b] != CurrCells[b]) {

          //Count the change for "stale" test
          changes++;

          if (prevChanges <= redrawMethodBoundary) {

            //Faster to redraw just changed parts of screen at this low level of changes
            unsigned long before = CurrCells[b];
            unsigned long after = NewCells[b];
            byte col = b << 2;

            for (byte x = 0; x <= 3; x++) {

              if ((before & 0xFF) != (after & 0xFF)) {

                digitalWriteFast(GLCD_RS, LOW);
                sendGLCD(B01000000 | row); // Set y
                sendGLCD(B10111000 | col); // set X
                digitalWriteFast(GLCD_RS, HIGH);
                sendGLCD(after & 0xFF);

              }
              before = before >> 8;
              after = after >> 8;
              col++;
            }
          }
        }

        Matrix[row][b] = NewCells[b];
        }

      //Current cells (before update), E , W, SE, SW and S neighbours become
      //new N, NW, NE, E, W neighbours and current cells for next loop
      NeighbourN[b] = CurrCells[b];
      NeighbourNW[b] = NeighbourW[b];
      NeighbourNE[b] = NeighbourE[b];
      NeighbourE[b] = NeighbourSE[b];
      NeighbourW[b] = NeighbourSW[b];
      CurrCells[b] = NeighbourS[b];
      }
    if (row == 63) {
      digitalWriteFast(GLCD_CS1, LOW);
      digitalWriteFast(GLCD_CS2, HIGH);
      }
    } //next row

    if (changes != prevChanges) staleCount = 0; else staleCount++; //Detect "stale" matrix
    if (staleCount > 32) injectGlider(); //Inject a glider

    if (prevChanges > redrawMethodBoundary) outputMatrix(); //Faster to redraw entire screen at this high level of changes

    prevChanges = changes;
  }