Standalone Setup

Ok folks,

I’ve done my homework on this subject, but it seems that there is TOO much information available or I can’t find the right info. I’m getting confused. It seems like all of the tutorials have something slightly different about the setup that makes me question if it’s the right method for my setup; usually older versions of hardware or software.

I’ve got an Arduino Uno R3 and several blank ATMega328P chips in the DIP-28 package. I’ve just downloaded the new version 1.0.3 of the Arduino IDE (I have the 1.0.1 and 1.0.2 versions available).

Would someone assist by pointing me in the right direction and the shortest route?

I want to burn my sketches to the blank chip and use them in my standalone projects. I think I’m good with setting up the external clock (which I do wish to use) and the other standalone setup stuff. I need help with preparing the chip for use.

What is the best way to get my sketches (produced in the Arduino IDE) up and running on a standalone?

Can I burn the bootloader on the new chips using my Uno as an ISP? Then how do I load the sketches? Would I need to swap chips with my Uno? I want to avoid chip swapping as much as possible.

Can I just use the Uno as an ISP to burn the sketches directly to the blank chip? Do I need the bootloader for this?
The final picture in my head is of a protoboard or shield that will allow me to insert a blank ATMega328P into a ZIF socket, burn my sketches, then insert into my standalone project.

Thanks for any help you can provide!

How often do you plan to reprogram the processors after they have been installed in your standalone project?

I'll tell you how I do it, it may not be the best way for you.

I bought this: http://www.digikey.com/product-detail/en/ATAVRISP2/ Pretty darn good value.

That ribbon cable has 6 connections, I know them by heart: VCC, GND, RESET, MISO, MOSI, and SCK. On your standalone board you connect VCC and GND to the VCC and GND for the board. The others are connected to the AVR. It's best to add a 6-conductor IDC socket for this and make it your programming port. The 328P is a good choice, but they all have these pins and the programmer can program any of them.

Apparently you can select the AVR ISP II programmer in the Arduino software and use it directly.

Personally, I compile my project, find the .ELF file (by doing a dir myprojectelf* /s from the command line starting at c:\ - there is probably an easier way of doing this), and then use Atmel Studio's programmer to send the ELF file up to the system. I like Atmel's programmer because it allows you to check voltage, set fuses, erase the chip, lock the chip down, and other features.

That's how I do it. No bootloader at all. The chips I use I got at Digikey for $1.81 each (non-P version). I've done it with ATTiny45s and 85s and the 1284 too. I have a 2560 on a Schmartboard I have to try it with soon.

You will need a few things:

  1. get the arduino ide to generate .elf/.hex files;
  2. get a programmer / programmer software so you can upload the .elf/.hex files to the chip.
  3. done.

GarageGeek:
Can I just use the Uno as an ISP to burn the sketches directly to the blank chip?

Yes, but it's much better to spend $10 on a programmer.

GarageGeek:
Do I need the bootloader for this?

No.

GarageGeek:
The final picture in my head is of a protoboard or shield that will allow me to insert a blank ATMega328P into a ZIF socket, burn my sketches, then insert into my standalone project.

This is really really easy. All you need is a 6 pin header and a ZIF socket on a board.

Here's something similar I built for ATtiny84 chips. It works as a programmer and a mini-Arduino at the same time:

http://arduino.cc/forum/index.php/topic,134673.0.html

Ok, thanks for the replies everyone.

The consensus seems to be to avoid using the Uno board itself as the ISP and go with a dedicated product. I'm good with that, I'll just continue to use the Uno as the development platform.

I took a brief look at programmers (starting with JoeN's AVR ISP II recommendation). It seems like I can spend anywhere from $10 to $150+.

What features are important?

Is the software provided with most programmers?

Any particular hardware/software to avoid?

For my current projects I won't have a need to reprogram in circuit, however, I would like that capability on future projects.

Thanks again!

GarageGeek:
I took a brief look at programmers (starting with JoeN's AVR ISP II recommendation). It seems like I can spend anywhere from $10 to $150+.

What features are important?

Is the software provided with most programmers?

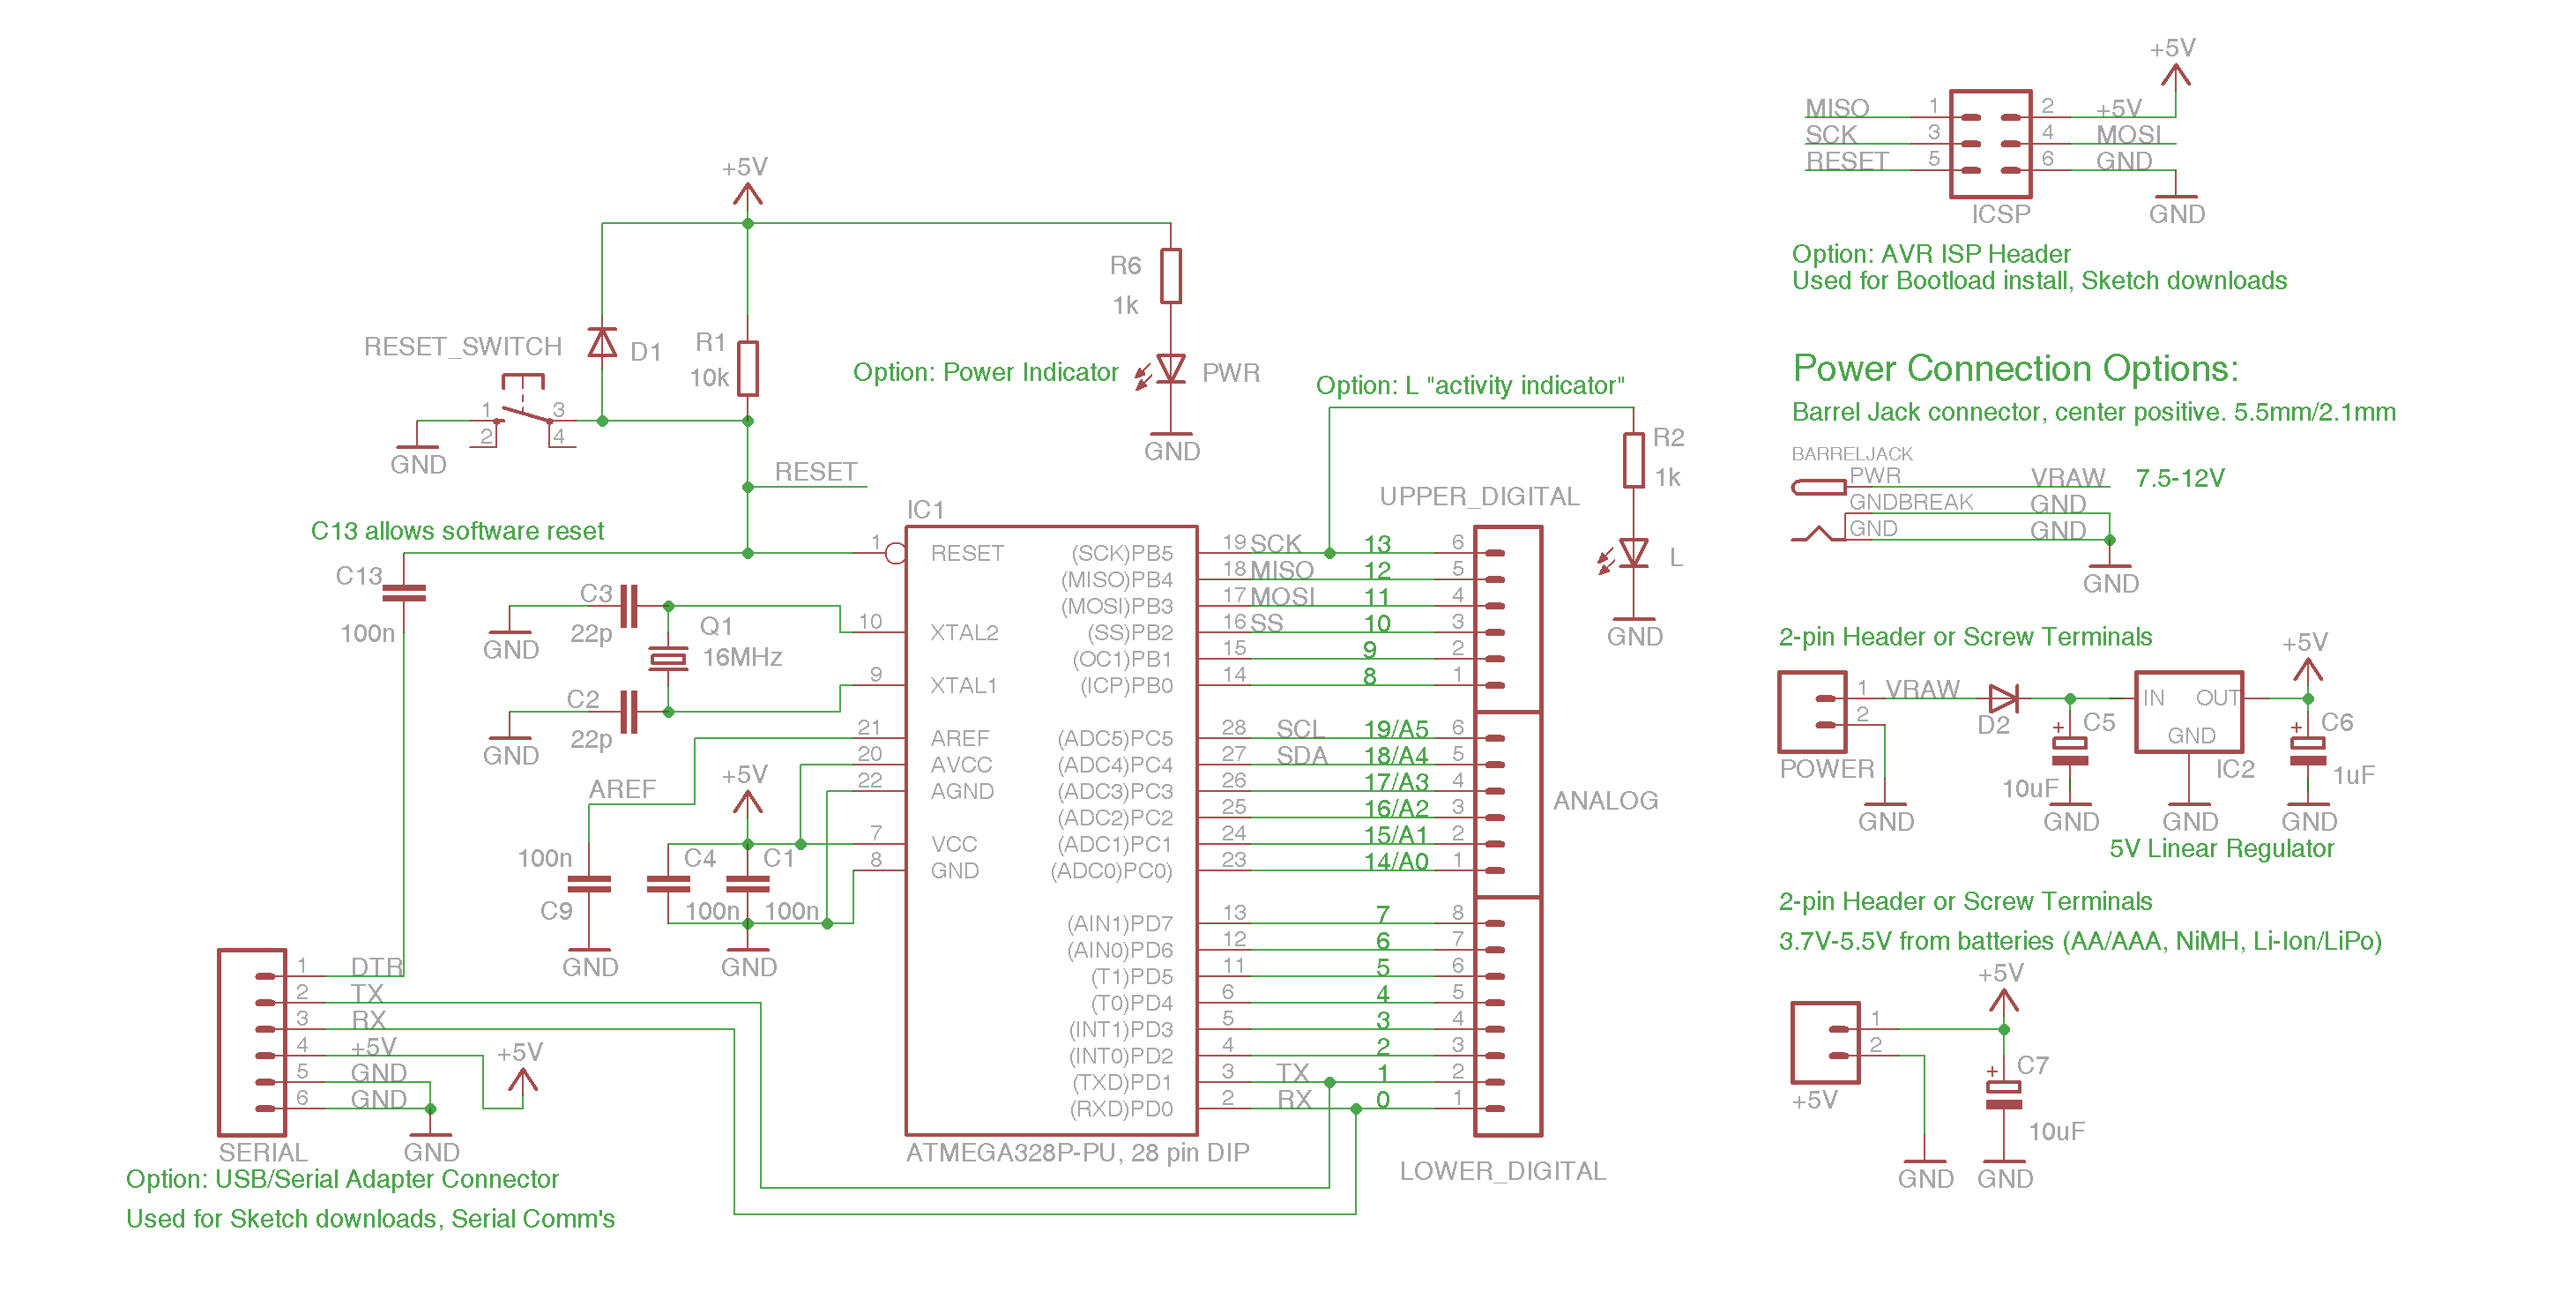
The IDE calls the avrdude program to upload the compiled sketch to the board/AVR.
avrdude knows how to talk to most programmers.
As long as the programmer is supported by avrdude then the IDE can use the programmer
to program the chip.
avrdude supports pretty much all the AVR programmers out there.
To name a few:
AVRisp mkII
AVR JTAGice
USBasp
USBTiny
AVR Dragon
PC parallel port

All of those above except for Dragon are now supported by the IDE
out of the box. You can always go in and modify the programmers.txt file to add support
for other programmers that avrdude supports like AVR Dragon.
So for all those above, there is no additional software needed.

The biggest difference in the programmers is some of the capabilities.
For example, devices like the AVR dragon can do high voltage programming
which is used to erase a part when the fuses have been set to not allow the ISP interface to do this.

Other devices like the Dragon and the JTAGice allow source level debugging.
While it is possible to source level debug when using the Arduino IDE, it isn't automated
nor particularly easy since the IDE doesn't have any built in support for this type of debugging.

The dragon has an area on the board where you can solder in a ZIF socket and then
with the addition of some jumpers you can make the Dragon into a standalone programmer.
The Arduino IDE would be able to use it since avrdude would be used to program the parts.

Me personally, I wouldn't want a programmer that didn't work with avrdude
since having avrdude support means it can used from both the Arduino IDE and the commandline.

Another thing to pay close attention to is target voltage.
Some can power the target and some can't.
Nearly all the programmers that can supply target voltage
have a jumper to enable/disable this however, some of the USBasp programmers have the target voltage permanently
enabled. (But you can easily modify it to put the header back in to allow using a jumper).

I have a Dragon but I usually use my $6 USBasp kk multicopter programmer that I got off Ebay.
It is actually faster at programming than the Dragon.
I like the kk multicopter version since it uses a 6 pin cable and requires no adapters.

As a word of caution, if you get a dragon, and you intend to use it burn bootloaders using the IDE,
it will not work. "As is", today, the Arduino IDE cannot burn a bootloader using the Dragon.
Here is the bug report on it: Google Code Archive - Long-term storage for Google Code Project Hosting.
Bottom line is that if using the dragon, you have to modify the IDE or avrdude in order to be
able to use the IDE to burn a bootloader.
(I use avrdude with the patch I suggested in the savannah bug report - it is only about 6 lines of code)

I think the best value for the money are the USBasp programmers.
For doing simple programming or burning bootloaders in chips like
m328 or Attinys it's hard to beat.
If you go that route and need a 6 pin ISP connector,
make sure you get one with a 6 pin header/cable or get an adapter
or cable for the 6 pin header since most of the USBasp devices
come with a 10 pin header.

--- bill

If you spend a little more, $34, for an Atmel AVR ISP MKii, you will never be limited in your programming for '328s or other size devices - 1284s, 2560s, or the smaller 8 pin to 20 pin parts.
Here's a schematic showing the minimal connections and options for connecting up other nice to have stuff.

CrossRoads:
If you spend a little more, $34, for an Atmel AVR ISP MKii, you will never be limited in your programming for '328s or other size devices - 1284s, 2560s, or the smaller 8 pin to 20 pin parts.

Any of those programmers above can program those parts.
One difference worth noting is the ability to program non 5v parts.
The USBasp (or least nearly all of those low cost ones out there) are limited to 5v.
Other programmers like the newer USBTinyISP, AVR Dragon, AVRISP mkii, AVR JTAGice will adjust
their outputs to match the target voltage.

--- bill

Ok, it seems like several votes for the Atmel AVR ISP MKii.

So if I understand correctly so far, the Atmel AVR ISP MKii (and others) will work directly with the Arduino IDE (via avrdude). I like that I don't need to leard other software or do any modifications to anything. I just want somthing that works.

About the power supply abilities...
I found this Dave Jones YouTube clip that discussed a limitation of the AVR ISP MKii and provides a modification to enable supply of 5v or 3.3v power. What do you think?

I figure I don't need the 3.3v option, which makes the modification just one wire if I choose to even go there.

Also, I looked at my Arduino IDE and noticed that I've already got the Atmel AVR ISP MKii selected as the programmer that I've been using to upload sketches to the Uno. So, if I plug in the Atmel AVR ISP MKii, then plug that into the correct pins on the ATMega328P via the 6 pin header...nothing really will have changed about how I'm going about things right now. I just have the Atmel AVR ISP MKii serving as the link between in place of the Uno board. Do I have this right?

Do I need to do anything to properly configure the fuses since I have blank chips? What about configuring it to use an external clock? Do I even need an external clock? If so when/why?

Thanks again for all the great help!

I never modified my MKii to be able to supply power, I just supply power via other means. Could be as simple as a 3 AA battery pack.

"I just have the Atmel AVR ISP MKii serving as the link between in place of the Uno board. Do I have this right?"
Yes.

"Do I need to do anything to properly configure the fuses since I have blank chips? "
Burn a bootloader in as the first step. That will set all the fuses you need.

After that, upload sketch with File:Upload Using Programmer if you don't want a bootloader, or upload with bootloader via the serial pins.

I just ended up building another standalone to drive an LED where I wanted to separate the logic from the LED board (because I want to drive it with a CPLD too but validate the LED section with something that I already have that works - Arduino code). This is what it looks like for me.

Do I need to do anything to properly configure the fuses since I have blank chips?

You generally need to configure the fuses for each programming. Newer gcc-avr allows user-defined fuse settings embedded in the code so that helps greatly.

For me, I burn the Uno bootloader in the IDE to set the fuses.
Then program via ICSP or via Serial, code runs either way & fuses make it act like an Uno.
You have AVCC connected to +5 also? I put decoupling caps on both pins.

CrossRoads:
For me, I burn the Uno bootloader in the IDE to set the fuses.
Then program via ICSP or via Serial, code runs either way & fuses make it act like an Uno.
You have AVCC connected to +5 also? I put decoupling caps on both pins.

Are you talking to me? I have VCC, AVCC, and AREF all connected to +V. On the top side I have one line going from +5 to AREF and AVCC, it's just joined by solder under the board. Yeah, I should probably have an extra cap up there.

JoeN:

CrossRoads:
For me, I burn the Uno bootloader in the IDE to set the fuses.
Then program via ICSP or via Serial, code runs either way & fuses make it act like an Uno.
You have AVCC connected to +5 also? I put decoupling caps on both pins.

Are you talking to me? I have VCC, AVCC, and AREF all connected to +V. On the top side I have one line going from +5 to AREF and AVCC, it's just joined by solder under the board. Yeah, I should probably have an extra cap up there.

No need to have +5 wired to Aref pin, leave it disconnected and maybe bypass it to ground with a .1ufd cap. The default ADC reference voltage is derived from whatever voltage is on Avcc. See all the standard Arduino boards where Aref is just wired to a shield pin so that if one wishes to use an external voltage (1.0 min to Vcc max) and then issue a external reference command for the ADC. Wiring a full time +5vdc to Aref would prevent you from ever selecting the internal 1.1vdc reference because damage would result.

Lefty

Aref should not be connected to Vcc. The chip makes that connection internally, or to 1.1V if that is used. Aref only needs a 0.1uF cap to gnd.
Vcc, Avcc should each have a cap.

GarageGeek:
What is the best way to get my sketches (produced in the Arduino IDE) up and running on a standalone?

Can I burn the bootloader on the new chips using my Uno as an ISP? Then how do I load the sketches? Would I need to swap chips with my Uno? I want to avoid chip swapping as much as possible.

Can I just use the Uno as an ISP to burn the sketches directly to the blank chip? Do I need the bootloader for this?
The final picture in my head is of a protoboard or shield that will allow me to insert a blank ATMega328P into a ZIF socket, burn my sketches, then insert into my standalone project.

Much better is to include a 6-pin ICSP header in your standalone project, then you can program and reprogram the chip in situ. You don't need a bootloader. See Prototyping small embedded projects with Arduino | David Crocker's Solutions blog. You can use your Arduino as the ICSP, although if you are going to do this a lot then I recommend getting an AVRISPmkII or some other ICSP instead.

Back to Aref, as I see a question in my e-mail that hasn't shown up here:

From the '328 datasheet:

"Internal reference voltages of nominally 1.1V or AVCC are provided On-chip. The voltage reference may be externally
decoupled at the AREF pin by a capacitor for better noise performance."

"The ADC converts an analog input voltage to a 10-bit digital value through successive approximation. The minimum
value represents GND and the maximum value represents the voltage on the AREF pin minus 1 LSB.
Optionally, AVCC or an internal 1.1V reference voltage may be connected to the AREF pin by writing to the REFSn
bits in the ADMUX Register. The internal voltage reference may thus be decoupled by an external capacitor at the
AREF pin to improve noise immunity."

And from "Atmel AVR042: AVR Hardware Design Considerations":

"To be able to obtain good accuracy with the ADC the analog supply voltage must be
decoupled separately, in the same manner as the digital supply voltage. AREF must
also be decoupled, a typical value for the capacitor is 100nF."

Thus connecting to 5V externally is not required, only a 0.1uF cap to Gnd is needed.

CrossRoads:
Thus connecting to 5V externally is not required, only a 0.1uF cap to Gnd is needed.

...but only if you're using the ADC, and need maximum accuracy.