So I am making an incubator that I want to be able to control with my Arduino Uno. I am thinking about using a heating element and digital thermometer to do his but I don’t really know how to get the high voltages that I will need for powering the element other than that I will need a relay and transformer. I am somewhat new to Arduino and new to using high voltages or anything with AC current. I would also like be able to read and possible control humidity of the air inside the incubator and view everything on a small LED screen, but that is a secondary goal to mainting temp I need. Please tell me or direct me to a good tutorial on how to set up and design the high voltage stuff for a small temperature control system.
I am thinking about using a heating element like this one to do the job. What do you think and what more would I need?
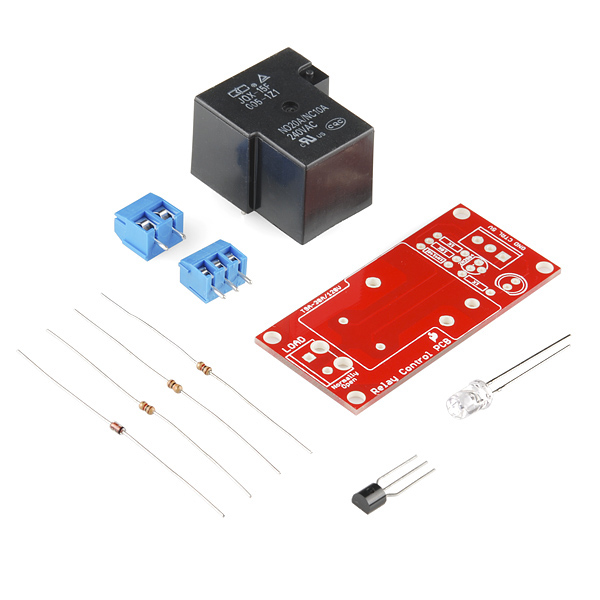
Something like this can help you control a 120 AC device If your unfamiliar with high voltage.
I've seen a DIY incubators use a low watt light bulb to produce enough heat for chickens, unless your looking to build something a large. In which case, if you are familiar with household wiring, a light bulb and an incandescent bulb pigtail like this would be easily wired up to a relay like this...
...put the bulb in the bottom. Get a $3-6 temperature sensor, and mount it in the central. Part of the incubator or. Wherever you. Can get the best reading for where the eggs will lay. Then it's. a simple. Matter to have the Arduino monitor the temp, turning on/off the relay-light bulb, and displaying the temp on the LCD. There a nice temp/humidy sensor combo that be real handy in this case, as you need humidy too, if I'm not mistaken, ya words the end of the hatch.
You should have at least two bulbs for redundancy. Sometimes one burns out! I found that two 30W bulbs for the ~3 cubic foot incubator I built was plenty to keep the heat up, but then if it's not you can always add larger bulbs. The shell of my incubator was a plywood cabinet with 1/2" of extruded foam insulation board.
Something I would suggest watching out for is humidity control. I continually found it very difficult to keep my humidity up and if I were to rebuild my cabinet I would add some type of misting system to do that. Assuming you're building an egg incubator, especially during the hatching stage if the humidity is not high enough the chicks will get stuck in their shells.
You'll also want to add in some air circulation to keep the heat even in your incubator. Small, computer fans will do that nicely.
masterwigglestin:
Thanks a lot for all the help so far but I am building a cell incubator for growing mammalian cell cultures, not a chicken incubator.
Oh, so eggs aren't mammalian cells now?!
Going back to your heat-producing device that you linked on omega.com, that's a really overpriced heater. We've already talked about using light bulbs, but if you have a concern about light in your incubator then the next option would be to use a power resistor. Aluminum clad power resistors would work well if you can attach them to metal walls/etc. inside the incubator or you could probably attach them to a CPU heatsink/fan to circulate hot air through the incubator. The resistance needed is calculated by R = V2/W where R is the resistance, in ohms, W is the wattage rating of the resistor, and V is the voltage you intend to run through it. You should choose a slightly higher resistance to stay safely under the wattage rating of the resistor. The lower cost of these resistors (~$3 for 10W) also means you can spread many of them throughout the incubator for more even heating.
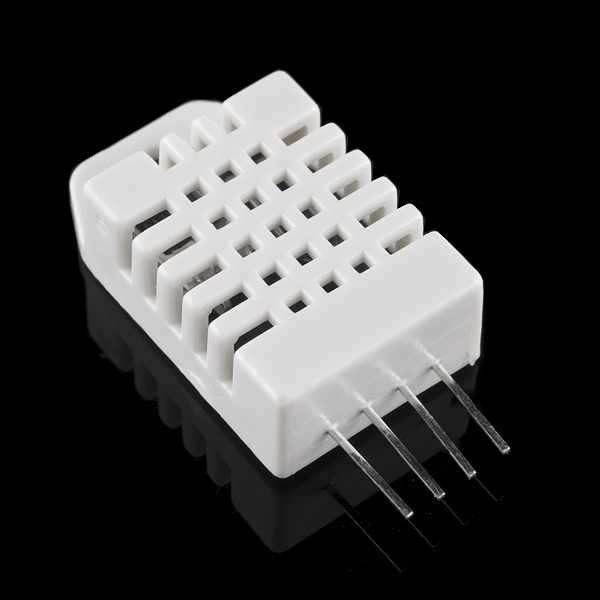
SouthernAtHeart linked to a popular temp/humidity sensor and here's a good tutorial. If the accuracy of these devices is too low for your liking you'll need to provide more specs for us.
Back to controlling the on/off of the heat, an electromechanical relay is fine if it will only be switched on/off a couple times a minute. Excessive switching will wear out the relay or drive you nuts with a clicking noise, so if you need to switch more frequently then you need to go to a more expensive solid state relay. These are non-mechanical devices, and when switching AC current they can be switched on/off -- assuming a 60Hz line frequency -- 120 times per second. Note that this linked SSR is not designed for DC current; those get a little more expensive.
For a reliable, interactive display I would suggest the Phi Panel. It plugs right into an Arduino, and if you get stuck and need support then you can count on Liudr to help you out with it. There are also Chinese knock-offs that might work fine but it'll probably ruin your chance at a friendship with Liudr ;).
Finally, to glue everything together programming wise, the PID library will give the most accurate results. The PID library would look at your current temperature reading, your desired temperature, and then figures out the the best timing for switching your heaters on and off to keep a stable temperature. It will provide better results than typical "if temperature < setpoint turn heater on" type of code.
Thanks and I would like something a little more accurate in temperature because I would like to keep my temp within 1 degree Fahrenheit or better, and those resistors might be a good idea, I was originally planning on attaching the kapton heater to the bottom of a CPU heat sink.