Dear Master
need help
I had project for School language lab service
and right now because the schematic is lost I must build again from scrath
but without changing the control panel
my problem is
the control panel using 4x10 momentary switch to control the student equipment
so I'm using arduino mega to solved it
below is my code even though isnt finish yet
++++++++++++++++++++++++++++++++++++++++++++++++++++++++++++++++++++++++++
// include the library code:
#include <Keypad.h> // Matrix Keypad library
// this constant won't change:
const int ledPin1 = 14; // the pin that the LED is attached to
const int ledPin2 = 15; // the pin that the LED is attached to
const int ledPin3 = 16; // the pin that the LED is attached to
const int ledPin4 = 17; // the pin that the LED is attached to
const int ledPin5 = 18; // the pin that the LED is attached to
const int ledPin6 = 19; // the pin that the LED is attached to
const int ledPin7 = 20; // the pin that the LED is attached to
// I cut the code for led here, it will imply for 40 pin
// set up the Keypad
const byte ROWS = 4; // Four rows
const byte COLS = 10; // Ten columns
// Define the Keymap
char keys[ROWS][COLS] =
{
  {    '1','2','3','4','5','6','7','8','9','10'   }  ,  // row 1
  {    '11','12','13','14','15','16','17','18','19','20'   }  ,  // row 2
  {    '21','22','23','24','25','26','27','28','29','30'   }  ,  // row 3
  {    '31','32','33','34','35','36','37','38','39','40'   }  ,  // row 4
};
// Connect keypad ROW1, ROW2, ROW3 and ROW4 to these Arduino pins.
byte rowPins[ROWS] = { 0, 1, 2, 3 }; // Keypad uses internal pullups? No externals supplied
// Connect keypad COL1, COL2, COL3, COL4 to these Arduino pins.
byte colPins[COLS] = { 4, 5, 6, 7, 8, 9, 10, 11, 12, 13 };
// Create the Keypad
Keypad keypad = Keypad( makeKeymap(keys), rowPins, colPins, ROWS, COLS );
void setup()
{
// initialize the LED as an output:
pinMode(ledPin1, OUTPUT);
// initialize the LED as an output:
pinMode(ledPin2, OUTPUT);
// initialize the LED as an output:
pinMode(ledPin3, OUTPUT);
// initialize the LED as an output:
pinMode(ledPin4, OUTPUT);
// initialize the LED as an output:
pinMode(ledPin5, OUTPUT);
// initialize the LED as an output:
pinMode(ledPin6, OUTPUT);
// initialize the LED as an output:
pinMode(ledPin7, OUTPUT);
// initialize the LED as an output:
pinMode(ledPin8, OUTPUT);
// initialize the LED as an output:
pinMode(ledPin9, OUTPUT);
// initialize the LED as an output:
pinMode(ledPin10, OUTPUT);
// initialize the LED as an output:
pinMode(ledPin11, OUTPUT);
// initialize the LED as an output:
pinMode(ledPin12, OUTPUT);
// initialize the LED as an output:
pinMode(ledPin13, OUTPUT);
// initialize the LED as an output:
pinMode(ledPin14, OUTPUT);
// initialize the LED as an output:
pinMode(ledPin15, OUTPUT);
// initialize the LED as an output:
pinMode(ledPin16, OUTPUT);
// initialize the LED as an output:
pinMode(ledPin17, OUTPUT);
// initialize the LED as an output:
pinMode(ledPin18, OUTPUT);
// initialize the LED as an output:
pinMode(ledPin19, OUTPUT);
// initialize the LED as an output:
pinMode(ledPin20, OUTPUT);
// I cut the code for pin mode here , it will imply for 40 pin
}
void loop()
{
// go read the keypad
char key = keypad.getKey(); // reading the keypad
if(key) // same as if(key != NO_KEY)- did something change?
{
// do something with the keypress, such as:
switch(key)
{
case '1':
digitalWrite(ledPin1, HIGH);
break;
case '2':
digitalWrite(ledPin2, HIGH);
break;
case '3':
digitalWrite(ledPin3, HIGH);
break;
case '4':
digitalWrite(ledPin4, HIGH);
break;
case '5':
digitalWrite(ledPin5, HIGH);
break;
case '6':
digitalWrite(ledPin6, HIGH);
break;
case '7':
digitalWrite(ledPin7, HIGH);
break;
case '8':
digitalWrite(ledPin8, HIGH);
break;
case '9':
digitalWrite(ledPin9, HIGH);
break;
case '10':
digitalWrite(ledPin10, HIGH);
break;
case '11':
digitalWrite(ledPin11, HIGH);
break;
case '12':
digitalWrite(ledPin12, HIGH);
break;
case '13':
digitalWrite(ledPin13, HIGH);
break;
case '14':
digitalWrite(ledPin14, HIGH);
break;
case '15':
digitalWrite(ledPin15, HIGH);
break;
case '16':
digitalWrite(ledPin16, HIGH);
break;
case '17':
digitalWrite(ledPin17, HIGH);
break;
case '18':
digitalWrite(ledPin18, HIGH);
break;
case '19':
digitalWrite(ledPin19, HIGH);
break;
// I cut the code for case code here, it will imply for 40 pin
}
}
}
+++++++++++++++++++++++++++++++++++++++++++++++++++
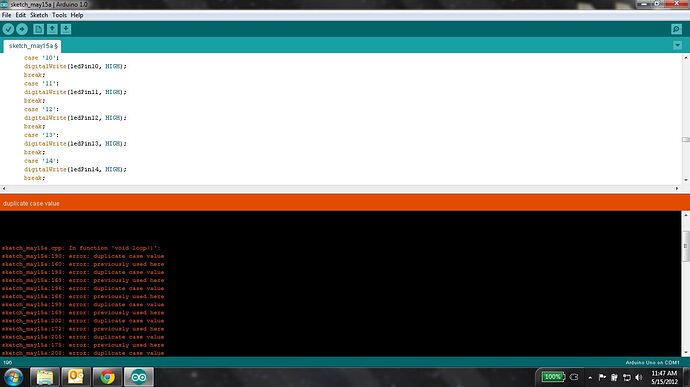
it show error in compiling, as picture attached
I guess I need to change the library
I see one of people has already changing into 5x4 keypad
but I tried and fail
below the code for library that I change
+++++++++++++++++++++++++++++++++++++++++++++++++++++
#include "keypad.h"
extern "C"
{
#include "Wconstants.h" //all things wiring / arduino
}
// --------- PIN MAPPINGS -------------------------------
// The pin mappings are matched to the pin numbers found on the Arduino. For example
// the first column from your keypad is connected to pin 6 on the Arduino and the
// second column is connected to pin 5. It's the same for the rows.
// These are the numbers you would change to match your keypad wiring. Even though
// they are shown in order you can set them to any valid (random) pin number.
#define COL0 4
#define COL1 5
#define COL2 6
#define COL3 7
#define COL4 8
#define COL5 9
#define COL6 10
#define COL7 11
#define COL8 12
#define COL9 13
#define ROW0 0
#define ROW1 1
#define ROW2 2
#define ROW3 3
// Note: The column pins will be set as outputs and the row pins will be set as inputs.
// Default row and col pin counts. Don't change these here. You can set them in your
// code when instantiating a new keypad object. See the example project.
int num_rows = 4;
int num_cols = 10;
static int col_select; // Keeps track of which column to activate/de-activate
// 4x4 keypad key mapping. You shouldn't need to touch this unless you have
// a keypad with different (or more) keys than those listed.
const char keymap[4][10] =
{
"1","2","3","4","5","6","7","8","9","10",
"11","12","13","14","15","16","17","18","19","20",
"21","22","23","24","25","26","27","28","29","30",
"31","32","33","34","35","36","37","38","39","40",
};
int row[5] = {ROW0, ROW1, ROW2, ROW3, };
int col[4] = {COL0, COL1, COL2, COL3, COL4, COL5, COL6, COL7, COL8, COL9};
//--------------------------------------------------------
+++++++++++++++++++++++++++++++++++++++++++++++++++++++++++++++++++++
and it shows error
need help here
comment or suggestion is appriciate
thanks
