RC Car Robot

Hello,

I am a robotics research scientist with several years of experience in industry, but my background his primarily been concerned with high-level topics such as sensor processing, navigation, localization, planning, control, etc. I am interested in learning more about the hardware side of robotics, and as such, have decided to build an autonomous RC car.

What I'm hoping to get out of this post is some answers to questions I have about the process. Other than soldering some wires to convert my son's crib side music player from battery power to a wall socket AC/DC adapter power, I haven't seen any real work with electronics since sophomore year in college (many moons ago).

Anyway, here's what I've purchased, along with intended purposes:

  1. RC car - This will serve at the platform for my robot. It's a scale model Hummer H2, which will provide enough space for mounting all the other hardware I have.

  2. Arduino Uno - This will act as the "bridge" between a netbook and the RC car's motor control board (and the IMU). It will handle low-level control of the robot.

  3. ArduIMU - I want/need some motion sensing.

  4. Netbook - This will handle the high-level algorithms for the robot

  5. Kinect - For 3D mapping and localization

Now I'd like to walk through my understanding of the process and ask some questions along the way:

Step 1: Open up the RC car and locate the motor control circuit board. As I understand it, the RC receiver will take radio control signals and pass them to the appropriate input pins on the motor controller. I can remove the RC receiver (unless I want to keep it for fun). I then need to connect the Arduino to the controller.

Questions:

a. Is this correct?
b. Can I use the motor control board that comes with the car, or do I need to purchase an Arduino motor shield?
c. Do I need to worry about voltages/currents between the Arduino and the control board?
d. What kind of hardware do I need for all of this (breadboards, wires, resistors, connectors, etc.), and why?

Step 2: Connect the ArduIMU to the Arduino. I'm assuming I can work this out from the documentation that comes with the unit or elsewhere online, but I may as well ask.

Questions:

a. I'd like the connection between the Arduino and the IMU to be solid, but not permanent. What's the best option? I don't know a lot about small electrical components for PCBs.

Step 3: Connect the netbook to the Arduino.

Questions:

a. The Arduino Uno appears to have a built-in USB-to-serial interface, allowing me to communicate with it using serial comms over a USB cable. Will this cable also power the Arduino, or do I need a separate power source for the board?

Everything else I can handle myself.

One more general question, though: if I wanted to add odometry to this robot, what would be the best way to accomplish that? I've seen hall effect sensors before; would that be a solid option?

Thanks in advance for taking the time to read and (hopefully!) respond.
a. Is this correct?
b. Can I use the motor control board that comes with the car, or do I need to purchase an Arduino motor shield?
c. Do I need to worry about voltages/currents between the Arduino and the control board?
d. What kind of hardware do I need for all of this (breadboards, wires, resistors, connectors, etc.), and why?

a) we don't know, we don't know what you've bought
b) see a)
c) yes, very much so. Make sure they've got a common ground and don't exceed about 30mA per Arduino pin
d) don't know until you've answered a) and b)

Apologies, I didn't realize the answer would be dependent upon the vehicle:

http://www.newegg.com/Product/Product.aspx?Item=9SIA1110EZ4863

I'm guessing at that price point the car will gave a single PCB with radio and motor control integrated.
Have you looked at the internals yet?
Googled any hacks for the car?

No sir, just ordered it. I've seen other posts for other chassis and assumed (perhaps incorrectly) that the concepts would be applicable elsewhere. I take it you're implying that I need a schematic that tells me what pins are responsible for what?

Model car kits (Tamiya, Kyosho, Schumacher whatever) unlike toy cars will normally accept radios ESCs etc from the mainstream radio manufacturers.
Toy cars will normally have a single PCB with it all integrated.
It is possible to hack them ( I've done this for a Heng Long tank) but you've got to know what you're looking for, and which tracks to break and which to leave alone.

What I suggest is that you open up the car, and take direct control of the motors with a motor driver (Could be the L298n).

Then, using WI-Fi or RF (Xbee) you can communicate with another arduino connected to the computer.

This way you don't have to deal with the single control board that most of the Rc cars have, and manage the motor control and communication yourself.

You can look for the model of the motors in the car and get the right specs.

Ok, so ditch the control board and drive the motors myself. Can I do that directly from the Arduino Uno or will I need to also get the motor shield?

Thanks, everyone, for the responses.

You need a motor shield, the current needed to get the motors running is very high, so do NOT connect the motor directly to the arduino outputs, you'll burn it.

The motor shield acts as a switch between the battery and the arduino, and controls the PWM signal and rotation direction. You have to connect the battery pack in your RC car to the motor shield (Vsupply) and the Vlogic connected to the 5V pin in the arduino.

I advice you to wait for more suggestions before you buy more things, maybe someone else has a better and cheaper approach for your project.

Excellent, thank you.

The logic inside the car is RF stage ---> Decoder -----> motor driver ----> motors.

For step 1 you can

A. Gut the car keeping only the motors body and gears then add a motor controller

B. Cut in between the decoder and motor driver, this saves on a motor driver but is a little more complex.

C. Cut in between the RF stage and the decoder. Only one wire required to do this, but you need to generate the train of pulses the decoder expects.

Mark

There seems to be precious little useful information on the neweeg website
about the details of the car, but lots of n/a's.

Can't even tell how large it is. Is it even big enough to carry something the size of
an Arduino bd, and possibly a few extra batteries?

Secondly, the forward speed of the car is a critical bit of information. Most R/C
cars go "much" too fast to be useful as a microcontroller-controlled robot. The
sensors and s.w. can't react fast enough.

holmes4: I think my best bet might be to go with your first option. The board isn't that expensive.

oric_dan: The car is 1/16th scale. A Hummer H2, according to Wikipedia, is 204" x 81" x 82". This means the model is roughly 12.75" x 5" x 5", which ought to be enough space to handle whatever payload I have.

As far as the speed is concerned, surely I can do some kind of PWM to more finely control it? I've seen other RC cars firsthand that have done so.

Re: the speed of the robot for closed-loop control, it really depends on the refresh rate of the sensor and how tight my control loop is. I'll have plenty of horsepower on the netbook, and the Kinect runs at 30 Hz. I've seen robots successfully controlled at ~1 m/s at 10 Hz, and while that's definitely a bit loose for my purposes, I'm hoping the forward speed can be kept in check enough for my control loop to function well.

As far as the speed is concerned, surely I can do some kind of PWM to more finely control it? I've seen other RC cars firsthand that have done so.

PWM'ing won't give you enough low-end torque to move the car, if the gearing
is too high. You'll just have to see how it goes once you get the car.

oric_dan(333):

As far as the speed is concerned, surely I can do some kind of PWM to more finely control it? I've seen other RC cars firsthand that have done so.

PWM'ing won't give you enough low-end torque to move the car, if the gearing
is too high. You'll just have to see how it goes once you get the car.

Ah, right. Ok, well I will take all this information in and report back here! Thanks for the help, everyone.

TheWumpus:

oric_dan(333):

As far as the speed is concerned, surely I can do some kind of PWM to more finely control it? I've seen other RC cars firsthand that have done so.

PWM'ing won't give you enough low-end torque to move the car, if the gearing
is too high. You'll just have to see how it goes once you get the car.

Ah, right. Ok, well I will take all this information in and report back here! Thanks for the help, everyone.

You might want to read (in full, and carefully - taking notes along the way) this mega-thread:

http://arduino.cc/forum/index.php/topic,86883.0.html

Long story short: It is likely that the car you have has everything you need to start; most of these el-cheapo R/C cars use the TX2/RX2 chipset, and are very easy to interface with once you understand the circuit. Even if it doesn't use such a chip, you can (with a knowledge of electronics and how to draw a schematic) reverse-engineer the on-board h-bridges of the R/C car that control the speed and steering, such that you can find the proper interface points on the PCB to control with the Arduino.

Something else to note: If the car doesn't have what is called "proportional steering" (most of these cheap cars don't), then you may want to replace build-in steering actuator with a standard-sized regular servo (-not- a continuous rotation one), and control it with the Servo library. At that point, though, you might as well cut the card away and use a regular h-bridge with the drive motor. Just make sure you measure the current consumption of the motor (both running and stall current; especially the latter - you need to size the h-bridge such that it can control the stall current plus about 15-25%) before you buy the h-bridge. You might be able to get away with an L298-based device (in bridged mode it can control up to 4 amps of current) - or you might need to purchase something else. Pololu has several suitable devices; there are other manufacturers/vendors as well.

Finally - next time you decide to build a robot using an R/C car, you may want to check thrift stores (like Goodwill or Savers) first; generally you can pick up something just like what you bought (or similar), missing nothing more than the transmitter (which you don't need) - and everything else is working fine (once again, read the thread - I'm pretty sure I covered it there). I've never paid more than 10 or 15 dollars -maximum- for such a regular vehicle (I did once find an MGA Tarantula without it's controller that I ended up buying for $25.00, though).

Good luck with your project!

I agree with cr0sh about the servo, if you use the rated voltage for the front motor (steering), it will over heat because it will have the rotor blocked by the limit of the steering. Or maybe just use low % duty cycle in your PWM signal and don't maintain the top steering for too long.

If the motor has plastic parts they could melt and block the rotor. It happened to me once.

Note to self: next time, come here before buying anything. Really helpful, everyone. I'll look into the car's steering - I may be able to return it if I don't open it.

If you do head back to the shop, try and find your way to a hobby shop where you will find options like these -

you can then use an Arduino together with or instead of the supplied controls using the techniques outlined throughout

rcarduino.blogspot.com

Duane B

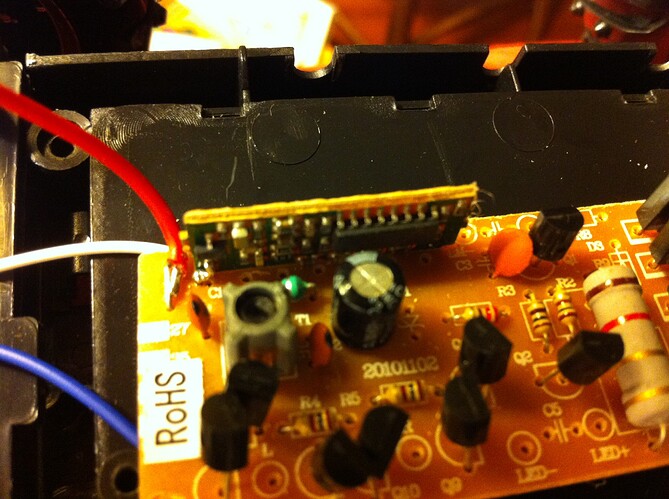
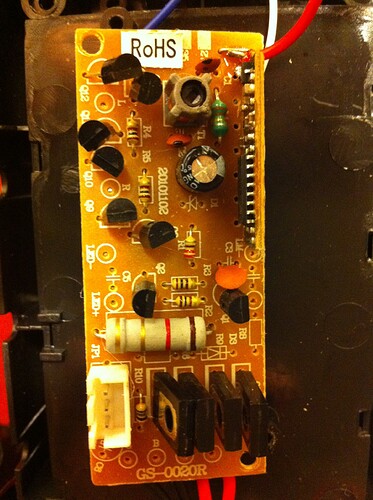
Alright, the RC car arrived. Neither the forward/backward speeds nor the turning are proportional (i.e., output is all or nothing). I've attached pictures of the motor controller. Does anyone recognize it? Does it look hack-able, or will I need to ditch it and get an Arduino Motor Shield?

Some notes on the attached images: the letters along the bottom of the board (right in the images) are G, B, V+, and F. B and F go to the motor; I'm assuming this indicates backwards and forwards in some kind of H-bridge setup. V+ and G, of course, go to the battery.