Adding custom (Zero based) boards to the Arduino IDE

Adding Custom (Zero based) boards to the Arduino IDE - Part I

This is a step-by-step guide of how to add Arduino Zero based custom boards to the "Boards Manager" in the Arduino IDE. This can be useful if your custom board deviates from the Zero's design and therefore requires modification of the "variant.h" and "variant.cpp" files that define the Arduino Zero's pin functions.

There currently seems to be little documentation regarding this subject, so I'm going to describe how I set up my two Zero based flight controller boards: the Falcon 1 and Falcon 2. The Falcon 1 like the Zero uses the SAMD21G18A, while the Falcon 2 deviates further from the Zero's design, it uses the larger SAMD21J18A. Both boards use the Zero's bootloader and upload code via their native USB ports.

My main reference has been the JSON index format specification located here: Arduino IDE 1.6.x package_index.json format specification · arduino/Arduino Wiki · GitHub

If there's anything I've missed, needs amending or is unclear please let me know. So here goes...

1) The JSON Index File - Part I

First start the Arduino IDE, then in the menu system choose File->Preferences. The dialog box contains a field named "Additional Board Manager URLs:". In this field you can enter the URL (web address) of a JSON file that defines how the IDE configures additional boards. Using a URL allows you to distribute your JSON file to other users. If however you're using the file on your own hard drive you can just replace "http://..." with "file://...". The JSON file name must have the prefix "package_" and the suffix "_index.json".

Below is the JSON file "package_falcon_index.json" for the Falcon boards:

{
  "packages":
  [
    {
      "name": "falcon",
      "maintainer": "Martin Lindupp",
      "websiteURL": "http://www.arduino.cc/en/Reference/HomePage",
      "help":
      {
        "online": "http://www.arduino.cc/en/Reference/HomePage"
      },
      "platforms":
      [
        {
          "name": "Falcon Flight Controller Boards",
          "architecture": "samd",
          "version": "1.0.0",
          "category": "Contributed",
          "url": "file://C:/Users/Computer/Documents/FalconBoards/Falcon-1.0.0.zip",
          "archiveFileName": "Falcon-1.0.0.zip",
          "checksum": "SHA-256:01303f3e0c0416ec53dd514ed5cd558f11cd20c8ab33d07b3b1f1cdac6ec18e7",
          "size": "1270658",
          "boards": [
    {
      "name": "Falcon 1"
    },
            {
              "name": "Falcon 2"
            }          
          ],
          "toolsDependencies":
          [
            {
              "packager": "arduino",
              "name": "arm-none-eabi-gcc",
              "version": "4.8.3-2014q1"
            },
            {
              "packager": "arduino",
              "name": "bossac",
              "version": "1.6.1-arduino"
            },
            {
              "packager": "arduino",
              "name": "openocd",
              "version": "0.9.0-arduino"
            },
            {
              "packager": "arduino",
              "name": "CMSIS",
              "version": "4.0.0-atmel"
            }
          ]
        }
      ],
      "tools":
      [
      ]
    }
  ]
}

The "Additional Board Manager URLs" field provides the location of the JSON file:

file://C:/Users/Computer/Documents/FalconBoards/package_falcon_index.json

If there is more than one URL then they can be separated with a comma. This example places the JSON file in the "Documents" folder, but there's nothing special about this path name.

The IDE's "Boards Manager" uses the information held in the JSON file and to display the platform name, board names, maintainer and version:

Adding Custom (Zero based) boards to the Arduino IDE - Part II

2) The Core Files

In the JSON file you'll notice that there's a URL link to a compressed file, in this case "Falcon-1.0.0.zip". The compressed file can be in either .zip, .tar.bz2, or .tar.gz formats. This zip file must contain a directory and within that directory is the location of the boards' core files.

Simply navigate to the directory:

C:\Users\Computer\AppData\Local\Arduino15\packages\arduino\hardware\samd

...and copy the "1.6.6" folder, (this is Arduino Zero's current build version so it might change), to another directory, doesn't matter where, I chose:

C:\Users\Computer\Documents\FalconBoards

Rename the "1.6.6" folder to whatever you like, I used "Falcon-1.0.0", but the name doesn't really matter. Next section we'll enter this folder to edit the "boards.txt", "variant.h" and "variant.cpp" files.

3) The "boards.txt" File

First enter the newly named folder and open the "boards.txt" file in an editor, (I use NotePad++). In the file take the native USB entry for the Arduino Zero and copy it, then delete the Arduino and MKR1000 entries. I copied the entry two times for both the Falcon 1 and Falcon 2 boards.

Here's the my "boards.txt" for the Falcon boards:

# Falcon 1 (Native USB Port)
# ---------------------------------------
falcon_1_native.name=Falcon 1 (Native USB Port)
falcon_1_native.vid.0=0x2341
falcon_1_native.pid.0=0x804d
falcon_1_native.vid.1=0x2341
falcon_1_native.pid.1=0x004d

falcon_1_native.vid.2=0x2341
falcon_1_native.pid.2=0x824d
# If the board is a 2341:824d use 2341:824d for build and set other parameters as well
falcon_1_native.vid.2.build.vid=0x2341
falcon_1_native.vid.2.build.pid=0x824d
falcon_1_native.vid.2.build.usb_product="Genuino Zero"
falcon_1_native.vid.2.bootloader.file=zero/samd21_sam_ba_genuino.bin

falcon_1_native.vid.3=0x2341
falcon_1_native.pid.3=0x024d
# If the board is a 2341:024d use 2341:824d for build and set other parameters as well
falcon_1_native.vid.3.build.vid=0x2341
falcon_1_native.vid.3.build.pid=0x824d
falcon_1_native.vid.3.build.usb_product="Genuino Zero"
falcon_1_native.vid.3.bootloader.file=zero/samd21_sam_ba_genuino.bin

falcon_1_native.upload.tool=bossac
falcon_1_native.upload.protocol=sam-ba
falcon_1_native.upload.maximum_size=262144
falcon_1_native.upload.use_1200bps_touch=true
falcon_1_native.upload.wait_for_upload_port=true
falcon_1_native.upload.native_usb=true
falcon_1_native.build.mcu=cortex-m0plus
falcon_1_native.build.f_cpu=48000000L
falcon_1_native.build.usb_product="Arduino Zero"
falcon_1_native.build.usb_manufacturer="Arduino LLC"
falcon_1_native.build.board=SAMD_ZERO
falcon_1_native.build.core=arduino
falcon_1_native.build.extra_flags=-D__SAMD21G18A__ {build.usb_flags}
falcon_1_native.build.ldscript=linker_scripts/gcc/flash_with_bootloader.ld
falcon_1_native.build.openocdscript=openocd_scripts/arduino_zero.cfg
falcon_1_native.build.variant=falcon_1
falcon_1_native.build.variant_system_lib=
falcon_1_native.build.vid=0x2341
falcon_1_native.build.pid=0x804d
falcon_1_native.bootloader.tool=openocd
falcon_1_native.bootloader.file=zero/samd21_sam_ba.bin

# Falcon 2 (Native USB Port)
# ---------------------------------------
falcon_2_native.name=Falcon 2 (Native USB Port)
falcon_2_native.vid.0=0x2341
falcon_2_native.pid.0=0x804d
falcon_2_native.vid.1=0x2341
falcon_2_native.pid.1=0x004d

falcon_2_native.vid.2=0x2341
falcon_2_native.pid.2=0x824d
# If the board is a 2341:824d use 2341:824d for build and set other parameters as well
falcon_2_native.vid.2.build.vid=0x2341
falcon_2_native.vid.2.build.pid=0x824d
falcon_2_native.vid.2.build.usb_product="Genuino Zero"
falcon_2_native.vid.2.bootloader.file=zero/samd21_sam_ba_genuino.bin

falcon_2_native.vid.3=0x2341
falcon_2_native.pid.3=0x024d
# If the board is a 2341:024d use 2341:824d for build and set other parameters as well
falcon_2_native.vid.3.build.vid=0x2341
falcon_2_native.vid.3.build.pid=0x824d
falcon_2_native.vid.3.build.usb_product="Genuino Zero"
falcon_2_native.vid.3.bootloader.file=zero/samd21_sam_ba_genuino.bin

falcon_2_native.upload.tool=bossac
falcon_2_native.upload.protocol=sam-ba
falcon_2_native.upload.maximum_size=262144
falcon_2_native.upload.use_1200bps_touch=true
falcon_2_native.upload.wait_for_upload_port=true
falcon_2_native.upload.native_usb=true
falcon_2_native.build.mcu=cortex-m0plus
falcon_2_native.build.f_cpu=48000000L
falcon_2_native.build.usb_product="Arduino Zero"
falcon_2_native.build.usb_manufacturer="Arduino LLC"
falcon_2_native.build.board=SAMD_ZERO
falcon_2_native.build.core=arduino
falcon_2_native.build.extra_flags=-D__SAMD21J18A__ {build.usb_flags}
falcon_2_native.build.ldscript=linker_scripts/gcc/flash_with_bootloader.ld
falcon_2_native.build.openocdscript=openocd_scripts/arduino_zero.cfg
falcon_2_native.build.variant=falcon_2
falcon_2_native.build.variant_system_lib=
falcon_2_native.build.vid=0x2341
falcon_2_native.build.pid=0x804d
falcon_2_native.bootloader.tool=openocd
falcon_2_native.bootloader.file=zero/samd21_sam_ba.bin

As you can see I replaced "arduino_zero_native" with "falcon_1_native" and "falcon_2_native" respectively.

Other changes of note is the name:

falcon_1_native.name=Falcon 1 (Native USB Port)

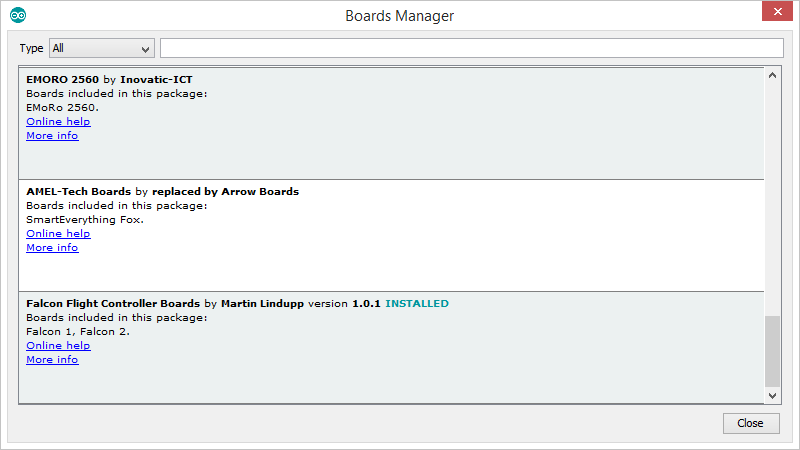
...this determines the name of the boards that appear in the Boards Manager drop down list.

Also the line specifying the variant directory:

falcon_1_native.build.variant=falcon_1

Also note that for the Falcon 2, I changed the build.extra flag to SAMD21J18A to account for the larger "J" variant micro-controller:

falcon_2_native.build.extra_flags=-D__SAMD21J18A__ {build.usb_flags}

4) The "variant" Files

The variant files are contained in the "variant" folder. Inside this folder are two directories for the "arduino_zero" and the "MKR1000". Rename the "arduino_zero" folder and delete "MKR1000", the name should match the variant names specified in the "boards.txt" file. I created two variant directories: "falcon_1" and "falcon_2".

Edit the "variant.h" and "variant.cpp" files for your board. In my case the Falcon 1 only required minor changes, commenting out the entries for PIN_LED_TXL and PIN_LED_RXL, while the Falcon 2 required more substantial alterations.

After making these changes take your newly named directory, in my case "Falcon-1.0.0" and place it in a .zip, .tar.bz2, or .tar.gz file. I called mine "Falcon-1.0.0.zip". Again, nothing special about the name.

5) The "platform.txt" File

The name and version at the head of the "platform.txt" file, also needs to be changed. I believe the version isn't currently used, but is reserved for future use and reflects the currrent build, in my case it's 1.0.0. The name provides the title name at the head of the drop down list. I chose "Falcon Flight Controller Boards".

DropDown.png

6) The JSON Index File - Part II

Looking at the JSON file oncemore, you'll notice that it specifies the compressed file's URL, filename, size and checksum. The checksum can be either MD5, SHA-256 or SHA-1 formats, but SHA-256 is recommended. The checksum and the filesize can be calculated by downloading a program called "md5deep" from sourceforge.net.

After downloading this program, move it to an appropriate directory. Then open the "Command Prompt", navigate to the md5deep directory and enter the following line, which generates the file size and SHL-256 checksum for the zip file:

sha256deep -r -z C:\Users\Computer\Documents\FalconBoards\Falcon-1.0.0.zip

Command.png

If you've got a 64-bit machine you can use sha256deep64, which avoids the warning, but oncemore it doesn't really matter.

The -r switch causes the algorithm to recursively enter directories within the zip file, while -z gets the program to return the file size. Now copy both the checksum and file size entries into the JSON file.

When the custom boards are installed in the "Boards Manager", the information in the JSON and compressed file are used by the IDE to build a directory structure and copy over the custom core files. So, while the Arduino Zero core files are stored in:

C:\Users\Computer\AppData\Local\Arduino15\packages\arduino\hardware\samd\1.6.6

...the custom, or in this case Falcon board files are copied to the directory:

C:\Users\Computer\AppData\Local\Arduino15\packages\falcon\hardware\samd\1.0.0

Adding Custom (Zero based) boards to the Arduino IDE - Part III

7) Installing the Custom Boards

Start the IDE, navigate to the "Boards Manager" and click on the install button for the your entry, in my case "Falcon Flight Controller Boards". It's then possible to switch between and upload code for each respective board.

Note: if the "Boards Manager" informs you that the checksum is incorrect and that the file is corrupted, just go to the directory:

C:\Users\Computer\AppData\Local\Arduino15\staging\packages

...and delete the copy of your compressed file, then restart the IDE.

8) Adding New Versions

To add new build versions to the "Boards Manager" you need to add a new platforms entry to the JSON file:

{
  "packages":
  [
    {
      "name": "falcon",
      "maintainer": "Martin Lindupp",
      "websiteURL": "http://www.arduino.cc/en/Reference/HomePage",
      "help":
      {
        "online": "http://www.arduino.cc/en/Reference/HomePage"
      },
      "platforms":
      [
        {
          "name": "Falcon Flight Controller Boards",
          "architecture": "samd",
          "version": "1.0.0",
          "category": "Contributed",
          "url": "file://C:/Users/Computer/Documents/FalconBoards/Falcon-1.0.0.zip",
          "archiveFileName": "Falcon-1.0.0.zip",
          "checksum": "SHA-256:f5c5ce0e2ab6175d6c65a5ee6b8c1b3d6d649f3a46d99ced7cbd4cfadfa14018",
          "size": "1270664",
          "boards": [
 {
 "name": "Falcon 1"
 },
            {
              "name": "Falcon 2"
            }          
          ],
          "toolsDependencies":
          [
            {
              "packager": "arduino",
              "name": "arm-none-eabi-gcc",
              "version": "4.8.3-2014q1"
            },
            {
              "packager": "arduino",
              "name": "bossac",
              "version": "1.6.1-arduino"
            },
            {
              "packager": "arduino",
              "name": "openocd",
              "version": "0.9.0-arduino"
            },
            {
              "packager": "arduino",
              "name": "CMSIS",
              "version": "4.0.0-atmel"
            }
          ]
        },
 {
          "name": "Falcon Flight Controller Boards",
          "architecture": "samd",
          "version": "1.0.1",
          "category": "Contributed",
          "url": "file://C:/Users/Computer/Documents/FalconBoards/Falcon-1.0.1.zip",
          "archiveFileName": "Falcon-1.0.1.zip",
          "checksum": "SHA-256:c1631cab4301568cac765682f1999df8414330da82f5d27b437420b5c59ab609",
          "size": "1270658",
          "boards": [
 {
 "name": "Falcon 1"
 },
            {
              "name": "Falcon 2"
            }          
          ],
          "toolsDependencies":
          [
            {
              "packager": "arduino",
              "name": "arm-none-eabi-gcc",
              "version": "4.8.3-2014q1"
            },
            {
              "packager": "arduino",
              "name": "bossac",
              "version": "1.6.1-arduino"
            },
            {
              "packager": "arduino",
              "name": "openocd",
              "version": "0.9.0-arduino"
            },
            {
              "packager": "arduino",
              "name": "CMSIS",
              "version": "4.0.0-atmel"
            }
          ]
        }
      ],
      "tools":
      [
      ]
    }
  ]
}

You can select then the appropriate version in the "Boards Manager".

Hopefully this information will allow you to integrate your own custom boards into the Arduino IDE and enable you to maintain a number of build versions.

9) Further work

The above steps allow you to add additional boards to the Arduino IDE, however the Tools->Port still mentions "Arduino/Genuino (Native USB Port)". I guess this is probably more a function of the boards COM port drivers. Anyway it's something that requires further investigation.

That's really great ! It's going to help a lot of people out there :slight_smile: Thanks Martin !

To change the name of the device as it appears in the Tools->Ports, you have to change the usb_product and usb_manufacturer attribute in the boards.txt file. I think you can also change the VID/PID, because otherwise every samd21 board with arduino bootloader will appear as you're device. I'm not sure if the devices are identified by there VID PID or usb_manufacturer and usb_product attribute...

Thanks AloyseTech.

I'll look into it and see if I can make some progress.

Martin

If you want to change the VID/PID, you'll probably need to change the one in the bootloader too. I'm not sure if it will still work with the windows driver though : I guess Adafruit Feather M0 use a custom VID/PID so they need a custom Windows driver maybe for this reason.

I've tried to investigate why the port name (Tools->Port in menu) is using "Arduino/Genuino Zero (Native USB Port)", rather than "Falcon 1 (Native USB Port)" or "Falcon 2 (Native USB Port)".

I now know that the Arduino IDE obtaining the name from the Arduino Zero's "boards.txt" file instead of the Falcons', but I've yet to discover how or why the IDE chooses to reference this file.

The only information I can find is from the "Arduino Hardware Cores migration guide from 1.0 to 1.6": Arduino Hardware Cores migration guide from 1.0 to 1.6 · arduino/Arduino Wiki · GitHub

...where it states:

Step 6: Add USB identifiers for Port List menu

This a very nice feature of the new Arduino IDE: it detects automatically the board connected to each serial port and shows the name of the board in front of each port listed in the ports menu. To make this work we need only to list the USB PID/VID associated with the board:

So perhaps the IDE's using the Zero's USB Vendor ID (VID) in order to reference its "boards.txt" and obtain the port name?

MartinL:
So perhaps the IDE's using the Zero's USB Vendor ID (VID) in order to reference its "boards.txt" and obtain the port name?

That's probably the case. I think Adafruit provide their own Feather M0 bootloader (Arduino one recompiled with new VID/PID) and drivers (tells windows to use internal usb CDC for this specific new VID/PID) for this reason.

Thanks MartinL, this is very helpful.

As to #9. Adafruit has a good tutorial on how to compile your own bootloader for the samd21.

When doing so you need to redefine the PID/VID in the Makefile (at minimum the VID), and also in boards.txt. The Arduino IDE will see the PID/VID from the board, and match it to the definition in boards.txt. It will then populate the port menu with the board name listed in boards.txt.

This is fine for testing, but for a release you'll need access to a PID/VID that you can rightfully use. The ones associated with Genuino Zero, Feather M0, and mkr1000 belong to either Arduino LLC or Adafruit.

Last thing, in order to compile the bootloader you'll need to install the first 4 recommended tools from this list: Overview | Windows Tools for the Electrical Engineer | Adafruit Learning System.

Hi steddyrobots,

Thanks for information and link, that's really useful.

Martin

By the way, Adafruit have also produced an excellent tutorial on how to sign Windows drivers and executables here: Overview | How to Sign Windows Drivers & Executables | Adafruit Learning System

If you're in the process of making your own custom boards, especially with Eagle, there's a number of useful Adafruit articles here: Adafruit Learning System

Thanks for this tutorial, MartinL, extremely helpful. Now I can change the clock setup on my custom board with reckless abandon. :slight_smile:

Ops! I just realized I had included the same link twice...the link to the adafruit tutorial for compiling your own bootloader has just been updated above.

Thanks - this worked for me and saved me a lot of time.

Thanks MartinL for your great walkthrough.

I'm also in the middle of designing a custom board around the SAMD21, replacing the Atmega328P due to need of more Flash/RAM. After reading through all info pertaining to this topic there is still a missing piece in the puzzle I need help with: as you have done already the Falcon projects with "virgin" SAMD21 processors, can you point me in the right direction how to burn the bootloader to such a custom board?

Thanks !!!

Hi Protonerd,

To burn the bootloader on to the SAMD21, you need to connect a programmer such as the Atmel-ICE, (I use the Atmel-ICE Basic kit), to a 2x5 way, 1.27mm pitch, SWD connector on your board. (On the Falcon boards it's the small pin header located on the top right hand side, shown in the image on the previous page).

To program:

  1. Connect your programmer to your custom board, via the SWD connector.
  2. Plug in your custom board's USB into your PC.
  3. Plug in you programmer's USB into your PC.
  4. In the Arduino IDE Tools->Board menu, select your custom board.
  5. In the Arduino IDE Tools->Programmer menu, select the "Atmel-SAM-ICE" programmer.
  6. Again in the Arduino IDE Tools menu, select "Burn Bootloader".

After you've successfully burned the the bootloader, you can remove the programmer and thereafter program to board directly using the native USB port.

Thanks a lot, I will have a look at the programmers.

I also found one page which describes how to do it with another SAMD21 based board with breakout debug signals:
http://www.avdweb.nl/arduino/samd21/samd21-programmer.html

What do you think about it? Could it work that way? Can such a board replace an expensive programmer?

Can such a board replace an expensive programmer?

I just noticed that the cost of the Atmel-ICE Basic has doubled. (I paid about £35 for mine a couple of years ago).

The cheapest option might be to buy the ATATMEL-ICE-PCBA. It's just the bare Atmel-ICE ciruit board, although you'd have to make up your own SWD ribbon cable and supply the USB cable.

Another related question (sorry to bother you!), if you made a custom PCB for your flight controller, can you tell me where did you get the scematic/footprint model of the SAMD21 series? I'm using Altium, I had no problem finding the libraries for the AVR's, but I fail to sind the same for the SAMD21. The ones I found so far have the M3 cortex designs only...