I would like to build a 32x32 LED wall (under the inspiration of this project). I am good in programming and have a big experience in C and Python, but I'm newbie in electronics so I need your help.
First my question is about control 1024 LEDs. Would Arduino Due enough to control all 1024 LEDs?
Next question is about powering. If the wall will be quite a big (for example 2000x2000mm) wire length from first to the last led will be about 64 meters if I understand it correctly. Probably I need some addition drivers? So as I understand, I need to split strip into 5m pieces and power them in parallel, is it correct? Can it be 4m pieces? I have calculated that I need power supply that provide 310W or more, and I'm going to use 350W 5V power supply.
Also I want to control led using raspberry pi and I'm worried about UART, as I understand baud rate can be a problem as it limits bandwidth on 250k bit/s. Is there any alternatives? It is not clear for me why uart connection is used in the project I referred, could USB be used instead of UART?
Would Arduino Due enough to control all 1024 LEDs?
Yes, you could even do it with a Mega.
So as I understand, I need to split strip into 5m pieces and power them in parallel, is it correct?
No.
If the wall will be quite a big (for example 2000x2000mm) wire length from first to the last led will be about 64 meters
What matters is the distance between each LED because the data signal gets regenerated at every LED. So for your wall the LEDs will be about 32mm apart, which is fine.
You will still have to provide good power and ground wiring. For LED strips this means wiring the power and ground of the LEDs at the end and start of each strip, in parallel.
have calculated that I need power supply that provide 310W
Think of it more as current, that is what is important. So at 60mA per LED you get 62 Amps, which is a lot. You can use several power supplies to power smaller segments of the strips. Connect all the grounds for the power supplies together BUT not the 5V lines.
PetrMaliarov:
So as I understand, I need to split strip into 5m pieces and power them in parallel, is it correct? Can it be 4m pieces?
You can - if it suits - power different sections with different power supplies, or with a single supply.
What you need to understand is that the LED strip itself cannot carry a significant current. 32 LEDs corresponds to just under 2 Amps and you really want to feed current in about every 32 LEDs, so you will want two power cables (twin cable with at the very least, 2 mm2 copper section) paralleling down each end of the 32 LED strips and bridged across from one side to the other. If using multiple supplies, you may break the 5 V but not the ground to segment out the sections.
The data wires must always run adjacent to a ground from one strip to another. You will want to "zig-zag" the data connections to minimise distance so that the data out from the end of one row goes down to the data in of the next row directly below - the strips are run data-wise back and forth in alternate directions. The controlling library can manage this.
I'm doing 50 LEDs per section - yes, pushing the limits but it's for practical reasons, 100 LEDs on a single strip with only good access from both ends, two power supplies (power banks, rated 3A output). Works well, but shorter sections are recommended.
In your case you have 32x32 pixels, so that makes 32 LEDs per section a natural number. Note that while the data will zigzag up-down-up-down (or horizontal) through the strips, all power connections may be made from one side.
Add a 1000 uF capacitor to the power connection point of each strip.
Keep the heat those LEDs produce in mind when designing the enclosure. At full power that's a lot of heat coming off of them.
wvmarle:
Note that while the data will zigzag up-down-up-down (or horizontal) through the strips, all power connections may be made from one side.
Not recommended. But more particularly, where the data line goes from the end of one strip to the start of the next, the ground line must also accompany it. Essentially you should parallel the power down both sides.
Of course the grounds have to be connected (can do this on both ends - and even connect the 5V lines of the strip for those that are on the same power supply), other than that I don't see a difference with at which end the power itself is connected.
Thank you so much for your advise. I also read that it is recommended to put 220-440 Ohm Resistor on signal wire, do I need to use it? Have not found the purpose of it.
I also read that it is recommended to put 220-440 Ohm Resistor on signal wire, do I need to use it? Have not found the purpose of it.
I'm not exactly sure either, but the guys (and gals!) at Adafruit recommend it, and they actually use/experiment with the stuff they sell and I trust 'em.
I assume it's for "impedance matching". You've got some high frequency pulses and any ringing (from impedance mismatch) could mess up your data transmission. It will probably work without it and I'm sure you're not going to damage anything if you leave it out but including it might make your design more reliable. It's only one resistor (or one per "data channel") so it seems best to include it.
It's not shown on the WS2812 datasheet, but that datasheet seems a little "thin" to me.
For me in about half the cases it only works if I do not place that resistor there, using 330R normally, same problem with higher and lower values. Doesn't make sense to me, but still it happens. All LEDs remain off with the resistor in place; the moment I bypass it the LEDs light and colour as they should.
Ok, thank you, so I will try with resistor and if it will not work just remove it. And what about the scheme I attached to previous message? Is it correct?
wvmarle:
For me in about half the cases it only works if I do not place that resistor there, using 330R normally, same problem with higher and lower values. Doesn't make sense to me, but still it happens. All LEDs remain off with the resistor in place; the moment I bypass it the LEDs light and colour as they should.
Are you using an Arduino Due?
That would be generating 3.3 V logic - the compatibility with the WS2812 which is running at 5 V would be marginal. If it is that touchy you need a level converter (74HCT14).
No, this is with a Nano running at 5V. Using 3.3V levels for a 5V device is always a bit borderline.
For some it works (perfectly, no glitches or so), for others not at all until I remove the resistor, after it works fine. Even 100R was too much for those. I haven't tried even lower resistance.
It was my first assumption when I read that every 5m have to be powered in parallel (I thought to power every 2.5 lines: 5 = 2+2+2*(1/2)). But currently I'm going to power every 2m strip in parallel. What arduino would be better to use for it Mega or Due? I guessed to use Due because it is a bit faster, but conversion 3.3v to 5v looks tricky.
PetrMaliarov:
What arduino would be better to use for it Mega or Due? I guessed to use Due because it is a bit faster, but conversion 3.3v to 5v looks tricky.
From what we know about your project, one output pin will be required. So to use Mega or Due would be very wasteful, because these Arduino have many pins.
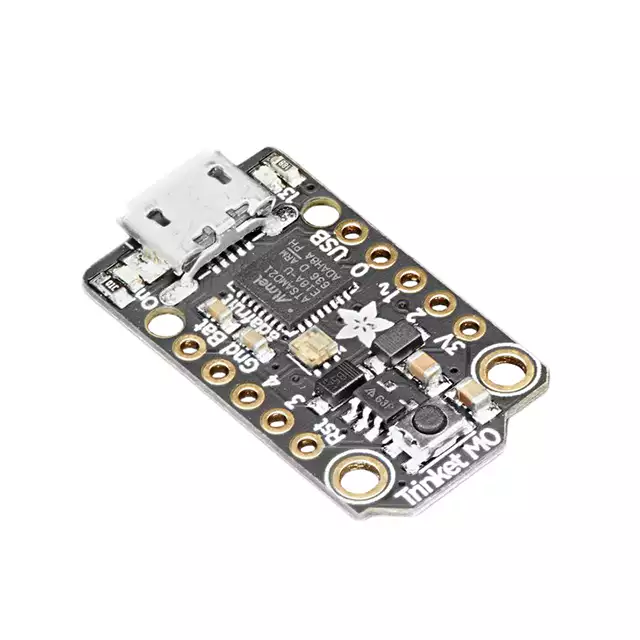
I could suggest an AdaFruit Trinket M0. I have not used one myself, but it seems appropriate for your project. The Trinket M0 has a special pin for driving led strips, so you would not need to convert the 3.3V to 5V. EDIT: The ItsyBitsy M0 has this special pin.