using serial monitor sending data to Arduino Mega from a text file OSLOOMPROJECT

I have develop a computerize loom from scratch, made with a Venetian blind and 16 servo motors that move the shafts to define the design of the weave.

you can see the Loom at

I am using the following sketch to move the servos using serial monitor and imputing by hand the values to move the servos
the following sample is for three servos but I will be using the same for 16 servos

 #include <Servo.h> 
    String readString, servo1, servo2, servo3;
    Servo myservo1;  // create servo object to control a servo 
    Servo myservo2;
    Servo myservo3;

    void setup() {
    Serial.begin(9600);
    myservo1.attach(1);  //the pin for the servo control 
    myservo2.attach(2);
    myservo3.attach(3);
   
    }

    void loop() {}

    void serialEvent() {
    while (Serial.available()) {
    delay(2);  
    if (Serial.available() >0) {
     char c = Serial.read();  //gets one byte from serial buffer
     readString += c; //makes the string readString
    } 
    }

    if (readString.length() >0) {
     Serial.println(readString); //see what was received

     // expect a string like 07002100 containing the two servo positions      
     servo1 = readString.substring(0, 2); //get the first two characters
     servo2 = readString.substring(2, 4); //get the next two characters 
     servo3 = readString.substring(4, 6);
     Serial.println(servo1);  //print ot serial monitor to see results
     Serial.println(servo2);
     Serial.println(servo3);

     int n1; //declare as number  
     int n2;
     int n3;

     char carray1[6]; //magic needed to convert string to a number 
     servo1.toCharArray(carray1, sizeof(carray1));
     n1 = atoi(carray1); 

     char carray2[6];
     servo2.toCharArray(carray2, sizeof(carray2));
     n2 = atoi(carray2);
     
    char carray3[6];
     servo3.toCharArray(carray3, sizeof(carray3));
     n3 = atoi(carray3); 

     myservo1.write(n1); //set servo position 
     myservo2.write(n2);
     myservo3.write(n3);
   readString=""; will read the next string 
   
   
 } 
}

So if I imput and enter in the serial monitor;
000000 the three motors will move to position 0 degrees
if I imput:
001500 the second motor will rotate 15 degrees the other 2 will stay at 0

One of the more simple weaves it is called "plain width" and will need to repeat only two sequences to be completed:
sequence 1; 001500
sequence 2: 150015

Question?
How and where can I store these two sequences so when I press enter in the serial monitor takes and executes the first sequence only, if I press again enter will take and execute the second sequence, and if I press enter again would go backwards and execute the first sequence, and so on.

I have been looking at serial monitor tutorials and how to read text files and upload them to the Arduino as I will be working with more complicated and long sequences of numbers.

I come from a design background and, to be honest, I am finding it difficult to understand and apply some of the codes that I have seen browsing the subject. I do not know where the sequences could be store, how to store them in the buffer, how to let the serial monitor know the number of characters that i want to upload every time I press enter, how can I go forward or backwards through the sequences

I will really appreciate some help
Thanks

How and where can I store these two sequences so when I press enter in the serial monitor takes and executes the first sequence only,

Nowhere. The Serial Monitor application isn't capable of doing that. You need to write your own PC application with the capabilities you want.

This is something I am interested in but my broadband is too slow right now to see your video. I will bookmark it to view in the morning.

Have look at Serial Input Basics - simple reliable ways to receive data.

Also, this Python - Arduino demo should provide a basis for developing a PC program to send instructions to the Arduino.

...R

Not "immediate" answers to exactly what you asked, but...

By the way... throughout, "^" is just another character. I could have used "a" or "7" or anything else. It is just a code for "and that's all for this line" (Or, three together, in second program, "job done; stop."

If it were me, I would write two Arduino programs...

The first would be for "simple" cloth...

And the data sent to it would look like....

0305^
00150015001500150015^
15001500001515001500^
00151500001515000015^

Which would "say"... we want to weave a pattern that has 3 sub-patterns, repeated over and over for as long as you want the piece of cloth to be.... and that there are 5 warp (weft?) strings/ solenoids to be lifted (or left down).

The "^"s are there so that the program can check that no character has been read twice or missed out. Just a little "insurance" against mis-reads of the serial stream.

The two "set-up" numbers and the three pattern code strings would be sent to the Arduino via the serial link, and stored in variables for reference and re-reference for as long as you wanted the loom to weave that pattern.

===
The other program would be for weaving tapestries. (Other programs (for big computer) could be written to turn a digital image into a loom command file, by the way.)

The data for them would NOT be held in the Arduino... it would require a stream of pattern lines, one after the other, from the big computer.

The first line would just say how many warp lines are being used for this project.
Then there would be many, many lines.... one for each row of the finished tapestry, and finally a line saying just "^^^", to "say" "That's it, job done."

For development, those lines could be supplied to the serial monitor "by hand", copy/pasting from a text file. It would be quite easy (if you know how... sorry!) to replace that cumbersome process with something more elegant in due course. You wouldn't be painting yourself into a corner.

So, the data might look like...

4^
150015001500150015^
001500001515001500^
151500151515000015^
150000001500150015^
001500001515001500^
151500151515000015^
150015001515150015^
001500001515001500^
151515001500000015^
^^^

===
Writing programs is chicken and egg. You need a plan to write a program. Above I've set out GOOD plans, which are very "do-able". AND you need to know how to write what you want, having first been careful not to want something that can't be written. Of course the trick for beginners is to know what CAN be written. The more you program, the less you get caught.

It's a bit like...

Wisdom is what you have after you've had experience.
And grief is what you get while having the experiences which will lead to wisdom.

A suggestion. Not the "best" or "ultimate" answer.... but a step along the way.

For now, forget about anything other than textiles created by doing a few, say up to 5, patterns... and then doing them again, and again, and again....

And put the patterns directly into the Arduino code.

What follows is NOT "proper" Arduino code... it will need cleaning up, getting "perfect", but I hope it will give the idea.

Besides everything obvious that you've already got hooked up, I need you to connect another switch. Where see boGoSwitch, you need to have created a little funtion which returns true when the switch is in the position that means "Go! Do it! Get Weaving!"

As written, there would be 3 patterns which would repeat over and over...

There are "clever" ways to avoid all the "ifs". Use them if comfortable. Leave til later if not familiar.

"mod 2" always gives 0, 1 or 2 as an answer.

The DoRow procedure you would write. It would lift the solenoids as necessary, and wait til weft (warp?) thread pulled through.

iRowsAcross is where you tell the program how many warp (weft?.... solenoids) are used for the cloth in question.

setup()
{
int iRowsDone=0;
int iRowsAcross=5;
}

loop()
if boGoSwitch
{
bTmp=iRowsDone mod 2;
if bTmp==0 then DoRow('0015001500');
if bTmp==1 then DoRow('1515001500');
if bTmp==2 then DoRow('1500000015');
inc(iRowsDone);
}

Question?
How and where can I store these two sequences so when I press enter in the serial monitor takes and executes the first sequence only, if I press again enter will take and execute the second sequence....

It CAN, actually, be done more or less as you describe... but not easily!

First of all, instead of "press enter", I would wire a button to the Arduino to say "do next", over and over.

Start with a program which will always have just TWO sequences, repeated. You COULD set things up to send "how many steps in pattern before it is time to repeat" to the Arduino from the serial monitor... but it would be messy. Easy enough to do a few variations on a SIMPLE program, each variation dedicated to doing patterns with a particular repeat number.

... and then have it go back and execute the first sequence, and so on.

This is easy if your program only ever does two sequences, i.e. repeats after second. (Most of what you need in in one of my other posts). And it is easy to have several versions of the program.

Once that much is working, it wouldn't be TOO hard to go back, modify the program to read one more byte from the serial monitor, right at the start of the stream of commands, and have that determine how many sequences to do before going back again to first one.

By the way... number things, and count FROM ZERO. So: the first pattern is "pattern 0" and the last one, when there are two sequences repeated over and over is "pattern 1". Seems odd at first, but has advantages which will become clear. And isn't so very hard to Just Do in the meantime.

You'd store the sequences in variables in the Arduino.

tkbyd:
Not "immediate" answers to exactly what you asked, but...

By the way... throughout, "^" is just another character. I could have used "a" or "7" or anything else. It is just a code for "and that's all for this line" (Or, three together, in second program, "job done; stop."

If it were me, I would write two Arduino programs...

The first would be for "simple" cloth...

And the data sent to it would look like....

0305^
00150015001500150015^
15001500001515001500^
00151500001515000015^

Which would "say"... we want to weave a pattern that has 3 sub-patterns, repeated over and over for as long as you want the piece of cloth to be.... and that there are 5 warp (weft?) strings/ solenoids to be lifted (or left down).

The "^"s are there so that the program can check that no character has been read twice or missed out. Just a little "insurance" against mis-reads of the serial stream.

The two "set-up" numbers and the three pattern code strings would be sent to the Arduino via the serial link, and stored in variables for reference and re-reference for as long as you wanted the loom to weave that pattern.

===
The other program would be for weaving tapestries. (Other programs (for big computer) could be written to turn a digital image into a loom command file, by the way.)

The data for them would NOT be held in the Arduino... it would require a stream of pattern lines, one after the other, from the big computer.

The first line would just say how many warp lines are being used for this project.
Then there would be many, many lines.... one for each row of the finished tapestry, and finally a line saying just "^^^", to "say" "That's it, job done."

For development, those lines could be supplied to the serial monitor "by hand", copy/pasting from a text file. It would be quite easy (if you know how... sorry!) to replace that cumbersome process with something more elegant in due course. You wouldn't be painting yourself into a corner.

So, the data might look like...

4^
150015001500150015^
001500001515001500^
151500151515000015^
150000001500150015^
001500001515001500^
151500151515000015^
150015001515150015^
001500001515001500^
151515001500000015^
^^^

===
Writing programs is chicken and egg. You need a plan to write a program. Above I've set out GOOD plans, which are very "do-able". AND you need to know how to write what you want, having first been careful not to want something that can't be written. Of course the trick for beginners is to know what CAN be written. The more you program, the less you get caught.

It's a bit like...

Wisdom is what you have after you've had experience.
And grief is what you get while having the experiences which will lead to wisdom.

Hi Tkbyd
Thank you very much for your post, yes I am an absolute begginer and I found the arduino programming difficult

for "simple" cloth...
the data sent to it would look like....

0402^//could be completed with only 4 sub-patterns, repeated over and over with 2 servos myservo1(would move half of the warp threads) and myservo2 (would move the other half)

0015^ servo 1 stays servo 2 rises (pass weft thread)
0000^ all motors that raised before go to 0 position (tuck weft thread)
1500^ servo 1 rises servo2 stays (pass weft thread)
0000^ all motors that raised before go to 0 position (tuck weft thread)

or with more servos

0404^//could be completed with only 4 sub-patterns, repeated over and over with 4 servos myservo1and 3(would move half of the warp threads 1/4 each) and myservo2 and 4 (would move the other half)you could add servos as long as they are in pairs
00150015^
00000000^
15001500^
00000000^

With my original sketch, I am already supplying to the serial monitor "by hand", copy/pasting from a text file. But I would like to replace that process with something quicker

"The four "set-up" numbers and the four pattern code strings would be sent to the Arduino via the serial link, and stored in variables for reference and re-reference for as long as you wanted the loom to weave that pattern" How can I implement this?

Question?
Do I need and event() to trigger sending the sequence to arduino (I need time to pass the weft and after when all servos go back to "0" I need time to comb or tuck the weft before the next sequence is executed, so will be ideal to communicate this to arduino through pressing a key (like I do now pressing sent in serial)

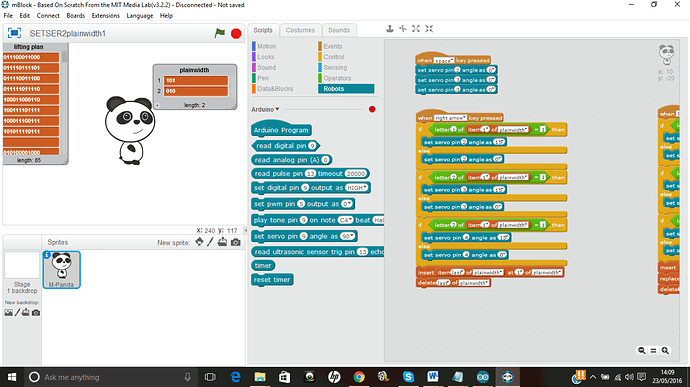
I have already programmed the sketch with a software called Mblock that interfaces with the arduino shield, but it is not working with more than 8 servos and I have 16 in my loom, please have a look at the sketch(picture), as you can see I can bring all the servos to "0" just pressing space key so that I save half of the sequences and the rotation of the servos is in my sketch not in the sequence
so my sequences will be reduced to "0" and "1" as you can see in plain width list, this will be easier to calibrate all servos on the sketch no on the input.
I have done quite challenging pieces of programming with this software and you can see how I generate the list for more complicated weaves at https://scratch.mit.edu/projects/110764955/
Thank you very much for your time and support

ignacioandcorral:
"The four "set-up" numbers and the four pattern code strings would be sent to the Arduino via the serial link, and stored in variables for reference and re-reference for as long as you wanted the loom to weave that pattern" How can I implement this?

Have you studied the links I gave you in Reply #2?

...R

Hi Robin2
Thank you very much for your post, I have been looking at the serial Input Basics link,I have try the end markers and upload some samples, but it seems that in all 5 samples the values have to be input one by one in the serial monitor do you think I could convert one into my sketch?

I have open and upload your ArduinoPC.ino but I don't know how to input things in the serial monitor I have try with markers and other numbers but I do not see any info printed back into my serial monitor, I have not attached a led in pin 13

Have a look at the sketch that I want to achieve, is in the picture, I think I need communication with arduino through keys, now by pressing enter I input the value for rotation and if I press enter again and the serial is empty all my servos go to "0" I would like to be able to press space key for instance and go to next sequence in a list, or if I press a left arrow goes backward and right goes forward through the list
Thanks Robin2

Image from Reply #8 so we don't have to download it. See Image Guide

...R

I can't make sense of that image at all. It is nothing like a program I am familiar with. Where did it come from?

What I have in mind is that you make a text file on your PC with a separate line for each instruction and then use a modification of my Python program to read the text file and send the instructions line by line to the Arduino.

I don't understand what you mean by this

I have open and upload your ArduinoPC.ino but I don't know how to input things in the serial monitor I have try with markers and other numbers but I do not see any info printed back into my serial monitor, I have not attached a led in pin 13

Did you also run the associated Python program on your PC? If you are using Windows or MAC you will need to change it a little to refer to the appropriate serial port.

...R

Robin2:
I can't make sense of that image at all. It is nothing like a program I am familiar with. Where did it come from?
...R

It is a program called scratch for children to learn programming in an easy an intuitive way that can be interface with arduino and executes programmes, but it is not very robust It didn't work for me with more than 8 servos, no good for robots, but I have programmed complicated task with it like a weaving list generator you can see how I generate the list for more complicated weaves at https://scratch.mit.edu/projects/110764955/

Robin2:
What I have in mind is that you make a text file on your PC with a separate line for each instruction and then use a modification of my Python program to read the text file and send the instructions line by line to the Arduino.
...R

This sounds good I have already the text files, but I did open your file with notebook and uploaded into arduino without the Python associated program,
Could you think of an easier way to run text files on arduino, I feel like you with the above program I can't make sense of the arduino codes and I have never look into Python, would I have to download Python 3.6 or 3.5 ? and them open your file ComArduino2.py

My program was written with Python 2.7

If you are more familiar with another PC programming language it should not be too difficult to apply the concept in the Python code in that language.

I don't know an easier way to do it.

...R

Sorry.... this comes at a time when "other stuff" is making demands. Apologies if how quickly I've scanned recent contributions becomes clear... but...

In my replies, I was, I now suspect wrongly, assuming that EACH thread that needs lifting or being left unlifted (are there more than two states? by the way) needed it's own servo.

Of course, I now see, that there are ways to have one servo lift a GROUP of threads. If you look again at some of what I wrote, maybe bits will become clear which weren't clear when you didn't know how little I understood looms!

Also, in same vein: I imagine that you "got" this, but, just in case.... I was thinking of a REALLY simple cloth when I spoke of "simple" cloth... hence my belief that it could be done with two patterns, repeated over and over. Perhaps pretty lousy cloth?

Will try to look more closely at what has gone before if I can steal time.

for "simple" cloth...
the data sent to it would look like....

0402^//could be completed with only 4 sub-patterns, repeated over and over with 2 servos myservo1(would move half of the warp threads) and myservo2 (would move the other half)

0015^ servo 1 stays servo 2 rises (pass weft thread)
0000^ all motors that raised before go to 0 position (tuck weft thread)
1500^ servo 1 rises servo2 stays (pass weft thread)
0000^ all motors that raised before go to 0 position (tuck weft thread)

Yes! If you really need to put them all back to zero, first, each time, and THEN do the next "lift one", then this is exactly right.

DO you need to say "everyone back to zero"?

If you say....

First.... 0015

Now.... 1500

.... as the loom "moves to" 1500, the second servo WILL GO to zero, won't it? After the first state, "first servo down, second servo up", do you need the second servo to finish going DOWN before the first servo starts going up??

I now see... since what I wrote in previous reply, that your simple cloth is also "just two patterns", at the end of the day. I don't think you need to "spell out" in such detail the servo positions. But it may be to do with details of the weaving which I don't understand.

Things you've said made me understand that I needed more in my answer which had...

The DoRow procedure you would write. It would lift the solenoids as necessary, and wait til weft (warp?) thread pulled through.

In "DoRow", that "wait til weft..." bit could be taken care of by looking at the signal that the "GoSwitch" provides.

Let's say that it goes HIGH when you press it. (It doesn't matter which way you wire it up... but you have to keep it clear in your mind as you write the software!!)

boGoSwitch would be programmed to return "true" when the switch was pressed.

AND... this is the bit I forgot, previously...

.... inside DoRow, there would be code to KEEP you IN the DoRow subroutine until boGoSwitch returned false again, i.e. until you released the button.

This is how you keep it from going at a silly speed. Give yourself time to "throw" the shuttle, comb or tuck the weft, etc, and then YOU tell the loom you are ready for what's lifted to go on to the next stage.

(Having "nothing lifted" stages between the "some things lifted" stages is no big deal at all.)

As for....

"The four "set-up" numbers and the four pattern code strings would be sent to the Arduino via the serial link, and stored in variables for reference and re-reference for as long as you wanted the loom to weave that pattern" How can I implement this?

The good news is: It CAN be done. And suggestions to date would all move you towards that ultimate goal.

First, though, get the loom working with just the program in the Arduino, "programmed" into it... and change the program, when you want to change what is woven.


Secondly...

I have already programmed the sketch with a software called Mblock that interfaces with the arduino shield, but it is not working with more than 8 servos and I have 16 in my loom.../quote]

Mblock MAY be a good starting point. Gives users the idea of what a program is, etc. Helps them by holding hand, making it hard to write something that just doesn't make sense.

But... as you pointed out... there will be limits.

The "raw" Arduino language IS a LITTLE strange at first... but I'd rather put my energies into something that, while strange, once mastered won't have limits. I will be able to do ANYTHING.

And it really isn't SO arcane, difficult, once you get the hang of it.

tkbyd:
DO you need to say "everyone back to zero"?

If you say....

First.... 0015

Now.... 1500

.... as the loom "moves to" 1500, the second servo WILL GO to zero, won't it?

Hi tkbyd
yes I need all motors in resting position or "0" to tuck the weft back to meet closely the previous threads in the fabric
Let me update you with my progress I have download Realterm, a Serial Terminal software for Windows, and I am managing to sent two sequences to arduino and can press "o" and all motors go resting
small steps

tkbyd:
In "DoRow", that "wait til weft..." bit could be taken care of by looking at the signal that the "GoSwitch" provides.

Hi tkbyd
so this "DoRow" procedure looks interesting what we have agreed so far is that the following is OK:
setup()
{
int iRowsDone=0;
int iRowsAcross=2;//Number of motors
}

loop()
if boGoSwitch
{
bTmp=iRowsDone mod 04;// number of pattern to be repeated
if bTmp==0 then DoRow('0015');
if bTmp==1 then DoRow('0000');
if bTmp==2 then DoRow('1500');
if bTmp==3 then DoRow('0000');
inc(iRowsDone);
}

}
//is this correct?
// if it is correct how can I introduce this in my original sketch

My original sketch was for three motors I have changed to 2 motors now so that you can show me how to mix both together I try myself and I get an error uploading it says boGoSwitch is not in the scope
My sketch for two motors would look like this

#include <Servo.h>
String readString, servo1, servo2;
Servo myservo1; // create servo object to control a servo
Servo myservo2;

void setup() {
Serial.begin(9600);
myservo1.attach(2); //the pin for the servo control
myservo2.attach(3);

}

void loop() {}

void serialEvent() {
while (Serial.available()) {
delay(2);
if (Serial.available() >0) {
char c = Serial.read(); //gets one byte from serial buffer
readString += c; //makes the string readString
}
}

if (readString.length() >0) {
Serial.println(readString); //see what was received

// expect a string like 07002100 containing the two servo positions
servo1 = readString.substring(0, 2); //get the first three characters
servo2 = readString.substring(2, 4); //get the next three characters

Serial.println(servo1); //print ot serial monitor to see results
Serial.println(servo2);

int n1; //declare as number
int n2;

char carray1[4]; //magic needed to convert string to a number
servo1.toCharArray(carray1, sizeof(carray1));
n1 = atoi(carray1);

char carray2[4];
servo2.toCharArray(carray2, sizeof(carray2));
n2 = atoi(carray2);

myservo1.write(n1); //set servo position
myservo2.write(n2);

readString="";

}
}
tdbyd please be explicit, how can I mix the two together?