Write-Up: Adding MIDI Control to a Guitar Effects Pedal

Adding MIDI to a Tech21 SansAmp Pedal

I recently completed a project where I added MIDI preset recall capability to a guitar effects pedal, and thought I’d do a write up so others may benefit from it.

First off, I have to give a big THANK YOU to both allanhurst and Grumpy_Mike. These two guys were extremely helpful, and certainly instrumental in the success of this project.

The full details on the project are located here: Virtual, variable resistors, with saved presets recallable by MIDI - General Electronics - Arduino Forum although I thought a more organized write up would be helpful to future searchers looking to do something similar.

My goal was to add MIDI preset functionality (ie: saving and recalling presets by MIDI) to a Tech21 SansAmp British effects pedal. This pedal is designed to emulate an amplifier, for use in running a guitar pedal board direct to a PA.

Here is the pedal I modified:

And here’s a look at the end result:

On the left side of the pedal, the ¼ output and power cables are original, but I added the 1/8” jack at the top for the MIDI input signal.

On the ride side, the ¼” input cable is original, but I added the RJ45 jack, and also (what you can’t see in the picture), I cut a hole so the USB port of the Arduino can be accessed without opening up the pedal.

These are the essential main parts of this project:

  • Arduino for interfacing and running the program

  • I used an Adruino Nano

  • Analog potentiometers (POTs) for user input

  • I planned to use the existing POTs, but needed to replace them due to damage. I used 100k linear POTs, as that's what was in the pedal

  • Digital potentiometers (Digi-POTs) for interfacing with the pedal’s electronics

  • I used some MCP41100 ICs for this

  • An opticoupler for interfacing with the MIDI network

  • I used a 4N35 which came with this Arduino breadboard kit

  • Power source for powering the Arduino and added components

  • I ended up needing to build a power supply to keep everything noise free

  • LCD display and a rotary encoder for navigating, storing, and recalling presets

  • I used this Rotary Encoder, which has a push button built in, for preset navigation, saving and storing.

  • I used an Adafruit 4 Character, 7-Segment Display with I2C Backpack, for the display. I opted for blue, but there are other colors available.

  • And I used this project box to house the rotary encoder and display; since the SansAmp pedal enclosure isn’t large enough to house everything.

I wanted the pedal to be functional without anything external connected, so I needed to fit the Arduino, the Digi-POTs, the Opticoupler, and power supply all inside the SansAmp pedal’s enclosure.

I used prototype boards from This Kit to create boards to install inside the enclosure.

Main Arduino Board

Here is the 1st board with the Arduino, the Digi-POTs, the opticoupler, a diode, and some resistors all mounted.

The 6 wires on the left side are the Digi-POTs outputs, and you can see the 1/8” jack for MIDI input under those wires, if you look closely.

The wiring is all on the underside of the board:

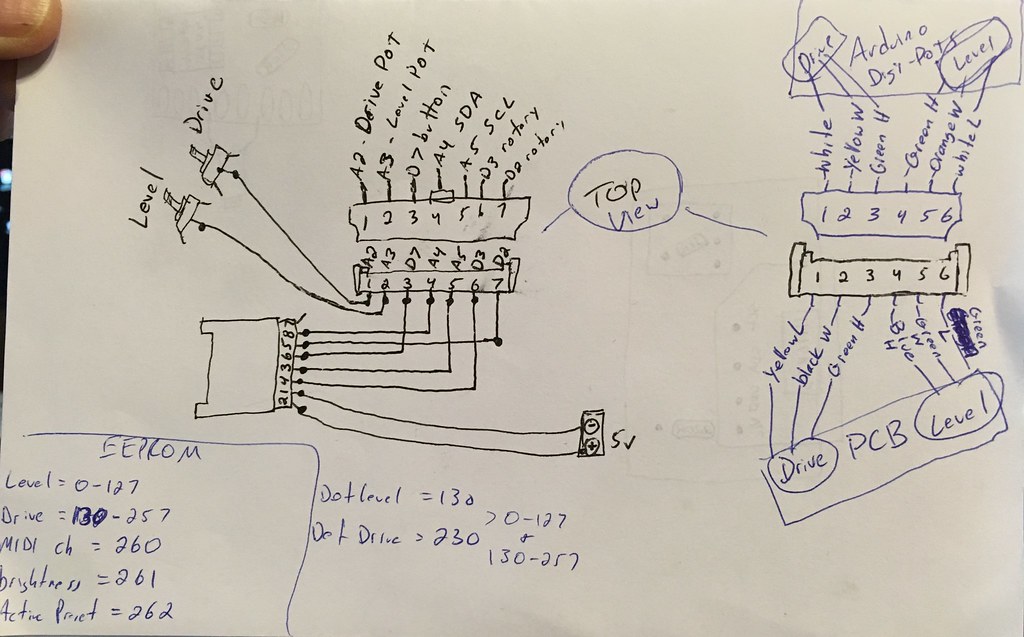
And here is how the components are connected:

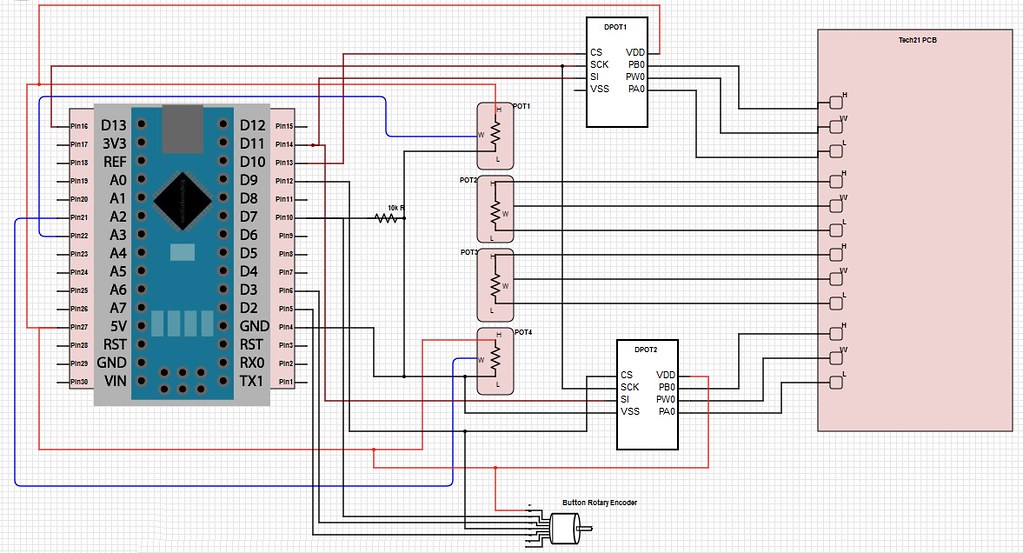
The Digi-POTs follow the above connection points. Notice the 4 analog POTs in the diagram. These relate to the LEVEL, MID, CHARACTER, and DRIVE knobs on the pedal. I only added preset capability over the LEVEL and DRIVE knobs though; but left all 4 in the diagram for a more complete understanding of how it’s all wired up.

So you’ll notice the 1st and last POTs are connected to the arduino, while the middle two continue to connect to the pedal, since I didn’t change those.

And here is how the Opticoupler is wired on the board.

(Image taken from this InvisibleCraftsLabs Instructable)

I added a 1/8” jack for the MIDI input, instead of using a 5 pin DIN connector. I did this due to space constraints, and since only 2 wires are needed for MIDI input, it made sense. If you want to do MIDI in, out and/or through … then you’ll need more wires and possibly the 5 pin DIN connector.

Power Supply Board

For the power, I didn’t want to add an additional power connection to the pedal, and wanted to tap into the existing 9v supply the pedal uses. I tried powering the Arduino and the other added components several different ways, of which all resulted in extreme noise on the guitar’s audio signal when it passed through the pedal. Allan (referenced above) helped greatly with this, and designed this power supply for me:

And here it is, worked up on the 2nd prototype board for installation inside the pedal’s enclosure:

Essentially, this power supply steps the voltage down from 9v to 5v, by shifting the positive side by 2v and also shifting the negative side by 2v, landing at 5v but keeping it centered around the 9v supply. Doing it this way completely eliminated the noise on the guitar signal, and allowed me to tap into the existing 9v supply inside the pedal.

Here is a look at the power supply laid out on a breadboard, just because it makes it easier to see how everything is connected. I did add a 100uf capacitor to the design (based on recommendation from Allan) to further protect against noise on the power bus.

Since the TLC2262/2 opamp is dual channel, only one is needed here. One channel is used for the positive side and the 2nd channel is used for the negative/ground side.

Breakout Box

For user control of the presets, and adding the display … I opted to create a small breakout box and used a network cable to connect it to the SansAmp pedal.

I used another prototype board to mount the rotary encoder and display onto, then mounted that board inside the project box. I also added the RJ45 jack to it, for connecting to the pedal.

EDIT: Since writing this, I've created a short sketch to seed EEPROM data to an Arduino. I've also added other functionality which can be read about below. Find the latest .ino version further down in this thread

I've added another attachment to this post, "eeprom_seed.ino", which when run, will seed the EEPROM of an Arduino with the appropriate data for preparing it for the MIDI Control Sketch.

SansAmp_MIDI_Control_v5.ino (24.3 KB)

eeprom_seed.ino (2.93 KB)

1 Like

Putting it all Together

So now that the design is implemented on the prototype boards, I moved to fitting them inside the pedal’s enclosure.

Here is how the 4 pieces connect to each other. The Arduino board with Digi-POTs and opticoupler (top center), the breakout box with rotary encoder and display (bottom left), the power supply (bottom center), and the SansAmp pedal (bottom right).

Notice the 220 ohm resistor on the Vcc line of the display’s input. Without this resistor in place, the display being connected to the Arduino caused the analog readings of the DRIVE and LEVEL potentiometers to be very erratic. I tried several different strategies for cleaning up the noise, but none seemed to work. Eventually, I settled on the resistor which has been rock solid.

Apparently the noise is due to the HT16K33 IC control chip causing fluctuations on the 5v supply, and since the Arduino relies on the 5v signal as a reference point for reading the position of the analog potentiometers, any fluctuation here causes erratic readings.

Here is how the boards installed into the pedal:

Notice I added an RJ45 jack, and some header pin connectors to the power supply board. The RJ45 jack is for connecting to the breakout box, and the header pin connectors are to make it easy to remove and reinstall the boards when/if needed.

In the above picture, you can see a momentary button at the top. This is a “normally closed” button, which is connected to the RX1 pin of the arduino and the opticouplers output. I did this because the MIDI in uses Serial 0, and since the Arduino Nano only has one serial bus, I cannot use the serial monitor when the MIDI input is connected to the RX pin. I added this button so I can use serial monitor for debugging the code when needed. I just have to hold the button in (to disconnect the MIDI input to the serial bus) when using serial monitor. Obviously this isn’t needed unless using serial monitor is desired on an Arduino with only one serial bus.

The final piece was cutting the holes in the pedal enclosure to fit everything.

Here is the final fitment of the right side, with the RJ45 jack, and the hole for the USB access:

And the final fitment of the left side, with the 1/8” jack added for MIDI input:

Because the Arduino, Digi-Pots, opticoupler, and power supply are all within the pedal, it functions just fine without the breakout box connected.

So I can use the pedal in 3 ways:

  • With the breakout box and MIDI connected for manual operation and complete preset capability (storing, recalling manually VIA button, and recalling VIA MIDI program change).
  • Without the breakout box connected, but with MIDI for manual operation or just MIDI recall (presets can be recalled VIA MIDI program change message, but no display to show which one, and no way to manually recall or save a preset)
  • Without the breakout box or MIDI connected for complete manual control (ie: like OEM … just turn the knobs to what you want)

The Code

For the coding piece, I wanted the following functionality:

  • Ability to store and recall 128 presets, either manually, or VIA MIDI PC commands
  • When powered up, the pedal to recall the last preset which was in use when power was lost
  • Some visual indication of where the physical POT locations are in reference to the recalled values of a preset
  • DRIVE and LEVEL values to not update when turning the knobs until the knob crosses over the currently recalled preset value
  • Some visual indication of when an actively applied DRIVE or LEVEL value is different than what is saved for the currently recalled preset
  • Some visual indication when a preset is saved successfully and when a preset is recalled successfully

To save a preset, rotate the rotary encoder to the desired preset number, then press and hold the rotary encoder button for 3-4 seconds to save the LEVEL and DRIVE values to the selected preset. The preset number on the LED display will flash twice indicating a successful save.

To manually recall a preset, rotate the rotary encoder to the desired preset number, then short press the rotary encoder button to apply the LEVEL and DRIVE values from the preset to the Digi-POTs. The preset number on the LED display will flash once to indicate a successful recall.

To recall by MIDI, just send a MIDI Program Change (PC) message to the pedal, and the preset corresponding to the PC# will be recalled. i.e: send PC #6 to the pedal, and preset # 6 will be recalled. I've set the MIDI channel to channel #1, but did so using a variable due to future plans to make the MIDI channel user configurable.

When recalling a preset, the preset values are sent to the Digi-POTs and applied to the DRIVE and LEVEL parameters. If the user then turns one of the knobs, the knob's value is displayed on the LED display, along with an indicator showing if the knob's value is above or below the currently applied preset value. Neither the LEVEL nor the DRIVE's applied setting will be affected until the knob is turned to match the position of the currently applied value. It’s only then that the knob will begin to control the parameter in real-time. I did this to prevent sudden changes in tone when performing live and wanting to make an adjustment on the fly. Without this feature, as soon as you start to turn one of the knobs, the applied value jumps to wherever the knob is pointing. So if DRIVE is recalled at 5%, but the knob is pointed at 95%, as soon as you would turn it, the drive would jump causing an issue in the output volume.

After releasing the knob, the display will go back to showing the preset number currently recalled.

When the preset number is being displayed, a decimal point will light up if either the DRIVE or the LEVEL applied value is different than what is saved for the currently recalled preset. This allows you to see if the values you are currently uysing are the same as what is saved in the preset which is applied. The left decimal point lights up if the LEVEL value is different, and the right decimal point lights up if the DRIVE value is different.

So there it is … It’s been about a 3 week project, and I’m very happy with the result! I’ve attached the code here, in case anyone wishes to duplicate it. Although I still want to build a menu system to allow the user to set the MIDI channel, display brightness, and possibly add MIDI expression pedal control over the LEVEL and DRIVE parameters. I'm thinking if the rotary encoder button is held during power on, it enters the menu and allows adjustments, as I don't want to add another button to the setup.

Oh, and here it is, integrated into my pedal board (don’t mind the empty space … that’s for a MIDI controller which is on the way).

EDIT: I came across my header pin connector pin-outs, so thought I would share these as well

The left side is a 7 pin connector, bridging from the Arduino to the RJ45 and the wiper leads of the analog POTs. Notice I put the SDA signal on a twisted pair of the Cat6 cable by itself, as I had read somewhere to not mix it with clock or power signals.

On the right is a 6 pin connector, bridging the Digi-POT outputs with the pedal's OEM PCB (ie: where the analog POTs used to be connected).

The bottom left just outlines where values are being stored in EEPROM

1 Like

Great write up. I would consider putting a link to this post in the playground section of the forum so the post doesn't get lost as it moves down the list.

Excellent! I do the same kinds of projects e.g.:

EHX Pitch Fork Remote Control

So far I've kept away from using digipots to replace real pots that process the audio signal, and stuck to 'control' pots that are just voltage dividers feeding an analogue input to a micro.

Do the SansAmp pedal pots pass the audio signal? If so, did you have any noise problems?

Grumpy_Mike:
Great write up. I would consider putting a link to this post in the playground section of the forum so the post doesn't get lost as it moves down the list.

Thanks Mike, I couldn't have done it without you! I'll check out the playground and see where it makes sense to add a link.

gutbag:
Excellent! I do the same kinds of projects e.g.:

EHX Pitch Fork Remote Control

So far I've kept away from using digipots to replace real pots that process the audio signal, and stuck to 'control' pots that are just voltage dividers feeding an analogue input to a micro.

Do the SansAmp pedal pots pass the audio signal? If so, did you have any noise problems?

Nice work on the EHX pedal integration! And yes, the SansAmp pedal does pass the guitar audio through the POTs.

When I initially tested the Digi-POTs handling the signal, there was plenty of noise. I tried several things to address it, and the solution ended up being the power supply Allan designed for me.

From what I can gather, so long as the voltage being passed through the H, W, L pins of the Digi-POTs are within spec of the Digi-POT, and so long as the reference ground on both sides (ie: the voltage going through the H, L, W pins as well as the voltage going through the other pins of the Digi-POT) is equal, or both floating, noise isn't an issue. So in my case, because I wanted to use the incoming 9v supply for both the pedal and the Arduino setup, the power supply Allan drew essentially matched what is going on in the pedal.

I measured between 4.5v and 5.5v passing through the OEM LEVEL and DRIVE knobs of the pedal. So Allan surmised the pedal's power handing was dropping the 9v down to ~5, with a floating ground. So to compensate on the Arduino, his power supply drops the 9v down to 5v, but keeps it centered by dropping 2v on the positive side and 2v on the negative side. I think it was a guess on his part, but was a darn good one as it worked perfectly!

So the end result is no noise is injected in the signal. The Digi-POTs are handling it without an issue. Granted, I haven't played live for 2-3 hours yet, but have left it powered on here at home for extended periods of time, and haven't had an issue.

Good info - thanks. So I suppose that a digipot with a higher maximum Vcc e.g. 9V could be used (if such a thing exists) and everything would have the same 0V? Maybe they don't exist - I should look...

I can see how this allows the digipot to work, and the MIDI is opto-isolated so the shift doesn't matter, but I usually also need to drive analogue or digital inputs to micros and that might get tricky. I could use optos, I suppose.

Well, the way I understand it, the important spec is the relationship between Vdd and the voltage passing through resistor pins (H, L, W) with respect to the Digi-POT's (same as the Arduino's) ground. So taking a voltage measurement of Vdd & GND feeding the chip, and then also H & GND, L & GND, W & GND; using the GND on the chip, and comparing those.

I believe this is why reducing the 9v to 5v, and keeping it centered, worked. Whereas when I tried to reduce from 9v to 5v with a simple 7805 regulator I had issues. I did get 5v, but the noise was horrible. I assume due to the variance in the reference grounds and it causing voltage issue on the Digi-POT pins. The 4.5v and 5.5v I measured at the OEM POTs were probably centered on the incoming 9v. Whereas the 5v I was feeding the Vdd pin was shifted to one side. So the variance was most likely way off. In hindsight, I should have measured it.

The Vdd of the MCP41100 Digi-POTs I used have a Vdd operating range of 2.7v - 5.5v, and the resistor pins (H, L, W) have an operating range of 0v - Vdd.

That said, the listed absolute maximum specs are 7.0v for Vdd and -0.6v to Vdd+1v for the other inputs/outputs.

Of course, they provide the expected disclaimer of:

http://ww1.microchip.com/downloads/en/DeviceDoc/11195c.pdf:
MCP41100 Datasheet] Notice: Stresses above those listed under “maximum ratings” may cause permanent damage to the device. This is a stress rating only and functional operation of the device at those or any other conditions above those indicated in the operational listings of this specification is not implied. Exposure to maximum rating conditions for extended periods may affect device reliability.

So on my setup, I am sending 5v to Vdd (4.95v actually), and I measured between 4.5v - 5.5v on the H, W, L pins coming from the pedal's PCB. So I could be pushing the limit of the operational specs by passing Vdd+0.55v through the resistor pins at some periods of time.

I actually considered changing out the resistors in the power supply I built for the Arduino, to up the output to 5.5v instead of 4.95v. This would bring it into specs all the way around; since Vdd is rated to 5.5v, and then H, L, W would be Vdd or Vdd-1v. What I don't know is if all the other components (opticoupler, Arduino, analog POTs, etc ...) would all be safe at 5.5v. I'll run it like this for now though, considering it is quiet and working very well.

Not sure on using 9v for the Digi-POTs? Even if you found one with operational spec of 9v or more, wouldn't that mean the Arduino would need to be running on 9v too? I suppose you mean feeding 9v into the VIN pin on the Arduino if using 9v. Allan had some input on what that would mean in this sort of setup.

Here are the quotes from post #s 18 and 19 from the original thread:

Stoopalini:
I took a look at the Pro Mini specs, and saw this:

mini specs:
The Arduino Pro Mini can be powered with an FTDI cable or breakout board connected to its six pin header, or with a regulated 3.3V or 5V supply (depending on the model) on the Vcc pin. There is a voltage regulator on board so it can accept voltage up to 12VDC. If you're supplying unregulated power to the board, be sure to connect to the "RAW" pin on not VCC.

The power pins are as follows:

RAW For supplying a raw voltage to the board.
VCC The regulated 3.3 or 5 volt supply.
GND Ground pins.

So considering the bold statement, could I just connect the Mini directly to the incoming 9vdc jack on the side of the pedal and the integrated regulator will take care of stepping it down to 5v?

allanhurst:
Yes.... but....

If you do you MUST isolate the digipots running from the arduinos's +5 from the audio stuff with capacitors - 3 per pot - since their 0v will be 4.5 volts or so lower than the audio's '0v'.

And if any of those audio pots ARE handling dc, they won't work. Check with a DMM.

Allan.

Grumpy_Mike:
Great write up. I would consider putting a link to this post in the playground section of the forum so the post doesn't get lost as it moves down the list.

I added a link to this in the Playground, under the Audio | MIDI section.

gutbag:
Excellent! I do the same kinds of projects e.g.:

EHX Pitch Fork Remote Control

I added a link in the Playground to your EHX project as well, hope you don't mind :wink:

I've since added a menu to the code to enable the user to set the MIDI channel, and the brightness level. I just used some if() statements, and for() loops to do it. I know there are better ways to do this, but considering the menu only gets used once during power up (if desired), this was easiest for me to put together.

I've attached ver.6 to this post, which has the menu functionality.
(I've removed ver.6 from this post becasue ver.7 is below)

To use it: Hold the rotary encoder's button down during power up, then release when the display is powered up. The menu will be entered upon releasing the button.

The 1st menu item (identified by the number '1' in the 1st character position of the LED display) is the MIDI channel selection. Whatever channel is currently set will be displayed. Turn the rotary encoder to select the new channel, or leave the existing selection, and short press the encoder button to save it.

The 2nd menu item will then display (identified by the number '2' in the 1st character position of the LED display), and this is the display's brightness level. The current stored value will be displayed. Turn the rotary encoder to select the new value, and then short press to save it. The brightness will update real time as you turn the rotary encoder, so you can see the result.

After saving the brightness, the normal operating mode of the pedal will be entered.

Another change to the code: I added 2 more menu items: One to select expression pedal control, and another to select the CC number for the expression pedal control to listen on. I also went through and fully commented the code, as I had some parts missing in the previous version.

So the menu now functions like this:

When the arduino is booting up, hold the button down to enter the menu. The use the rotary encoder to make a selection for the current menu item, and press the button to store the selection. The menu auto-advances to the next item after making a selection.

When each selection is presented, it will display the currently applied value.

The menu is as follows:

1 = MIDI channel selection (1 - 16)
2 = Display brightness selection (0 - 15)
3 = Expression pedal parameter (0 = None, 1 = Level parameter, 2 = Drive parameter)
4 = Expression pedal CC number to listen (0 - 127)

The 4th menu option won't appear if the 3rd option is set to 0 (ie: if no expression pedal parameter is set).

Of course this latest version of the code also has the expression pedal being functional too. So when playing live, and recalling a preset, the values in the preset are applied. Then if the expression pedal is configured and you move the pedal, you will see the values being sent from the expression pedal to the effect pedal on the display (just like turning a knob). But, also just like turning a knob, those values won't be applied to the digi-POT outputs until the value crosses the threshold of the currently applied preset value. Again, this is to prevent sudden changes in the parameters when playing live.

If the expression pedal and the knob for the parameter it is controlling, are in two different positions, and you save a preset, it will save the value for the knob; not the pedal.

ver.7 attached

SansAmp_MIDI_Control_v7.ino (43.5 KB)

Great job! Just what I was looking for... info for setting up presets for rotary pots using digi-pots. Very detailed information and nice build! Thank you for sharing this project.

Did you ever fix the issue with the clicking/ticking when turning the physical pots?

I've read about putting decoupling caps and what not, but wanted to ask before hand!

doxasound:
Did you ever fix the issue with the clicking/ticking when turning the physical pots?

I've read about putting decoupling caps and what not, but wanted to ask before hand!

I didn't dig into it too much, as I only turned the POTs when making adjustments to save a preset. So when using it live, it really isn't an issue because I'm recalling presets.

If I remember correctly ... using an expression pedal in conjunction with the MIDI pedal assignment feature I added, didn't have the same clicking noise ... I'd have to plug it up and test though.

I've since purchased a Line 6 Helix processor for live use, so this Tech 21 pedal now sits on my shelf ... although it does work great, I just don't have a use for it anymore.

haha I'm still on the fence about the Line 6 stuff (mainly because of price), but man, I'm GASing for the HX Stomp =X

I'm a GE200 going direct, now, but the reverb/delay isn't great on it.

Anyway, with your write up, I was able to adapt this for 6 Digipots and got it working on a PedalPCB Arachnid I built:

https://www.instagram.com/p/Bp3IzfTHfV7/

Thanks for doing the preliminary and paving the way! high five

To anyone it might help, I should mention that the power supply in the original post did not work for my 6 pots. Instead I used a simple, Chinese step down module.

Thanks, again!

1 Like

Great job man! Looks like my code ported nicely to your setup 8) Right down to the "above" and "below" value indicators. So glad you were able to leverage what I did and make it work!

The Helix line is really, really good ... The HX Stomp would be a great centerpiece of a full board. I bought my Helix Floor on Reverb for $1050 used, then sold so many pedals, I actually made a couple hundred dollars in the end LOL.

I've thought about selling the Tech21 pedal, but it was such a labor of love, I just can't bring myself to do it ....

Interesting the power supply didn't work. It must be due to the reference points. Maybe the pedal you're working from has a different design than the Tech21 pedal has.

haha good to know about the Helix line! I may switch one day since I'm digging IRs and easy transportation haha

Yeah, I'm pretty sure it's because my circuit uses 3 or 4 pots as voltage dividers (3.3v) for the controls. Probably didn't like the power supply? shrugs haha

Good luck everyone!