In all my time building projects with Arduinos, nothing has been a more mind-breaking nightmare than trying to pair, bind, and link an HC-05 with an HC-06.
Trying to follow online bluetooth tutorials doesn't help because they are either outdated, ambiguous, or incorrect. No matter what, though, ALL of the current tutorials out there are extremely tedious - requiring all AT commands to be executed by hand.
THE GOOD NEWS:
You can use the attached sketch to automatically pair, bind, and link an HC-05 with an HC-06 in under 30 seconds. You don't need to learn any AT commands!!
Also, this sketch will work if you have multiple hardware serial ports (i.e. Mega) or if you need to use software serial ports (i.e. Uno) - one sketch to rule them all...
EDIT: The most recent code can be found here in the tutorial's Github Repo.
Pair_Link_Bind_Tutorial.ino (10.3 KB)
If all goes well, you should see something similar to this in your serial monitor:
<<<=====================================================================>>>
Put HC-05 into AT mode
Ensure Serial Montior line-ending is 'Newline'
Enter the desired name of the HC-06
<<<=====================================================================>>>
Entered name is: myBT
AT
OK
AT+ROLE=0
OK
AT+UART=9600,0,0
OK
AT+CMODE=0
OK
AT+PSWD=1234
OK
AT
OK
AT+NAMEmyBT
OKsetname
AT+BAUD4
OK9600
AT+PIN1234
OKsetPIN
AT+RMAAD
OK
AT+ROLE=1
OK
AT+RESET
OK
<<<=====================================================================>>>
Put HC-05 back into AT mode, press and hold the HC-05 button, and send 'OK' through Serial Monitor
MAKE SURE THE HC-05's BUTTON IS PRESSED UNTIL TOLD OTHERWISE!!!
<<<=====================================================================>>>
AT
OK
AT+CMODE=0
OK
AT+INQM=0,5,9
OK
AT+INIT
OK
AT+INQ
+INQ:A402:B9:29F454,A010C,7FFF
+INQ:98D3:31:FB8013,1F00,7FFF
<<<=====================================================================>>>
HC-05's button no longer needs to be pressed
Put HC-05 back into AT mode, press and hold the HC-05 button, and send 'OK' through Serial Monitor
MAKE SURE THE HC-05's BUTTON IS PRESSED UNTIL TOLD OTHERWISE!!!
<<<=====================================================================>>>
AT
OK
AT+INIT
OK
AT+RNAME?A402,B9,29F454
DESKTOP-3MD8VVS
AT+RNAME?98D3,31,FB8013
myBT
HC-06 found at address: 98D3:31:FB8013
AT+PAIR=98D3,31,FB8013,20
OK
AT+BIND=98D3,31,FB8013
OK
AT+CMODE=1
OK
AT+LINK=98D3,31,FB8013
OK
<<<=====================================================================>>>
HC-05's button no longer needs to be pressed - Modules shoud be paired! 
<<<=====================================================================>>>
One quick note: In order to put the HC-05 into AT mode, you must:
1.) Disconnect power to the module
2.) If your HC-05 breakout board has a "KEY" pin, set that HIGH (3v3) - if not, press and hold the tiny pushbutton on the top of the module
3.) Reconnect power to the module (5V for most breakout boards)
4.) Drive "KEY" pin low if "KEY" pin present - if not, let go of the pushbutton <--- Only disengage the "KEY" or pushbutton if the above program says you can, otherwise keep "KEY" high/pushbutton pressed until all AT commands that need your HC-05 in that configuration are done
Also, HC-06 modules can be put into AT mode at anytime - no buttons or extra pins required.
Lastly, the "EN" pin IS NOT THE SAME as the "KEY" pin. "EN" pin will "enable" (turn on and off) the module based on the pin's voltage level.
Currently working on making edits to the tutorial code so that it can also run on boards that do not have extra serial ports - one sketch to work nomatter what sort of board you have 
Good news folks!
I was able to get the softwareserial part of the tutorial working. Now you no longer need a Mega to run this tutorial, now you can use an Uno, a Nano, etc. The sketch attached to the original post has been updated with the new feature.
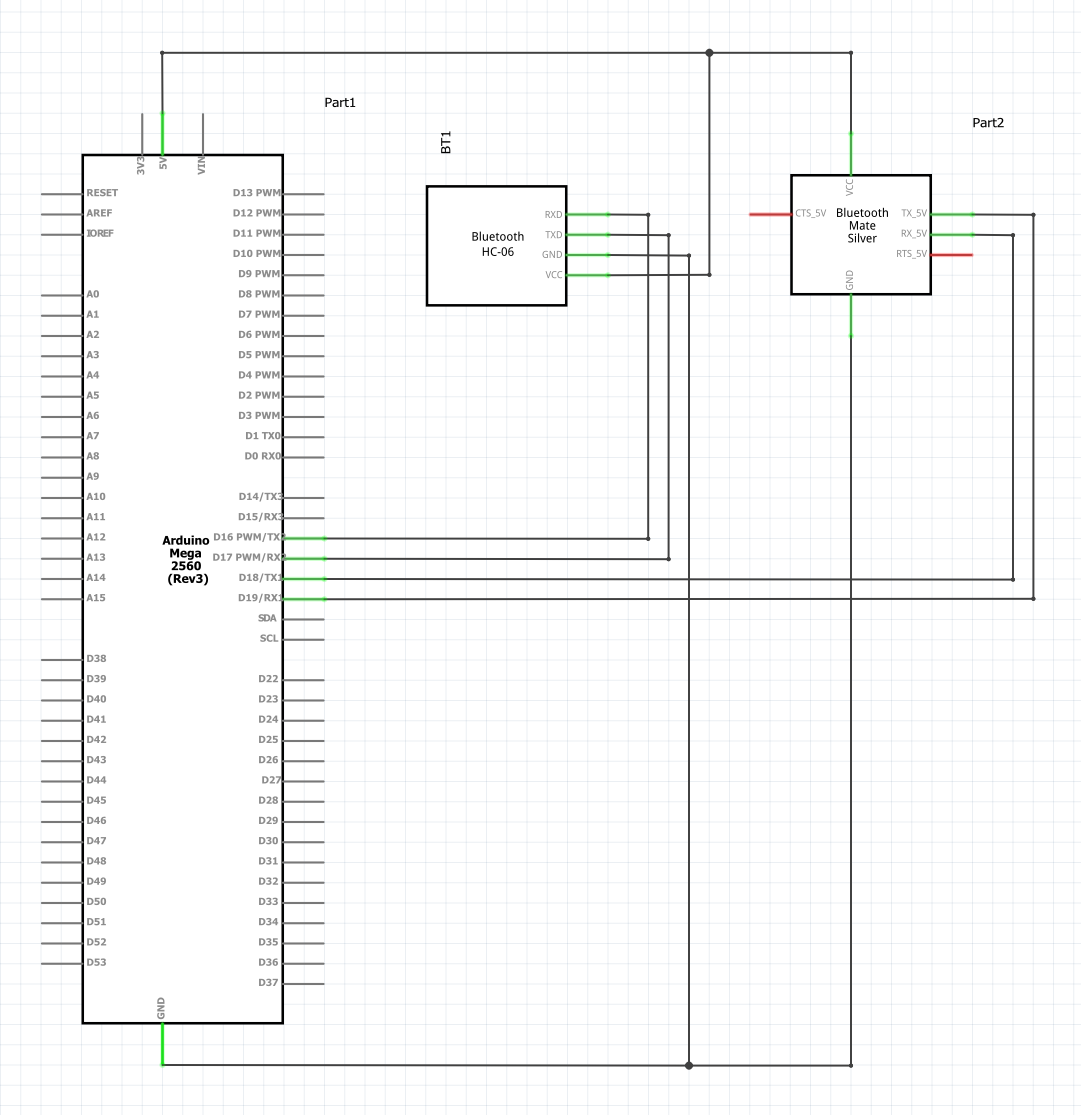
I had to update the sketch because the wiring directions in the header comments were incorrect.
Also, I made schematics for the wiring required for this tutorial:
Although it's usually advisable to use a level shifters or voltage dividers for the serial signal from the Arduino TX to the bluetooth RX pins, you really don't need them for this quick setup tutorial.
In order to understand what is going on in the tutorial code and for general AT command reference for both modules, the datasheets for both modules are attached below.
Bluetooth_HC-05.pdf (841 KB)
HC-06 datasheet 201104 revised.pdf (757 KB)
Made a Github repository for this tutorial - the most updated sketch for this tutorial will be found here.
As always, please let me know if you run into any problems or have any suggestions to improve or expand this tutorial.