I suggest having one function watch the switch and update a global flag/trigger variable when the switch goes HIGH to LOW.
Let a control function use that flag to decide what to do then clear the flag so the watch function has to set it only on HIGH to LOW event.
That way you have a reed switch watcher function to use in future code. One caveat though, this way only works if the sketch keeps void loop() always running and never delays that, never blocks execution of the functions in the sketch.
That is called non-blocking code and it is at the heart of all good Arduino automation. It starts with using millis/micros timers but also includes not running long for-next loops and the like but instead using void loop to walk through the steps.
It is not difficult, just different and what you get is the ability to make sketches that run as parts working together at the same time and not having to make big code structures to coordinate all the parts, but have them use variables to coordinate through, it shifts what you debug and makes that easier using print statements knowing the control variables to show.
It will help make smaller code with re-usable functions for your ow code toolbox slash bag of tricks you get right once and use forever (till you inprove them of course, then us those).
Nothing wrong with that code, something wrong with replies that insist there's a problem. Seems that some peeps don't get the point about transition as opposed to state so I try different words hoping they'll Get It.
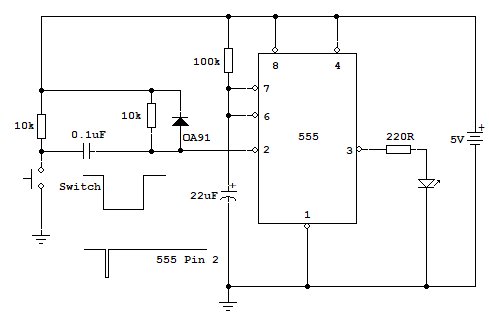
Came up with the following circuit using a 555 timer and a few bits.
Yellow LED is output but can be replaced by a relay up to around 200mA coil current I believe.
This circuit runs off 5v so if you need to interface further with a uC then ok.
Video shows it working.
Whoa, great site, I had no idea - thanks for the link! Best of all, my local electronics supply house has a clearance sale on Radio Shack breadboards right now.
the Nano controls when the motor is powered, not the switch. The Nano monitors the switch to determine when to turn motor off and uses a timer to determine when to turn it on, not the condition of the switch
Above runs the motor as soon as the input pulse is detected and allows magnet to move away from the switch.
I am fairly certain this is exactly what the Op required.
If you can see different, please show where the Op posted it for the rest of us.
Don't download libraries. Just use the IDE library manage3r and "Install" them. If it asks you to install the supporting libraries say YES. Then it's no issue at all.
Man! There are tenthousands of people that have successfully installied dozens of libraries with the library-manager. This proves that it works !
I believe you that it did not work for you. Still you must have done something wrong.
If you want really help there is no other way than that you describe in all details step by step what you did.
starting with
computer you use
operation system of your computer
the installation-path of your arduino-IDE
exact IDE-version that you use
and then making screenshots of each and every step
and if I write each and every step
I mean each and every step that you did.
Otherwise somebody would have to write a 1000 pages long tutorial what all could go wrong.
It will be much easier if you simply document all the steps how you tried it.