Newbie just tsrating, need help with a sketch

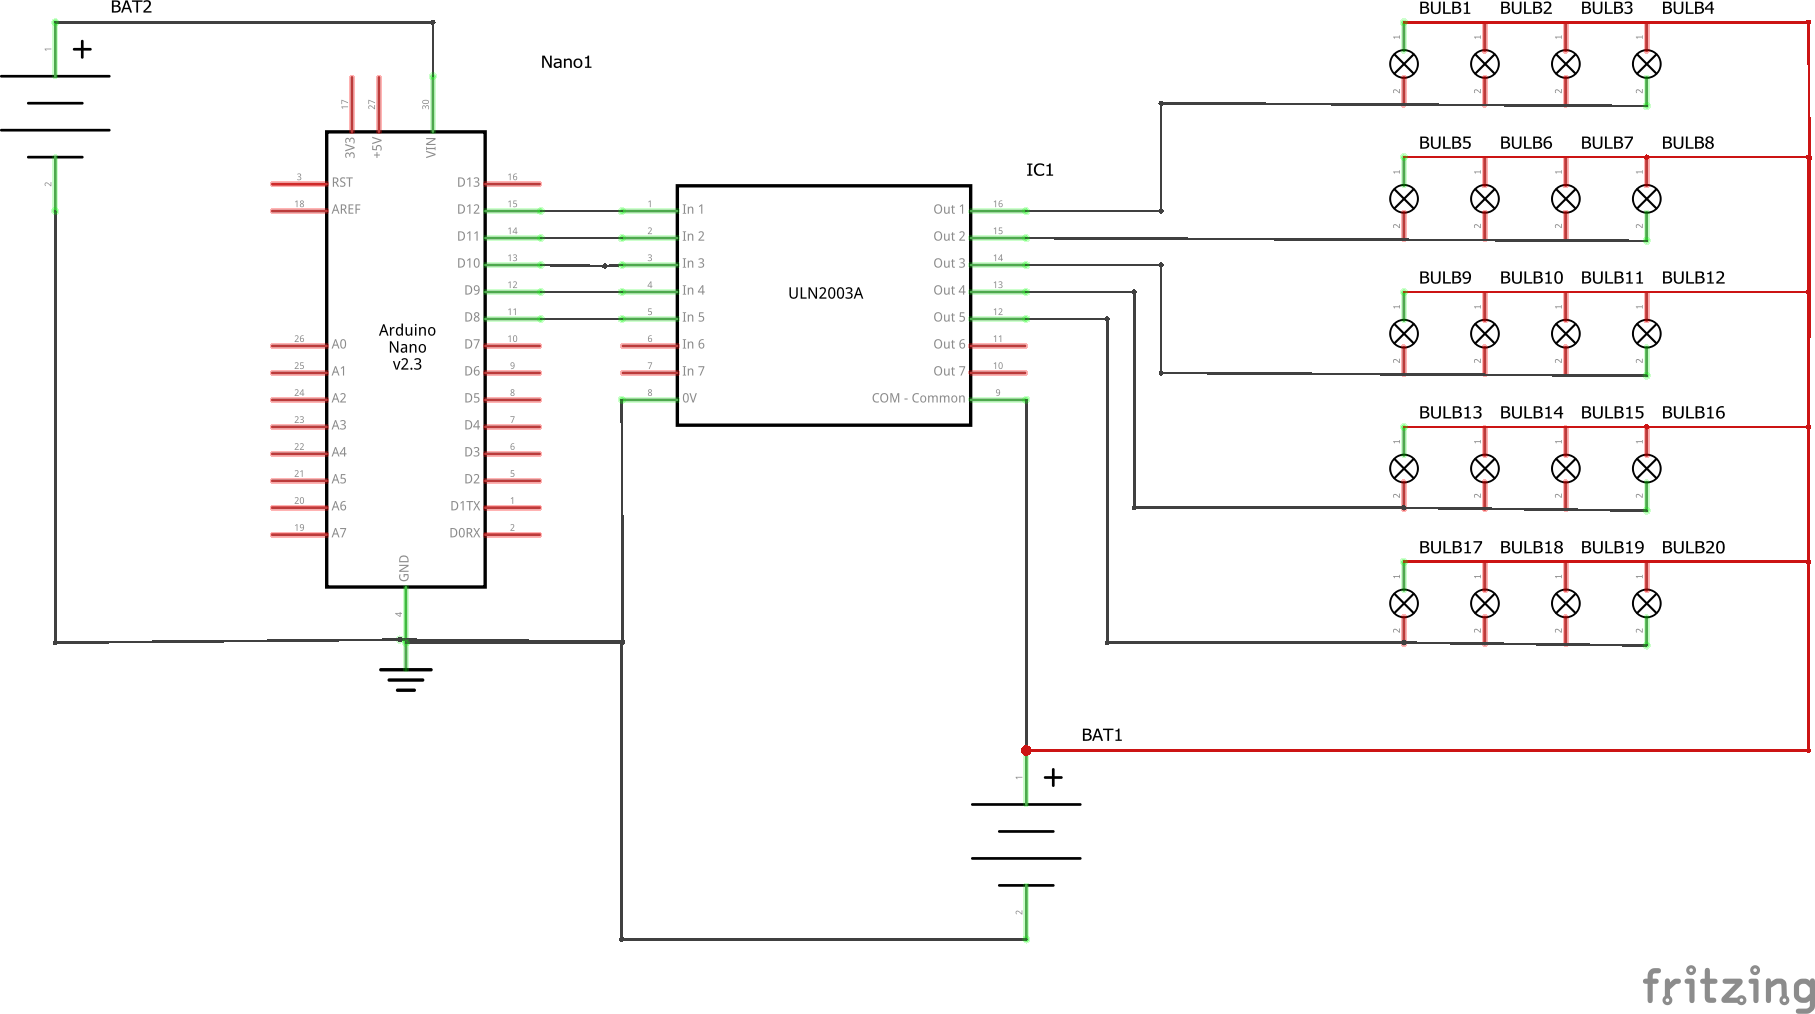
In your Diagram it is not really clear what is connected to what

How about drawing and connecting it this way
leftest row Bulb 2..4 connected to out 4
bulb5..8 connected to Out 3
bulb 9..12 connected to out 2
bulb 13..16 connected to out1

so no lines are crossing at all

do the bulbs light up if you

  1. disconnect the connection to the ULN2003
  2. connect the upper end of the row directly to minus?

“There are 5 rows of 4 LEDS in 12, 11, 10 , 9 , and 8 so in theory any should work,“

You need current limiting resistor with LEDs.

HI Stefan
A


pologies, I;ve updated he diagram, is it more useful?

sorry not LEDs they are LAMPS

We do have to be accurate in are descriptions :wink:


Will you give us a link to the lamps being used ?


What are your battery voltages ?

Yes sorry Larry, appreciate the help btw! The lamps are:

GI 738 Midget Miniature Bulbs 6mm 6.3v 0.04A Flange SX6s 5 Lumens OM0297

So Battery wise, I'd like to keep it battery driven and self contained for a desk object i dont have to plug in, the bulbs will be flashing but at most 1 row (4 bulbs) at a time.

Im thinking of buying 18V ones for max brightness but keeping it battery driven

This currently works but the bulbs flash on and off but i want it to switch the light off and the next at the same time, theres a noticable gap

#define INTERVAL 500  // how often to flash
byte pins [] = {  12, 11, 10, 9, 8 };

void setup() 
{
  for (byte i = 0; i < sizeof pins; i++)
    pinMode(pins [i], OUTPUT);     
}  // end of setup

void loop ()
{
  static unsigned long previousMillis = 0;        // will store last time LED was updated
  static byte currentItem = 0;  // which array item we are at

  unsigned long currentMillis = millis();

  if (currentMillis - previousMillis > INTERVAL) 
    {
    previousMillis = currentMillis;   
    
    // toggle LED
    if (digitalRead ( pins [currentItem]) == LOW)
      digitalWrite ( pins [currentItem], HIGH);
    else
      {
      digitalWrite ( pins [currentItem++], LOW);
      currentItem %= sizeof pins;  // wrap around at end of array
      }  // end of currently on
    }  // end of it time to do something
}  // end of loop

I purchased these a while back (10 per pkg) $17.50 at Amazon.

They operate at 12vDC ≈ 200mA about as bright as 25 watt Halogen bulb !

220 lumens !

AC/DC 12V G4 LED bulbs 360 degree With warm white 3000K brings a warm light

I use these for the sockets.

#define INTERVAL 500  // how often to flash

const byte pins [] = {12, 11, 10, 9, 8};

byte maximum = sizeof pins / sizeof pins[0];

byte currentItem = 0;

unsigned long previousMillis = 0;


//****************************************************************************
void setup()
{
  for (byte i = 0; i < sizeof pins; i++)
  {
    pinMode(pins [i], OUTPUT);
    digitalWrite ( pins [currentItem], LOW);
  }

}  // end of setup


//****************************************************************************
void loop ()
{
  unsigned long currentMillis = millis();

  //************************
  if (currentMillis - previousMillis > INTERVAL)
  {
    //restart the TIMER
    previousMillis = currentMillis;

    digitalWrite (pins[currentItem], HIGH);

    //*******
    //is this the 1st LED
    if (currentItem == 0)
    {
      //turn off the last LED
      digitalWrite (pins[maximum - 1], LOW);
    }

    //*******
    else
    {
      //turn off the previous LED
      digitalWrite (pins[currentItem - 1], LOW);      
    }

    currentItem++;
    currentItem %= sizeof pins;

  }

}  // end of loop

please describe the ON/OFF-pattern in detail:
there are 4 rows of lights
shall the pattern be:

start:
row1 ON
row2 OFF
row3 OFF
row4 OFF
row5 OFF

row1 OFF
row2 ON
row3 OFF
row4 OFF
row5 OFF

row1 OFF
row2 OFF
row3 ON
row4 OFF
row5 OFF

row1 OFF
row2 OFF
row3 OFF
row4 ON
row5 OFF

row1 OFF
row2 OFF
row3 OFF
row4 OFF
row5 ON

go back to start
which is
start:
row1 ON
row2 OFF
row3 OFF
row4 OFF
row5 OFF

?

The code you have posted uses non-blocking timing based on millis() but each switch to the next state is only done after 500 milliseconds

very compact code using arrays and doing it all most directly but the result is not exactly what you want.

And I guess you do not understand in detail how this code works

here is a codeversion that does a running light

// start of macros dbg and dbgi
#define dbg(myFixedText, variableName) \
  Serial.print( F(#myFixedText " "  #variableName"=") ); \
  Serial.println(variableName);
// usage: dbg("1:my fixed text",myVariable);
// myVariable can be any variable or expression that is defined in scope

#define dbgi(myFixedText, variableName,timeInterval) \
  do { \
    static unsigned long intervalStartTime; \
    if ( millis() - intervalStartTime >= timeInterval ){ \
      intervalStartTime = millis(); \
      Serial.print( F(#myFixedText " "  #variableName"=") ); \
      Serial.println(variableName); \
    } \
  } while (false);
// end of macros dbg and dbgi

const byte row1 =  12;
const byte row2 =  11;
const byte row3 =  10;
const byte row4 =   9;
const byte row5 =   8;

#define OFF LOW
#define ON  HIGH

unsigned long myFastCounter;

unsigned long MyTestTimer = 0;                   // variables MUST be of type unsigned long


//helper-function for non-blocking timing
boolean TimePeriodIsOver (unsigned long &periodStartTime, unsigned long TimePeriod) {
  unsigned long currentMillis  = millis();  
  if ( currentMillis - periodStartTime >= TimePeriod )
  {
    periodStartTime = currentMillis; // set new expireTime
    return true;                // more time than TimePeriod) has elapsed since last time if-condition was true
  } 
  else return false;            // not expired
}


int blinkState;

void setup() {
  Serial.begin(115200);
  Serial.print( F("\n Setup-Start  \n") );

  pinMode(row1,OUTPUT);
  pinMode(row2,OUTPUT);
  pinMode(row3,OUTPUT);
  pinMode(row4,OUTPUT);
  pinMode(row5,OUTPUT);

  digitalWrite(row1,OFF);
  digitalWrite(row2,OFF);
  digitalWrite(row3,OFF);
  digitalWrite(row4,OFF);
  digitalWrite(row5,OFF);
  blinkState = 1;
}


void loop() {
  myFastCounter++;
  // loop is running fast but only once per second (1000 milliseconds)
  // the value myFastCounter is printed to the serial monitor
  dbgi("dbgi-demo",myFastCounter,1000);

  // non-blocking timing-function
  // evaluates true only if milliseconds given as the second parameter
  // have passed by
  if (TimePeriodIsOver (MyTestTimer,500) ) {
    blinkState++;

    if (blinkState > 5) {
      blinkState = 1;
    }
    dbg("dbg-Demo",blinkState);
  }
  
  switch (blinkState) {
    case 1: {
      digitalWrite(row1,ON);
      digitalWrite(row2,OFF);
      digitalWrite(row3,OFF);
      digitalWrite(row4,OFF);
      digitalWrite(row5,OFF); 
      break;     
    }

    case 2: {
      digitalWrite(row1,OFF);
      digitalWrite(row2,ON);
      digitalWrite(row3,OFF);
      digitalWrite(row4,OFF);
      digitalWrite(row5,OFF);      
      break;
    }
  
    case 3: {
      digitalWrite(row1,OFF);
      digitalWrite(row2,OFF);
      digitalWrite(row3,ON);
      digitalWrite(row4,OFF);
      digitalWrite(row5,OFF);
      break;      
    }

    case 4: {
      digitalWrite(row1,OFF);
      digitalWrite(row2,OFF);
      digitalWrite(row3,OFF);
      digitalWrite(row4,ON);
      digitalWrite(row5,OFF);      
      break;
    }

    case 5: {
      digitalWrite(row1,OFF);
      digitalWrite(row2,OFF);
      digitalWrite(row3,OFF);
      digitalWrite(row4,OFF);
      digitalWrite(row5,ON);      
      break;
    }  
  }
}

I tested the code with the WOKWI-simulator

best regards Stefan

@LarryD OK the second coe does a running light. But there is no explanation what each line of code is doing. Pretty hard to understand for a newbee

best regards Stefan

The assumption is of course, ask us to explain when the OP has trouble understanding a line of code.

The OP brought arrays in the mix in post #27 and the offered example builds on their sketch.

The complicated part might be, if you turn ON the current LED you turn OFF the proceeding LED.

Is the competition for who programs the "best" Blink sketch open?

Hello
I did it again. The sketch is using an array for the bulb-pattern and a User Defined Data Type (UDT) to conrol the bulbs. Use this sketch as an example how to apply C++ to simplify coding.

// BLOCK COMMENT
// ATTENTION: This Sketch contains elements of C++.
// https://www.learncpp.com/cpp-tutorial/
// https://forum.arduino.cc/t/newbie-just-tsrating-need-help-with-a-sketch/908165/31
#define ProjectName "Newbie just tsrating, need help with a sketch"
// CONSTANT DEFINITION
// you may need to change these constants to your hardware and needs.
constexpr byte Output_[] {2, 3, 4, 5, 6};		 // portPin o---|220|---|LED|---GND
constexpr unsigned long Interval {1000};
// VARIABLE DECLARATION AND DEFINTION
struct BULBPATTERN {
  bool bulbs[sizeof(Output_) / sizeof(Output_[0])];
} pattern [] = {
  {true, false, false, false, false},
  {false, true, false, false, false},
  {false, false, true, false, false},
  {false, false, false, true, false},
  {false, false, false, false, true},
  {false, false, false, true, false},
  {false, false, true, false, false},
  {false, true, false, false, false},
};
unsigned long currentTime;
struct TIMER {
  unsigned long duration;
  unsigned long stamp;
};
TIMER blink_{Interval, 0};

// FUNCTIONS
bool checkTimer(TIMER & time_) {  // generic time handler using TIME struct
  if (currentTime - time_.stamp >= time_.duration) {
    time_.stamp = currentTime;
    return true;
  } else return false;
}
void setup() {
  Serial.begin(9600);
  Serial.println(F("."));
  Serial.print(F("File   : ")), Serial.println(__FILE__);
  Serial.print(F("Date   : ")), Serial.println(__DATE__);
  Serial.print(F("Project: ")), Serial.println(ProjectName);
  pinMode (LED_BUILTIN, OUTPUT);
  for (auto Output : Output_) pinMode(Output, OUTPUT);
}
void loop () {
  currentTime = millis();
  digitalWrite(LED_BUILTIN, (currentTime / 500) % 2);
  if (checkTimer(blink_)) {
    int element=0;
    static int number=0;
    for (auto bulb:Output_) digitalWrite(bulb,pattern[number].bulbs[element++]);
    number++;
    number = number % (sizeof(pattern)/sizeof(pattern[0])); 
  }
}

Have a nice day and enjoy coding in C++.

@paulpaulson: in most cases you are contributing good postings.

in this posting your wish "enjoy C++-coding" is very unlike to become true

  1. not working at all
  2. too complex, too less comments
  3. too short variable names

I copied and pasted your code into the WOKWI-simulator. It compiles and blinks the onboard-LED but the other IO-pins with LEDs connected do not blink

Here is a modified version of your code that has more self-explaining names and comments that are still pretty short but do some basic explaining.

even such small things like using a variable-name "Output_Pins" instead of "Output_" guides a newbee to understand what the variable is for.

// BLOCK COMMENT
// ATTENTION: This Sketch contains elements of C++.
// https://www.learncpp.com/cpp-tutorial/
// https://forum.arduino.cc/t/newbie-just-tsrating-need-help-with-a-sketch/908165/31
#define ProjectName "Newbie just tsrating, need help with a sketch"
// CONSTANT DEFINITION
// you may need to change these constants to your hardware and needs.
constexpr byte Output_Pins[] {2, 3, 4, 5, 6};     // portPin o---|220|---|LED|---GND
constexpr unsigned long Interval {1000};
// VARIABLE DECLARATION AND DEFINTION
struct BULB_on_Off_PATTERN {
  bool bulbs[sizeof(Output_Pins) / sizeof(Output_Pins[0])];
} on_off_pattern [] = {
  {true, false, false, false, false},
  {false, true, false, false, false},
  {false, false, true, false, false},
  {false, false, false, true, false},
  {false, false, false, false, true},
  {false, false, false, true, false},
  {false, false, true, false, false},
  {false, true, false, false, false},
};

unsigned long currentTime;
struct TIMER {
  unsigned long duration;
  unsigned long timeStamp;
};

// create a structured variable with name "blink_Timer" of type TIMER
TIMER blink_Timer{Interval, 0}; 

// FUNCTIONS
bool checkTimer(TIMER & p_time) {  // generic time handler using TIME struct
  // if more time than given in p_time.duration is over
  if (currentTime - p_time.timeStamp >= p_time.duration) { 
    p_time.timeStamp = currentTime; // update timestamp
    return true; // duration over return value "true"
  } 
  else          // duration not over return value "false"
    return false;
}

void setup() {
  Serial.begin(9600);
  Serial.println(F("."));
  Serial.print(F("File   : ")), Serial.println(__FILE__);
  Serial.print(F("Date   : ")), Serial.println(__DATE__);
  Serial.print(F("Project: ")), Serial.println(ProjectName);
  pinMode (LED_BUILTIN, OUTPUT);

  // run through all elements of struct "Output_Pins" setting them as OUTPUT
  // Output_Pins is an array that contains the IO-pin-numbers
  // for (auto ....
  // iterates through all elements of the array
  // and sets variable Pin_Nr to the values defined in the array Output_Pins
  // execute command "pinMode(Pin_Nr, OUTPUT)" for each element 
  for (auto Pin_Nr : Output_Pins) pinMode(Pin_Nr, OUTPUT);
}

void loop () {
  currentTime = millis();
  // blink    the     onboard-LED  with    500 milliseconds
  digitalWrite(LED_BUILTIN, (currentTime / 500) % 2);

  // check if blink_Timer has expired
  if (checkTimer(blink_Timer)) { 
    int element = 0;
    static int number = 0;

    // run through all elements of struct "Output_Pins" 
    // and use the defined pattern to switch On/off each IO-pin
    // each time the timer expires one row of the defined "on_off_pattern"
    // is used to switch on/off all five IO-pins 
    // by executing the command "digitalWrite(Pin_Nr,on_off_pattern[number].bulbs[element++]);"
    for (auto Pin_Nr : Output_Pins) digitalWrite(Pin_Nr,on_off_pattern[number].bulbs[element++]);

    // set number to a value that is the begin of the next row
    number++; 
    number = number % (sizeof(on_off_pattern) / sizeof(on_off_pattern[0])); 
  }
}

I'm a somehow advanced hobbyprogrammer. maybe even some comments of me are wrong.
I estimate it would take me 2 to 3 hours to analyse why the LEDs are not blinking. Something like this is not newbee-friendly.

If you managed to learn c++ with such examples I pull my hat because you showed
exceptional perseverance and a high tolerance for frustration

best regards Stefan
Hello
You may take some time and study the appliance of C++ too.
The provided smart and clever coded sketch is in this case selfexplaning and is running of an Arduino UNO.
I always post tested sketches!
You may check the constrains of the selected simulator. Maybe the simulator doesn´t like C++ too.

Have a nice day and enjoy coding in C++.

p.s.
https://www.learncpp.com/cpp-tutorial/

OK found the error: it is something different. The WOKWI-simulator is able to compile it properly. You used different IO-pins.

Well If you think stumbling across difficulties is enjoyable. Enjoy.

At least for me it is different. Both ways are OK.
best regards Stefan

I took a look into the link you posted.

Well - again: to me this link is an attempt trying to maximise frustration for newbees.

The link lists specialised things using a lot of special programming terms.

If you intended to to scare away newbees from learning C++ in my opinion:
well done

IMHO: These two links are much better suited to "enjoy learning c++"

Q: What are the three death-enemies of a coder?
A: 1. Fresh air, 2. Daylight. 3. That deafening roar of the birds

Hello
I have a different way to learn new things.

Thanks @StefanL38 for pointing me into the direction of this code, from a begineers point of view it's MUCH easier to understand, Must thank @Koepel for writing it also.

Now I have to make sure I understand it!

I want to be able to add a pushbutton in Pin 7, to run the loop for 30 seconds then stop until the next time the pushbutton is pressed

const byte LedPins[5] = { 8, 9, 10, 11, 12};

unsigned long previousMillis;
int index = 0;
int updown = +1;      // +1 or -1 for going left and right

void setup() 
{
  for( auto a:LedPins) 
    pinMode( a, OUTPUT);
}

void loop () 
{
  unsigned long currentMillis = millis();

  if( currentMillis - previousMillis >= 80)
  {
    previousMillis = currentMillis;

    digitalWrite( LedPins[index], LOW);       // turn old led off
    index += updown;
    digitalWrite( LedPins[index], HIGH);      // turn new led on

    if( index <=0 || index >= 4)
      updown = -updown;
  }
}