Yes, 9600.
I’m wondering if someone is going to tell me that people at this category have done everything they can for me (for now), and which category I should go to (to get help getting the serial monitor to work).
Whoops. I just read the following.
Continuing the discussion from How to get the best out of this forum:
You are making the mistake of thinking there are people in this category and some completely different people with different knowledge in a different category. There are not. Mostly there are a small number of people offering help who will see your questions wherever you put them.
In any case, no one knows if you have had all the help you can get in this category because no one knows what someone else might be able to offer to help you.
That code worked for me in a fresh New Arduino Uno Project - Wokwi Simulator setup.
This post can be skipped.
I think the following sketch indicates the Serial port is ready. It also works in the Wokwi Simulator.
//Uses a LED to indicate if the Serial port is ready
//modified from other people's sketches

const int LED = 13; // Blue "stat" LED on pin 13

void setup()
{
  Serial.begin(9600);
  pinMode(LED, OUTPUT); //set pin as output
  digitalWrite(LED, LOW); //turn LED off
}

void loop() {

  // The LED will blink three times, once for each letter in the word "yes", if the Serial port is ready.  This happens.
  if (Serial) {

    digitalWrite(LED, HIGH); // Blue LED on
    delay(100);
    digitalWrite(LED, LOW); // Blue LED off
    delay(300);
    digitalWrite(LED, HIGH); // Blue LED on
    delay(100);
    digitalWrite(LED, LOW); // Blue LED off
    delay(300);
    digitalWrite(LED, HIGH); // Blue LED on
    delay(100);
    digitalWrite(LED, LOW); // Blue LED off

  } else {
    // The LED will blink two times, once for each letter in the word "no", if the Serial port isn't ready.  This doesn't happen.

    digitalWrite(LED, HIGH); // Blue LED on
    delay(100);
    digitalWrite(LED, LOW); // Blue LED off
    delay(300);
    digitalWrite(LED, HIGH); // Blue LED on
    delay(100);
    digitalWrite(LED, LOW); // Blue LED off
  }
  delay(3000);
}This works.
// "Hello USB world" sketch
#define Serial SerialUSB  //explained at https://learn.sparkfun.com/tutorials/sparkfun-qwiic-micro-samd21e-hookup-guide?_ga=2.189204203.1942777960.1679245747-648687454.1678149671&_gac=1.238692020.1679245747.EAIaIQobChMI5sby773o_QIV8w2tBh1jiAF_EAAYASAAEgL3jfD_BwE#example-2-serial-ports

void setup()
{
  //initialize communications at a 9600 baud rate
  Serial.begin(9600);
}

void loop()
{
  //send 'Hello, USB world!' over the port
  Serial.println("Hello, USB world!");
  delay(5000);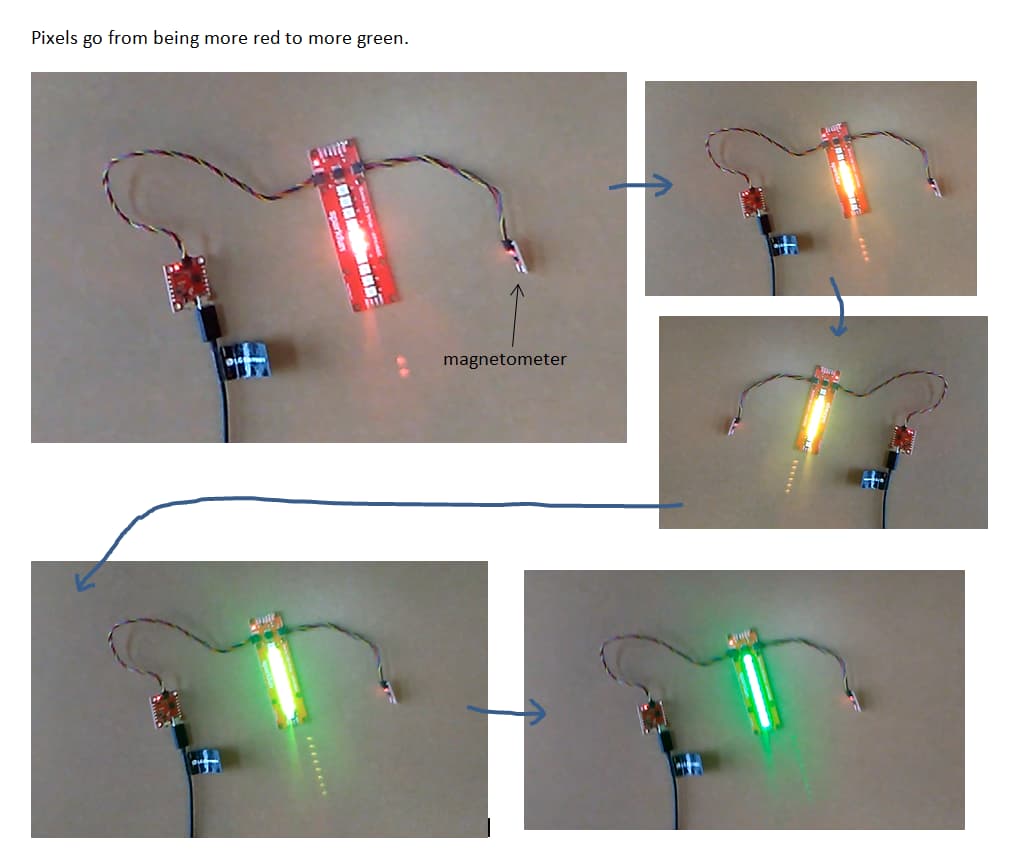
}The LED stick isn’t doing what I want it to. I try to get the pixels on the stick to change color, using a switch statement. In the sketch that is below, I describe my problem in more detail, in the comments above the for statement.
//  Supposed to use arrays with ten elements to change the color of each of the ten pixels on a LED stick.
//  modified from Ciara Jekel's I2C based LED Stick

#include <Wire.h>
#include "Qwiic_LED_Stick.h" // Click here to get the library: http://librarymanager/All#SparkFun_Qwiic_LED_Stick

// Might need to be made into a comment if using a different microcontroller
#define Serial SerialUSB

LED LEDStick; //Create an object of the LED class

void setup() {
  Wire.begin();
  Serial.begin(115200);

  //Start up communication with the LED Stick
  if (LEDStick.begin() == false) {
    Serial.println("Qwiic LED Stick failed to begin. Please check wiring and try again!");
    while (1);
  }

  Serial.println("Qwiic LED Stick ready!");
}

void loop() {

  //Create 3 arrays the same length as the LED stick.  There are 10 pixels on the LED stick, which is why 10 is between the brackets.
  byte redArray[10];    //will store how red each pixel is.
  byte greenArray[10];  //will store how green each pixel is.
  byte blueArray[10];   //will store how blue each pixel is

  /*  The problem in a forum is described in more detail here.
      I make what the variable "angle" equals (at different times) come from a for statement instead of a magnetometer, to keep the sketch shorter.
      As far as I can tell, the results are similar to the results from the magnetometer.
      Some of the pixels are different colors from the others.
      But I wasn’t trying to get that combination of colors, ever.
      And I was trying to get the colors to change, but they don’t look to me like they are changing.
  */

  for (int angle = 0; angle < 182; angle++) {

    switch (angle)
    {
      case 0 ... 90:
        {
          //  Pixel#             1        2        3        4        5        6        7        8        9        10
          byte redArray[10] =   {0 * 63,  0 * 63,  0 * 63,  0 * 63,  0 * 63,  0 * 63,  0 * 63,  0 * 63,  0 * 63,  0 * 63};
          byte greenArray[10] = {0 * 63,  0 * 63,  0 * 63,  0 * 63,  0 * 63,  0 * 63,  0 * 63,  0 * 63,  0 * 63,  0 * 63};
          byte blueArray[10]  = {0 * 63,  0 * 63,  0 * 63,  0 * 63,  0 * 63,  0 * 63,  0 * 63,  0 * 63,  0 * 63,  0 * 63};
          break;
        }
      case 91 ... 108:
        {
          byte redArray[10]   = {0 * 63,  0 * 63,  0 * 63,  0 * 63,  4 * 63,  4 * 63,  0 * 63,  0 * 63,  0 * 63,  0 * 63};
          byte greenArray[10] = {0 * 63,  0 * 63,  0 * 63,  0 * 63,  0 * 63,  0 * 63,  0 * 63,  0 * 63,  0 * 63,  0 * 63};
          byte blueArray[10]  = {0 * 63,  0 * 63,  0 * 63,  0 * 63,  0 * 63,  0 * 63,  0 * 63,  0 * 63,  0 * 63,  0 * 63};
          break;
        }
      case 109 ... 126:
        {
          byte redArray[10]   = {0 * 63,  0 * 63,  0 * 63,  3 * 63,  3 * 63,  3 * 63,  3 * 63,  0 * 63,  0 * 63,  0 * 63};
          byte greenArray[10] = {0 * 63,  0 * 63,  0 * 63,  1 * 63,  1 * 63,  1 * 63,  1 * 63,  0 * 63,  0 * 63,  0 * 63};
          byte blueArray[10]  = {0 * 63,  0 * 63,  0 * 63,  0 * 63,  0 * 63,  0 * 63,  0 * 63,  0 * 63,  0 * 63,  0 * 63};
          break;
        }
      case 127 ... 144:
        {
          byte redArray[10]   = {0 * 63,  0 * 63,  2 * 63,  2 * 63,  2 * 63,  2 * 63,  2 * 63,  2 * 63,  0 * 63,  0 * 63};
          byte greenArray[10] = {0 * 63,  0 * 63,  2 * 63,  2 * 63,  2 * 63,  2 * 63,  2 * 63,  2 * 63,  0 * 63,  0 * 63};
          byte blueArray[10]  = {0 * 63,  0 * 63,  0 * 63,  0 * 63,  0 * 63,  0 * 63,  0 * 63,  0 * 63,  0 * 63,  0 * 63};
          break;
        }
      case 145 ... 162:
        {
          byte redArray[10]   = {0 * 63,  1 * 63,  1 * 63,  1 * 63,  1 * 63,  1 * 63,  1 * 63,  1 * 63,  1 * 63,  0 * 63};
          byte greenArray[10] = {0 * 63,  3 * 63,  3 * 63,  3 * 63,  3 * 63,  3 * 63,  3 * 63,  3 * 63,  3 * 63,  0 * 63};
          byte blueArray[10]  = {0 * 63,  0 * 63,  0 * 63,  0 * 63,  0 * 63,  0 * 63,  0 * 63,  0 * 63,  0 * 63,  0 * 63};
          break;
        }
      case 163 ... 181:
        {
          byte redArray[10]   = {0 * 63,  0 * 63,  0 * 63,  0 * 63,  0 * 63,  0 * 63,  0 * 63,  0 * 63,  0 * 63,  0 * 63};
          byte greenArray[10] = {4 * 63,  4 * 63,  4 * 63,  4 * 63,  4 * 63,  4 * 63,  4 * 63,  4 * 63,  4 * 63,  4 * 63};
          byte blueArray[10]  = {0 * 63,  0 * 63,  0 * 63,  0 * 63,  0 * 63,  0 * 63,  0 * 63,  0 * 63,  0 * 63,  0 * 63};
          break;
        }
    }
    Serial.print("Angle = ");
    Serial.println(angle);
    Serial.println("Pixel# 1  2  3 4  5  6  7 8  9  10");
    Serial.println((String)"Red:   " + redArray[1] + " " + redArray[2] + " " + redArray[3] + " " + redArray[4] + " " + redArray[5] + " " + redArray[6] + " " + redArray[7] + " " + redArray[8] + " " + redArray[9] + " " + redArray[10]);
    Serial.println((String)"Green: " + greenArray[1] + " " + greenArray[2] + " " + greenArray[3] + " " + greenArray[4] + " " + greenArray[5] + " " + greenArray[6] + " " + greenArray[7] + " " + greenArray[8] + " " + greenArray[9] + " " + greenArray[10]);
    Serial.println(" ");

    LEDStick.setLEDColor(redArray, greenArray, blueArray, 10);
    delay(200);
  }
}Did you get the Serial working?
What does it print to your monitor?
I do not see any obvious problems.
Use of String is not recommended on small mcu's.
Instead use a for loop.
Serial.print("Angle =");
Serial.println(angle);
for (int i=0; i<10; i++) {
   Serial.print(i);
   Serial.print("Blue= ");
   Serial.print(blueArray[i]);
   //other colors
   Serial.println();
}
Also for setting your colors you could use a for loop.
Saves a lot of typing...
Make the number of leds a const. That saves a lot of work if you want to add leds.
const int numLeds=10;
Can you share a picture of your setup?
If you plan to add more
Like this? It started working when I did it this way.
//  Uses arrays with ten elements to change the color of each of the ten pixels on a LED stick.
//  Uses for loops to change what the elements are equal to
//  modified from Ciara Jekel's I2C based LED Stick

#include <Wire.h>
#include "Qwiic_LED_Stick.h" // Click here to get the library: http://librarymanager/All#SparkFun_Qwiic_LED_Stick

// Might need to be made into a comment if using a different microcontroller
#define Serial SerialUSB

LED LEDStick; //Create an object of the LED class
const int numLeds = 10;

void setup() {
  Wire.begin();
  Serial.begin(115200);

  //Start up communication with the LED Stick
  if (LEDStick.begin() == false) {
    Serial.println("Qwiic LED Stick failed to begin. Please check wiring and try again!");
    while (1);
  }
  for (int n = -1; n < 10; n++) {
    LEDStick.setLEDColor(n, 0, 0, 0);   //To keep them off, makes sure pixels 0 to 9 aren't red, green, or blue.
  }

  Serial.println("Qwiic LED Stick ready!");

  //Create 3 arrays the same length as the LED stick.  There are 10 pixels on the LED stick, which is why 10 is between the brackets.
  byte redArray[numLeds];    //will store how red each pixel is.
  byte greenArray[numLeds];  //will store how green each pixel is.
  byte blueArray[numLeds];   //will store how blue each pixel is

  //  delay(100);

  int angle;
  for (angle = -1; angle < 182; angle++) {

    switch (angle)
    {
      case 0 ... 90:
        {
          for (int a = -1; a < 10; a++) {
            redArray[a] = 0;
            greenArray[a] = 0;
          }
          break;
        }
      case 91 ... 108:
        {
          for (int b = -1; b < 4; b++) {

            // make more pixels on the ends not lit
            redArray[b] = 0;
            redArray[b + 6] = 0;
          }
          for (int c = 4; c < 6; c++) {

            //make pixels the reddest they will get in this sketch
            redArray[c] = 4 * 63;
          }
          for (int d = -1; d < 10; d++) {
            greenArray[d] = 0;
          }
          break;
        }
      case 109 ... 126:
        {
          for (int e = -1; e < 3; e++) {
            redArray[e] = 0;
            redArray[e + 7] = 0;
            greenArray[e] = 0;
            greenArray[e + 7] = 0;
          }
          for (int f = 3; f < 7; f++) {
            redArray[f] = 3 * 63;
            greenArray[f] = 1 * 63;
          }
          break;
        }
      case 127 ... 144:
        {
          for (int g = -1; g < 2; g++) {
            redArray[g] = 0;
            redArray[g + 8] = 0;
            greenArray[g] = 0;
            greenArray[g + 8] = 0;
          }
          for (int h = 2; h < 8; h++) {
            redArray[h] = 2 * 63;
            greenArray[h] = 2 * 63;
          }
          break;
        }
      case 145 ... 162:
        {
          for (int i = -1; i < 1; i++) {

            // make fewer pixels on the ends not lit
            redArray[i] = 0;
            redArray[i + 9] = 0;
            greenArray[i] = 0;
            greenArray[i + 9] = 0;
          }
          for (int j = 1; j < 9; j++) {
            redArray[j] = 1 * 63;

            // make pixels greener
            greenArray[j] = 3 * 63;
          }
          break;
        }
      case 163 ... 181:
        {
          for (int k = -1; k < 10; k++) {
            redArray[k] = 0;
            greenArray[k] = (4 * 36);
          }
          break;
        }
    }
    for (int m = -1; m < 10; m++) {
      blueArray[m] = 0;
    }

    // Very similar to part of a sketch recommended by user build_1971 at a forum
    Serial.println();
    Serial.print("Angle: ");
    Serial.println(angle);

    for (int l = -1; l < 10; l++) {
      Serial.print("Pixel: ");
      Serial.println(l);

      Serial.print("red: ");
      Serial.print(redArray[l]);
      Serial.print(",  ");
      Serial.print("green: ");
      Serial.println(greenArray[l]);
    }
    LEDStick.setLEDColor(redArray, greenArray, blueArray, numLeds);
    delay(100);
  }
}

void loop() {}Would what it prints still be useful, now that you have the picture?
What do you mean?
Thank you.
What is while(1); supposed to accomplish?
The for is almost like that. But you should start at 0, not at -1. Where (in mcu memory) do you think element -1 of your array is?
Serial is always useful during debugging. It can tell you where the program goes and what intermediate values it calculates.
'If you plan to add more" is probably a relic of a sentence that I copied and pasted somewhere...
By the way, you can reuse i (instead of the complete alphabet). i is often used as a counter to run through array elements. If the array is 2D you would use i and j.
I’m not sure. I didn’t write it. Maybe it pauses, because there is a problem. I’ve also seen while (true);
Is the lower of the last two for loops better than the upper of the last two?
//  Two for loops that make pixel 0 and pixel 1 brighter.

#include <Wire.h>
#include "Qwiic_LED_Stick.h" // Click here to get the library: http://librarymanager/All#SparkFun_Qwiic_LED_Stick

// Might need to be made into a comment if using a different microcontroller.
#define Serial SerialUSB

LED LEDStick; //Create an object of the LED class

void setup() {
  Wire.begin();
  Serial.begin(115200);

  //Start up communication with the LED Stick
  if (LEDStick.begin() == false) {
    Serial.println("Qwiic LED Stick failed to begin. Please check wiring and try again!");
    while (1);
  }
  for (int i = 0; i < 11; i++) {
    LEDStick.setLEDColor((i - 1), 0, 0, 255);   //I used this to make the next for loop
  }
  delay(750);

  for (int i = 0; i < 11; i++) {
    LEDStick.setLEDColor((i - 1), 0, 0, 0);   //To keep them off, makes sure pixels 0 to 9 aren't red, green, or blue.
  }
  Serial.println("Qwiic LED Stick ready!");
}

void loop() {

  // I'm assuming this isn't the right way, because of what was said in a forum.
  for (int i = -1; i < 2; i++) {
    LEDStick.setLEDColor(i, 255, 0, 0);  // use the wrong way to make them red
    LEDStick.setLEDColor(i, 255, 0, 0);
  }
  delay(750);
  LEDStick.LEDOff();
  delay(750);

  // Is this better?
  for (int i = 0; i < 3; i++) {
    LEDStick.setLEDColor((i - 1), 0, 255, 0);  //use another way to make them green
    LEDStick.setLEDColor((i - 1), 0, 255, 0);
  }
  delay(750);
  LEDStick.LEDOff();
  delay(750);
}Where on your stick is led nr -1?
And where is led nr 10?
Usually counting is started at zero. So led nr10 would be in position 9...
Have you tried while(1);?
I think it might wait forever there.
Sometimes people use that during debugging, or just to 'end' a program. But you have it in a place where you don't want to end.
Did you ever compile/run your program?
If I understand what nr means, it starts at pixel 0 and goes to pixel 9.
i is initialized to 0, and I think increments to 1 before the curly braces are entered. (i – 1) turns the 1 into a 0. The condition is i < 11, in other words 10. And in this case (i – 1) is 9, because 10 – 1 = 9. So all ten pixels, pixel 0 to pixel 9, are lit.
I think I would want it to end if LEDStick.begin() == false.
All ten pixels are blue, and then the first two pixels go from being red to green to red to green...
Also, after I upload about three or four times, my port disappears. Sometimes I forget the order that I might have to do it in, but my port doesn’t show up again until after I log out and log in, shut down and turn on my laptop, unplug and plug in the USB cable, and tap the reset button on the microcontroller twice. I can get it to work that way, but it would be nicer if there were a faster way.
Thank you.
This is not true. i will be 0 when it first enters the curly braces.
That would make sense. Add a Serial.print("some message") before the while (1).
That is really annoying. What type of laptop do you have and what type of usb port/cable?
Is this what you were asking for?
Computer:
macOS Sierra
Version 10.12.6
MacBook Pro (13-inch, Early 2011)
Processor: 2.3 GHz Intel Core i5
Memory: 4 GB 1067 MHz DDR3
Graphics: Intel HD Graphics 3000 384 MB
USB cable:
LG Electronics
USB Data Cable
OUTPUT: DC 5V --- 1.0A
P/N: EAD62377907
DC1709
Am I supposed to turn the switch on the microcontroller off before I unplug the USB cable that is connected to my laptop and plug in the USB cable that is connected to the battery holder? I’m worried it will break if I don’t turn it off.
Thank you.
Do you run your program when the mcu is fed from your pc?
What is the current draw of your ledstick? At max brightness it might exceed 1A.
I had a similar laptop. Always was ok. I bought a M1 that was usb-c only. That gave a lot of trouble...
In your program you set the colours to 255. That will give a blinding bright color and will draw considerable current. Maybe you should try 16 or so...
Can you turn off the switch before you connect to your laptop and on when you have removed the cable?