Hi everyone,
I am using an arduino nano ESP32 with a MAX30102 sensor to sense heartbeat and blood oxygen.
I tested this using the arduino IDE and it works perfectly and senses the data correctly.
I wanted to set this up with the arduino cloud so I can see the data in the dashboard on my phone.
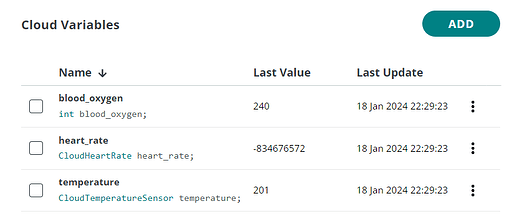
My code compiles and uploads fine and the serial port also shows the data being read and the dashboard also updates correctly. However, the data being read is wildy inaccurate as you can see below...
This is my code:
// DFRobot_BloodOxygen_S - Version: Latest
#include <DFRobot_BloodOxygen_S.h>

/*
  Sketch generated by the Arduino IoT Cloud Thing "Untitled"
  https://create.arduino.cc/cloud/things/364ddafc-8c4c-4cba-bf5b-c29bac8577ee

  Arduino IoT Cloud Variables description

  The following variables are automatically generated and updated when changes are made to the Thing

  CloudHeartRate heart_rate;
  CloudTemperatureSensor temperature;
  int blood_oxygen;

  Variables which are marked as READ/WRITE in the Cloud Thing will also have functions
  which are called when their values are changed from the Dashboard.
  These functions are generated with the Thing and added at the end of this sketch.
*/

#include "thingProperties.h"

#define I2C_COMMUNICATION  //use I2C for communication, but use the serial port for communication if the line of codes were masked
#ifdef  I2C_COMMUNICATION
#define I2C_ADDRESS    0x57
DFRobot_BloodOxygen_S_I2C MAX30102(&Wire, I2C_ADDRESS);
#else

#if defined(ARDUINO_AVR_UNO) || defined(ESP8266)
SoftwareSerial mySerial(4, 5);
DFRobot_BloodOxygen_S_SoftWareUart MAX30102(&mySerial, 9600);
#else
DFRobot_BloodOxygen_S_HardWareUart MAX30102(&Serial1, 9600);
#endif
#endif

void setup() {
  // Initialize serial and wait for port to open:
  Serial.begin(9600);
  // This delay gives the chance to wait for a Serial Monitor without blocking if none is found
  delay(1500);

  // Defined in thingProperties.h
  initProperties();

  // Connect to Arduino IoT Cloud
  ArduinoCloud.begin(ArduinoIoTPreferredConnection);

  /*
     The following function allows you to obtain more information
     related to the state of network and IoT Cloud connection and errors
     the higher number the more granular information you’ll get.
     The default is 0 (only errors).
     Maximum is 4
  */
  setDebugMessageLevel(2);
  ArduinoCloud.printDebugInfo();

  // Sensor starts collecting data
  MAX30102.sensorStartCollect();
}

void loop() {
  ArduinoCloud.update();
  // Your code here

  sensor();

}

void sensor ()
{
  MAX30102.getHeartbeatSPO2();

  // Heart rate
  heart_rate = MAX30102._sHeartbeatSPO2.Heartbeat;
  Serial.print("heart rate is : ");
  Serial.print(heart_rate);
  Serial.println("Times/min");


  // Blood oxygen
  blood_oxygen = MAX30102._sHeartbeatSPO2.SPO2;
  Serial.print("SPO2 is : ");
  Serial.print(blood_oxygen);
  Serial.println("%");


  // Temperature
  temperature = MAX30102.getTemperature_C();
  Serial.print("Temperature value of the board is : ");
  Serial.print(temperature);
  Serial.println(" ℃");


}
Does anyone have any idea why this is happening or if I can fix it?
Thanks!


