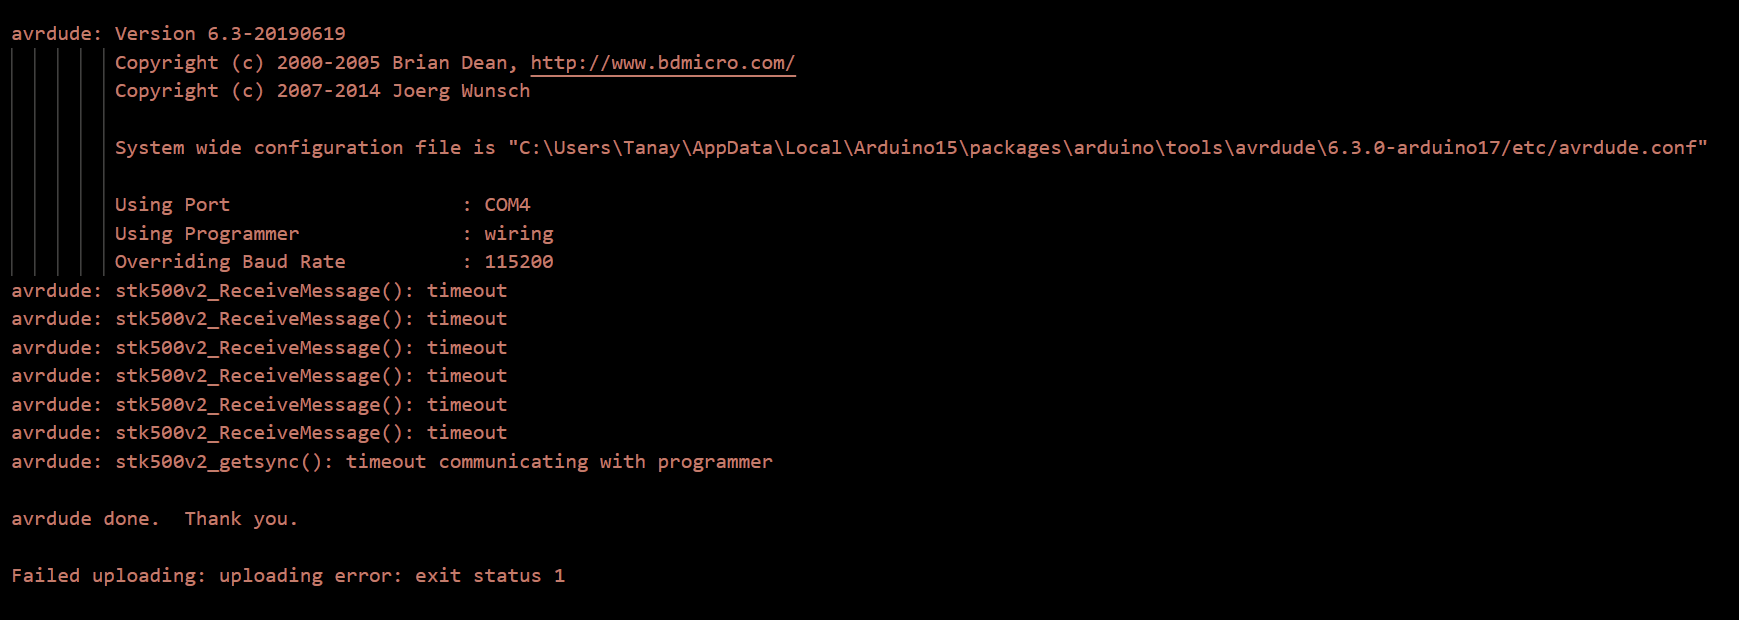
Attempting to upload a sketch (or separately trying to upload a .hex file through the terminal) returns avrdude: stk500v2_ReceiveMessage(): timeout errors. Notably, the RX LED remains blinking. I'm quite lost here. This is a new board we just purchased. What could be causing this? Is there something I'm doing wrong?
It's an Arduino Mega? That's currently the only board I know of that uses the "wiring" upload protocol...
Yes, it is an Arduino MEGA.
Does COM4 disappear from the IDE when you disconnect the board? If not, it's not the Mega.
Is your board properly recognised by the operating system (Windows device manager)? Any yellow exclamation marks?
What is the serial-to-usb converter on the board (the chip closest to the USB port).
I don't have access to the board at the moment but I can definitely confirm its the right port. There are no other arduinos plugged in and it does dissappear. No yellow exclamation marks, either.
The USB controller chip is: ATMEL MEGA 16U2
What is the project that you're working on? Anything connected to pins 0 and 1? What else was connected when it failed the first time? Did you ever manage to upload to this board?
You can run the Loop-Back Test Instructions. If it fails, we known that the problem lays with the 16U2. If it passes, the problem is more than likely with the 2560 processor.
When you press and release the reset button, does the L-LED flash a couple of times? If not, the 2560 does not have a bootloader or is damaged.
The board passes the loop-back test. The LED does flash when the reset button is released.
Hi @elaque. Given the information gathered so far, I am left with only two possible causes for the upload failure:
- The bootloader was somehow corrupted.
- There is physical damage to the microcontroller or its support circuitry.
There is a program named a "bootloader" that is stored in a special area of the memory in the primary microcontroller of your Arduino board. This program receives the data sent by the computer when you upload a sketch to the board.
If the cause is a missing bootloader, the board might be recoverable by a "Burn Bootloader" operation.
Prepare ISP programmer
You will need an ISP programmer. If you don't have a programmer, you can use a spare Arduino board as an "Arduino as ISP" programmer.
Arduino as ISP
The following instructions are for using an Arduino board as an "Arduino as ISP" programmer. If you have a dedicated programmer, you can skip to the next set of instructions.
Although the "Arduino as ISP" only works for programming targets of the AVR architecture, you can also use boards of a variety of architectures (e.g., "AVR", "SAMD", "megaAVR") as an "Arduino as ISP" programmer.
ⓘ In the instructions below, the board used as an "Arduino as ISP" is referred to as the "programmer board". The board the bootloader is being burned on is referred to as the "target board".
-
Disconnect the USB cable of the Arduino boards from your computer.
-
Make the following connections between the "programmer board" and the "target board".
ⓘ Refer to the "Connections" table on the SPI library reference page to determine the pin numbers.Programmer Target CIPO (AKA "MISO") CIPO VCC 5V (VCC on 3.3 V boards) SCK SCK COPI (AKA "MOSI") COPI 10 RESET GND GND -
Connect the "programmer board" to your computer with a USB cable.
-
Select File > Examples > 11.ArduinoISP > ArduinoISP from the Arduino IDE menus.
The "ArduinoISP" sketch will open in Arduino IDE. -
Select your "programmer board" from Arduino IDE's Tools > Board menu.
-
Select the port of your "programmer board" from Arduino IDE's Tools > Port menu.
-
Select Sketch > Upload from the Arduino IDE menus.
-
Wait for the upload to finish.
You are now ready to burn the bootloader using your "Arduino as ISP" programmer.
Burn Bootloader
Instructions for burning the bootloader:
ⓘ It is not possible to do this via Arduino Cloud Editor. You will need to use Arduino IDE or Arduino CLI.
- Connect an ISP programmer to your Arduino board.
If you are using an "Arduino as ISP", then you have already connected it according to the previous instructions. - Select the target board from the Tools > Board menu and any other custom Tools menus (e.g., Tools > Processor).
- Select the appropriate programmer from the Tools > Programmer menu.
- Tools > Burn Bootloader
- Wait for the process to finish successfully.
- Disconnect the USB cable of the programmer from your computer.
- Disconnect the programmer from the "target board".
Now connect the "target board" to your computer with a USB cable, select its port from the Tools > Port menu, and try uploading a sketch as usual.
Conclusion
Now connect the "target board" to your computer with a USB cable and try uploading again. Does the upload succeed now?
Thank you for your response. Unfortunately, I do not have immediate access to an ISP programmer or another arduino board... Is there an alternative?
This topic was automatically closed 180 days after the last reply. New replies are no longer allowed.