Hi to all .
i have one VFD unit (Sako SKI600/650 series) that would like to experiment with it and drive it through Arduino - RS485
i have found some default commands from the manual for some functions
the basic setup is one Arduino Nano with the Arduino MAX485 Module RS-485 TTL To RS485 MAX485CSA Converter Module (https://img.joomcdn.net/e175facf206b3d418cac9633d51c5cf02a79ad41_original.jpeg) and 6 buttons for 6 commands to send via RS485 to the VFD
- start run
2 )Start reverse - start at 40HZ
- start at 50Hz
- Start at 20hs
- Stop
/*

   ModBus RTU control VFD

   Address               : 01H  (is the address of the VFD)
   Function              : 06H  (write function code)
   Starting data address : 20H
                         : 00H  (2000H  is the address of control command)
   Data(2Byte)           : 00H
                         : 01H  (0001H is forward command)
   CRC CHK Low           : 43H
   CRC CHK High          : CAH   (43CAH (is 16bits CRC check code)


  From manual vfd Forward command = 01H 06H 2000H 0001H 43CAH

  The 'H' postfix is translated into a '0x' prefix in the Arduino world, so '2000H' gets '0x2000'.

      modbus rtu output
  SKI600 VFD      Arduino RS485 Module

  +485    ---------    A
  -485    ---------    B
  Gnd    ---------    Gnd

*/


#include <SoftwareSerial.h>

#define SSerialRX        10  //Serial Receive pin
#define SSerialTX        11  //Serial Transmit pin
//#define SSerialRX        0  //Serial Receive pin
//#define SSerialTX        1  //Serial Transmit pin
#define SSerialTxControl 3   //RS485 Direction control
#define RS485Transmit    HIGH
#define RS485Receive     LOW
#define Pin13LED         13

byte Fw_Button = 4; //  push button Forward
byte Rev_Button = 5; //  push button Forward
byte Fw40_Button = 6; //  push button Forward
byte Fw50_Button = 7; //  push button Forward
byte Fw20_Button = 8; //  push button Forward
byte Stop_Button = 9; //  push button Forward

byte led = 12;
// From manual vfd Forward command = 01H 06H 2000H 0001H 43CAH

// From manual vfd Stop command = 01H 06H 2000H 0003H C20BH

byte request1[] = {0x01, 0x06, 0x20, 0x00, 0x00, 0x01, 0x43, 0xCA}; // start Forward

byte request2[] = {0x01, 0x06, 0x20, 0x00, 0x00, 0x09, 0x04, 0x20}; // Start Reverse

byte request3[] = {0x01, 0x06, 0x20, 0x01, 0x0F, 0xA0, 0xD6, 0x42}; // start Forward 40 HZ

byte request4[] = {0x01, 0x10, 0x20, 0x00, 0x00, 0x02, 0x04, 0x00, 0x01, 0x13, 0x88, 0x36, 0xFB}; // start Forward 50 HZ

byte request5[] = {0x01, 0x10, 0x20, 0x00, 0x00, 0x02, 0x04, 0x00, 0x01, 0x13, 0x88, 0x07, 0xD0}; // start Forward 20 HZ

byte request6[] = {0x01, 0x06, 0x20, 0x00, 0x00, 0x03, 0xC2, 0x0B}; // Stop

SoftwareSerial RS485Serial(SSerialRX, SSerialTX); // RX, TX
byte byteSend;

void setup()
{
  // Start the built-in serial port, probably to Serial Monitor
  Serial.begin(9600, SERIAL_8E1);
  Serial.println("SerialRemote");  // Can be ignored

  pinMode (Fw_Button, INPUT_PULLUP);      //Define the pin as input
  pinMode (Rev_Button, INPUT_PULLUP);      //Define the pin as input
  pinMode (Fw40_Button, INPUT_PULLUP);      //Define the pin as inpu
  pinMode (Fw50_Button, INPUT_PULLUP);      //Define the pin as input
  pinMode (Fw20_Button, INPUT_PULLUP);      //Define the pin as input
  pinMode (Stop_Button, INPUT_PULLUP);      //Define the pin as input
  pinMode(Pin13LED, OUTPUT);
  pinMode(led, OUTPUT);
  pinMode(Pin13LED, OUTPUT);
  pinMode(SSerialTxControl, OUTPUT);

  // digitalWrite(SSerialTxControl, RS485Receive);  // Init Transceiver


  RS485Serial.begin(9600);


}
void loop()
{


  if (digitalRead(Fw_Button) == LOW)
  {
    digitalWrite(SSerialTxControl, RS485Transmit);
    RS485Serial.write(request1, sizeof(request1));
    Serial.println("Send start command Forward");
    digitalWrite(led, HIGH);
  }
  else if (digitalRead(Fw_Button) == HIGH)
  {
    digitalWrite(led, LOW);
  }

 if (digitalRead(Rev_Button) == LOW)
  {
    digitalWrite(SSerialTxControl, RS485Transmit);
    RS485Serial.write(request2, sizeof(request2));
    Serial.println("Send start command Reverse");
    digitalWrite(led, HIGH);
  }
  else if (digitalRead(Rev_Button) == HIGH)
  {
    digitalWrite(led, LOW);
  }

  if (digitalRead(Fw40_Button) == LOW)
  {
    digitalWrite(SSerialTxControl, RS485Transmit);
    RS485Serial.write(request3, sizeof(request3));
    Serial.println("Send start command 40HZ");
    digitalWrite(led, HIGH);
  }
  else if (digitalRead(Fw40_Button) == HIGH)
  {
    digitalWrite(led, LOW);
  }
  if (digitalRead(Fw50_Button) == LOW)
  {
    digitalWrite(SSerialTxControl, RS485Transmit);
    RS485Serial.write(request4, sizeof(request4));
    Serial.println("Send start command 50HZ");
    digitalWrite(led, HIGH);
  }
  if (digitalRead(Fw20_Button) == LOW)
  {
    digitalWrite(SSerialTxControl, RS485Transmit);
    RS485Serial.write(request5, sizeof(request5));
    Serial.println("Send start command 20HZ");
    digitalWrite(led, HIGH);
  }
  if (digitalRead(Stop_Button) == LOW)
  {
    digitalWrite(SSerialTxControl, RS485Transmit);
    RS485Serial.write(request6, sizeof(request6));
    Serial.println("Stop command");
    digitalWrite(led, LOW);
  }


}
My problems :
A) For some reason when i power up the Nano from a usb phone charger, i have to keep pressing constantly the start button for the vfd to start drive the motor i have connected ... if i leave the button then stop the motor as if i had press the stop button.
Now if i connect my Nano to get power from my pc usb i have to press only once the start button in order my motor run continuously until press the stop button (send stop command)
what is wrong here? in the case of pc connection it works like even if i have the arduino IDE closed or open
B) For the moment i have manage to make it work with only 2 buttons... the star run command and stop command.
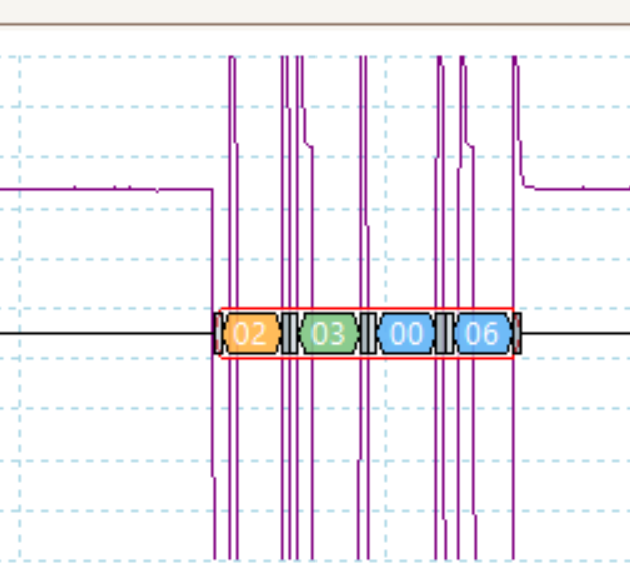
The command for reverse doesn't work as and with the commands with speed (HZ) and i am not sure if it is fault of the VFD or (probably) me not understanding what have to do ![]()
![]()
here are some pictures from the vfd manual about setting the commands.. if someone can understand more .
i am not sure if i have translate right the commands...
one more tip is that i have try all the above with the transmission response parameter in the vfd on and off
pictures :


