Arduino Uno stuck on upload

Hello,

I know this question has been asked countless times, I looked through over 15 topics but still non of them apply to me, and most don't actually reach a solution.

Issue:
I can't upload any sketch. It just hangs there and eventually says "An error occurred while uploading the sketch". My test sketch is the blinker program, no other wires are connected. The USB cable is fine, I tried it with another uno. Once I hit upload, the pin 13 LED, and TX/RX will flash a few times. Then TX and pin13 LEDs will be stuck on.

I'll try to post answers to questions I found on other topics just to make everyone's life a little easier.

I have an old arduino uno that a friend gave me ages ago. I'm not honestly sure if it's a genuine board or not. It looks genuine, but I'm not 100% certain.

I tried changing the rate in the device manager, but still nothing worked, and return it to the original value.

I saw some people having luck with pressing the reset button right before the uploading starts, or right after it starts. Either I'm doing it wrong, or it's not working for me.

I'm using IDE 1.8.10. I have the correct board selected and the correct COM port selected.

I have another arduino uno that works. So I tried the following tests.

Lookback test works.
Atmega16U2 chip test works.
ATmega328P chip test works.

Should I attempt to install a bootloader on it?

Please do this:

  • (In the Arduino IDE) File > Preferences
  • Uncheck the checkbox next to "Show verbose output during: compilation"
  • Check the checkbox next to "Show verbose output during: upload
  • Click "OK"
  • Sketch > Upload
  • After the upload fails, you'll see a button on the right side of the orange bar "Copy error messages" (or the icon that looks like two pieces of paper at the top right corner of the black console window in the Arduino Web Editor). Click that button.
  • In a forum reply here, click on the reply field.
  • Click the </> button on the forum toolbar. This will add the forum's code tags markup to your reply.
  • Press "Ctrl + V". This will paste the upload output between the code tags.
  • Move the cursor outside of the code tags before you add any additional text to your reply.
Arduino: 1.8.10 (Windows 10), Board: "Arduino/Genuino Uno"

Sketch uses 924 bytes (2%) of program storage space. Maximum is 32256 bytes.
Global variables use 9 bytes (0%) of dynamic memory, leaving 2039 bytes for local variables. Maximum is 2048 bytes.
C:\Program Files (x86)\Arduino\hardware\tools\avr/bin/avrdude -CC:\Program Files (x86)\Arduino\hardware\tools\avr/etc/avrdude.conf -v -patmega328p -carduino -PCOM10 -b115200 -D -Uflash:w:C:\Users\super\AppData\Local\Temp\arduino_build_954584/Blink.ino.hex:i 

avrdude: Version 6.3-20190619
         Copyright (c) 2000-2005 Brian Dean, http://www.bdmicro.com/
         Copyright (c) 2007-2014 Joerg Wunsch

         System wide configuration file is "C:\Program Files (x86)\Arduino\hardware\tools\avr/etc/avrdude.conf"

         Using Port                    : COM10
         Using Programmer              : arduino
         Overriding Baud Rate          : 115200
avrdude: stk500_getsync() attempt 1 of 10: not in sync: resp=0x00
avrdude: stk500_getsync() attempt 2 of 10: not in sync: resp=0x00
avrdude: stk500_getsync() attempt 3 of 10: not in sync: resp=0x00
avrdude: stk500_getsync() attempt 4 of 10: not in sync: resp=0x00
avrdude: stk500_getsync() attempt 5 of 10: not in sync: resp=0x00
avrdude: stk500_getsync() attempt 6 of 10: not in sync: resp=0x00
avrdude: stk500_getsync() attempt 7 of 10: not in sync: resp=0x00
avrdude: stk500_getsync() attempt 8 of 10: not in sync: resp=0x00
avrdude: stk500_getsync() attempt 9 of 10: not in sync: resp=0x00
avrdude: stk500_getsync() attempt 10 of 10: not in sync: resp=0x00
An error occurred while uploading the sketch

This report would have more information with
"Show verbose output during compilation"
option enabled in File -> Preferences.

Thank you for the quick reply.

It looks like you've already done all the easy things I normally recommend for this specific error. So the next step would be to burn the bootloader. If you don't own a dedicated ISP programmer, you can use your good Uno as an "Arduino as ISP" programmer to do this:

Is this the same as the section in the link I posted earlier titled ATmega328P responds but has no bootloader. I already have the sketch downloaded and the wiring is fresh in my memory. If they do the same thing, this will be easier for me to apply right.

Yes, it's the same wiring. I never use that "Atmega bootloader programmer" sketch though, so I don't know anything about using it.

Instead, I always use the File > Examples > 11.ArduinoISP > ArduinoISP sketch, as in the tutorial I posted a link to in my previous reply.

The Nick Gammon thing probably works, but you're limited to the bootloaders he provides, while the Arduino as ISP approach creates a programmer that can be used to program any bootloader to any AVR microcontroller, so it's much more flexible and powerful. I would only consider using Nick Gammon's approach if I wanted to create a programmer that could be used without needing to be around a computer. I have never had that need in over 7 years of burning bootloaders, but I'm sure the Nick Gammon sketch will be super nice to have when that day comes.

Hello. So I decided to go with the wiring from the post, but used the internal ISP sketch. It installed the bootloader successfully. But the upload didn't work.

Arduino: 1.8.10 (Windows 10), Board: "Arduino/Genuino Uno"

Sketch uses 924 bytes (2%) of program storage space. Maximum is 32256 bytes.
Global variables use 9 bytes (0%) of dynamic memory, leaving 2039 bytes for local variables. Maximum is 2048 bytes.
C:\Program Files (x86)\Arduino\hardware\tools\avr/bin/avrdude -CC:\Program Files (x86)\Arduino\hardware\tools\avr/etc/avrdude.conf -v -patmega328p -carduino -PCOM10 -b115200 -D -Uflash:w:C:\Users\super\AppData\Local\Temp\arduino_build_414735/Blink.ino.hex:i 

avrdude: Version 6.3-20190619
         Copyright (c) 2000-2005 Brian Dean, http://www.bdmicro.com/
         Copyright (c) 2007-2014 Joerg Wunsch

         System wide configuration file is "C:\Program Files (x86)\Arduino\hardware\tools\avr/etc/avrdude.conf"

         Using Port                    : COM10
         Using Programmer              : arduino
         Overriding Baud Rate          : 115200
avrdude: stk500_recv(): programmer is not responding
avrdude: stk500_getsync() attempt 1 of 10: not in sync: resp=0xf5
avrdude: stk500_recv(): programmer is not responding
avrdude: stk500_getsync() attempt 2 of 10: not in sync: resp=0xf5
avrdude: stk500_recv(): programmer is not responding
avrdude: stk500_getsync() attempt 3 of 10: not in sync: resp=0xf5
avrdude: stk500_recv(): programmer is not responding
avrdude: stk500_getsync() attempt 4 of 10: not in sync: resp=0xf5
avrdude: stk500_recv(): programmer is not responding
avrdude: stk500_getsync() attempt 5 of 10: not in sync: resp=0xf5
avrdude: stk500_recv(): programmer is not responding
avrdude: stk500_getsync() attempt 6 of 10: not in sync: resp=0xf5
avrdude: stk500_recv(): programmer is not responding
avrdude: stk500_getsync() attempt 7 of 10: not in sync: resp=0xf5
avrdude: stk500_recv(): programmer is not responding
avrdude: stk500_getsync() attempt 8 of 10: not in sync: resp=0xf5
avrdude: stk500_recv(): programmer is not responding
avrdude: stk500_getsync() attempt 9 of 10: not in sync: resp=0xf5
avrdude: stk500_recv(): programmer is not responding
avrdude: stk500_getsync() attempt 10 of 10: not in sync: resp=0xf5

avrdude done.  Thank you.

Problem uploading to board.  See http://www.arduino.cc/en/Guide/Troubleshooting#upload for suggestions.

This report would have more information with
"Show verbose output during compilation"
option enabled in File -> Preferences.

What I noticed different this time is that the TX light does not stay stuck this time, just the pin13 LED.

I didn't change ANYTHING in the ISP sketch though. Was I supposed to?

No, there is no need to change anything in the ArduinoISP sketch with the wiring shown on that Stack Exchange page. If the Tools > Burn Bootloader process finished successfully then it means you had everything correct.

Let's try the manual reset in case something is wrong with your auto-reset circuit.

If you press the reset button too early, the bootloader will have already timed out by the time the upload starts. The tricky thing is that when you press the "Upload" button in the Arduino IDE, it first compiles your sketch before starting the actual upload. So you need to wait until after the compilation finishes before pressing the reset button. The way to get the timing right is to watch the black console window at the bottom of the Arduino IDE window. As soon as you see something like this:

Sketch uses 444 bytes (1%) of program storage space. Maximum is 30720 bytes.
Global variables use 9 bytes (0%) of dynamic memory, leaving 2039 bytes for local variables. Maximum is 2048 bytes.

press and release the reset button.

I must have tried this now over 15 times but still no luck. I tried doing a little bit earlier so that I'd be pressing the button as soon as the message pops, still no luck. Tried doing straight after the message comes out and tired giving it a second before i pressed. Still nothing.

Not sure if my timing is off, or if this thing is completely dead. I hate that I'm wasting your time with this, I'm sorry. I'm not giving up on it, but I don't know what to do anymore.

Try this:

Connect your "Arduino as ISP" Uno to the bad Uno, with the usual wiring.

Connect the "Arduino as ISP" Uno's USB cable to your computer.

Paste the following sketch into the Arduino IDE:

void setup() {
  Serial.begin(9600);
}

void loop() {
  Serial.println("hello");
  delay(1000);
}

Tools > Port > select the port of your "Arduino as ISP" Uno

Sketch > Upload Using Programmer

Wait for the upload to finish successfully.

Unplug the "Arduino as ISP" Uno from your computer.

Disconnect the "Arduino as ISP" Uno from the bad Uno.

Connect the bad Uno's USB cable to your computer.

Tools > Port > select the port of your bad Uno

Tools > Serial Monitor

Make sure the baud rate menu near the bottom right corner of the Serial Monitor window is set to 9600.

Do you see "Hello" printed repeatedly in the Serial Monitor? The idea is to see if serial communication is working correctly all the way through between the ATmega328P to the ATmega16U2 to the computer.

NOTE: when you did the "Upload Using Programmer", it erased the bootloader from the bad Uno, which will make it so you can't upload sketches over the USB cable. You can replace the bootloader by connecting the "Arduino as ISP" back to the bad Uno and doing a Tools > Burn Bootloader.

Upload using programmer just gives me an error and doesn't upload.

Arduino: 1.8.10 (Windows 10), Board: "Arduino/Genuino Uno"

Sketch uses 1628 bytes (5%) of program storage space. Maximum is 32256 bytes.
Global variables use 194 bytes (9%) of dynamic memory, leaving 1854 bytes for local variables. Maximum is 2048 bytes.
C:\Program Files (x86)\Arduino\hardware\tools\avr/bin/avrdude -CC:\Program Files (x86)\Arduino\hardware\tools\avr/etc/avrdude.conf -v -patmega328p -cstk500v1 -PCOM8 -b19200 -Uflash:w:C:\Users\super\AppData\Local\Temp\arduino_build_692233/Tester_to_bad_uno.ino.hex:i 

avrdude: Version 6.3-20190619
         Copyright (c) 2000-2005 Brian Dean, http://www.bdmicro.com/
         Copyright (c) 2007-2014 Joerg Wunsch

         System wide configuration file is "C:\Program Files (x86)\Arduino\hardware\tools\avr/etc/avrdude.conf"

         Using Port                    : COM8
         Using Programmer              : stk500v1
         Overriding Baud Rate          : 19200
avrdude: stk500_getsync() attempt 1 of 10: not in sync: resp=0x80
avrdude: stk500_getsync() attempt 2 of 10: not in sync: resp=0x9e
avrdude: stk500_getsync() attempt 3 of 10: not in sync: resp=0x66
avrdude: stk500_getsync() attempt 4 of 10: not in sync: resp=0x06
avrdude: stk500_getsync() attempt 5 of 10: not in sync: resp=0x9e
avrdude: stk500_getsync() attempt 6 of 10: not in sync: resp=0xe0
avrdude: stk500_getsync() attempt 7 of 10: not in sync: resp=0x9e
avrdude: stk500_getsync() attempt 8 of 10: not in sync: resp=0xfe
avrdude: stk500_getsync() attempt 9 of 10: not in sync: resp=0x9e
avrdude: stk500_getsync() attempt 10 of 10: not in sync: resp=0xe6

avrdude done.  Thank you.

An error occurred while uploading the sketch

This report would have more information with
"Show verbose output during compilation"
option enabled in File -> Preferences.

Does Tools > Burn Bootloader work?

Nope. Neither one worked. I tried the Arduino ISP code just in case, to double check that my wiring is good, and that worked with Tools > Burn Bootloader. But burning/uploading your code doesn't work.

EDIT: Shouldn't it be done in C code rather than arduino code?

Perhaps there is some confusion. I'll provide more detailed instructions. Please try this:

Try this:

File > Examples > 11.ArduinoISP > ArduinoISP

Connect the "Arduino as ISP" Uno's USB cable to your computer.

Tools > Port > select the port of your "Arduino as ISP" Uno

Sketch > Upload

Wait for the upload process to finish successfully. Your "Arduino as ISP" Uno now has the sketch installed that allows it to be used as an ISP programmer.

Disconnect the "Arduino as ISP" Uno from the bad Uno.

Connect your "Arduino as ISP" Uno to the bad Uno, with the usual wiring.

Connect the "Arduino as ISP" Uno's USB cable to your computer.

Paste the following sketch into the Arduino IDE:

void setup() {
  Serial.begin(9600);
}

void loop() {
  Serial.println("hello");
  delay(1000);
}

Sketch > Upload Using Programmer

Wait for the upload to finish successfully. The "hello" sketch has now been uploaded to the bad Uno via the "Arduino as ISP"

Unplug the "Arduino as ISP" Uno from your computer.

Disconnect the "Arduino as ISP" Uno from the bad Uno.

Connect the bad Uno's USB cable to your computer.

Tools > Port > select the port of your bad Uno

Tools > Serial Monitor

Make sure the baud rate menu near the bottom right corner of the Serial Monitor window is set to 9600.

Do you see "Hello" printed repeatedly in the Serial Monitor? The idea is to see if serial communication is working correctly all the way through between the ATmega328P to the ATmega16U2 to the computer.

NOTE: when you did the "Upload Using Programmer", it erased the bootloader from the bad Uno, which will make it so you can't upload sketches over the USB cable. You can replace the bootloader by connecting the "Arduino as ISP" back to the bad Uno and doing a Tools > Burn Bootloader.


krusion:
I hate that I'm wasting your time with this, I'm sorry.

Don't worry about it. Helping people here on the forum is what I do. I only hope I'll be able to be of assistance.

krusion:
Shouldn't it be done in C code rather than arduino code?

Nope. It's only Arduino language code or C code on the computer. The compiler converts either one to binary machine code, and that's what gets uploaded to the Uno. As long as you're using a language that can be compiled to machine code, it doesn't matter.

pert:
Perhaps there is some confusion.

You're right, I was confused. For some reason I thought you said upload that hello sketch to the good uno.

pert:
Disconnect the "Arduino as ISP" Uno from the bad Uno.

For the first instance, you meant to say disconnect the "Arduino as ISP" Uno from the computer right?

Anyway, I uploaded using the programmer. It worked. And the serial monitor shows the "hello". What does this all mean then?

krusion:
For the first instance, you meant to say disconnect the "Arduino as ISP" Uno from the computer right?

You're right. Copy/paste error. Sorry for any confusion.

krusion:
Anyway, I uploaded using the programmer. It worked. And the serial monitor shows the "hello". What does this all mean then?

It means that serial communication is working correctly all the way from the ATmega328P to your computer. It did only test communication in one direction, and we need communication both ways for an upload to work, so I guess it would be worth checking that while we're at it. Repeat the above process, except "Upload Using Programmer" this sketch to the bad Uno instead of the "hello" sketch:

void setup() {
  Serial.begin(9600);
  while (!Serial) {}
  Serial.println("hello");
}

void loop() {
  if (Serial.available() > 0) {
    Serial.write(Serial.read());
  }
}

After you have opened Serial Monitor, type some text in the input field at the top of the window, then click the "Send" button. You should see the same text printed in the Serial Monitor's output window. The text was sent to the Uno, then "echoed" back to Serial Monitor. This proves that communication is working in both directions.

I suppose that's where the issue lies then. I get the "hello". But whatever I type in the serial monitor doesn't get sent back. What's weird is when I did the feedback loop before it worked. Like when I wired the Tx to Rx and the Reset to the ground.

Now you have the issue pretty well pinpointed.

krusion:
What's weird is when I did the feedback loop before it worked. Like when I wired the Tx to Rx and the Reset to the ground.

That test tells you that the serial communication is working from the computer to the ATmega16U2, to the Rx pin, through your wire, back to the Tx pin, back through the ATmega16U2 to the computer. It doesn't check the communication between the ATmega16U2 and the ATmega328P.

We now know there is some problem between The TX pin of the ATmega16U2 and the TX pin of the ATmega328P (the "hello" sketch proved there is no problem between the RX and TX pins). You also know that the connection is good all the way up to where the ATmega16U2's communication lines meet the traces between the ATmega328P's serial pins and the RX and TX pins of the Uno.

Unless there is a damaged trace on the board, which would be fairly obvious with a visual inspection, likely the problem is either the connection between the ATmega328P's pin and the board, or internal to the ATmega328P.

Is your Uno one of the ones with the rectangular socketed DIP ATmega328P, or one with the square SMD ATmega328P?

Sorry for the late reply. I ended up crashing as I was up all night. I tried to look for visual damage on the board but I can't see it. I have the rectangular socketed DIP ATmega328P. If this requires changing the ATmega328, then I think this might be out of my scope. I don't have one lying around already, so if I'll order one, then I'll probably just pay for the uno to justify the shipping haha. Stores are kinda closed right now for me since the city is in lockdown.

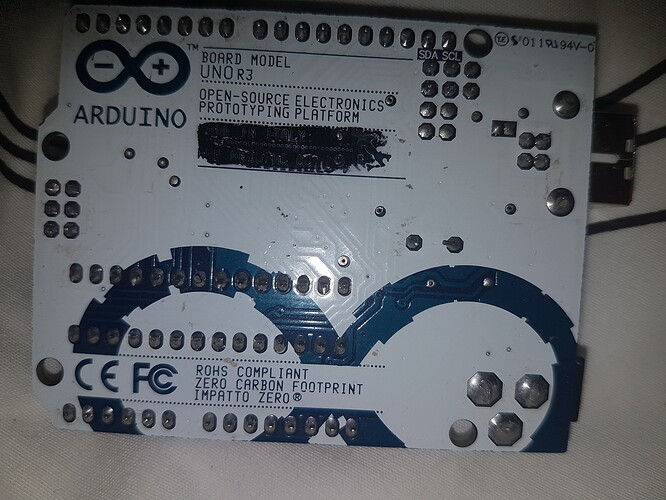
I've attached pictures of the board, maybe I'm missing the visual damage?

That being said, I can still use the "Arduno as ISP" Uno to program the bad Uno, I can see the serial monitor but I cannot input anything to it. I don't actually need to input anything to it through USB. Just some analog signals (assuming nothing else broke in the ATmega328p). Correct?

For learning purposes. Assuming this test worked too. Would there be anything else that one should test, or was that the final test? Asking for future reference, if I was ever stuck in this situation.