Controlling 12V PWM fan & reading speed (tach readout issues)

I have a very powerful 12V PWM fan that I would like to control with an Arduino Nano. I found some code, that I fail to understand, on Ferederico Dossena's site linked below.

How to properly control PWM fans with Arduino - Federico Dossena (fdossena.com)

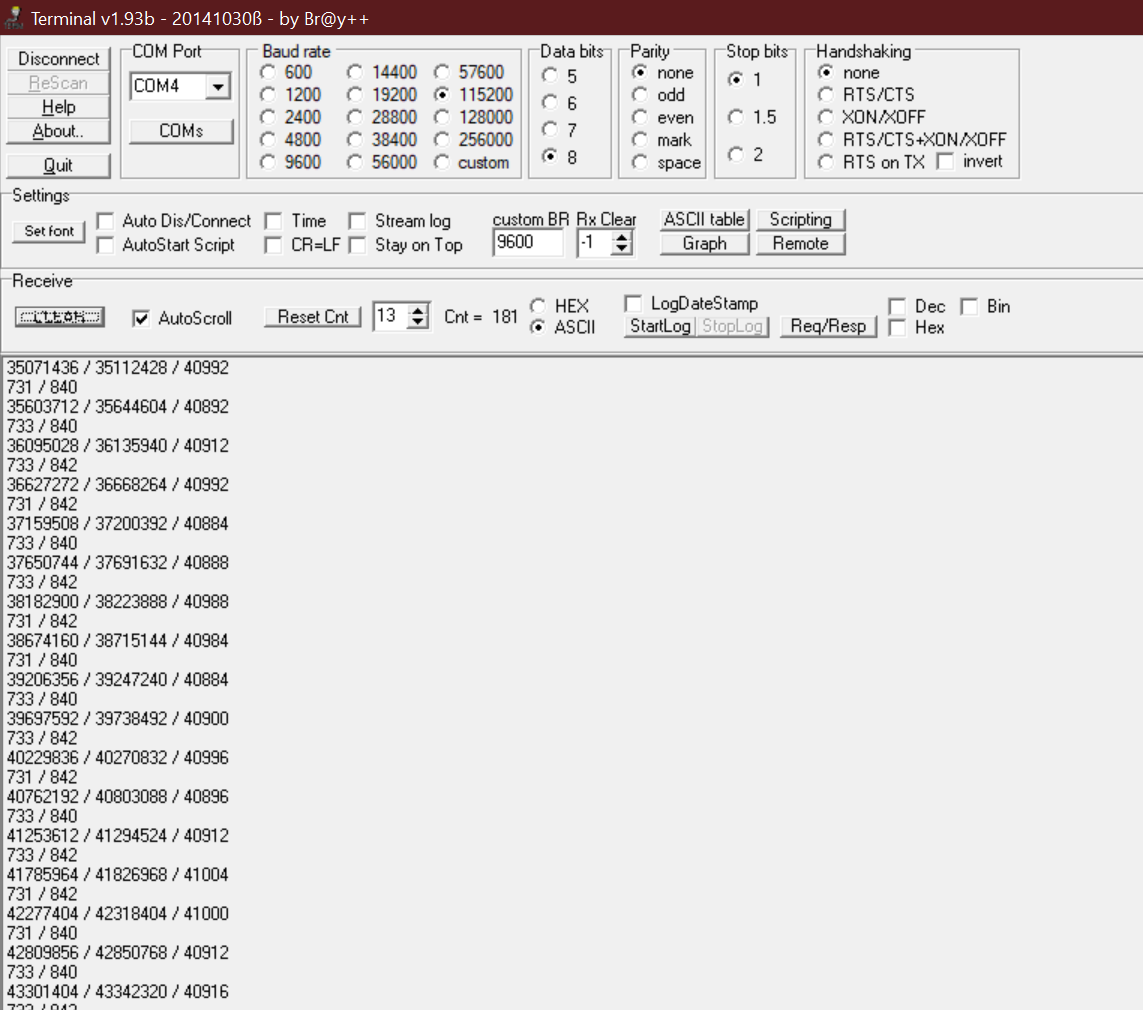
I merged the code for the PWM control and the RPM measurement together. The PWM control part works fine, but the RPM readout is a bit erratic. I checked the actual PRMs with a tachometer and it is about 20 to 30 rpm from the readings given by the Arduino and it is stable. However, the readout from the Arduino tends to jump up and down about 50 RPM when at 1400 RPM (just as an example). On occasion it jumps up to 2700 - 3000 which seems to be double what the previous reading was - more or less. When I push the duty cycle to 100%, the reading flickers between 5000 and 6000. The actual RPM is 5580 according to the tachometer. This matches the spec sheet for the fan.

As mentioned above, I don't understand most of the code written by Federico so I can only guess that my issue is related to the handling of interrupts or the timers... just a guess.

Also, I looked at the tach output of the fan on a scope and the frequency readout appears to be double what the RPM readout is. Right now the scope is stating 31Hz pulse train, but I am getting a 909 RPM readout from the Arduino, which matches the tachometer. Shouldn't 31Hz be 1860 RPM? Coincidentally, the Arduino RPM reading occasionally jumps up to 1875 RPM... The square waveform of the tach output is also something possibly unusual... see the images below.

#include <Wire.h>
//#include <TimerOne.h>
#include <LiquidCrystal_I2C.h>


#define PIN_SENSE 2 //where we connected the fan sense pin. Must be an interrupt capable pin (2 or 3 on Arduino Uno)
#define DEBOUNCE 5 //0 is fine for most fans, poor quality fans may require 10 or 20 to filter out noise
#define FANSTUCK_THRESHOLD 500 //if no interrupts were received for 500ms, consider the fan as stuck and report 0 RPM


// LCD on 0x27
LiquidCrystal_I2C lcd(0x27, 20, 4);

//Interrupt handler. Stores the timestamps of the last 2 interrupts and handles debouncing
unsigned long volatile ts1=0,ts2=0;

int potVal;
int potPin = A2;
int fanVal;
float fanSet;
//LCD Buffer
char msg[20];

// Generally, you should use "unsigned long" for variables that hold time
// The value will quickly become too large for an int to store
unsigned long previousMillis = 0;        // will store last time RPM was updated

// constants won't change :
const long interval = 1000;           // interval at which to update RPM (milliseconds)


//configure Timer 1 (pins 9,10) to output 25kHz PWM
void setupTimer1(){
    //Set PWM frequency to about 25khz on pins 9,10 (timer 1 mode 10, no prescale, count to 320)
    TCCR1A = (1 << COM1A1) | (1 << COM1B1) | (1 << WGM11);
    TCCR1B = (1 << CS10) | (1 << WGM13);
    ICR1 = 320;
    OCR1A = 0;
    OCR1B = 0;
}

/*
//configure Timer 2 (pin 3) to output 25kHz PWM. Pin 11 will be unavailable for output in this mode
void setupTimer2(){
    //Set PWM frequency to about 25khz on pin 3 (timer 2 mode 5, prescale 8, count to 79)
    TIMSK2 = 0;
    TIFR2 = 0;
    TCCR2A = (1 << COM2B1) | (1 << WGM21) | (1 << WGM20);
    TCCR2B = (1 << WGM22) | (1 << CS21);
    OCR2A = 79;
    OCR2B = 0;
}
*/

//equivalent of analogWrite on pin 9
void setPWM1A(float f){
    f=f<0?0:f>1?1:f;
    OCR1A = (uint16_t)(320*f);
}

/*
//equivalent of analogWrite on pin 10
void setPWM1B(float f){
    f=f<0?0:f>1?1:f;
    OCR1B = (uint16_t)(320*f);
}
//equivalent of analogWrite on pin 3
void setPWM2(float f){
    f=f<0?0:f>1?1:f;
    OCR2B = (uint8_t)(79*f);
}
*/

void setup(){
    //enable outputs for Timer 1
    pinMode(9,OUTPUT); //1A
    //pinMode(10,OUTPUT); //1B
    setupTimer1();
    //enable outputs for Timer 2
    //pinMode(3,OUTPUT); //2
    //setupTimer2();
    //note that pin 11 will be unavailable for output in this mode!
    //example...
    //setPWM1A(0.5f); //set duty to 50% on pin 9
    //setPWM1B(0.2f); //set duty to 20% on pin 10
    //setPWM2(0.8f); //set duty to 80% on pin 3
    
    pinMode(PIN_SENSE,INPUT_PULLUP); //set the sense pin as input with pullup resistor
    attachInterrupt(digitalPinToInterrupt(PIN_SENSE),tachISR,FALLING); //set tachISR to be triggered when the signal on the sense pin goes low
  
    //initialize lcd screen
    lcd.init();
    // turn on the backlight
    lcd.backlight();

    lcd.clear();
    lcd.setCursor(0,0);
    lcd.print("FAN SPEED CONTROLLER");
    lcd.setCursor(0,1);
    lcd.print("PWM DUTY: ");
    lcd.setCursor(0,2);
    lcd.print("RPM: ");
}


void loop() {
    potVal = analogRead(potPin);
    fanVal = map(potVal, 0, 1023, 0, 100);
    fanSet = float(fanVal)/100;
    setPWM1A(fanSet);
    lcd.setCursor(0,1);
    sprintf(msg, "PWM DUTY: %3d%%", fanVal);
    lcd.print(msg);

    // Non blocking delay
    // check to see if it's time to read RPM. If the difference between
    // the current time and last time you read RPM is bigger than the
    // interval, then read again.
    unsigned long currentMillis = millis();

    if (currentMillis - previousMillis >= interval) {
      // save the last time you read the RPM
      previousMillis = currentMillis;
      lcd.setCursor(0,2);
      sprintf(msg, "RPM: %4u", calcRPM());
      lcd.print(msg);
      }
}


//Calculates the RPM based on the timestamps of the last 2 interrupts. Can be called at any time.
unsigned long calcRPM(){
    if(millis()-ts2<FANSTUCK_THRESHOLD&&ts2!=0){
        return (60000/(ts2-ts1))/2;
    }else return 0;
}

void tachISR() {
    unsigned long m=millis();
    if((m-ts2)>DEBOUNCE){
        ts1=ts2;
        ts2=m;
    }
}

Edit: Adding pictures of the tach output. Is that normal? If not, could it be part of the issue?


Edit2: The frequency above is shown as ~52Hz and the Arduino is reporting 1500 / 1578 / 1666/ 3000 / 3333 with the 15xx being the most frequent RPM.

The variables you use inside the ISR, ts1 and ts2 can not be completely read/written in a single instruction since they are unsigned long (4 bytes) so you need to turn off interrupts, make a copy and then re-enable interrupts to guarantee you got the correct value when dealing with them outside the ISR

//Calculates the RPM based on the timestamps of the last 2 interrupts. Can be called at any time.
unsigned long calcRPM() {
  unsigned long ts1_copy, ts2_copy
  noInterrupts();
  ts1_copy = ts1;
 ts2_copy = ts2;
 interrupts();
  if (millis() - ts2_copy < FANSTUCK_THRESHOLD && ts2_copy != 0) {
    return (60000 / (ts2_copy - ts1_copy)) / 2;
  } else return 0;
}

Not sure if that is the root of your issue, but it is an issue with the code.

1 Like

Thank you @blh64 ! I had noticed that many other examples did that and did not really understand why the example I went with did not. The only reason I picked it was that the same person wrote both the PWM generation and the tach reading so I figured the two would work in the same sketch.

I had to adjust your code slightly for it to compile:

unsigned long calcRPM(){
    unsigned long volatile ts1_copy, ts2_copy;
    noInterrupts();
    ts1_copy = ts1;
    ts2_copy = ts2;
    interrupts();
    if(millis()-ts2_copy <FANSTUCK_THRESHOLD&&ts2_copy !=0){
        return (60000/(ts2_copy - ts1_copy ))/2;
    }else return 0;
}

Do I have to do the same copy for this other one too?

void tachISR() {
    unsigned long m=millis();
    if((m-ts2)>DEBOUNCE){
        ts1=ts2;
        ts2=m;
    }
}

EDIT: Nevermind, I read your post again and you specifically said "outside the ISR", and tachISR() is... well an ISR :wink:

EDIT2: With the change implemented it seems to be a bit better, however there is still a good amount of jumping around. At 10% PWM the readings are 1153, 1200, 1250 and at times even 2500. Laser tachometer reads 1200 to 1210 RPM.

Those copy variables do not need to be declared as 'volatile' since you are not using them both inside and outside the ISR

1 Like

I found that part of the RPM jumping around was due to the original author of the code using millis() to keep track of interrupt timestamps. That was way too little resolution especially when the fan was spinning close to 6000 rpm. The time stamp delta was jumping back and forth between 5 and 6 which resulted in the RPM also jumping between 5000 and 6000 RPM. I switched the timestamps over to micros() and I got much better resolution.

However, there is still something torturing me as the RPMs double every so often and I cannot figure out why.

In the serial output below I highlighted two cases where the RPM doubled compared to the previous reading.

The first row is output by:

    Serial.print(ts1_copy);
    Serial.print(" / ");
    Serial.print(ts2_copy);
    Serial.print(" / ");
    Serial.println(ts2_copy - ts1_copy);

The second is output row by:

      Serial.print(RPM);
      Serial.print(" / ");
      Serial.print(maxDecrease);
      Serial.print(" / ");
      Serial.println(maxIncrease);

As you can see, there are half the microseconds between the timestamps when the erroneous reading occur. I monitored the actual RPM with a laser tachometer and the RPMs appear stable.

17035492 / 17050600 / 15108
1985 / 1726 / 2283
17548252 / 17563356 / 15104
1986 / 1726 / 2282
18060740 / 18075840 / 15100
1986 / 1726 / 2283
18588300 / 18603348 / 15048
1993 / 1726 / 2283
19100828 / 19115876 / 15048
1993 / 1733 / 2291
19620848 / 19628340 / **7492**
**4004** / 1733 / 2291
20110652 / 20125752 / 15100
1986 / 3481 / 4604
20623160 / 20638260 / 15100
1986 / 1726 / 2283
21135540 / 21150640 / 15100
1986 / 1726 / 2283
21662976 / 21670528 / **7552**
**3972** / 1726 / 2283
22145284 / 22160336 / 15052
1993 / 3453 / 4567
22657752 / 22672800 / 15048
1993 / 1733 / 2291
23170372 / 23185428 / 15056
1992 / 1733 / 2291

The latest revision of the sketch includes a lot of commented and/or debugging stuff I am using to figure out what is happening. The RPMs printed on the LCD mostly discard the erroneous reading in most, if not all, cases. Either way, I'd like to eliminate the fluke that causes the occasional jumps rather than filtering them out... if that can't be done, then I will need to figure out how to improve the filtering.:

#include <Wire.h>
//#include <TimerOne.h>
#include <LiquidCrystal_I2C.h>


#define PIN_SENSE 2 //where we connected the fan sense pin. Must be an interrupt capable pin (2 or 3 on Arduino Uno)
#define DEBOUNCE 0 //0 is fine for most fans, poor quality fans may require 10 or 20 to filter out noise
#define FANSTUCK_THRESHOLD 500 //if no interrupts were received for 500ms, consider the fan as stuck and report 0 RPM


// LCD on 0x27
LiquidCrystal_I2C lcd(0x27, 20, 4);

//Interrupt handler. Stores the timestamps of the last 2 interrupts and handles debouncing
unsigned long volatile ts1=0,ts2=0;

int potVal;
int potPin = A2;
int fanVal;
float fanSet;
//LCD Buffer
char msg[20];

unsigned int RPM;
unsigned int previousRPM = 9999;
unsigned int maxDecrease;
unsigned int maxIncrease;

// Generally, you should use "unsigned long" for variables that hold time
// The value will quickly become too large for an int to store
unsigned long previousMillis = 0;        // will store last time RPM was updated

// constants won't change :
const long interval = 500;           // interval at which to update RPM (milliseconds)


void setup(){
    Serial.begin(9600);  // Begin serial communication.
    //enable outputs for Timer 1
    pinMode(9,OUTPUT); //1A
    //pinMode(10,OUTPUT); //1B
    setupTimer1();
    //enable outputs for Timer 2
    //pinMode(3,OUTPUT); //2
    //setupTimer2();
    //note that pin 11 will be unavailable for output in this mode!
    //example...
    //setPWM1A(0.5f); //set duty to 50% on pin 9
    //setPWM1B(0.2f); //set duty to 20% on pin 10
    //setPWM2(0.8f); //set duty to 80% on pin 3
    
    pinMode(PIN_SENSE,INPUT_PULLUP); //set the sense pin as input with pullup resistor
    attachInterrupt(digitalPinToInterrupt(PIN_SENSE),tachISR,FALLING); //set tachISR to be triggered when the signal on the sense pin goes low
  
    //initialize lcd screen
    lcd.init();
    // turn on the backlight
    lcd.backlight();

    lcd.clear();
    lcd.setCursor(0,0);
    lcd.print("FAN SPEED CONTROLLER");
    lcd.setCursor(0,1);
    lcd.print("PWM DUTY: ");
    lcd.setCursor(0,2);
    lcd.print("RPM: ");
}


void loop() {
    potVal = analogRead(potPin);
    fanVal = map(potVal, 0, 1015, 0, 100); //1023 was causing 99%, so I reduced it a bit to ensure it reaches 100%. V at input was just over 5V.
    fanSet = float(fanVal)/100;
    setPWM1A(fanSet);
    lcd.setCursor(0,1);
    sprintf(msg, "PWM DUTY: %3d%%", fanVal);
    lcd.print(msg);

    // Non blocking delay
    // check to see if it's time to read RPM. If the difference between
    // the current time and last time you read RPM is bigger than the
    // interval, then read again.
    unsigned long currentMillis = millis();


    if (currentMillis - previousMillis >= interval) {
      // save the last time you read the RPM
      previousMillis = currentMillis;
      
      previousRPM = RPM;      
      RPM = calcRPM();
      //maxDecrease = previousRPM / 1.15;
      maxIncrease = previousRPM * 1.15;  
      //RPM = constrain(RPM, 0, maxIncrease);
      Serial.print(RPM);
      //Serial.print(" / ");
      //Serial.print(maxDecrease);
      Serial.print(" / ");
      Serial.println(maxIncrease);


      if (/*RPM >= maxDecrease && */RPM <= maxIncrease || previousRPM == 9999) {
        lcd.setCursor(0,2);
        sprintf(msg, "RPM: %4u ", RPM);
        lcd.print(msg);
        lcd.setCursor(0,3);
        lcd.print("              ");


      } else {
        lcd.setCursor(0,3);
        sprintf(msg, "%4u DISCARDED ", RPM);
        lcd.print(msg);
        RPM = calcRPM();
      }

      //lcd.setCursor(0,3);
      //lcd.print(previousRPM);
      
      }
}

//configure Timer 1 (pins 9,10) to output 25kHz PWM
void setupTimer1(){
    //Set PWM frequency to about 25khz on pins 9,10 (timer 1 mode 10, no prescale, count to 320)
    TCCR1A = (1 << COM1A1) | (1 << COM1B1) | (1 << WGM11);
    TCCR1B = (1 << CS10) | (1 << WGM13);
    ICR1 = 320;
    OCR1A = 0;
    OCR1B = 0;
}

/*
//configure Timer 2 (pin 3) to output 25kHz PWM. Pin 11 will be unavailable for output in this mode
void setupTimer2(){
    //Set PWM frequency to about 25khz on pin 3 (timer 2 mode 5, prescale 8, count to 79)
    TIMSK2 = 0;
    TIFR2 = 0;
    TCCR2A = (1 << COM2B1) | (1 << WGM21) | (1 << WGM20);
    TCCR2B = (1 << WGM22) | (1 << CS21);
    OCR2A = 79;
    OCR2B = 0;
}
*/

//equivalent of analogWrite on pin 9
void setPWM1A(float f){
    f=f<0?0:f>1?1:f;
    OCR1A = (uint16_t)(320*f);
}

/*
//equivalent of analogWrite on pin 10
void setPWM1B(float f){
    f=f<0?0:f>1?1:f;
    OCR1B = (uint16_t)(320*f);
}
//equivalent of analogWrite on pin 3
void setPWM2(float f){
    f=f<0?0:f>1?1:f;
    OCR2B = (uint8_t)(79*f);
}
*/

//Calculates the RPM based on the timestamps of the last 2 interrupts. Can be called at any time.
unsigned int calcRPM(){
    unsigned long ts1_copy, ts2_copy;
    noInterrupts();
    ts1_copy = ts1;
    ts2_copy = ts2;
    interrupts();
    /*
    if (micros() - ts2_copy < FANSTUCK_THRESHOLD && ts2_copy != 0){
        return ((60000000 / (ts2_copy - ts1_copy )) / 2);
    }else return 0;
    */
    Serial.print(ts1_copy);
    Serial.print(" / ");
    Serial.print(ts2_copy);
    Serial.print(" / ");
    Serial.println(ts2_copy - ts1_copy);   
    return (60000000 / (ts2_copy - ts1_copy ) / 2);
}

void tachISR() {
    unsigned long m=micros();
    //if((m-ts2)>DEBOUNCE){
        ts1=ts2;
        ts2=m;
    //}
}

EDIT: I updated the code as I improved, or so I think, the filtering.

Not sure if this will help, but you can increase your baud rate for Serial. If you are sending a lot of info, it takes time at 9600 baud and when the tx buffer is full, those print() statements will block.

There is no reason not to use 115200 (and set the same in Serial Monitor)

I had the issue before I added serial for debugging purposes however the code was a lot worse so maybe I traded one issue for another.

Either way, I changed the sketch to 115200 and also the serial monitor on the web editor and I am only getting gibberish. I also changed the com port speed settings but it did not help. In case it matters, this is a CH340 version of the Nano (clone). Same goes with a few other speeds I tried.

@blh64 - I appreciate your continued help! Every comment you make, I learn something new!

EDIT: Today I am receiving a UNI-T UTG962 200MSa/s Function Arbitrary Waveform Generator so I will be checking to see what happens with better / different square wave pulse trains. The issue happens with both fans I tested (completely different in brand / size / specs) so I doubt it will make a difference but worth checking.

There is no reason that 115200 should not work, with a genuine Nano or a clone.

Does this mean you are programming the Arduino with a WEB-EDITOR inside your browser?

If you have a Computer you should use the Arduino-IDE which is available for Windows, Linux and Mac

Anyway post the complete sketch with the 115200 baud and a screenshot of the serial-monitor that shows the baudrate.
115200 should work straihgjt off. 115200 baud is deadly boring slow for actual computer. It is even boring slow for 20 year old computers.

So if you receive gibberisch you might have a typo in the baudrate

best regards Stefan

1 Like

I don't like the 1.8 Arduino IDE. I believe 2.0+ might be better, however Arduino's web based editor is more pleasant to use if only for the dark mode. I took a long break from programming Arduino's and recently upgraded my PC (Ryzen 7 5800X / 64GB RAM / etc) so I am slowly working my way back up to using Atmel Studio and/or Visual Basic Community Edition.

Anyhow, below is an image of what I am getting. It works perfectly at 9600.

I would do crosstesting with the classical arduino IDE or maybe with some other serial terminal-software

This one is a single exe-file that needs no installation

best regards Stefan

1 Like

@StefanL38 - The issue seems related to the Arduino Web Editor ( Arduino Cloud ) as I get the correct output using Terminal.

Anyhow, even with Serial running at 115200, I still get the doubled RPM quite frequently. The tach signal of the fan is stable at 2000 RPM but every few seconds, at random intervals, the reading goes up to 4000 RPM. At this point I am discarding does readings so I could just ignore the issue but I would rather understand why it is happening.

EDIT: After attempting, and failing, to upload a new version with reduced serial prints, it started working with no changes. What I mean by failing is that I get an avrdude error that requires me to reselect the board, com port and "Flavours" before it successfully uploads. I have not looking into why this happens but I've had it happen many times in the past (different PC, SW, Arduino, etc) as well to the point I just started using a JTAG programmer instead of the traditional com port method.

OK, I got the function generator and I can confirm that it is a hardware issue with the fans I tested.

When I set the FG to 70Hz with a 5Vpp, the Arduino is very stable around 2000 RPM. When I hook the arduino up to the fan, the frequency I measure is 69Hz stable however the reading jumps frequently to 4000 RPM. Maybe I am suffering from a bounce... but I don't know how to capture that with my scope and I am guessing it is too low end to even do it.

Tach signal from FAN:


Mimicked Tach signal from FG:


There seems to be less noise on the signal from the low cost FG and something different with the voltage. I set it to 5Vpp but the numbers don't seem to match maybe because of that spike you can see. Just got it, so I am still very unfamiliar, anyhow with the FG the Arduino works perfectly so I wonder whether a Schmitt Trigger is what I need to clean up the tach signal.

Making progress....

I connected my tach signal to a 74HCT14 Schmitt Trigger to clean up the square wave and am happy to say that it now looks great (no noise as shown above). I still get some rare double values but they occur significantly less and are filtered by the code. I have to review what the proper implementation of the Schmitt Trigger is as I may be able to optimize it further. Right now, all I did was:

  • connect the tack to pin 1 (the input of the first trigger)
  • connect the out put of the 1st trigger to the input of the 2nd trigger (to invert it back, whether it matters or not)
  • connect the output of the 2nd trigger to the Arduino
  • connect a 10Kohm resistor between 5V and pin 1 (pullup resistor)
  • connect 5V and GND to the chip for power

I might need to optimize the pull up resistor and add a 104nF cap on the power input.

This is what the 'cleaned' tach signal now looks like:

Compared to:

EDIT:

I have come to a conclusion that my issue was related to rise and fall time of the tach pulses. While the wave looks perfectly square on the scope, I believe it takes too long to rise/fall for Arduino to reliably capture it. Adding the Schmitt Trigger essentially improved the rise/fall time as well as the noise.

An EEVblog video on the topic that shows the issue:

This topic was automatically closed 120 days after the last reply. New replies are no longer allowed.