My current setup is that i have 3 relays, 3 led's, 4 buttons.
If button 1 is pressed relay 1 would be the only one active, led 1 would come on (all other would be off)
If button 2 is pressed relay 2 would be the only one active, led 2 would come on (all other would be off)
If button 3 is pressed relay 3 would be the only one active, led 3 would come on (all other would be off)
If button 4 is pressed no relays are active and all led's are off
I'm currently using this to define the pins:
#define LED_PIN1 6
#define LED_PIN2 7
#define LED_PIN3 12

int relay1 = 11; //Amp CH1 relay
int relay2 = 10; //Amp CH2 relay
int relay3 = 9; //Amp CH3 relay

int button1 = 2; //CH1 Button
int button2 = 3; //CH2 Button
int button3 = 4; //CH3 Button
int button4 = 5; //CH4 Button
I hope this makes sense
I would like to keep this configuration but the only part that needs updating is for the LED to go off after a set period of time (5 seconds for testing purposes but will be changed to 10 mins once it's all working). The relay will remain engaged until another button is pressed.
a) either just declare a fourth monoflop with a buttonPin but the outputPin at one GPIO which is not available (not connected). for example 255 can be used on most microcontrollers.
b) check the state of the fourth button in loop and call the function "release(255)". This will end all monoflops.
You know that I have - at least - some programming knowledge.
I will describe in more detail what my knowledge is.
I programmed quite a lot of things including industrial controls. Not in C++ but in delphi.This was a job for the living for 4 years.
think about whateever you want if you read the following:
I have never coded a class. I have never read anything about how to write my own classes. This means I am a real newbee about c++classes.
I will ask you all the questions about your class that I have. From these questions you can conclude what it means to a newcomer in programming in general.
A general newcomer will have even more questions.
Here are my questions / my assumptions that I would like to have corrected or confirmed.
class Monoflop {
    const uint8_t buttonPin;      // the input GPIO, active LOW
    const uint8_t relayPin;       // the output GPIO, active
    uint32_t previousMillis = 0;  // time management
    bool state = false;           // active or inactive
MonoFlop: the name of the class
    const uint8_t buttonPin;      // the input GPIO, active LOW
    const uint8_t relayPin;       // the output GPIO, active
    uint32_t previousMillis = 0;  // time management
    bool state = false;           // active or inactive
variables that are defined inside the class so that these variables are accessible for functions defined inside the class. Are these variables accessible only inside the class-functions?
public: mark start of that section where functions are defined that are accessible through the dot.-writing
or
Monoflop(uint8_t buttonPin, uint8_t relayPin) : {buttonPin}, {relayPin}
What happens if I only use it one times?
Monoflop(uint8_t buttonPin, uint8_t relayPin);
condensed into the question:
what is the function of the first, the second the third quoting?
I never used the for auto-option
for (auto &i : monoflop) i.begin();
without any explaining this is very hard to understand
I can imagine iterate through all existant objects to do execute function-call begin()
But assuming this does not mean that I would be able to modify or write something similar on my own.
So I am asking you @noiasca :
What is your attitude to learn these things ?
some options
go googling find out anything about it yourself!
if you have a question ask the question
well just use it" It works
These are the questions that I as a
let's say moderate experienced programmer -
have.
A newcomer in general will have much much more questions.
I'm pretty sure that a real newcomer is even unable to ask a specific question about such a cryptic code. With the very small given explanations you expect a pretty how knowledge-level that is nescessary to uncrypt it.
Most coders are unaware of this fact. Which is what I call the
experts blindness for beginner-difficulties.
well Stefan, I'm here to help the TO. Whatever he asks about my code I try to answer.
If you have questions regarding auto range based for loop or class constructors or initializer list you are free to open your own thread.
Ok, i think i'm very close now to getting this working with the help of @noiasca code
I have the buttons working with the LED's and the relays. The LED's are on a time delay and unfortunately so is the relay's. What part would i need to change to get the relay to stay on.
When button 1 is pressed LED 1 will light up and also relay 1 will switch on. When the time lapses LED 1 goes out and so does relay 1.
/*
  Interlocking Monoflop

  https://forum.arduino.cc/t/delay-turning-led-off-after-button-press/1105635/
  2023-03-23 by noiasca
  to be deleted: 2023-06
*/

void release(); // only a prototype - just the signature of a function implemented later in the code


// a class for one LED one button
class Monoflop {
    const uint8_t buttonPin;  // the input GPIO, active LOW
    const uint8_t ledPin;   // the output GPIO, active
    const uint8_t relayPin; // the output for relay
    uint32_t previousMillis = 0; // time management
    bool state = false;       // active or inactive
  public:
    Monoflop(uint8_t buttonPin, uint8_t ledPin, uint8_t relayPin) : buttonPin{buttonPin}, ledPin{ledPin}, relayPin{relayPin}
    {}

    void begin() {                         // to be called in setup()
      pinMode(buttonPin, INPUT_PULLUP);
      pinMode(ledPin, OUTPUT);
      pinMode(relayPin, OUTPUT);
    }

    void off() {                           // handles switching off
      digitalWrite(ledPin, LOW);
      digitalWrite(relayPin, LOW);
      state = false;
    }

    void update(uint32_t currentMillis = millis()) {   // to be called in loop()
      uint8_t buttonState = digitalRead(buttonPin);
      if (buttonState == LOW) {
        release();
        previousMillis = currentMillis;
        digitalWrite(ledPin, HIGH);
        digitalWrite(relayPin, HIGH);
        state = true;
      }
      if (state && currentMillis-previousMillis > 1000) {
        off();
      }

    }
};

//create 3 instances (each with one button and one led/LED)
Monoflop monoflop[] {
  {A0, 12, 9},  // buttonPin, ledPin, relayPin
  {A1, 11, 8},
  {A2, 10, 7},
  {A3, 255, 255},
};

void release(){    // release all outputs
  for (auto &i : monoflop) i.off();
}

void setup() {
  for (auto &i : monoflop) i.begin();
}

void loop() {
  for (auto &i : monoflop) i.update();
}
      if (state && currentMillis-previousMillis > 1000) {
        digitalWrite(ledPin, LOW);
        state = false;
      }
would only switch off the LED by time - not the relay. I would also set the state to false because the time management is just for the LED anymore. Hence the state = false.
The relay would be switched off if either another led/relay would be activated or the 4th button would be pressed.
edit:
/*
  Interlocking Monoflop

  https://forum.arduino.cc/t/delay-turning-led-off-after-button-press/1105635/
  2023-03-23 by noiasca
  to be deleted: 2023-06
*/

void release(uint8_t); // only a prototype - just the signature of a function implemented later in the code

// a class for one button, one LED, one Relay
class Monoflop {
    const uint8_t buttonPin;     // the input GPIO, active LOW
    const uint8_t ledPin;        // the output GPIO, active
    const uint8_t relayPin;      // the output for relay
    uint32_t previousMillis = 0; // time management
    bool state = false;          // active or inactive
  public:
    Monoflop(uint8_t buttonPin, uint8_t ledPin, uint8_t relayPin) : buttonPin{buttonPin}, ledPin{ledPin}, relayPin{relayPin}
    {}

    void begin() {                         // to be called in setup()
      pinMode(buttonPin, INPUT_PULLUP);
      pinMode(ledPin, OUTPUT);
      pinMode(relayPin, OUTPUT);
    }

    void off() {                           // handles switching off
      digitalWrite(ledPin, LOW);
      digitalWrite(relayPin, LOW);
      state = false;
    }

    uint8_t getLedPin() {                  // returns the ledPin
      return ledPin;
    }

    void update(uint32_t currentMillis = millis()) {   // to be called in loop()
      uint8_t buttonState = digitalRead(buttonPin);
      if (buttonState == LOW) {
        release(ledPin);
        previousMillis = currentMillis;
        digitalWrite(ledPin, HIGH);
        digitalWrite(relayPin, HIGH);
        state = true;
      }
      if (state && currentMillis - previousMillis > 1000) {
        // only the LED, not the relay
        digitalWrite(ledPin, LOW);
        state = false;
      }
    }
};

//create 3 instances (each with one button and one led/LED)
Monoflop monoflop[] {
  {A0, 12, 9},  // buttonPin, ledPin, relayPin
  {A1, 11, 8},
  {A2, 10, 7},
  {A3, 255, 255},
};

void release(uint8_t currentPin) {   // release all outputs beside the current output
  for (auto &i : monoflop) if (currentPin != i.getLedPin()) i.off();
}

void setup() {
  for (auto &i : monoflop) i.begin();
}

void loop() {
  for (auto &i : monoflop) i.update();
}
some adoptions to stop that blinking in case the button gets pressed for longer time:
Sure. I estimate it will take more hints to make this code working in all details as the TO wants
As you can see from the character of this question
@rickkap428 you are really OK.
You did not make a suggestion or an own attempt to modify it. @noiasca you will have to guide with a lot of guiding questions or post the solution straight forward.
The usefulnes and sense of my postings is to reflect what is going on.
You are right in saying this does not help find a solution for the TO in a direct way.
At least my intention is to point to the difficulties of the postings that have been made so far.
There are basically two and a half ways:
posting a working solution right away
posting the working solution as a developping process
learn-effect for the TO: minimal very likely to be frustrating because hard to understand.
going down to an intensiv way of explaining a lot of basics
which would need a lot of time from the supporters and a lot of time from the TO.
Learning-effect for the TO: HIGH with small frustration because easy to understand.
Even if the last sketch in #34 will do what you want, i would like to show you the next step.
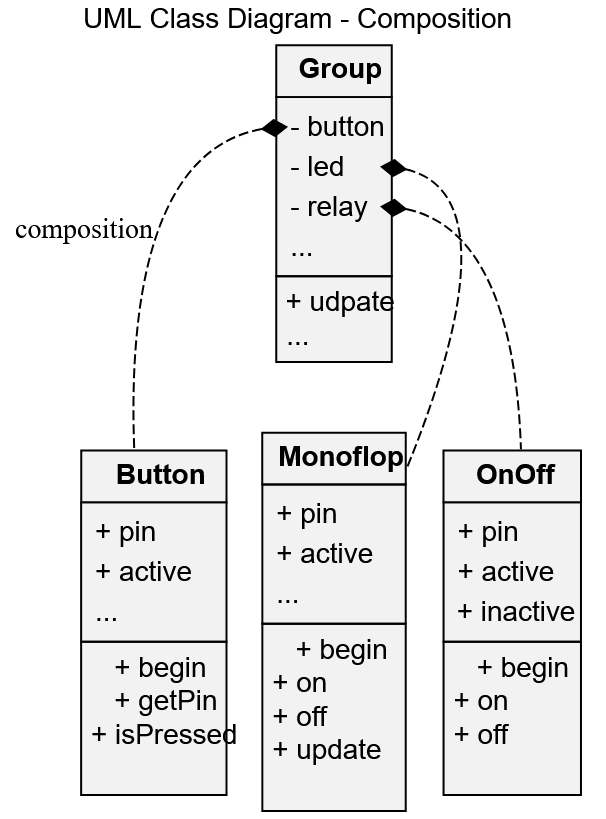
Currently you have all the functionality in one class Monoflop. What this post should demonstrate, how to separate the functionality in separate classes to make the elements reusable.
So let's examine the current monoflop#34.
currently it consists of a button, a monoflop for the LED and simple on/off for the relay.
I would split these in 3 separate classes.
A monoflop is just the functionality to get switched on by an external event and to switch off after a certain time. No need for a "read button ". It could be a sensor, a temperature threshold, a remote control, ... anything.
So we would extract the button read into a separate class. An immediate advantage is, that a separate class Button can be reused for the stand alone masterOff button. One day the class Button could be debounced or react on other events (double click, long press). But currently we just need the information that the button is pressed.
Finally there is the relay. It is a simple on/off of an GPIO. Let's make a class for it because - because we can and because we should learn something.
When you have a class Button, a class Monoflop and a class OnOff you combine them into a class. This can be done by a composition. I just call that class Group because it is a group of different HW elements.
Within the Group you have
a button of the class Button.
a LED reacting as Monoflop
a relay as simple OnOff object
In the sketch you create again an array of 3 instances and assign the pin.
The master off switch reuses the class Button and calls the off function of the amplifier group.
/*
  A Group of several objects
   a simple on/off relay
   a retriggerable Monoflop
   a button to read

  https://forum.arduino.cc/t/delay-turning-led-off-after-button-press/1105635/
  2023-03-25 by noiasca
  to be deleted: 2023-06
  refactored to composition
*/

constexpr uint8_t noPin = 255;  // unused dummy GPIO
void release(uint8_t);          // only a prototype - just the signature of a function implemented later in the code

// a simple button read in OOP
class Button {
    const uint8_t pin;
    const uint8_t active = LOW;
  public:
    Button(uint8_t pin) : pin{pin} {}

    void begin() {
      pinMode(pin, INPUT_PULLUP);
    }

    uint8_t getPin() {
      return pin;
    }

    bool isPressed()  {
      if (digitalRead(pin) == active ) return true; else return false;
    }
};

// a simple on/off output
class OnOff {
    const uint8_t pin;                 // the ouput pin
    const uint8_t active = HIGH;
    const uint8_t inactive = LOW;
  public:
    OnOff(uint8_t pin) : pin{pin}
    {}

    void begin() {
      pinMode(pin, OUTPUT);
    }

    void on() {
      digitalWrite(pin, active);
    }

    void off() {
      digitalWrite(pin, inactive);
    }
};

// a class to "switch off a pin" after a certain time
class Monoflop {
    const uint8_t pin;                     // the output GPIO, active HIGH
    bool state = false;                    // timer is running or not
    uint32_t previousMillis = 0;           // time management
  public:
    Monoflop(uint8_t pin) : pin{pin}
    {}

    void begin() {                         // to be called in setup()
      pinMode(pin, OUTPUT);
    }

    void on(uint32_t currentMillis = millis()) {
      previousMillis = currentMillis;
      digitalWrite(pin, HIGH);
      state = true;
    }

    void off() {                           // handles switching off
      digitalWrite(pin, LOW);
      state = false;
    }

    void update(uint32_t currentMillis = millis()) {   // to be called in loop()
      if (state && currentMillis - previousMillis > 3000) {
        off();
      }
    }
};

// composite serveral harware belonging together
// a class for one button, one LED, one Relay
class Group {
    Button button;
    Monoflop led;
    OnOff relay;
  public:
    Group(uint8_t buttonPin, uint8_t ledPin, uint8_t relayPin)
      : button(buttonPin), led(ledPin), relay(relayPin)
    {};

    void begin() {
      button.begin();
      led.begin();
      relay.begin();
    }

    void off() {
      led.off();
      relay.off();
    }

    uint8_t getButtonPin() {
      return button.getPin();
    }

    void update(uint32_t currentMillis = millis()) {
      if (button.isPressed()) {
        release(button.getPin());  // call release with the current pressed button
        led.on();
        relay.on();
      }
      led.update(currentMillis);   // the led needs to be updated;
    }
};

//create 3 instances (each with one button, one LED, one relay)
Group amplifier[] {
  {A2, 12, 7},  // buttonPin, ledPin, relayPin
  {A1, 11, 8},
  {A0, 10, 9},
};

Button offButton(A3); // a master off button

void release(uint8_t currentPin = noPin) {
  for (auto &i : amplifier)  {
    if (currentPin != i.getButtonPin())
      i.off();
  }
}

void setup() {
  Serial.begin(115200);
  for (auto &i : amplifier) i.begin();
  offButton.begin();
}

void loop() {
  if (offButton.isPressed()) release();
  for (auto &i : amplifier) i.update();
}
wokwi to test
Whats next/You might ask why to do all that effort.
Example Speakers:
If you need another switch group for your speaker sets, you could create a separate group.
If you don't want to switch off the LEDs for the speakers, well, create a separate class for your Speakers and reuse the class Button and use the class OnfOff instead of the monoflop.
Example Relay Modules
If you have different relay modules - some might be active LOW, some active HIGH - adopt the On/Off class to except the active/inactive states on object creation. The control unit just sends an on() - the hardware class knows if it needs to send a LOW or HIGH.
When you ask - hey why is the monoflop so similar to the on/off ... well, yes ... this might be the next step for improvement and use inheritance to get rid of code duplicates. Or the handling of the release() could be a callback function handed over to the class.
If you have reusable code, you just write code once and can use it multiple times.
Smaller Units can be tested on its own easier than large code parts.
p.s.: TL;DR my next post in any thread will be a one liner again...