I sincerely apologize for that mistake. I wasnt thinking clearly. This is the main code of the Arduino. Don't mind the IR_remote.h and keymap.h because I think these are just for the IR remote.
#include "IR_remote.h"
#include "keymap.h"

IRremote ir(3);

#include <Servo.h>

Servo servo_10;
volatile char BLE_bit_temp;
String BLE_value;
String BLE_value_temp;
String G_Bluetooth_value;
volatile int G_degree;
volatile int re_string_len;
volatile float Left_photosensitive;
volatile float Right_photosensitive;
volatile int Lightseeking_Degree;
volatile float f;
volatile int speed_value;
volatile int D_mix;
volatile int D_mid;
volatile int D_max;
volatile boolean Funtion_FLag;
volatile int G_string_len;
volatile int BLE_Change_SPEED;
volatile float V_Servo_angle;
volatile int Left_Tra_Value;
volatile int Center_Tra_Value;
volatile int Right_Tra_Value;
volatile int Black;
volatile int white;
volatile int Front_Distance;
volatile char IR_Car_Mode;
volatile boolean IR_Mode_Flag;

void Infrared_Tracing() {
  Left_Tra_Value = digitalRead(7);
  Center_Tra_Value = digitalRead(8);
  Right_Tra_Value = digitalRead(9);
  if (Left_Tra_Value != Black && (Center_Tra_Value == Black && Right_Tra_Value != Black)) {
    Move_Forward(120);

  } else if (Left_Tra_Value == Black && (Center_Tra_Value == Black && Right_Tra_Value != Black)) {
    Rotate_Left(80);
  } else if (Left_Tra_Value == Black && (Center_Tra_Value != Black && Right_Tra_Value != Black)) {
    Rotate_Left(120);
  } else if (Left_Tra_Value != Black && (Center_Tra_Value != Black && Right_Tra_Value == Black)) {
    Rotate_Right(120);
  } else if (Left_Tra_Value != Black && (Center_Tra_Value == Black && Right_Tra_Value == Black)) {
    Rotate_Right(80);
  } else if (Left_Tra_Value == Black && (Center_Tra_Value == Black && Right_Tra_Value == Black)) {
    STOP();
  }
}

void Move_Forward(int car_speed) {
  digitalWrite(2,HIGH);
  analogWrite(5,car_speed);
  digitalWrite(4,LOW);
  analogWrite(6,car_speed);
}

void Move_Backward(int car_speed) {
  digitalWrite(2,LOW);
  analogWrite(5,car_speed);
  digitalWrite(4,HIGH);
  analogWrite(6,car_speed);
}

void Rotate_Left(int car_speed) {
  digitalWrite(2,LOW);
  analogWrite(5,car_speed);
  digitalWrite(4,LOW);
  analogWrite(6,car_speed);
}

void Rotate_Right(int car_speed) {
  digitalWrite(2,HIGH);
  analogWrite(5,car_speed);
  digitalWrite(4,HIGH);
  analogWrite(6,car_speed);
}

void STOP() {
  digitalWrite(2,LOW);
  analogWrite(5,0);
  digitalWrite(4,HIGH);
  analogWrite(6,0);
}

float checkdistance() {
  digitalWrite(12, LOW);
  delayMicroseconds(2);
  digitalWrite(12, HIGH);
  delayMicroseconds(10);
  digitalWrite(12, LOW);
  float distance = pulseIn(13, HIGH) / 58.00;
  delay(10);
  return distance;
}

void Ultrasonic_Avoidance() {
  Front_Distance = checkdistance();
  if (Front_Distance <= 10) {
    Move_Backward(100);
    delay(200);
    if (50 >= random(1, 100)) {
      Rotate_Left(100);

    } else {
      Rotate_Right(100);

    }
    delay(500);

  } else if (Front_Distance >= 10 && Front_Distance <= 20) {
    STOP();
    delay(200);
    if (50 >= random(1, 100)) {
      Rotate_Left(100);

    } else {
      Rotate_Right(100);

    }
    delay(500);
  } else if (Front_Distance > 20) {
    Move_Forward(70);
  }
}

void Ultrasonic_Follow() {
  Front_Distance = checkdistance();
  if (Front_Distance <= 5) {
    Move_Backward(80);

  } else if (Front_Distance >= 5 && Front_Distance <= 10) {
    STOP();
  } else if (Front_Distance > 20) {
    Move_Forward(100);
  }
}


/*
    IR_KEYCODE_1->Button 1
    IR_KEYCODE_2->Button 2
    IR_KEYCODE_3->Button 3
    IR_KEYCODE_4->Button 4
    IR_KEYCODE_5->Button 5
    IR_KEYCODE_6->Button 6
    IR_KEYCODE_7->Button 7
    IR_KEYCODE_8->Button 8
    IR_KEYCODE_9->Button 9
    IR_KEYCODE_0->Button 0
    IR_KEYCODE_STAR->Button *
    IR_KEYCODE_POUND->Button #
    IR_KEYCODE_UP->Button UP
    IR_KEYCODE_DOWN->Button DOWN
    IR_KEYCODE_OK->Button OK
    IR_KEYCODE_LEFT->Button LEFT
    IR_KEYCODE_RIGHT->Button RIGHT
*/
void IR_remote_control() {
  switch (IR_Car_Mode) {
   case 'b':
    Move_Backward(110);
    delay(300);
    STOP();
    IR_Car_Mode = ' ';
    break;
   case 'f':
    Move_Forward(110);
    delay(300);
    STOP();
    IR_Car_Mode = ' ';
    break;
   case 'l':
    Rotate_Left(110);
    delay(300);
    STOP();
    IR_Car_Mode = ' ';
    break;
   case 'r':
    Rotate_Right(110);
    delay(300);
    STOP();
    IR_Car_Mode = ' ';
    break;
   case 's':
    STOP();
    IR_Car_Mode = ' ';
    break;
   case '+':
    V_Servo_angle = V_Servo_angle + 3;
    if (V_Servo_angle >= 180) {
      V_Servo_angle = 180;

    }
    servo_10.write(round(V_Servo_angle));
    delay(0);
    IR_Car_Mode = ' ';
    break;
   case '-':
    V_Servo_angle = V_Servo_angle - 3;
    if (V_Servo_angle <= 0) {
      V_Servo_angle = 0;

    }
    servo_10.write(round(V_Servo_angle));
    delay(0);
    IR_Car_Mode = ' ';
    break;
  }
  if (ir.getIrKey(ir.getCode(),1) == IR_KEYCODE_UP) {
    IR_Car_Mode = 'f';
    IR_Mode_Flag = true;

  } else if (ir.getIrKey(ir.getCode(),1) == IR_KEYCODE_LEFT) {
    IR_Car_Mode = 'l';
    IR_Mode_Flag = true;
  } else if (ir.getIrKey(ir.getCode(),1) == IR_KEYCODE_DOWN) {
    IR_Car_Mode = 'b';
    IR_Mode_Flag = true;
  } else if (ir.getIrKey(ir.getCode(),1) == IR_KEYCODE_RIGHT) {
    IR_Car_Mode = 'r';
    IR_Mode_Flag = true;
  } else if (ir.getIrKey(ir.getCode(),1) == IR_KEYCODE_OK) {
    IR_Car_Mode = 's';
    IR_Mode_Flag = true;
  } else if (ir.getIrKey(ir.getCode(),1) == IR_KEYCODE_2) {
    IR_Car_Mode = '+';
    IR_Mode_Flag = true;
  } else if (ir.getIrKey(ir.getCode(),1) == IR_KEYCODE_8) {
    IR_Car_Mode = '-';
    IR_Mode_Flag = true;
  }
}

void setup(){
  Serial.begin(115200);
  servo_10.attach(10);
  pinMode(7, INPUT);
  pinMode(8, INPUT);
  pinMode(9, INPUT);
  BLE_bit_temp = ' ';
  BLE_value = "";
  BLE_value_temp = "";
  G_Bluetooth_value = "";
  G_degree = 0;
  re_string_len = 0;
  IRremote ir(3);

  Left_photosensitive = 0;
  Right_photosensitive = 0;
  Lightseeking_Degree = 0;
  f = 0;
  speed_value = 200;
  D_mix = 5;
  D_mid = 10;
  D_max = 400;
  Funtion_FLag = false;
  G_string_len = 0;
  BLE_Change_SPEED = 60;
  V_Servo_angle = 90;
  Left_Tra_Value = 1;
  Center_Tra_Value = 1;
  Right_Tra_Value = 1;
  Black = 1;
  white = 0;
  Front_Distance = 0;
  IR_Car_Mode = ' ';
  IR_Mode_Flag = false;
  servo_10.write(V_Servo_angle);
  delay(0);
  pinMode(2, OUTPUT);
  pinMode(5, OUTPUT);
  pinMode(4, OUTPUT);
  pinMode(6, OUTPUT);
  pinMode(12, OUTPUT);
  pinMode(13, INPUT);
}

void loop(){
  while (true) {
    while (Serial.available() > 0) {
      BLE_value_temp = BLE_value_temp + ((char)(Serial.read()));
      delay(2);
      if (!Serial.available() > 0) {
        BLE_value = BLE_value_temp;
        BLE_value_temp = "";

      }
    }
    if (0 < String(BLE_value).length()) {
      if (4 >= String(BLE_value).length()) {
        if ('%' == String(BLE_value).charAt(0) && '#' == String(BLE_value).charAt((String(BLE_value).length() - 1))) {
          if (IR_Mode_Flag == true) {
            STOP();
            IR_Car_Mode = ' ';
            IR_Mode_Flag = false;

          }
          switch (String(BLE_value).charAt(1)) {
           case 'H':
            V_Servo_angle = V_Servo_angle + 4;
            if (V_Servo_angle >= 180) {
              V_Servo_angle = 180;

            }
            servo_10.write(round(V_Servo_angle));
            delay(0);
            BLE_value = "";
            break;
           case 'G':
            V_Servo_angle = V_Servo_angle - 4;
            if (V_Servo_angle <= 0) {
              V_Servo_angle = 0;

            }
            servo_10.write(round(V_Servo_angle));
            delay(0);
            BLE_value = "";
            break;
           case 'F':
            Move_Forward(110);
            delay(400);
            BLE_value = "";
            break;
           case 'B':
            Move_Backward(110);
            delay(400);
            BLE_value = "";
            break;
           case 'L':
            Rotate_Left(110);
            delay(250);
            BLE_value = "";
            break;
           case 'R':
            Rotate_Right(110);
            delay(250);
            BLE_value = "";
            break;
           case 'T':
            Infrared_Tracing();
            break;
           case 'S':
            BLE_value = "";
            STOP();
            break;
           case 'A':
            Ultrasonic_Avoidance();
            break;
           case 'Z':
            Ultrasonic_Follow();
            break;
          }

        }

      } else {
        BLE_value = "";
        STOP();

      }

    } else {
      STOP();

    }
    IR_remote_control();
  }

}
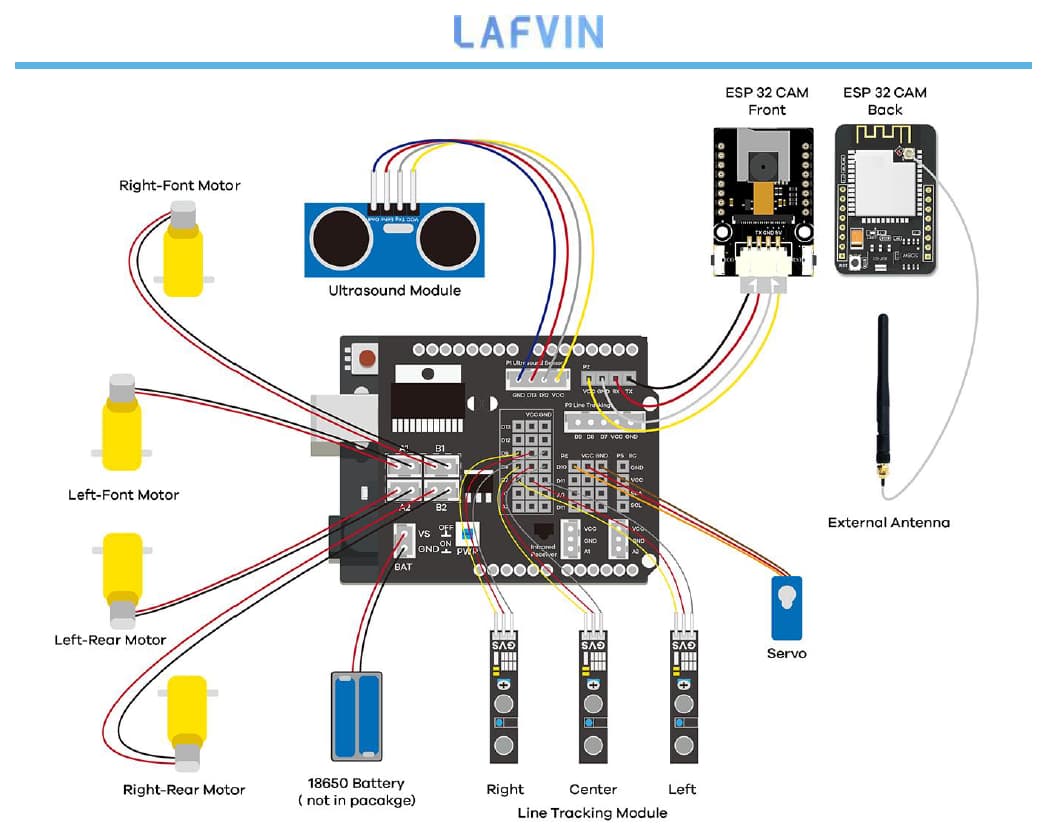
Also, this is the schematic of the robot car:
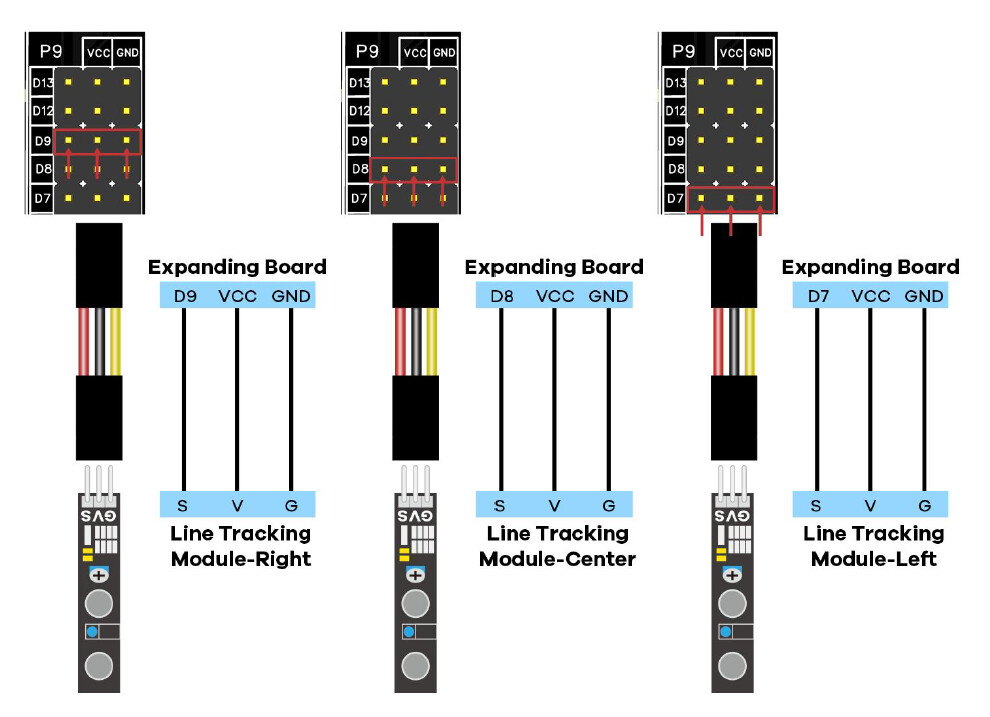
For line tracking:
For the Ultrasonic, ESP32 CAM, and the line tracking