I'm doing my first project ever with Arduino (or with any programming involved at all) which is to create a 3D printer module for a CNC Mill.
The only electronic stuff I need is simple: control the temperature of the nozzle and the speed of a DC fan.
What I wanted is for it to be independant of a PC while operating, so I'd use an LCD display to show the set temperature and the actual temperature and a rotary encoder to change the set temperature. As for the fan just a simple potentiometer to change the speed.
I've done a little bit of research (I wanted to do more but I don't have much time), joined a bunch of circuits I've seen online and created the circuit attached. The problem now is that I've absolutely no idea if it's correct (it probably isn't). Could you guys please shed some light and inform me of how I could do this better?
Please just make a simple pencil drawing showing all the connections clearly labelled and post a photo of the drawiing. It will be much easier to follow than your attractive picture.
Also post your Arduino program.
If you are new to Arduinos I suggest you take everything out of the project except the Arduino and the heater components and just show the data on the Arduino Serial Monitor. Start as simple as possible.
How do you propose that the Arduino will detect the temperature?
Do you have the means to measure the temperature independently to verify the Arduino data?
Robin2:
Please just make a simple pencil drawing showing all the connections clearly labelled and post a photo of the drawiing. It will be much easier to follow than your attractive picture.
Yeah, sorry about that. Although I'm not sure a pencil drawing will be much clearer, but I'll try!
Robin2:
Also post your Arduino program.
I don't really have one just yet, still working on it
Robin2:
How do you propose that the Arduino will detect the temperature?
If you squint your eyes you might see a thermistor (100k) on the middle of the breadboard. That's a standard thermistor that comes with nozzles
Robin2:
Do you have the means to measure the temperature independently to verify the Arduino data?
MorganS:
And that's why we don't like F**ing. Your 12V battery looks a lot like a 9V one. But putting the label on it helps.
I tried my best with MS Paint
MorganS:
What is the knob-like component in the fan's positive line? Motors work really well with MOSFETs. Use another MOSFET to control the fan speed.
Sorry, that's the potentiometer. I've seen somewhere that is how you connect them. Not sure I trust it though. And thank you for the tip.
I think I should have really made a simpler schematic...
Please read the first post in any forum entitled how to use this forum. http://forum.arduino.cc/index.php/topic,148850.0.html then look down to item #7 about how to post your code.
It will be formatted in a scrolling window that makes it easier to read.
Please read the first post in any forum entitled how to use this forum. http://forum.arduino.cc/index.php/topic,148850.0.html then look down to item #7 about how to post your code.
It will be formatted in a scrolling window that makes it easier to read.
Have you written any code yet?
Tom...
Hi, thank you Tom
No I haven't actually, that would be the next part of my research. I've found examples of codes for the different parts of my circuit, I just have to join them I suppose.
Truth be told, I'm quite desperate. I thought this would be a lot easier than this. Oh well, I think I'm gonna remove the LCD display and the rotary encoder for now and control all of this through my computer. That should be much simpler right? I'll go back to the LCD once I know how to properly connect it.
Hi,
Okay.
It sounds like you have programmed before?
Can you tell us your electronics, programming, Arduino, hardware experience?
Start your programming in stages, so get your temperature sensing working first, then do other parts separately to prove their operation before combining codes.
You will do much better writing your own code, if you post any code you do, we can help you tidy it up and streamline any problems you may have.
Well, I've taken a Python course a few years back, that's about it for programming.
As for electronics and hardware I have a bit of a hard time, but nothing some searching around won't do.
The thing is, if I don't finish this project, I might not graduate this semester, so I have to do this.
Thank you Tom for the tips, I'll follow that.
Alas, can you see something wrong with the wiring on my mess of a circuit? Something obvious that really doesn't look right?
Hi,
I'm at work at the moment, lunchbreak, but I'll look later.
What fan are you going to use?
Check the spec on the MOSFET, it needs to be logic level type N-CH MOSFET.
TomGeorge:
Hi,
This schematic may help, its just a suggestion.
You have two potentiometers, one to set your temperature, the other to control your fan speed,
Robin2:
You don't appear to have posted any image.
...R
I'm sorry Robin, I was just telling Morgan about how I used MS Paint to relabel that 9V battery on the original image.
I think Tom's image is a lot better than any drawing I could come up with right now.
gian_nichele:
I'm sorry Robin, I was just telling Morgan about how I used MS Paint to relabel that 9V battery on the original image.
I think Tom's image is a lot better than any drawing I could come up with right now.
No problem. But like I said in Reply #2 start simple.
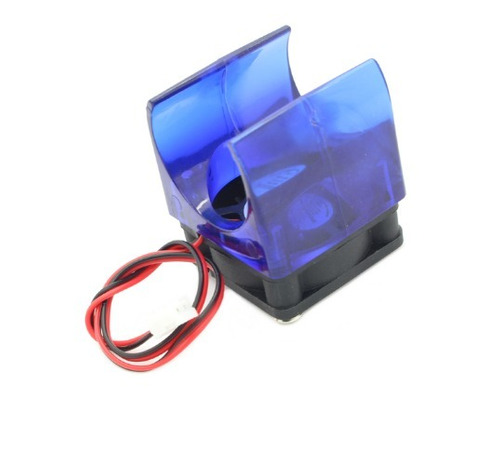
Is the fan EXACTLY like that or is that a photo of another fan?
The reason is that modern brushless fans behave very poorly when given PWM power. They always attempt to run at full speed until there's not enough energy to keep going at that speed. Then they stop. No proportional control at all.
It's useless looking up the part number in the photo if it's only "like" the one you have.
MorganS:
Is the fan EXACTLY like that or is that a photo of another fan?
The reason is that modern brushless fans behave very poorly when given PWM power. They always attempt to run at full speed until there's not enough energy to keep going at that speed. Then they stop. No proportional control at all.
It's useless looking up the part number in the photo if it's only "like" the one you have.
Ah I see it. Well, this is the one I'm actually gonna use
I can't see what model it is though, as it hasn't arrived yet and this is the only picture. It says it's for 3D printers though, so I'm hopeful. If all fails I guess I can always just plug it directly to power supply with an on/off switch.