Freertos global variables (newbie)

Hi to all.
I am new to use the FreeRtos for a esp32 module.
I have a general question about the usage of Global variables.

Let's say that I have some switches and the variables for the pins assignment.

I have one task that runs in 0 core and reads the pins state and print them in a oled display and an other task that runs in 1 core and read the pins state and do something depend which switch is on or off

I haven't use any Queue
Should I? I just read only and not change the variables

Are the Queue methods only when we want to change the variables?

Thanks in advance

Ps : I notice that the right method would not be the Queue but the semaphore / mutex, so my question refers to them also

1 Like

Which ESP32 Model (please, post a picture) and which GPIO pins you are using to connect your switches? It would be good if you post your sketch.

Note that you are working in Multicore Multitasking environment and sharing common hardware (the GPIO pins) resources between tasks. You must follow appropriate ways to avoid deadlock/race conditions which might exist when the tasks try to access the resource (GPIO pins)

Queues are used for sending messages to other tasks. You can build the output of the core 0 task in a queue and then output it on the oled without interruption by other task outputs.

Button states can be handled as in ordinary Arduino sketches. Only one task reads the buttons and provides the values. You can notify other tasks of button state changes, see e.g. the xTaskNotify() function.

Is it not that the OP wants his both cores independently read the states of the pins?

No problem then. Any number of tasks can read shared resources like pins.

It becomes more interesting if button state changes should be watched, or debounced switch state should be made available to other tasks. Then one task can do all the work and notifies other tasks waiting for such a change.

1 Like

Here is a sketch Putting Focus on Queues
Play with it and see if it fits your needs
simple as that

/*/////////////////////////////////////////////////////////////////////////////////////////
 Libraries to include
*///---------------------------------------------------------------------------------------
#include <Arduino.h>             //Arduino Base Library
///////////////////////////////////////////////////////////////////////////////////////////

static const uint8_t The_Queue_Length = 5; // Defines the Queue Length
static QueueHandle_t The_Queue;            // Declares the Queue as a Global variable so all tasks can access it

void Task_Queue_Message(void *parameters)
{
  int QueueValueStorage;

  while (true) 
  {// Check if there is a message in the Queue
   //xQueueReceive is the Macro that reads from the Queue
   //(xQueueReceive(Parameter 1, (void *)Parameter 2, Parameter2a) == pdTRUE)
   // Parameter 1 = Global Variable HANDLE for the Queue
   // Parameter 2 = The Address of the Local variable where the Queue item is copied TO
   // Parameter 2a = The timeout in Ticks while waiting for something to appear  in Queue
    if (xQueueReceive(The_Queue, (void *)&QueueValueStorage, 0) == pdTRUE)
    {  
      debugln(QueueValueStorage); // Prints whatever it finds in Queue
      vTaskDelay(100 / portTICK_PERIOD_MS); // If nothing is found wait 1 second
      // Controls HOW OFTEN the Queue is Checked
    } 
  }
}
/*/////////////////////////////////////////////////////////////////////////////////////////
 BEGIN SETUP
*//////////////////////////////////////////////////////////////////////////////////////////
void setup() 
  {  // OPENS void setup Function
  Serial.begin(115200);  // Setup of Serial BAUD Rate
  vTaskDelay(1000 / portTICK_PERIOD_MS);

  Serial.println();
  Serial.println("----FREE RTOS QUEUE DEMO ----");

  The_Queue = xQueueCreate (The_Queue_Length, sizeof(int));

  xTaskCreate(Task_Queue_Message, "Task Queue Message", 1024, NULL, 1, NULL);

  }  // CLOSES void setup Function
///////////////////////////////////////////////////////////////////////////////////////////

/*/////////////////////////////////////////////////////////////////////////////////////////
 BEGIN LOOP
*//////////////////////////////////////////////////////////////////////////////////////////
void loop() 
  {  // OPENS void loop Function
  static int Counter = 0;
    if (xQueueSend(The_Queue, &Counter, 10) !=pdTRUE)
    {
      Serial.println("ERROR - QUEUE IS FULL");
    }
    Counter++;
    vTaskDelay(1000 / portTICK_PERIOD_MS);
    // Controls the Output Rate

  }  // CLOSES void loop Function
///////////////////////////////////////////////////////////////////////////////////////////

Respectfully to the O.P.
Does the O.P. Know what he wants ?
Does anyone starting ESP32 Know what they want?
He did also state

On those grounds i think we educate him on putting focus on MultiTasking and inter task communication vs the Multi Core thing he thinks that he needs.

As was my experience, i also thought i needed Multi Core
Turns out you can do a hell of a lot on a single core with Multi Tasking
I reckon we teach him the basic structure of FreeRTOS
Then Queues and Maybe Mutexes if it comes to that.

for now i've given him a basic Queue Sketch to play with and see if it suits his needs.
Granted he'll need to understand a few basics

so @caslor

Go through this as Basic Training
Arduino Programming Course

Go through this ... It's 400 pages BUT WELL WORTH IT, You'll understand everything.
Mastering the FREE RTOS Real Time Kernel
(this is the one you read first)
at this point you'll have plenty of what you need

After all that we'll see if you have questions
and then you can use this location for the reference manual and companion Source book
https://www.freertos.org/Documentation/RTOS_book.html

1 Like

I'm interested in this myself, but... is this supposed to be a link? It looks like a link, feels like a link, but it doesn't act like a link!

I'm guessing it should point to https://freertos.org/Documentation/161204_Mastering_the_FreeRTOS_Real_Time_Kernel-A_Hands-On_Tutorial_Guide.pdf.

2 Likes

Hi mate, let me fix that link for you
but, in any case, Here you go

FreeRTOS_Real_Time_Kernel-A_Hands-On_Tutorial_Guide.pdf (4.4 MB)

Here's an example of protecting a shared resource using a mutex..

SemaphoreHandle_t xSemaphore = NULL;

unsigned long sharedCount = 0;

void setup() {
  // put your setup code here, to run once:
  Serial.begin(115200);
  Serial.println("Hello, ESP32!");
  /* Create the semaphore to guard a shared resource.  As we are using
    the semaphore for mutual exclusion we create a mutex semaphore
    rather than a binary semaphore. */
  xSemaphore = xSemaphoreCreateMutex();

  if ( xSemaphore != NULL )
  {
    xTaskCreate(vTask, "Task0", 1000, NULL, 1, NULL);
    xTaskCreate(vTask, "Task1", 1000, NULL, 1, NULL);
    xTaskCreate(vTask, "Task2", 1000, NULL, 1, NULL);
  }

}

void loop() {
  // put your main code here, to run repeatedly:
  delay(10); // this speeds up the simulation
}

/* A task that uses the semaphore. */
void vTask( void * pvParameters )
{
  for ( ; ; )
  {
    /* ... Do other things. */

    if ( xSemaphore != NULL )
    {
      /* See if we can obtain the semaphore.  If the semaphore is not
        available wait 10 ticks to see if it becomes free. */
      if ( xSemaphoreTake( xSemaphore, ( TickType_t ) 10 ) == pdTRUE )
      {
        /* We were able to obtain the semaphore and can now access the
          shared resource. */

        sharedCount++;
        Serial.println(pcTaskGetName(NULL));
        Serial.print("Counter: ");
        Serial.println(sharedCount);


        /* We have finished accessing the shared resource.  Release the
          semaphore. */
        xSemaphoreGive( xSemaphore );
        vTaskDelay(1000);
      }
      else
      {
        /* We could not obtain the semaphore and can therefore not access
          the shared resource safely. */
      }
    }
    vTaskDelay(1);
  }
}

have fun.. ~q

1 Like

You have followed FreeRTOS's convention in writing the name of the function (xQueueCreate()) but NOT for the varible THE_QUEUE (xQueue). Uniform use of conventions brings cool as most of us follow FreeRTOS documents. Anyway, I have the respect for your own convenient conventions as I have also my conventions like Task10, Task11, .... to which you showed respect.

1 Like

So much help and information!!
Thank you all

I started experiment with just 1 core (core 1 that is default for arduino also) and Queue

I have manage to make it work if I use for all the tasks the same priority.

One more question.

I have read that esp uses by dafault the core 0 for bluetooth / wifi.
So if I make a task for some bluetooth / wifi functions should I declare the 0 core to the "xTaskCreatePinnedToCore" or just use the "xTaskCreate" and the Esp idf will place it to the right core?

Thanks again for the help

FreeRTOS uses core 0 for system functions, leaving core 1 for user tasks.

Pinning user tasks is not normally required. Then the system can distribute tasks over both cores. Why leave core 0 idle as long as no system task wants to use it?

No problem, I personally found the default example a bit confusing at first so i assigned names that made sense to me, that's all.

1 Like

You notice that the names of both your variable THE_QUEUE and the constant THE_QUEUE_LENGTH are all capitals? According to C convention all-caps names are reserved for macros (#define...).

You can use any convention for private/corporate use, but in the forum people will be confused by breaking C conventions.

2 Likes

See, Now you owe all of us a coffee or a Beer :stuck_out_tongue:

That's good, as what i have learned is....
You don't need to use the second core UNTIL YOU NEED TO USE THE SECOND CORE.
In saying that, By all means , When learning Use it
But not until you've used only 1 core and many many Multi Tasking examples that you understand how to control multi Tasks within 1 core
After that you can move to 2 cores

I would suggest you experiment between using

xTaskCreatePinnedToCore()
//and
xTaskCreate()

Ii find it very useful to know which to use when
as a cheat sheet, the only difference between those 2 is the specific allocation of a core when using the first

That makes sense
Remember to keep your delays the same length while testing,
vTaskDelay will affect what gets executed first or second or whatever

in a nutshell , Priorities work like this
we are taught that 0 is the lowest, but not told the highest,
Fact is you can pick most any number you like,
I Personally have tested from Priority 0 to Priority 50
it all works
Until i find a reason to go above that i won't.
You should only need up to 5 Priority levels

DO THIS

Create 2 tasks
NO DELAYS at all in the sketch

TASK 1 Priority 1
TASK2 Priority 2
compile and Run

IS THIS WHAT YOU ARE GETTING

Result
Only TASK2 is allowed to run
2023-09-02 00_29_52-sketch_sep1b _ Arduino IDE 2.1.1

If i now change the priorities in reverse

  xTaskCreate(TASK1, "Task 1", 2000, NULL, 2, NULL); 
  xTaskCreate(TASK2, "Task 2", 2000, NULL, 1, NULL);

I get this output
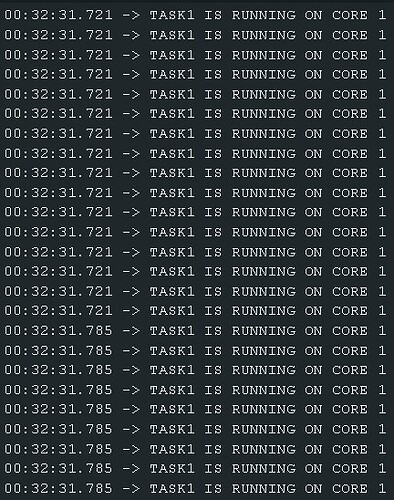
Now it would APPEAR that it's not working.. BUT IT IS

if i now add a 1 sec delay to TASK1 and TASK2 as follows

void TASK1( void *pvParameters )  
{
    for(;;)
    {
      Serial.print("TASK1 IS RUNNING ON CORE ");
      Serial.println(xPortGetCoreID());
      vTaskDelay(1000); 
    }
}

The compile and run

See, it works
2023-09-02 00_35_42-sketch_sep1b _ Arduino IDE 2.1.1

Because adding the delay puts the task into Blocked status for the duration of the delay,
While in blocked status the Task with the lower priority is allowed to run,
Then when the higher priority Task returns from Blocked Status it takes priority and is allowed to run without interruption form the lower priority task

As you can see here , my tests were done with xTaskCreate Menaing i let the ESP decide which core it wants to use
it started on Core 1, it finished up on Core 0

Unless it actually affects something that you're doing, WHY DOES IT MATTER

when you are learning
First understand xTaskCreate
then play with xTaskCreatePinnedToCore
that's my advice

You are correct, ABSOLUTELY

Allow me to Explain
of course the convention is Uppercase for Macro's and everything else is
Uppercase on first letter

When i created this sketch i got an idea in my head, that being
"I wonder if i can name it all in capitals, would that work"
ANSWER : Yes it works

But i do agree that you shouldn't do it permanently, so .. You are correct

You are correct, i wasn't thinking of that, I'll go and change it.

1 Like

The changes have been made

Thanks one more time all for your guidance.

One more general propose question if allow me.

Alla this time I was playing - making personal projects with arduino had never in my mind about memory management.
I have projects running for months without any issue even when the compiler had warning about the low free memory available.

In free rtos is something that should worry me?

Most of my projects had to to to monitor physical switches and control some relays.. + a screen printing some prefix messages and maybe a can bus Communication in the distance future.

So if a make a code in freertos and working fine for one day... Is an change in one month had problem with memory?

As I told just read global variables of a pin state store them in one array and making high or low some output pins.

1 Like

You're Welcome

I don't know if i will allow you :stuck_out_tongue:
Is there a :coffee: in it for me ?

Most people don't

No, it should worry you in Arduino .
it's just good habit to keep memory optimized and programs optimized
but it's less of a concern in RTOS than it is in Arduino

1 Like