Getting Started with Git

Understanding Git: An Essential Tool for Arduino Enthusiasts

Git, at its heart, is a system designed for tracking changes in files. Imagine having limitless undo levels for your projects, enabling you to retrace your steps, regardless of how complex your code becomes or where you're working from. And you can even access these undo levels from a completely different computer.

As a beginner, it may seem convenient to repeatedly save your growing code in one file. However, the more intricate your project, the more challenging it becomes to identify and undo mistakes. Creating different versions of your file by saving with different names or numbers may initially seem like a solution, but it often leads to a cluttered workspace and potential issues with dependency updates.

Here's where Git proves its worth, offering a powerful version control system. This system enables you to track changes chronologically, maintain multiple versions without space constraints, and create branches for exploring alternate ideas. It also facilitates collaborative coding by allowing seamless sharing and monitoring of changes.

The core concepts of Git revolve around repositories, commits, and branches. A repository is a collection of files you wish to monitor changes in, such as the files in your Arduino project. Commits are the tracked changes, acting as personal restore points. Branches provide a safe playground for testing new ideas without impacting your main code, and they can be merged or discarded based on the outcome.

In a typical Git workflow, you initiate your code and make an initial commit. As you progress, every significant change or addition—like fixing a bug or adding a function—marks a new commit. When you need to introduce a major feature, you create a new branch. Once you're satisfied with the result, you merge it back into your main branch. This system ensures efficient, organized, and risk-free development.

To sum up, Git is a highly potent tool that provides unparalleled advantages for Arduino enthusiasts and programmers in general. It not only helps to keep your codebase organized but also empowers you to confidently experiment with new features. Its systematic tracking of changes facilitates easy troubleshooting and allows seamless collaboration. Embracing Git in your Arduino projects means embracing a streamlined, stress-free coding experience that ultimately leads to more effective and efficient project completion.

Here's a good link if you want to learn more about how Git works and all the different functions it supports.

This tutorial will focus on the two basic skills you need to get started. Making commits and working with branches.

Here is a Discussion thread for comments and questions:

3 Likes

Step 1. Install and Configure Git

I'll be working in Ubuntu 22.04 Jammy Jellyfish for this tutorial. However I've tried to also provide Windows instructions in the places where they are very different. Thanks to @ptillisch for providing the Windows details.

While there are dozens upon dozens of GUI options for working with Git, I will be using git-gui for this tutorial as it comes pre-installed with git so it should be safe to assume that it is available and accessible to anyone trying the tutorial. It is a bit dated looking and plain, but it does all of the functions needed for this tutorial and the use will translate well to other GUI options if you decide to use something nicer later.

++++++++++++++++++++++++++++++++++++++
**** UBUNTU / LINUX ****
++++++++++++++++++++++++++++++++++++++
On Ubuntu

For anyone on Linux the command line is the easiest place to start and get installed.

First step is to make sure Git isn't already installed:

david@VirtualUbuntu:~$ git --version

and I get:

Command 'git' not found, but can be installed with:
sudo apt install git

So follow it's advice and run

david@VirtualUbuntu:~$ sudo apt install git

And after it does its installation:

david@VirtualUbuntu:~$ git --version
git version 2.34.1

so now Git is installed.

Git needs to know who to attribute our commits to. So we have to give it a name and email it can use to identify us. You don't have to use a real name or email, it just has to have something in there.

Run these two more commands at the command line after git is installed.

david@VirtualUbuntu:~$ git config --global user.name "<UserName>"
david@VirtualUbuntu:~$ git config --global user.email "<Email>"

Replace UserName and Email with the user name and email you want to attribute your commits to. If you plan on using GitHub and want to keep your email address private, then it would be a good idea to go and set your account up now and get the private no-reply email that they provide in the email settings and use that here.

Finally you have to install the git-gui if you want to use it. There are dozens of GUI options available, but I've chosen git-gui because it comes installed with git and it should be available to everyone.

sudo apt install git-gui

That completes the setup and configuration for Ubuntu / Linux users. You can close out the terminal window.

++++++++++++++++++++++++++++++++++++++
**** WINDOWS ****
++++++++++++++++++++++++++++++++++++++

On Windows

  1. Open a web browser and navigate to Git - Downloading Package
  2. Click on the "64-bit Git for Windows Setup" link on the download page.
  3. Wait for the download to finish
  4. Run the downloaded file. An installer dialog will open.
  5. Complete the installation via the installer dialog.
    Accepting the default settings for the various options should be fine.

Git needs to know who to attribute our commits to. So we have to give it a name and email it can use to identify us. You don't have to use a real name or email, it just has to have something in there. These two commands need to be run from the powershell.

  1. Click the Windows Start Button.
  2. Type 'powershell' in the search field.
  3. Select "Windows PowerShell ISE" from the search results.
  4. At the terminal prompt type

git config --global user.name "<username>"

where username is the username you want to use and press Enter.

Then type the second command:

git config --global user.email "<email>"

where email is the email you want to use and hit Enter. If you plan on using GitHub and want to keep your email address private, then it would be a good idea to go and set your account up now and get the private no-reply email that they provide in the email settings and use that here.

That completes the setup and cofiguration for Windows users. You can close out of the powershell.

Step 2. First Commit

The rest of this tutorial will look almost the same for users on any OS. It will mainly just use git-gui and the Arduino IDE. The only difference is launching git-gui.

For Windows users it's in the Start menu under a folder called "Git".

For Linux users you can open a terminal and type 'git gui' (no quotes) and hit Enter and it will launch. Instructions to put it in the application launcher are in Post #6.

So start by opening the Arduino IDE and writing some code and saving it. I'm going to use the classic Blink example with one obvious mistake and I'm going to save the project as "MyBlink"

image

void setup() {

  pinMode(13, OUTPUT);

}

void loop() {
  
  digitalWrite(13, HIGH);
  delay(1000);
  digitalWrite(13,LOW);

}

Once that is saved, launch git-gui. It opens to this dialog. Choose Create New Repository.
image
image

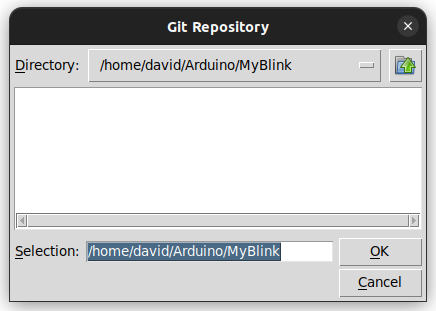
Click Browse and:

image

image

Hit Create.

In Linux I was getting an error about how they were trying to change away from using "master" as the main branch name. But it wasn't a real error and and repository was created correctly. You can confirm by looking in the MyBlink folder in the sketch directory. There should be a hidden folder called .git. (You may need to show hidden folders)

image

Close out of git-gui and launch it again and this time choose Open Existing Repository on the first screen and then choose the folder with the new repository in the dialog.

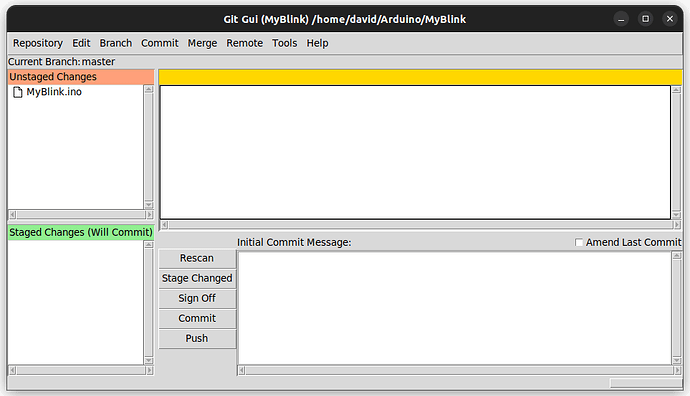
This is the screen you get in git-gui once you have your repository open.

image

Since there's never been a commit here, the file is up there in the Unstaged Changes area.

Click on Stage Changed and it moves to the bottom section Staged Changes. Add a comment to the window on the bottom right that describes the commit.

image

Then press Commit

The files seem to just disappear from the gui window. That means that the repository is completely up to date and all changes are committed. Congratulations! You now have your first Git Repository.

Go back to the Arduino IDE and load the code to an UNO and run it (or at least pretend to)

There's a problem with the code! The light just stays on!

To correct this problem another delay statement is needed after the led is turned off. Correct the code and save.

image

void setup() {

  pinMode(13, OUTPUT);

}

void loop() {
  
  digitalWrite(13, HIGH);
  delay(1000);
  digitalWrite(13,LOW);
  delay(1000);
}

Be sure to save after you edit. Git only knows about changes that you've saved.

Now go back to git-gui and either use the Commit menu and choose Rescan or simply hit the F5 button. Now the MyBlink.ino file shows back up in Unstaged Changes. And in the window to the right you can see the changes that were made. A blank line was deleted and a delay(1000) was added.

image

Commit the change by clicking Stage Changed and adding a comment just like before. Then click Commit. Once again the screen is clear because everything is caught up.

Now you can continue making changes to your code and making commits to your repo as you want. You can stop here and use Git. But to get the real potential you need at least one more piece. The next step will describe how to create a branch.

Step 3. (Optional) Create a Branch

Inevitably there will come a time when you want to work on adding something new to your code without necessarily committing to leaving it there. Maybe you're unsure how a new function will work or maybe you just want to try something out. Either way, a branch allows you to create a sort of parallel universe where the changes happened while the normal universe goes on without ever knowing.

Without git one would just do a save-as and create a separate file. Then when you get it working you just start using that new file instead of the old one. But what if you want to work on multiple things at once and keep each one connected to the working code? Branches are the answer.

Creating a branch is easy. The following step will show how to create a new branch to switch the Blink code from the previous step to code in the style of Blink Without Delay.

First open up the repository from the last step in git-gui if it isn't already open. Click on the Branch menu and select Create. The following dialog comes up.

image

Give the branch a name and choose the branch that this branch should start from. Select Checkout After Creation if it isn't already selected.

image

Click Create and now on the git-gui main screen you can see that the Current Branch has changed to the new branch that was just created.

image

Now go back to the Arduino IDE and modify the code for the new feature. Edit the code to this:

int ledPin = 13;
unsigned long lastBlinkTime;
boolean ledState = false;

unsigned int blinkInterval = 1000;

void setup() {

  pinMode(ledPin, OUTPUT);

}

void loop() {
  
  unsigned long currentTime = millis();

  if(currentTime - lastBlinkTime >= blinkInterval){
    ledState = ! ledState;
    digitalWrite(ledPin, ledState);
  }
}

This is the same blinking written in the Blink Without Delay style. But with one tiny error. Be sure to hit save. Git only knows about changes that you've saved.

Now go back to git-gui and hit F5 then click Stage Changed and add a comment.

image

And click Commit

Now go back to the IDE and load the code onto the UNO and run it (or at least pretend to).

Oh no. There is a problem with the code! The light just dims. It's missing the line that sets the lastBlinkTime to the currentTime when the blink changes.

So back in the Arduino IDE and edit the code to correct. Be sure to save it.

int ledPin = 13;
unsigned long lastBlinkTime;
boolean ledState = false;

unsigned int blinkInterval = 1000;

void setup() {

  pinMode(ledPin, OUTPUT);

}

void loop() {
  
  unsigned long currentTime = millis();

  if(currentTime - lastBlinkTime >= blinkInterval){
    ledState = ! ledState;
    digitalWrite(ledPin, ledState);
    lastBlinkTime = currentTime;
  }
}

And do a commit by the same process as before.
image

The last thing to do with the new branch is to merge it back into the master branch. In this case there was only one edit, but in real world use there may be months or years of work on a branch and there may be branches off of branches off of branches. But at some point you want to merge back into the main branch.

You have to have the branch you're merging into checked out in order to merge. In git-gui, use the Branch menu and select Checkout.

image

Select the master branch and click Checkout

Now git-gui should show the Current Branch as master. And if you switch back to the IDE for a minute you'll see.

image

This is the true power of Git.
The code has magically changed back to how it was before. Since the master branch is now checked out again, the file appears as it does in the master branch. The stuff from the new branch isn't lost, it's just not checked out right now. This idea of checking out different branches allows us to have lots of different versions of the same code in the same files.

To bring the new code into the master branch requires a merge. On git-gui click the Merge menu and choose Local Merge. The following window appears.

image

It wants to know what branch to merge into master. Select the new branch and click Merge.

image

This screen says that the merge was a "Fast Forward". That means that master hadn't changed while we were on the other branch. That isn't necessarily always the case and there may be conflicts. If there are then the gui will show them to you and mark them out. I will do another post later with some advanced tips on merge if anyone is interested.

Now go back to the Arduino IDE. And magically the code without delay is back. Now that code has been merged into the master branch that we have checked out.

image

This is the real power of Git. In this simple case it didn't save much. But imagine if this was a more complicated piece of code with lots more moving parts, one could use multiple branches to work on different parts in parallel. And the whole time all you have to do is go check out the master branch and you have the old working code. When you get a little more advanced, you can rebase your other branches after master has changed and bring those changes into the other branches. Just about anything you can think of has been accounted for.

That concludes the Beginners Tutorial for Git with Arduino. At this point you can take advantage of the most useful features for beginners and single users. There is a TON of tutorials and articles out there to learn the rest and there are a lot of other cool things Git can do for you.

I will add one more optional step and that has to do with github. But if you don't plan on publicly sharing your code, you may not be interested.

Step 4. (Optional) Connect to GitHub

The last of the basic steps is to connect to GitHub. This step is quite optional. If you don't plan on sharing your code anywhere and you think it is safe on your hard drive or in your backup then look no further. But if you want to collaborate, GitHub is the place right now.

Connecting and configuring GitHub is a little more complicated, but still not beyond the grasp of a beginner.

First thing first, you need an account. Go to github.com and create one. If you choose to keep your email private, then go into the email settings and make it so. While there you can copy the no reply email that they supply for you to track commits. Use this as your email in your git installation. You can rerun the last command from step 1 and change the email, but you have to make a new commit after that with that as the author before you try to push to GitHub.

Because of security concerns with the big important packages, GitHub doesn't allow pushing with a password anymore. Everything has to be authenticated by SSH. In the GitHub page, click on the little circle in the upper right and go to Settings. Choose "SSH and GPG keys" from the menu on the left.

image

In the top section are your SSH keys. You may not have any. Under that box is a link that says generating SSH keys. Follow the instructions at that link to generate SSH keys and add them to your profile on this page. Only add your PUBLIC key. Never under any circumstances whatsoever share a private key.

The SSH key thing is kind of a pain but you only have to do it once for a computer. It works for all of your repositories.

I noticed that git-gui has a menu option for creating and copying keys. It may be possible to use that but I didn't test it.

Now create the repository on GitHub. On the Repositories tab, click New. This page comes up. Give the repository a name and click Create repository.

image

This page comes up. You need a piece of information off this window.

image

Where it says "Quick Setup" click on the SSH and it shows you an address. You'll need this address to push to the repository. In my case it is: git@github.com:delta-G/MyBlink.git

Now that GitHub has you all set up, go back to git gui and add the remote repository you just created. In git-gui click the Remote menu and choose Add. The following dialog pops up.

image

Add a name for the remote and the location that you got from the Quick Setup part earlier. If you didn't copy it you can still get it on the main page for the repository under the green Code button.

Select "Do Nothing Else Now". Since this is a new repository there is nothing to fetch. Click Add.

Now when you hit the Remote menu in git-gui, there are a lot more options. Select Push to push the code up to GitHub.

If you get a window like this:
image
Type "yes" and press OK. Just typing "y" won't do. You have to spell out "yes" on this one. GitHub is usually who they say they are. You can SSH with them. Once you've approved them once you shouldn't have to again.

This is the dialog that comes when you select Remote -> Push

image

Choose which branch or branches to push. You can use Control and Shift to multi-select in the usual way. Click Push. You may need to enter a passphrase for your SSH key if you were smart and gave it one.

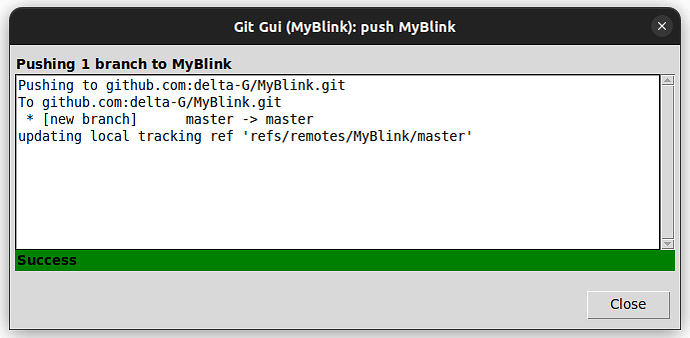
Finally you see this:
image

And if you open github and look at the repositories you will see the new repository there now has the file in it.

image

And now the repository is published on GitHub and ready for collaboration.

On Windows git-gui is available through the Start Menu as one would expect. But on Ubuntu it has to be launched from the command line.

Here's how to create an application shortcut for git-gui in Ubuntu.

Navigate to the ~/.local/share/applications folder and create a new file called Git-Gui.desktop

In that file paste this content:

[Desktop Entry]
Encoding=UTF-8
Version=1.0
Type=Application
Terminal=False
Exec=git gui
Name=Git-Gui

and save the file.

Now you will have an icon in the applications and you can pin it to the launcher if you like.

If you want it globally available to all users then move the file you created to /usr/share/applications. This will require sudo or root privileges.

The git-gui application that comes with Git is simple and easy, but not very powerful or slick. I chose it for the tutorial because it comes packaged with Git and is known to work on all the major OS.

Personally I use Eclipse to do most of my code writing. I use a plugin there called eGit to manage most of my repository stuff. There is a standalone version called MeGit which I have layed with a little bit. This in no way serves as an endorsement, but I thought I would include a link.

Another really popular GUI for interacting with Git is called GitKraken. I've never used it myself, but it seems to be quite popular. I really like the way it looks. I may try it soon.

If you do a Google search you can find dozens of other options for just about any taste.