HX711 Calibration

I am trying to find the calibration factor for my scale. The is the code I am using :

#include <HX711.h>

#define DOUT 11
#define CLK 13

float calibration_factor = -11200;

HX711 scale;

void setup() {
  Serial.begin(9600);
  Serial.println("HX711 calibration");
  Serial.println("Press + to increase");
  Serial.println("Press - to decrease");

  scale.set_scale();
  scale.tare();
  

}

void loop() {

  scale.set_scale(calibration_factor);

  Serial.print("Reading: ");
  Serial.print(scale.get_units()*0.453592,1);
  Serial.print("Kg");
  Serial.print("calibration_factor ");
  Serial.print(calibration_factor);
  Serial.println();

  if(Serial.available())
  {
    char temp = Serial.read();
    if(temp == '+')
      calibration_factor += 20;
    else if (temp == '-')
      calibration_factor -= 20;
  }
}

However in the serial monitor the only reading I am getting is 30kg no matter how much weight I put on. Why is this the case?

The way the HX711 load cell is connected to my load cell is shown here:

You code doesn't call scale.begin(). You should probably start out by trying the examples that come with the HX711 library.

I've made the necessary changes to my code by adding parts of examples which work better but I still don't seem to be getting accurate readings. How can I calibrate my scale do give those accurate readings.

We can't see your updated code.

#include "HX711.h"

const int LOADCELL_DOUT_PIN = 11;
const int LOADCELL_SCK_PIN = 13;

float calibration_factor = -10000;

HX711 scale;

void setup() {
  Serial.begin(9600);
  scale.begin(LOADCELL_DOUT_PIN, LOADCELL_SCK_PIN);

  scale.set_scale();
  scale.tare();
  

}

void loop() {

  scale.set_scale(calibration_factor);

  Serial.print("Reading: ");
  Serial.print(scale.get_units()*0.453592,1);
  Serial.print("Kg");
  Serial.print("calibration_factor ");
  Serial.print(calibration_factor);
  Serial.println();

  if(Serial.available())
  {
    char temp = Serial.read();
    if(temp == '+')
      calibration_factor += 20;
    else if (temp == '-')
      calibration_factor -= 20;

      delay(1000);

Here is the updated code

That code doesn't compile.

I think I didn't copy the 2 curly brackets at the end with the code. With them it complies.

1. It is always necessary to calibrate a load cell before it is engaged to measure unknown load accurately. The calibration can be done in two ways:
(1) Using HX711.h Library.
(2) Using one's own codes.

2. Sample of one's own codes:
...

That code was to find the calibration factor which would be used to in the actual scale code to get accurate readings. So why doesn't changing the calibration factor change the actually reading.

Show some output.

Reading: 0.0Kgcalibration_factor -10000.00

Now no matter what weight I put on the reading is always 0

I have tried the example that came with the library and the same result. The reading is always 0

@OP

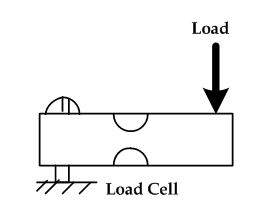
Under the following setup, just upload the following sketch and check if the load cell responds to changing loads. It is a qualitative functional check. (The Weight equation for your load cell will be slightly different from the one given in this sketch as the gain and offset differ from load cell to load cell; but, the calibration method is the same.)
hx711+loadcell.png

/* This program takes 10 samples from LC + HX711B at
   2-sec interval and then computes the average.
*/

unsigned long x = 0, y=0;
unsigned long dataArray[10];
int j = 0;
void setup()
{
  Serial.begin(9600);
  pinMode(A1, INPUT); //data line  //Yellow cable
  pinMode(A0, OUTPUT);  //SCK line  //Orange cable
}

void loop()
{

  for (int j = 0; j < 10; j++)
  {
    digitalWrite(A0, LOW);//SCK is made LL
    while (digitalRead(A1) != LOW) //wait until Data Line goes LOW
      ;
    {
      for (int i = 0; i < 24; i++)  //read 24-bit data from HX711
      {
        clk();      //generate CLK pulse to get MSB-it at A1-pin
        bitWrite(x, 0, digitalRead(A1));
        x = x << 1;
      }
      clk();  //25th pulse
      Serial.println(x, HEX);
      y = x;
      x = 0;
      delay(1000);
    }
    dataArray[j] = y;
  }

  Serial.println("===averaging process=========");
  unsigned long sum = 0;

  for (j = 0; j < 10; j++)
  {
    sum += dataArray[j];
  }
  Serial.print("Average Count = ");
  sum = sum / 10;
  Serial.println(sum, HEX);
  float W = (float)0.90*(sum-901002)/946560 + 0.75;//0.005331 * sum - 1146.176;
  //W = (float)W / 1000.00; 
  Serial.println(W, 2);
}

void clk()
{
  digitalWrite(A0, HIGH);
  digitalWrite(A0, LOW);
}

hx711+loadcell.png

Or, do it the easy way. Try the code from the examples that come with the HX711 library. Does that work? If not, you might have a hardware problem.

I've changed the set up and uploaded the program but I still get 0 as the output. The 5V power didn't work so I did change it to 3.3V

Garima_Mishra123:
I've changed the set up and uploaded the program but I still get 0 as the output. The 5V power didn't work so I did change it to 3.3V

That provides precisely zero information. When you change the code post the complete new sketch. When you change the hardware, post a schematic.

Post the datasheet (or link) for the HX711 board you're using.

I was following all of GolamMostafa's steps if that does make more sense.

And I'm using the: Load Cell 1KG Amplifier HX711 Breakout, Digital Portable Kitchen Scale Weight Sensor AD Module Weighing for Arduino Raspberry Pi, DIYmall from Amazon

@OP

After uploading the sketch of Post#11, are you getting changing counts on the Serial Monitor in response to changing loads? If not, change load cell and then change HX711 Module one by one to find out the faulty hardware component. Check the continuity of the jumper wiring as well!

The load cell is a cantilever type; so, you have to screw up it at one side with the bench and then apply load at the other end.

loadcell.png

loadcell.png