I need help with keypad

Hi I am new to arduino and I have this school project where i want to use a keypad with arduino but I ran into a problem I can't solve myself. I am using a 4x4 keypad and the issue is that every row works like 1 big button doesn't matter which one I press, only rows register, so basically I can use 4 different buttons but I want all 16. Can someone help me with this? Sorry if I am missing something it's my first time posting here, anyways here is the part of my code that should be of interest (the variables are named in my language sorry for that):

#include <LiquidCrystal.h>
#include <Keypad.h>
#include <math.h>
#include <stdlib.h>

LiquidCrystal lcd(2,3,4,5,6,7);
int analogPin = 4;
int mertfesz = 0;
int Vbe = 5;
float Vki = 0;
float R1 = 1000;
float R2 = 0;
float buffer = 0;
const byte SOROK = 4;
const byte OSZLOPOK = 4;
char hexaKeys[SOROK][OSZLOPOK] = {
{'1', '2', '3', 'A'},
{'4', '5', '6', 'B'},
{'7', '8', '9', 'C'},
{'*', '0', '#', 'D'}
};
byte sorpinek[SOROK]={8,9,10,11};
byte oszloppinek[OSZLOPOK]={14,15,16,17};
Keypad szampad=Keypad( makeKeymap(hexaKeys), sorpinek, oszloppinek, SOROK, OSZLOPOK);
char lenyomott, kezdes;
bool merese=false, kezdese=true;

void setup(){
    lcd.begin(16, 2);
    lcd.setCursor(0, 0);
}

void kezdomenu(){
  lcd.clear();
  lcd.print("1. Meres");
  lcd.setCursor(0,1);
  lcd.print("2. Szinkod      ");
  kezdes=szampad.waitForKey();;
  if(kezdes=='1'){merese=true; kezdese=false;}
}

void meres(){
  if((digitalRead(11) == LOW)/* && (analogRead(3) > 0)*/){merese=false; kezdese=true;}
   else{
   lcd.clear();
   lcd.print("     Meres      ");
    mertfesz = analogRead(analogPin);
   if(mertfesz==0){
    lcd.setCursor(0, 1);
    lcd.print("Nincs ellenallas");
    }

    
  if(mertfesz){
    buffer=mertfesz*Vbe;
    Vki=buffer/1024.0;
    buffer = (Vbe/Vki) - 1;
    R2 = R1 * buffer;
    lcd.setCursor(0, 1);


    if(R2>1022000){
      lcd.print("Nincs ellenallas");
      }
    if(R2>999.99){
    lcd.print(R2/1000);
    lcd.print("K Ohm"); 
    }
    else{
    lcd.setCursor(0, 1);
    lcd.print(R2);
    lcd.print(" Ohm");
      }
    delay(300);
  }
    }
}

void loop(){
  while(kezdese){kezdomenu();}  
  while(merese){meres();}
}

It is currently an ohm meter with a menu system in place right now it only has 1 menu option but i want to have more programs you can choose from later on.

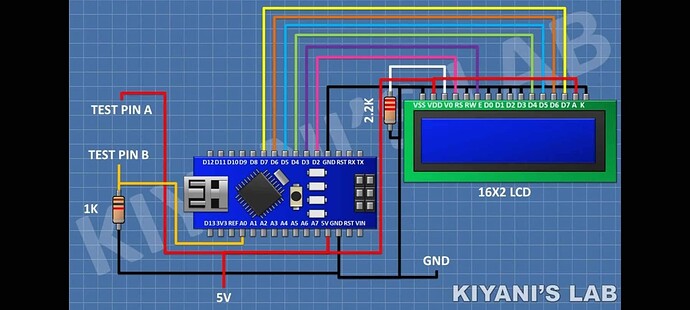
Post whole code, please. It's usually the case that the poster doesn't know where the real error lies and is instead focusing on code that is correct.

Also beginners seem not to know that a question, is not a tutorial, so I have moved your post here, a better place for your question.

and post also the drawing of your circuit and a picture of you arduino and keypad and how they are connected

I posted it altough it is entirely in my language I don't know if you can make something of it.

This but Test Pin B is on A4 instead of A0 because of keypad.

Remove those 1K pull-down resistors. I don't think the keypad library will work with those connected.

That might be it! I'll try it and get back to you if it works.

Don't use your own sketch to test the keypad. Use one of the example sketches from the examples menu for the keypad library to test it (but with your chosen pins).

When you have the example sketch working with keypad library, then use one of the example sketches for the LCD library to test that also (but with your chosen pins).

When you know that the keypad is working with its example sketch, and the LCD is working with its example sketch, then you can test with your own sketch, with the confidence that any problems you find will be due to errors in your own sketch, rather than hardware or wiring faults.

1 Like

You should not be using the keypad pins except through the keypad library. What are you looking for here?

2 Likes

Oh yeah thank you for noticing, I forgot about that, I'll go and change it right now. (I was not aware that getkey function doesn't stop the loop so I wanted an alternate way of stopping the loop anytime, then I learnt about waitforkey and I understand everything now)

And that is why posting the whole code, and a schematic, is so important. Your original post did not include that code line, nor could we 'see' the resistors.

1 Like

Thank you! That was indeed the problem!

This topic was automatically closed 180 days after the last reply. New replies are no longer allowed.