Joining 4 arduino sketches in to one sketch and adding a button

Hi, i have 4 arduino sketches using ws2812b led stip with 4 different white led effects. i would like to put all 4 sketches into one sketch and add a button so i can change between the 4 effects, i am a complete novice with arduino code so any help would be appreciated

thanks ic

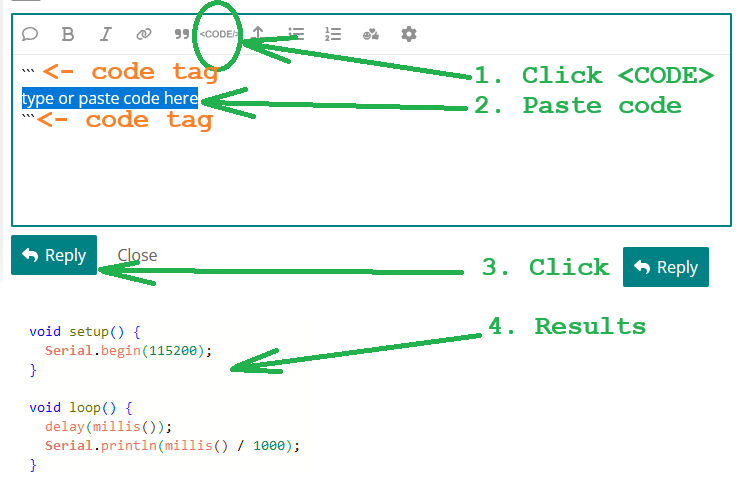
type or paste code h#include <FastLED.h>

// --- Configuration ---
#define NUM_LEDS    10// Total number of LEDs in your strip
#define DATA_PIN    3   // The Arduino pin connected to the Data In line
#define LED_TYPE    WS2812B // Adjust to your specific LED type
#define COLOR_ORDER GRB  // Adjust to your specific color order (may be RGB or BGR)
#define BRIGHTNESS  64   // Adjust brightness (0-255)
#define GROUP_SIZE  2    // Number of LEDs in each group
#define FLASH_DELAY 200  // Delay in milliseconds for each flash (controls speed)
// ---------------------

CRGB leds[NUM_LEDS];

void setup() {
  FastLED.addLeds<LED_TYPE, DATA_PIN, COLOR_ORDER>(leds, NUM_LEDS)
    .setCorrection( TypicalLEDStrip );
  FastLED.setBrightness(BRIGHTNESS);
  FastLED.clear(); // Turn all LEDs off
  FastLED.show();  // Update the strip
}

void loop() {
  // Loop through the strip in groups of three
  for (int i = 0; i < NUM_LEDS; i += GROUP_SIZE) {
    // Turn on the current group (set color to white)
    for (int j = 0; j < GROUP_SIZE; j++) {
      if (i + j < NUM_LEDS) { // Ensure we don't go out of bounds
        leds[i + j] = CRGB::White;
      }
    }
    FastLED.show(); // Display the change
    delay(FLASH_DELAY);

    // Turn off the current group (set color to black)
    for (int j = 0; j < GROUP_SIZE; j++) {
      if (i + j < NUM_LEDS) {
        leds[i + j] = CRGB::Black; // Black is off
      }
    }
    FastLED.show();
    // Shorter delay after turning off to make the flash more distinct before moving on
    delay(FLASH_DELAY / 2); 
  }
}

#include <FastLED.h>

// Define the number of LEDs in your strip
#define NUM_LEDS 10

// Define the pin the data line is connected to
#define DATA_PIN 3

// Define the LED type and color order (most common is WS2812B, GRB)
#define LED_TYPE WS2812B
#define COLOR_ORDER GRB

// Define the brightness (0-255)
#define BRIGHTNESS 80

// Define the delay between steps in milliseconds
#define CHASE_DELAY 100

// Define the size of the chasing block
#define CHASER_SIZE 4

// Define the color as white (RGB values: 255, 255, 255)
#define CHASER_COLOR CRGB(255, 255, 255)

// Create an array of LEDs
CRGB leds[NUM_LEDS];

void setup() {
// Initialize FastLED
FastLED.addLeds<LED_TYPE, DATA_PIN, COLOR_ORDER>(leds, NUM_LEDS);
FastLED.setBrightness(BRIGHTNESS);
FastLED.clear(); // Turn off all LEDs initially
FastLED.show();
}

void loop() {
// Loop through each LED position
for (int i = 0; i <= NUM_LEDS; i++) {
// Turn off all LEDs before lighting the next block
FastLED.clear();

// Turn on a block of 3 LEDs starting at the current position 'i'
for (int j = 0; j < CHASER_SIZE; j++) {
  // Check if the LED index is within bounds of the strip
  if (i + j < NUM_LEDS) {
    leds[i + j] = CHASER_COLOR;
  }
}

// Display the changes on the strip
FastLED.show(); 

// Wait before moving to the next position
delay(CHASE_DELAY); 

}
}

#include "FastLED.h"

// How many LEDs in your strip?
#define NUM_LEDS 10

// On which pin to connect the data line?
#define DATA_PIN 3 

// Define the array of leds
CRGB leds[NUM_LEDS];

void setup() {
  // Initialize the FastLED library
  // Change WS2812B to the correct chip if you are using a different one (e.g., NEOPIXEL, SK6812)
  FastLED.addLeds<WS2812B, DATA_PIN, GRB>(leds, NUM_LEDS);
  // Set global brightness (optional)
  FastLED.setBrightness(50); 
  FastLED.clear(); // Turn all LEDs off initially
}

void loop() {
  // Move a single white LED for(int whiteLed = 0; whiteLed < NUM_LEDS; whiteLed = whiteLed + 1) {
  for(int whiteLed = 0; whiteLed < NUM_LEDS; whiteLed++) {
    // Turn the current LED on to white, then show the LEDs
    leds[whiteLed] = CRGB::White;
    FastLED.show();

    // Wait a little bit to control speed (adjust delay time as needed)
    delay(30);

    // Turn the current LED back to black (off) for the next loop around
    leds[whiteLed] = CRGB::Black;
  }
}

#include <FastLED.h>

// --- Configuration ---
#define NUM_LEDS 10 // Number of LEDs in your strip
#define DATA_PIN 3 // Arduino pin connected to the Data line (e.g., D6)
#define BRIGHTNESS 100 // Adjust brightness (0-255)

// Define the array of leds
CRGB leds[NUM_LEDS];

void setup() {
// Initialize FastLED library
FastLED.addLeds<WS2812B, DATA_PIN, GRB>(leds, NUM_LEDS); // Adjust WS2812B/GRB if using a different chip/color order
FastLED.setBrightness(BRIGHTNESS);
FastLED.clear();
FastLED.show();
}

void loop() {
// Run the time travel effect
timeTravelChaser();
}

void timeTravelChaser() {
int delayTime = 100; // Initial delay in milliseconds (slowest speed)
int minDelay = 10; // Minimum delay for flashing effect
int delayDecrement = 5; // How much to speed up each cycle

while (delayTime >= minDelay) {
// Chaser effect with a 2-LED white bar
for (int i = 0; i < NUM_LEDS + 1; i++) {
// Clear previous LEDs
FastLED.clear();

  // Turn on 2 white LEDs
  if (i < NUM_LEDS) {
    leds[i] = CRGB::White;
  }
  if (i + 1 < NUM_LEDS) {
    leds[i + 1] = CRGB::White;
  }
  
  FastLED.show();
  delay(delayTime); // Use the variable delay
}

// Speed up for the next cycle
delayTime -= delayDecrement;

}

// Final rapid flashing/strobe effect
flashRapidly(50, 20); // Flash 50 times with a 20ms delay

// Reset for the next loop, if desired
FastLED.clear();
FastLED.show();
delay(1000); // Pause before restarting the effect
}

void flashRapidly(int count, int flashDelay) {
for (int i = 0; i < count; i++) {
fill_solid(leds, NUM_LEDS, CRGB::White); // All LEDs white
FastLED.show();
delay(flashDelay);
FastLED.clear(); // All LEDs off
FastLED.show();
delay(flashDelay);
}
}

@icemanmjb - You should separate your four sketches into four code blocks. Here is a graphic on how-to...

========== SKETCH ONE ==========

#include <FastLED.h>

// --- Configuration ---
#define NUM_LEDS    10// Total number of LEDs in your strip
#define DATA_PIN    3   // The Arduino pin connected to the Data In line
#define LED_TYPE    WS2812B // Adjust to your specific LED type
#define COLOR_ORDER GRB  // Adjust to your specific color order (may be RGB or BGR)
#define BRIGHTNESS  64   // Adjust brightness (0-255)
#define GROUP_SIZE  2    // Number of LEDs in each group
#define FLASH_DELAY 200  // Delay in milliseconds for each flash (controls speed)
// ---------------------

CRGB leds[NUM_LEDS];

void setup() {
  FastLED.addLeds<LED_TYPE, DATA_PIN, COLOR_ORDER>(leds, NUM_LEDS)
  FastLED.setCorrection( TypicalLEDStrip ); // this line was mangled... fixed it.
  FastLED.setBrightness(BRIGHTNESS);
  FastLED.clear(); // Turn all LEDs off
  FastLED.show();  // Update the strip
}

void loop() {
  // Loop through the strip in groups of three
  for (int i = 0; i < NUM_LEDS; i += GROUP_SIZE) {
    // Turn on the current group (set color to white)
    for (int j = 0; j < GROUP_SIZE; j++) {
      if (i + j < NUM_LEDS) { // Ensure we don't go out of bounds
        leds[i + j] = CRGB::White;
      }
    }
    FastLED.show(); // Display the change
    delay(FLASH_DELAY);

    // Turn off the current group (set color to black)
    for (int j = 0; j < GROUP_SIZE; j++) {
      if (i + j < NUM_LEDS) {
        leds[i + j] = CRGB::Black; // Black is off
      }
    }
    FastLED.show();
    // Shorter delay after turning off to make the flash more distinct before moving on
    delay(FLASH_DELAY / 2); 
  }
}

========== SKETCH TWO ==========

#include <FastLED.h>
// Define the number of LEDs in your strip
#define NUM_LEDS 10
// Define the pin the data line is connected to
#define DATA_PIN 3
// Define the LED type and color order (most common is WS2812B, GRB)
#define LED_TYPE WS2812B
#define COLOR_ORDER GRB
// Define the brightness (0-255)
#define BRIGHTNESS 80
// Define the delay between steps in milliseconds
#define CHASE_DELAY 100
// Define the size of the chasing block
#define CHASER_SIZE 4
// Define the color as white (RGB values: 255, 255, 255)
#define CHASER_COLOR CRGB(255, 255, 255)
// Create an array of LEDs
CRGB leds[NUM_LEDS];

void setup() {
  // Initialize FastLED
  FastLED.addLeds<LED_TYPE, DATA_PIN, COLOR_ORDER>(leds, NUM_LEDS);
  FastLED.setBrightness(BRIGHTNESS);
  FastLED.clear(); // Turn off all LEDs initially
  FastLED.show();
}

void loop() {
  // Loop through each LED position
  for (int i = 0; i <= NUM_LEDS; i++) {
    // Turn off all LEDs before lighting the next block
    FastLED.clear();
    // Turn on a block of 3 LEDs starting at the current position 'i'
    for (int j = 0; j < CHASER_SIZE; j++) {
      // Check if the LED index is within bounds of the strip
      if (i + j < NUM_LEDS) {
        leds[i + j] = CHASER_COLOR;
      }
    }
    // Display the changes on the strip
    FastLED.show();
    // Wait before moving to the next position
    delay(CHASE_DELAY);
  }
}

========== SKETCH THREE ==========

#include "FastLED.h"

// How many LEDs in your strip?
#define NUM_LEDS 10

// On which pin to connect the data line?
#define DATA_PIN 3

// Define the array of leds
CRGB leds[NUM_LEDS];

void setup() {
  // Initialize the FastLED library
  // Change WS2812B to the correct chip if you are using a different one (e.g., NEOPIXEL, SK6812)
  FastLED.addLeds<WS2812B, DATA_PIN, GRB>(leds, NUM_LEDS);
  // Set global brightness (optional)
  FastLED.setBrightness(50);
  FastLED.clear(); // Turn all LEDs off initially
}

void loop() {
  // Move a single white LED for(int whiteLed = 0; whiteLed < NUM_LEDS; whiteLed = whiteLed + 1) {
  for (int whiteLed = 0; whiteLed < NUM_LEDS; whiteLed++) {
    // Turn the current LED on to white, then show the LEDs
    leds[whiteLed] = CRGB::White;
    FastLED.show();

    // Wait a little bit to control speed (adjust delay time as needed)
    delay(30);

    // Turn the current LED back to black (off) for the next loop around
    leds[whiteLed] = CRGB::Black;
  }
}

========== SKETCH FOUR ==========

#include <FastLED.h>
// --- Configuration ---
#define NUM_LEDS 10 // Number of LEDs in your strip
#define DATA_PIN 3 // Arduino pin connected to the Data line (e.g., D6)
#define BRIGHTNESS 100 // Adjust brightness (0-255)
// Define the array of leds
CRGB leds[NUM_LEDS];

void setup() {
  // Initialize FastLED library
  FastLED.addLeds<WS2812B, DATA_PIN, GRB>(leds, NUM_LEDS); // Adjust WS2812B/GRB if using a different chip/color order
  FastLED.setBrightness(BRIGHTNESS);
  FastLED.clear();
  FastLED.show();
}

void loop() {
  // Run the time travel effect
  timeTravelChaser();
}

void timeTravelChaser() {
  int delayTime = 100; // Initial delay in milliseconds (slowest speed)
  int minDelay = 10; // Minimum delay for flashing effect
  int delayDecrement = 5; // How much to speed up each cycle
  while (delayTime >= minDelay) {
    // Chaser effect with a 2-LED white bar
    for (int i = 0; i < NUM_LEDS + 1; i++) {
      // Clear previous LEDs
      FastLED.clear();
      // Turn on 2 white LEDs
      if (i < NUM_LEDS) {
        leds[i] = CRGB::White;
      }
      if (i + 1 < NUM_LEDS) {
        leds[i + 1] = CRGB::White;
      }
      FastLED.show();
      delay(delayTime); // Use the variable delay
    }
    // Speed up for the next cycle
    delayTime -= delayDecrement;
  }
  // Final rapid flashing/strobe effect
  flashRapidly(50, 20); // Flash 50 times with a 20ms delay
  // Reset for the next loop, if desired
  FastLED.clear();
  FastLED.show();
  delay(1000); // Pause before restarting the effect
}

void flashRapidly(int count, int flashDelay) {
  for (int i = 0; i < count; i++) {
    fill_solid(leds, NUM_LEDS, CRGB::White); // All LEDs white
    FastLED.show();
    delay(flashDelay);
    FastLED.clear(); // All LEDs off
    FastLED.show();
    delay(flashDelay);
  }
}

Have you had time to look at how to debounce a button? This will be your key to making this work.
https://docs.arduino.cc/built-in-examples/digital/Debounce/

Good thing #1 is... all four sketches use FastLED.h... so setup() should be the same... so we got that going for us...

First thing I do is consolidate the sketches... discard redundancies... put each sketch in its own function... then try to compile it...

#include <FastLED.h>
#define NUM_LEDS    10// Total number of LEDs in your strip
#define DATA_PIN    3   // The Arduino pin connected to the Data In line
#define LED_TYPE    WS2812B // Adjust to your specific LED type
#define COLOR_ORDER GRB  // Adjust to your specific color order (may be RGB or BGR)
#define BRIGHTNESS  64   // Adjust brightness (0-255)

// sketch one
#define GROUP_SIZE  2    // Number of LEDs in each group
#define FLASH_DELAY 200  // Delay in milliseconds for each flash (controls speed)

// sketch two
#define CHASE_DELAY 100
#define CHASER_SIZE 4
#define CHASER_COLOR CRGB(255, 255, 255)

CRGB leds[NUM_LEDS];

void setup() {
  FastLED.addLeds<LED_TYPE, DATA_PIN, COLOR_ORDER>(leds, NUM_LEDS);
  // FastLED.setCorrection(TypicalLEDStrip); // what is this and is it needed?
  FastLED.setBrightness(BRIGHTNESS);
  FastLED.clear(); // Turn all LEDs off
  FastLED.show();  // Update the strip
}

void loop() {
  sketch01();
  sketch02();
  sketch03();
  timeTravelChaser();
}

void sketch01() {
  for (int i = 0; i < NUM_LEDS; i += GROUP_SIZE) {
    for (int j = 0; j < GROUP_SIZE; j++) {
      if (i + j < NUM_LEDS) { // Ensure we don't go out of bounds
        leds[i + j] = CRGB::White;
      }
    }
    FastLED.show(); // Display the change
    delay(FLASH_DELAY);
    for (int j = 0; j < GROUP_SIZE; j++) {
      if (i + j < NUM_LEDS) {
        leds[i + j] = CRGB::Black; // Black is off
      }
    }
    FastLED.show();
    delay(FLASH_DELAY / 2);
  }
}

void sketch02() {
  for (int i = 0; i <= NUM_LEDS; i++) {
    FastLED.clear();
    for (int j = 0; j < CHASER_SIZE; j++) {
      if (i + j < NUM_LEDS) {
        leds[i + j] = CHASER_COLOR;
      }
    }
    FastLED.show();
    delay(CHASE_DELAY);
  }
}

void sketch03() {
  for (int whiteLed = 0; whiteLed < NUM_LEDS; whiteLed++) {
    leds[whiteLed] = CRGB::White;
    FastLED.show();
    delay(30);
    leds[whiteLed] = CRGB::Black;
  }
}

void timeTravelChaser() {
  int delayTime = 100; // Initial delay in milliseconds (slowest speed)
  int minDelay = 10; // Minimum delay for flashing effect
  int delayDecrement = 5; // How much to speed up each cycle
  while (delayTime >= minDelay) {
    for (int i = 0; i < NUM_LEDS + 1; i++) {
      FastLED.clear();
      if (i < NUM_LEDS) {
        leds[i] = CRGB::White;
      }
      if (i + 1 < NUM_LEDS) {
        leds[i + 1] = CRGB::White;
      }
      FastLED.show();
      delay(delayTime); // Use the variable delay
    }
    delayTime -= delayDecrement;
  }
  flashRapidly(50, 20); // Flash 50 times with a 20ms delay
  FastLED.clear();
  FastLED.show();
  delay(1000); // Pause before restarting the effect
}

void flashRapidly(int count, int flashDelay) {
  for (int i = 0; i < count; i++) {
    fill_solid(leds, NUM_LEDS, CRGB::White); // All LEDs white
    FastLED.show();
    delay(flashDelay);
    FastLED.clear(); // All LEDs off
    FastLED.show();
    delay(flashDelay);
  }
}

And... it compiles... next is to work on "mash button, change sketch"...

Your last animation should be split into two. Also, the use of for() loops will not allow reading of the button during the for() loop time... and the button will only have a chance to be sensed briefly between for() loops. These are called "blocking" sketches.

A resent post had a "blocking" sketch... but solved it by reading the button in every loop by calling this function which devides a delay() total time into ten increments of time... so the button is checked ten times during a blocking loop()... a clever way to not re-write your sketch using millis() to control the LEDs, while still reading the button.

void interruptibleDelay(int totalMs) {
  int steps = totalMs / 10;
  for (int i = 0; i < steps; i++) {
    if (checkButtonPressed()) { advanceMode(); return; }
    delay(10);
  }
}

... which references this function to select the next function...

void advanceMode() {
  mode = (mode + 1) % NUM_MODES;
  clearAllLEDs();
}

google arduino combining sketches

@xfpd's method can work. I skimmed the thread referenced in that post, as I did not see checkButtonPressed(), the exact functioning of which will make this work or just kinda sorta work.

I found

bool checkButtonPressed() {
  int reading = digitalRead(buttonPin);
  if (reading != lastReading) lastDebounceTime = millis();

  if ((millis() - lastDebounceTime) > debounceDelay) {
    if (reading != buttonState) {
      buttonState = reading;
      if (buttonState == HIGH) {
        lastReading = reading;
        return true;
      }
    }
  }

  lastReading = reading;
  return false;
}

which I would bet lunch will correctly function as needed.

Wait, the function refers to buutonState and looks to update lastReading in an odd place, so maybe not so fast.

But wait is needed is edge detection and debouncing, both of which seem to be the sim of the function.

I won't be in the lab to test this for some time.

a7

The read-button-in-blocked-code "simmed"... here... Arduino Heart LED for beginners - #11 by xfpd

THX. A closer reading of the checkButtonPress() function shows two places where you update lastReading.

A slight modification would be equivalent:

bool checkButtonPressed() {
  bool pressed = false;   // unless it was!

  int reading = digitalRead(buttonPin);
  if (reading != lastReading) lastDebounceTime = millis();
  lastReading = reading;

  if ((millis() - lastDebounceTime) > debounceDelay) {
    if (reading != buttonState) {
      buttonState = reading;
      if (buttonState == HIGH)
        pressed = true;
    }
  }

  return pressed;
}

which has one update of lastReading close to where we start wondering where we will find it, and but one return statement at the end of the function, which matters not to me but is expected by some styles.

a7

Hi thanks for all the help, all working in one sketch now, just got to sort the button out, i will have a look at the link and your code and see what i can do

thanks again ic :+1:

H,i im still having problems coding the button into the sketch that was written for me, if someone could code a button into my sketch it would be a big help.i would like each effect to run continuously till the button to pressed to swich between them
thanks, any help would be much appreciated :+1:

#include <FastLED.h>
#define NUM_LEDS    10// Total number of LEDs in your strip
#define DATA_PIN    3   // The Arduino pin connected to the Data In line
#define LED_TYPE    WS2812B // Adjust to your specific LED type
#define COLOR_ORDER GRB  // Adjust to your specific color order (may be RGB or BGR)
#define BRIGHTNESS  64   // Adjust brightness (0-255)

// sketch one
#define GROUP_SIZE  2    // Number of LEDs in each group
#define FLASH_DELAY 200  // Delay in milliseconds for each flash (controls speed)

// sketch two
#define CHASE_DELAY 100
#define CHASER_SIZE 4
#define CHASER_COLOR CRGB(255, 255, 255)

CRGB leds[NUM_LEDS];

void setup() {
  FastLED.addLeds<LED_TYPE, DATA_PIN, COLOR_ORDER>(leds, NUM_LEDS);
  // FastLED.setCorrection(TypicalLEDStrip); // what is this and is it needed?
  FastLED.setBrightness(BRIGHTNESS);
  FastLED.clear(); // Turn all LEDs off
  FastLED.show();  // Update the strip
}

void loop() {
  sketch01();
  sketch02();
  sketch03();
  timeTravelChaser();
}

void sketch01() {
  for (int i = 0; i < NUM_LEDS; i += GROUP_SIZE) {
    for (int j = 0; j < GROUP_SIZE; j++) {
      if (i + j < NUM_LEDS) { // Ensure we don't go out of bounds
        leds[i + j] = CRGB::White;
      }
    }
    FastLED.show(); // Display the change
    delay(FLASH_DELAY);
    for (int j = 0; j < GROUP_SIZE; j++) {
      if (i + j < NUM_LEDS) {
        leds[i + j] = CRGB::Black; // Black is off
      }
    }
    FastLED.show();
    delay(FLASH_DELAY / 2);
  }
}

void sketch02() {
  for (int i = 0; i <= NUM_LEDS; i++) {
    FastLED.clear();
    for (int j = 0; j < CHASER_SIZE; j++) {
      if (i + j < NUM_LEDS) {
        leds[i + j] = CHASER_COLOR;
      }
    }
    FastLED.show();
    delay(CHASE_DELAY);
  }
}

void sketch03() {
  for (int whiteLed = 0; whiteLed < NUM_LEDS; whiteLed++) {
    leds[whiteLed] = CRGB::White;
    FastLED.show();
    delay(30);
    leds[whiteLed] = CRGB::Black;
  }
}

void timeTravelChaser() {
  int delayTime = 100; // Initial delay in milliseconds (slowest speed)
  int minDelay = 10; // Minimum delay for flashing effect
  int delayDecrement = 5; // How much to speed up each cycle
  while (delayTime >= minDelay) {
    for (int i = 0; i < NUM_LEDS + 1; i++) {
      FastLED.clear();
      if (i < NUM_LEDS) {
        leds[i] = CRGB::White;
      }
      if (i + 1 < NUM_LEDS) {
        leds[i + 1] = CRGB::White;
      }
      FastLED.show();
      delay(delayTime); // Use the variable delay
    }
    delayTime -= delayDecrement;
  }
  flashRapidly(50, 20); // Flash 50 times with a 20ms delay
  FastLED.clear();
  FastLED.show();
  delay(1000); // Pause before restarting the effect
}

void flashRapidly(int count, int flashDelay) {
  for (int i = 0; i < count; i++) {
    fill_solid(leds, NUM_LEDS, CRGB::White); // All LEDs white
    FastLED.show();
    delay(flashDelay);
    FastLED.clear(); // All LEDs off
    FastLED.show();
    delay(flashDelay);
  }
}

There is a problem with coding a button into your code because your functions are running "blocking" code which do not allow time during the function to read a button, and only allow a luckysecond of time between functions.

In Post #2 I mention a topic using interruptiblebleDelay() which @alto777 comments on. In Post #5 I add interruptibleDelay() to the sketch... and it "sorta" works.

What you need to do is re-write your program and take all the blocking code out and introduce millis() to time multiple events.

I will post one of my wokwi sketches for demonstration. I changed them all to timeouts or interrupts.

I will work on one of your functions to change it to timed event using millis()

Or, would you like to learn how to code for an interrupt?

I agree. The IDE has an example sketch BlinkWithoutDelay that you can read and learn from, and you can also read forum posts and blogs about programming the loop without delays. Using delays and other code inside your loop that takes a long time to finish will block you from putting your sketch together and reading buttons. Think of loop() as something that should run from top to bottom over and over, thousands of times per second. Once you get accustomed to programming with that in mind, you will probably love it as it will give you great power and flexibility.

@icemanmjb

Before making "non-blocking" animations, you need a non-blocking "button debouncer" to control the selected animation.

Electrified pushbuttons cause noise, which is hundreds of transitions when the button is pressed and released, called "bouncing," which can be (unintentionally) registered as hundreds of individual button presses and releases.

A "button debouncer" is a valuable function to write once and use forever on almost every project with a pushbutton.

Pseudocode for how to debounce a button:

  1. Wire the button for HIGH = RELEASED (nominal), LOW = PRESSED
    -> Arduino pin >> button pin 1 N.O. >> button pin 2 N.O. >> GND

  1. Configure a "timer" variable and a "debounce timeout" variable... try 50ms to 100ms
  2. Read the button.
  3. Is the reading different from the state? ( if (buttonread != buttonstate)
  4. If different, something happened, so start a timer; timer = millis();
  5. Store the button READ as the lSTATE
  6. If the current state is LOW (pressed) and the previous state is HIGH (released), button was pressed.
  7. Act on the debounced button press/release... in this case, increase an "animation" counter.

Here is my "button debounce" that I have modified by using Pin 12 with a 50ms debounce timeout. It toggles LED_BUILTIN and increases a counter.

// button debouncer

byte buttonPin = 12; // DIO pin for button N.O. pin
int buttonCounter; // count button presses
unsigned long buttonTimer, buttonTimeout = 50; // used in readButton() debounce timer
bool currentButtonState, lastButtonRead; // record button states

void setup() {
  Serial.begin(115200);
  pinMode(buttonPin, INPUT_PULLUP); // pin --> button (n.o.) button --> gnd
  Serial.print("Press yer button on Pin ");
  Serial.print(buttonPin);
  Serial.println(".");
}

void loop() {
  bool currentButtonRead = digitalRead(buttonPin);              // read button pin

  if (currentButtonRead != lastButtonRead) {                    // if THIS read is not the same as LAST read...
    buttonTimer = millis();                                     // ...start a timer by storing millis()
    lastButtonRead = currentButtonRead;                         // ... and store current state
  }

  if ((millis() - buttonTimer) > buttonTimeout) {               // if button change was longer than debounce timeout (NOT NOISE)
    if (currentButtonState == HIGH && lastButtonRead == LOW) {  // ... and State is "NOT pressed" while Button "IS PRESSED"

      //==================================================      // The button WAS pressed...
      digitalWrite(LED_BUILTIN, HIGH);                          // Do something here...
      Serial.print(++buttonCounter);                            // ... an action...
      digitalWrite(LED_BUILTIN, LOW);                           // ... or call functions
      //==================================================

    }
    currentButtonState = currentButtonRead;                     // update button state for first if() condition test
  }
}

About your animations and timing their internal sequence...

During nested for() loops and delay(), button reading must wait for the loop to finish.

Your nested for() loops count like this...

i j
==================
0 0 leds[0]::White
0 1 leds[1]::White
show
delay
0 0 leds[0]::Black
0 1 leds[1]::Black
show
half-delay

(next i, repeat until)

9 0 leds[9]::White
9 1 leds[10]::White
show
delay
9 0 leds[9]::Black
9 1 leds[10]::Black
show
half-delay

You can still use "nested counts" by using counters, for example, i++ and j++ and checking for overflow, if (i > NUM_LEDS) and if (j > GROUP_SIZE)

    if (i > NUM_LEDS - GROUP_SIZE) { // constrain i
      i = 0; // reset i
      if (j > GROUP_SIZE) // constrain j
        j = 0; // reset j

      (do the thing with the LEDs)

      j++; // increment j
    }
    i++; // increment i

[oops... I must leave... brb (as the kids say) to finish later]

Now, put a call to the button counter function in loop()... and then make a switch(case) to act on those button presses (counts).

void loop() {
  readButton(); // call the readButton() function
  switch (buttonCounter) { // do what the button counter says
    case 0: sketch01(); break; // if the button counter is 0, do call this function
    case 1: sketch02(); break;
    case 2: sketch03(); break;
    case 3: timeTravelChaser();  break;
    default: break;
  }
  if (buttonCounter > cases) // you have also declared the number of animation cases
    buttonCounter = 0; // reset/rollover the button count
}

I only have one animation here, but it is in the form of a non-blocking function... that is to say, only at a designated (recurring) time does something happen... all other times, the program is free to poll the button.

void sketch01() {  // GROUP_SIZE chaser
  if (millis() -  sketch01Timer > sketch01Timeout) { // if time between "now" and "last time" is greater than timeout
    sketch01Timer = millis(); // reset timer
    if (i++ > NUM_LEDS - GROUP_SIZE) // constrain trailing LED count to NUM_LEDS - GROUP_SIZE
      i = 0; // start for trailing LED
    fill_solid(leds + i, GROUP_SIZE, CRGB::White ); // fill LEDs from leds + i to leds + GROUP_SIZE
    FastLED.show(); // display the buffer
    FastLED.clear(); // clear the buffer
  }
}

In case you want to see another way to read a button... Here's a readButton() function for edge detecting (pressed to released or released to pressed) and debouncing.

void readButton() {
  // =======================================================
  // READ A BUTTON AND INCREMENT A COUNTER
  // =======================================================
  bool currentButtonRead = digitalRead(buttonPin);              // read button pin

  if (currentButtonRead != lastButtonRead) {                    // if THIS read is not the same as LAST read...
    buttonTimer = millis();                                     // ...start a timer by storing millis()
    lastButtonRead = currentButtonRead;                         // ... and store current state
  }

  if ((millis() - buttonTimer) > buttonTimeout) {               // if button change was longer than debounce timeout
    if (currentButtonState == HIGH && lastButtonRead == LOW) {  // ... and State is "NOT pressed" while Button "IS PRESSED"
      //==================================================
      digitalWrite(LED_BUILTIN, HIGH);                          // The button WAS pressed...
      Serial.print(++buttonCounter);                            // Do something here...
      digitalWrite(LED_BUILTIN, LOW);                           // ... or call functions here.
      //==================================================
    }
    currentButtonState = currentButtonRead;                     // update button state for first if() condition test
  }
}

hi, thanks for the the help, think i understand the code a bit better now, will try and code the button to my sketch agian. :+1: