I would like to use the PID function. I checked the following web page PID Position Controller does not work #24 where I wrote the same post. I found similar problems but couldn't solve them.
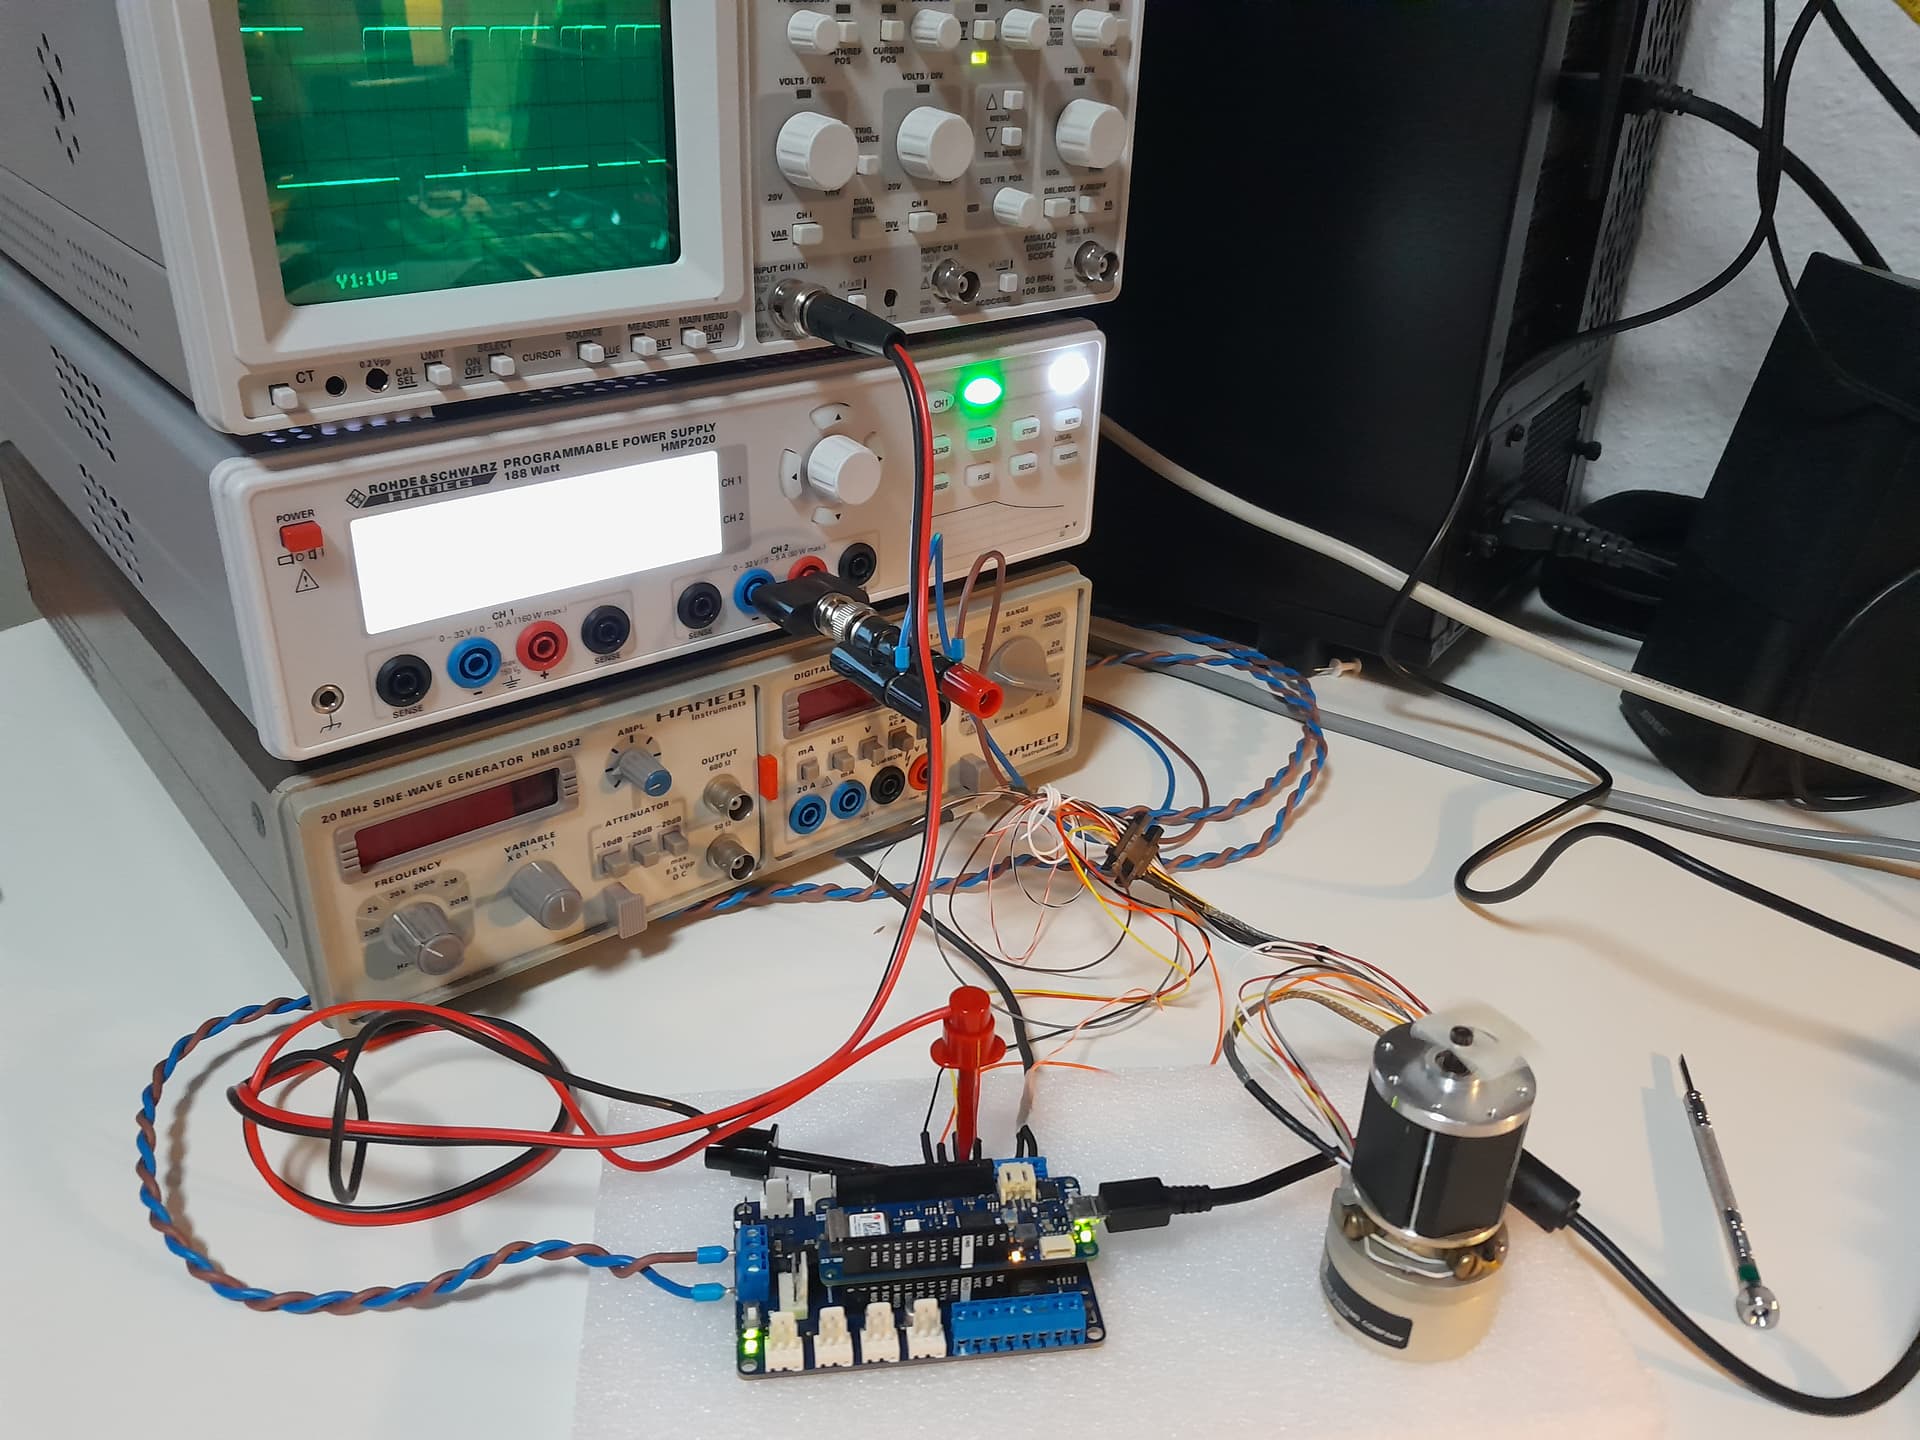
I am using a MKR Motor Carrier with a MKR WIFI 1010 and a Nano Motor Carrier with an Arduino Nano 33. I also started with the MKR Motor Carrier Test example and am using a DC servo motor with a 200 lines integrated encoder. Both motor carriers are updated to firmeware 0.20 (according to Serial Monitor).
The motor reacts the same with both boards. It turns in both directions alternately. No control behavior is visible, everything seems chaotic. The encoder signal was checked with an oscilloscope and is very good. The board also detects the motor position correctly.
If I remove the encoder (A and B) or set the encoder position as a constant in the sketch, the motor behavior does not change. The direction of rotation still changes alternately, which makes no sense.
If I set the PID values all to 0 or perform a reset (controller.reboot();), this also has no effect.
In short: The PID1/PID2 commands do not work, the M1/M2/M3/M4 commands do. I can only imagine that it is due to the motor carrier (hardware or software).
With an Arduino Uno and a suitable Motor Shield Rev3 the motor position can be controlled. However, the sampling frequency for the encoder at full speed is unfortunately not high enough.
I get no progress since two weeks and a MKR WIFI 1010 broke during multiple updates.
Someone might be able to help, but you will have to provide some useful information. Please see the "How to get the best out of the forum" post, linked at the head of every forum topic.
I am not sure what might be a usefull information in this case. Sorry for that. But maybe I found an easier way I would like to try first. But I need a hint.
The engine behavior is attributed to the old firmeware (fw0.06 and fw0.11), which I should have actually overwritten to fw0.20 with the Flasher sketch. However, flashing has always caused the most problems so far. So the MKR WIFI 1010 is also stuck here. But I could reactivate it with an Atmel ICE-C and Atmel Studio 7. This is all new to me, so I'm glad it worked.
I downgraded the Motor Carrier back to fw0.06 via the Atmel ICE. That worked nice.
So here is the idea:
Can I write the firmeware with bootloader directly to the Motor Carrier via the Atmel ICE? Where do you get the fw0.20 .bin or the .hex?
The test example sketch (ArduinoMotorCarrier lib):
/*
  MKR Motor Carrier Test sketch
  This sketch demonstrates some APIs exposed by the ArduinoMotorCarrier library.
  For the complete list, visit the reference page on https://www.arduino.cc/en/Reference/MKRMotorCarrier
  This example code is in the public domain.
*/

#include "ArduinoMotorCarrier.h"

void setup() {

  Serial.begin(115200);
  while (!Serial);

  // Start communication with the Motor Carrier
  if (controller.begin()) {
    Serial.print("MKR Motor Carrier connected, firmware version ");
    Serial.println(controller.getFWVersion());
  } else {
    Serial.println("Couldn't connect! Is the red LED blinking? You may need to update the firmware with FWUpdater sketch");
    while (1);
  }

  // Reboot the motor controller; brings every value back to default
  controller.reboot();

  Serial.println(controller.getFreeRam());

  // Reset the encoder internal counter to zero (can be set to any initial value)
  encoder1.resetCounter(0);

  // Start DC Motor 1 (labeled M1) with 90% of maximum speed, clockwise
//  M1.setDuty(90);
//
//  // Read the encoder connected to Motor1 until it reaches 36000 counts
//  int motor1Pos = 0;
//  while (motor1Pos < 36000) {
//    motor1Pos = encoder1.getRawCount();
//    // Remember to call ping() here and there!
//    // If you forget to do so the controller will think that the user sketch is not running and will freeze.
//    // You can wait up to 3 seconds between pings before the reset kicks in
//    controller.ping();
//  }

  // Switch motor control from DIRECT to PID-driven.
  // This way, you can program the motor to reach a certain position or velocity without any further intervention.
  // The PID can be carefully tuned if a particular profile is needed.
  pid1.setControlMode(CL_POSITION);
  pid1.setGains(25.0, 0.0, 3.0); // tried int and float
  pid1.setMaxAcceleration(4000);
  pid1.setSetpoint(TARGET_POSITION, 5000);
}

void loop() {
  // Simply print the actual position while the PID is running, pinging the controller every loop()
  Serial.println(encoder1.getRawCount());
  controller.ping();
  delay(100);
}
The flasher sketch (ArduinoMotorCarrier lib):
/*
  STANDALONE FIRMWARE UPDATE FOR Arduino Motor Carrier

  To generate a new firmware, compile D11-Firmware with target MKRMotorShield, 4KB bootloader, LTO enabled, pinmap complete
  and execute

  echo -n "const " > fw.h && xxd -i D11-Firmware.ino.bin >> fw.h
*/

#include "Wire.h"
#include "ArduinoMotorCarrier.h"

#ifdef ARDUINO_SAMD_NANO_33_IOT
#include "fw_nano.h"
#else
#include "fw_mkr.h"
#endif

#define I2C_ADDRESS 0x09

void setDataRunning(int cmd, uint8_t target, int data) {
  Wire.beginTransmission(0x66);
  Wire.write((uint8_t)cmd);
  Wire.write((uint8_t)target);
  Wire.write(data);
  Wire.endTransmission();
}


void setup() {
  // put your setup code here, to run once:
  Wire.begin();
  Wire.setClock(1000000);

  Serial.begin(115200);
  while (!Serial);
  pinMode(6, OUTPUT);
  digitalWrite(6, HIGH);

  int prev_address = -1;

  Wire.beginTransmission(0x66);
  Wire.write((uint8_t)GET_VERSION);
  Wire.write((uint8_t)0);
  Wire.endTransmission();

  Wire.requestFrom(0x66, 5);
  Wire.read();

  String version = "";

  while (Wire.available()) {
    version += (char)Wire.read();
  }

  if (version.c_str()[0] == '0') {
    Serial.println("Reset D11");
    setDataRunning(RESET, 0, 0);
    delay(10);
  } else {
    // TODO: on NanoMotorCarrier we have the change to forcefully reset the D11; do it now if it is unresponsive

  }

  // reset running D11
  Serial.println("Erase flash");

  Wire.beginTransmission(I2C_ADDRESS);
  Wire.write('r');
  Wire.endTransmission();

  delay(500);

  Serial.println("Starting flash");

  int address = 0;
  while (address < (D11_Firmware_ino_bin_len + 0x1000)) {
    int retry = 0;
    do {
      Wire.requestFrom(I2C_ADDRESS, 4);
      uint8_t buf[4];
      int k = 0;
      while (Wire.available()) {
        buf[k++] = Wire.read();
      }
      address = *(uint32_t*)buf;
      delay(10);
    } while (prev_address == address && retry++ < 5);
    prev_address = address;
    Serial.println(address);

    uint8_t crc = 0;
    for (int j = 0; j < 64; j++) {
      crc ^= D11_Firmware_ino_bin[address - 0x1000 + j];
    }

    Serial.println(crc, HEX);

    Wire.beginTransmission(I2C_ADDRESS);
    Wire.write('w');
    Wire.write(crc);
    Wire.write(&D11_Firmware_ino_bin[address - 0x1000], 64);
    Wire.endTransmission();
  }

  Serial.println("Booting FW");
  Wire.beginTransmission(I2C_ADDRESS);
  Wire.write('x');
  Wire.endTransmission();

  delay(1000);

  Wire.beginTransmission(0x66);
  Wire.write((uint8_t)GET_VERSION);
  Wire.write((uint32_t)0);
  Wire.endTransmission();

  Wire.requestFrom(0x66, 5);
  Wire.read();

  Serial.print("New version: ");
  while (Wire.available()) {
    Serial.print((char)Wire.read());
  }
  Serial.println();
}

void loop() {
  // put your main code here, to run repeatedly:

}
I tried the MKRMotorCarrier lib too. Same result. And I am using Arduino IDE 1.8.19. And a Atmel ICE-C.