Introduction:
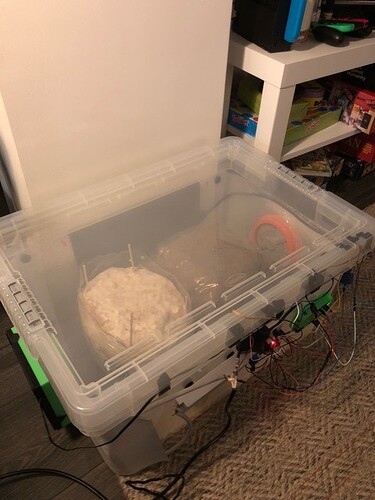
Hello Arduino enthusiasts! Over the past two months, I've been experimenting with Arduino and decided to build a project that allows for precise control of environmental conditions for gourmet mushroom cultivation. I'm excited to share my automated grow chamber project, which combines environmental control, efficient power management, and web integration.
Project Overview:
This project aims to create a self-contained and efficient grow chamber for cultivating gourmet mushrooms. Using the Arduino Uno R4 WiFi, I've developed a system that meticulously manages temperature, humidity, and airflow, all powered from a single wall outlet.
Specifications:
- Microcontroller: Arduino Uno R4 WiFi
- Temperature Control:
- 230V 60Hz Reptile Heat Mat controlled via a 5V Relay.
- DH11 Temperature/Humidity Sensor with onboard pull-up resistor.
- Humidity Control:
- Mister Circuit controlled via a 5V Relay.
- Air Exchange:
- 2 x 25KHz PWM Fans.
- 2 x HEPA Filters housed in 3D-printed ducts (one intake, one exhaust).
- Power Management:
- Single 230V AC wall plug input.
- 230V AC to 12V DC Converter (for fans).
- 12V to 5V Buck Converter (for Arduino, mister, sensor, and relays).
- Enclosure:
- 45-liter Generic Storage Box with Radiator Foil Insulation.
- Connectivity:
- Onboard WiFi for Web Server and Firebase Realtime Database integration (toggleable).
- Webserver to adjust temperature and humidity threshold values.
- Additional Components:
- Breadboard, Pin Leads, Electrical Tape, Solder.
Key Features:
- Single-Plug Power: Streamlined power management, with all components powered from a single wall outlet.
- Precise Environmental Control: The Arduino monitors and regulates temperature and humidity, essential for successful gourmet mushroom growth.
- Web Server Interface: Remote adjustment of temperature and humidity thresholds via a user-friendly web interface.
- Firebase Integration: Data logging capabilities (toggleable) for tracking environmental conditions, aiding in process optimization.
- 3D Printed Ducts: Controlled and filtered airflow for a healthy growing environment.
Bill of Materials (BOM):
- Arduino Uno R4 WiFi
- DH11 Temperature/Humidity Sensor
- 2 x 5V Relays
- 230V 60Hz Reptile Heat Mat
- Mister Circuit
- 2 x 25KHz PWM Fans
- 2 x HEPA Filters
- 2 x 3D-Printed Fan/Filter Ducts
- 230V AC to 12V DC Converter
- 12V to 5V Buck Converter
- 45-Liter Storage Box
- Radiator Foil
- Breadboard
- Pin Leads
- Electrical Tape
- Solder
Challenges and Learnings:
- Optimizing power distribution from a single source.
- Designing efficient airflow with HEPA filters.
- Integrating Firebase and managing data limits.
- Creating a responsive webserver.
Future Plans:
- Refining control algorithms for enhanced precision.
- Optimizing Firebase data logging for long-term monitoring.
- Developing a more advanced web interface.
- Fine tuning the parameters for specific gourmet mushroom species.
Call to Action:
This project was a rewarding experience, and I'm eager to share it with the Arduino community. If you're interested in gourmet mushroom cultivation or environmental control projects, please feel free to reach out. I'd love to hear your thoughts and answer any questions.
#Arduino #GourmetMushrooms #Automation #DIY #Electronics #ProjectShowcase #Mycology #Firebase #WebServer #R4WiFi


