Press a button and when released switch off led with delay

Hi, for my modeltrain I want to make an infrared light barrier which after passing the last wagon releases another track with some delay. I want to use millis(0 or millisDelay(0 to get this done but alas my coding is very bad. I already got this but want to add a button (the light barrier) to it.

#include <millisDelay.h>
int led = 13;// Pin 13 has an LED connected on most Arduino boards.
millisDelay ledDelay;

void setup() {
  // initialize the digital pin as an output.
  pinMode(led, OUTPUT);
  digitalWrite(led, HIGH); // turn led on
  // start delay
  ledDelay.start(10000);
}
void loop() {
  // check if delay has timed out
  if (ledDelay.justFinished()) {
    digitalWrite(led, LOW); // turn led off
  }
}

Does anyone have an idea, I would appreciate it very much.

Let's start with this:

//********************************************^************************************************
//
#define PUSHED                             LOW
#define RELEASED                           HIGH

#define CLOSED                             LOW
#define OPEN                               HIGH

#define ENABLED                            true
#define DISABLED                           false

#define LEDon                              HIGH
#define LEDoff                             LOW

//********************************************^************************************************

const byte led                      = 13;
const byte heartbeatLED             = 12;
const byte mySwitch                 = 11;

boolean myFlag                      = DISABLED;

byte  lastMySwitchState;

//Timing stuff
unsigned long heartbeatMillis;
unsigned long switchMillis;
unsigned long lastMillis;

unsigned long interval              = 2000ul; //2 seconds

//********************************************^************************************************
//
void setup()
{
  pinMode(mySwitch, INPUT_PULLUP);  
  
  pinMode(led, OUTPUT);
  digitalWrite(led, LEDoff);

  pinMode(heartbeatLED, OUTPUT);

} //END of   setup()


//********************************************^************************************************
//
void loop()
{
  //*********************************
  //is it time to toggle the heartbeatLED ?
  if (millis() - heartbeatMillis >= 500ul)
  {
    //restart this TIMER
    heartbeatMillis = millis();
    
    //toggle the heartbeatLED
    digitalWrite(heartbeatLED, !digitalRead(heartbeatLED));
  }

  //*********************************
  //is it time to check the switches ?
  if (millis() - switchMillis >= 50ul)
  {
    //restart this TIMER
    switchMillis = millis();
    
    checkSwitches();
  }

  //*********************************
  //if the TIMER is enabled, has it timed out ?
  if (myFlag == ENABLED && millis() - lastMillis >= interval)
  {
    myFlag = DISABLED;
    
    digitalWrite(led, LEDoff);      

  }  
  
} //END of   loop()


//                              c h e c k S w i t c h e s ( )
//********************************************^************************************************
//
void checkSwitches()
{
  byte currentState;

  //*********************************                                           m y S w i t c h
  currentState = digitalRead(mySwitch);

  //has this switch changed state ?
  if (lastMySwitchState != currentState)
  {
    //update to the new switch state
    lastMySwitchState = currentState;

    //******************
    //has the switch been pushed ?
    if (currentState == PUSHED)
    {
      //do something
    }

    //******************
    //switch must have been released
    else
    {
      digitalWrite(led, LEDon);
      
      //enable the TIMER
      myFlag = ENABLED;
      
      //restart this TIMER
      lastMillis = millis();
    }

  } //END of     if (lastStartSwitch != currentState)


  //*********************************
  //future switches go here
  //*********************************

} //END of   checkSwitches()


//********************************************^************************************************
//                            E N D   o f   s k e t c h   c o d e
//********************************************^************************************************

Hi @anon37033065 ,

congratulations to your normal worded description. This is a very good starting point.
lot's of newcomers do not explain in normal words but describing the wanted functionality in normal words is very helpful.

OK: So a lightbarrier is interrupted through a train. All the waggons pass by and after the last waggon has passed by the state of the lightbarrier changes from interrupted to not-interrupted.

This state-change has to be detected.

If state-change happend start timer.
The function

justFinished()

gives back a "true" only one single time.
consecutive calls to function justFinished() gives back "false"
until the timer is started new. This can be used here but is an important detail to know.

state-change-detection is done by comparing the state of the last iteration with the actual iteration of function loop()

This means you need a new variable. All names in code should be self-explaining

You are dealing with a lightbarrier that detects "train passing" or "no train passing track free"

or maybe you like "trackInUse" / "trackFree"

or "waggonCrossing"
all examples that explain what is going on.

so here is an example code

#include <millisDelay.h>
const byte ledPin = 13;// Pin 13 has an LED connected on most Arduino boards.
millisDelay ledDelay;

const byte lightBarrierPin = 4;
byte lightBarrierState;
byte lastLightBarrierState;

const byte waggonCrossing = HIGH;
const byte trackFree = !waggonCrossing; // the not-operator "!" inverts the logic state

void setup() {
  // initialize the digital pin as an output.
  pinMode(ledPin, OUTPUT);
  pinMode(lightBarrierPin, INPUT);

  digitalWrite(ledPin, HIGH); // turn led on
  // start delay
  ledDelay.start(10000);
}

void loop() {
  lightBarrierState = digitalRead(lightBarrierPin);

  if (lastLightBarrierState != lightBarrierState) { // check if state of lightbarrier has CHANGED
    // if the state has REALLY changed
    if (lightBarrierState == trackFree) { // check if state is all waggons have passed by
      // if all waggons HAVE passed by (which means lightBarrierState has value "trackFree"
      ledDelay.start(10000); // start the timer
    }
  }
  // check if delay has timed out
  if (ledDelay.justFinished()) {
    digitalWrite(ledPin, LOW); // turn led off
  }

  lastLightBarrierState = lightBarrierState; // update lastLightBarrierState
}

best regards Stefan

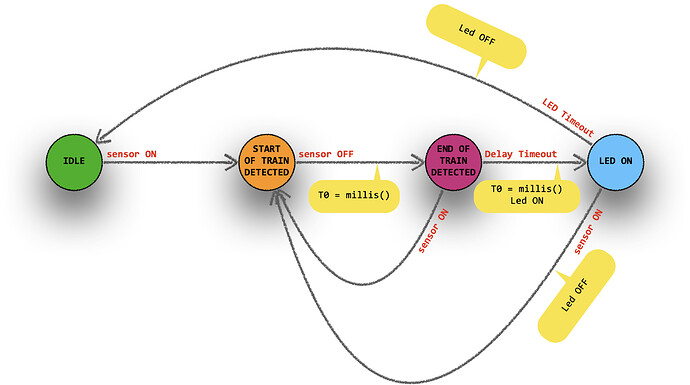
you could read about state machines and the diagram could look something like this:

1 Like

You might get some inspiration from the code I posted in #26 here, @anon37033065.

@GreyOwl , this thread and its OP might interest you.

By using this LED library, you able to turn on LED during a period of time, without managing timestamp. It is non-blocking library.
The below example turn on LED in 10 seconds and then turn off automatically.

led.turnON(); // turn on LED immediately
led.turnOFF(10000); // turn off LED after 10000 milliseconds ( like set a timer)

why aren't you using an interrupt? If you use an interrupt, you can just write functions for rising(button press) edge & falling edge (button release). Though I wouldn't use delay() inside an interrupt.

Nice pic @J-M-L : what tool did you use to draw that?

Hello
This is possible but not recommended.

because interrupts ass an extra portion of knowledge you must have to use them properly

@LarryD
Your code has some comments, but for a real beginner these comments aren't enough to make it easy to understand.

You should add a lot more comments that explains what your code does.

best regards Stefan

Point taken but, this was purposely done to get the questioner to ask questions and hopefully stir a discussion of why things are done as written.


example:
What does the hearbeatLED do ?

Answer:
It gives you a visual indication that code is executing and can show if the code is blocking.

etc.


To many times an all encompassing sketch is taken by a questioner never to hear from them again (until they once again need help); you know how it happens :wink: .

This name is selfexplaining and needs no extra comment.
Thus do coding with selfexplaining names always.
And camelCaseTyping will support the reading.

Have a nice day and enjoy programming in C++ and learning.
Errors and omissions excepted.
Дайте миру шанс!
Hi all, thank you! I appreciate your help very much. I will start working on all your comments this weekend. You will hear from me how I progress.

Regards,
Ernie

Hello Ernie
Even if another forum member doesn't like it, I will propose a solution for modeltrain block control with C++ programming for you.

In this case, all the common information is declared in a data structure:

struct BLOCKCONTROL {
byte sensorPin; // portPin o---|button|---GND
byte ledPin; // portPin o---|220|---|LED|---GND
int sensorOldState;
TIMER ledDelay;
scan TIMER;
};

This data structure can be used to initialise any number of track blocks:

BLOCKCONTROL blockControls [] {.
{A0, 8, false, SomeDelay, 0, false, 20, 0, false},
{A1, 9, false, SomeDelay, 0, false, 20, 0, false},
{A2, 10, false, SomeDelay, 0, false, 20, 0, false},
{A3, 11, false, SomeDelay, 0, false, 20, 0, false},
{A4, 12, false, SomeDelay, 0, false, 20, 0, false},
};

In the loop(), a service takes care of the processing.
What else is conceivable here is to use a PWM output to accelerate a locomotive?

Just try it out and play around with the sketch.

/* BLOCK COMMENT
  ATTENTION: This Sketch contains elements of C++.
  https://www.learncpp.com/cpp-tutorial/
  Many thanks to LarryD
  https://europe1.discourse-cdn.com/arduino/original/4X/7/e/0/7e0ee1e51f1df32e30893550c85f0dd33244fb0e.jpeg
  https://forum.arduino.cc/t/press-a-button-and-when-released-switch-off-led-with-delay/1005935
  Tested with Arduino: Mega[x] - UNO [ ] - Nano [ ]
*/
#define ProjectName "Press a button and when released switch off led with delay"
// HARDWARE AND TIMER SETTINGS
// YOU MAY NEED TO CHANGE THESE CONSTANTS TO YOUR HARDWARE AND NEEDS
#define OutPutTest
constexpr  unsigned long OutPutTestTime {1000};
constexpr  unsigned long SomeDelay {500};

// VARIABLE DECLARATION AND DEFINITION
unsigned long currentTime;

// -- objects -----------------------------------------
struct TIMER {              // has the following members
  unsigned long duration;   // memory for interval time
  unsigned long stamp;      // memory for actual time
  int onOff;               // control for stop/start/repeat
};
struct BLOCKCONTROL {
  byte sensorPin;           // portPin o---|button|---GND
  byte ledPin;              // portPin o---|220|---|LED|---GND
  int sensorOldState;
  TIMER ledDelay;
  TIMER scan;
};
BLOCKCONTROL blockControls [] {
  {A0, 8, false, SomeDelay, 0, false, 20, 0, false},
  {A1, 9, false, SomeDelay, 0, false, 20, 0, false},
  {A2, 10, false, SomeDelay, 0, false, 20, 0, false},
  {A3, 11, false, SomeDelay, 0, false, 20, 0, false},
  {A4, 12, false, SomeDelay, 0, false, 20, 0, false},
};

// -------------------------------------------------------------------
void setup() {
  Serial.begin(9600);
  Serial.println(F("."));
  Serial.print(F("File   : ")), Serial.println(__FILE__);
  Serial.print(F("Date   : ")), Serial.println(__DATE__);
  Serial.print(F("Project: ")), Serial.println(ProjectName);
  pinMode (LED_BUILTIN, OUTPUT);  // used as heartbeat indicator
  //  https://www.learncpp.com/cpp-tutorial/for-each-loops/
  for (auto blockControl : blockControls) pinMode(blockControl.sensorPin, INPUT_PULLUP);
  for (auto blockControl : blockControls) pinMode(blockControl.ledPin, OUTPUT);
#ifdef OutPutTest
  // check outputs
  for (auto blockControl : blockControls) digitalWrite(blockControl.ledPin, HIGH), delay(OutPutTestTime);
  for (auto blockControl : blockControls) digitalWrite(blockControl.ledPin, LOW), delay(OutPutTestTime);
#endif
}
void loop () {
  currentTime = millis();
  digitalWrite(LED_BUILTIN, (currentTime / 500) % 2);
  for (auto &blockControl : blockControls) {
    if ( currentTime - blockControl.scan.stamp >= blockControl.scan.duration) {
      blockControl.scan.stamp = currentTime;
      int stateNew = !digitalRead(blockControl.sensorPin);
      if (blockControl.sensorOldState != stateNew) {
        blockControl.sensorOldState = stateNew;
        if (!stateNew) {
          blockControl.ledDelay.onOff = true;
          blockControl.ledDelay.stamp = currentTime;
          digitalWrite(blockControl.ledPin, HIGH);
        }
      }
    }
    if ( currentTime - blockControl.ledDelay.stamp >= blockControl.ledDelay.duration  && blockControl.ledDelay.onOff) {
      blockControl.ledDelay.onOff = false;
      digitalWrite(blockControl.ledPin, LOW);
    }
  }
}

Have a nice day and enjoy programming in C++ and learning.
Errors and omissions excepted.
Дайте миру шанс!

Keynote on a Mac

care to explain? seems superior in every way.

interrupts are pretty damn basic, I used them on my first ever arduino project. Plenty of tutorials on the subject. No need to baby people, just get him setup the right way.

Not convinced

If the interrupt just sets a flag that you capture later on in the loop, for a button press that will last tens or hundreds of ms, there is no difference with polling the button instead of checking the flag in the loop. Then you benefit from the loop looping and you don’t block millis etc so it’s easy to handle all the timing stuff.

If you deal with everything in the ISR Propose some code with interrupts managing the bouncing and handling the deferred action on the led.

I wasn't trying to convince you, I ask for your reasoning. which you provided, so thank you.

a)my understanding was this is an IR interrupter, not a physical button to be pressed, my responses are informed as such (correct me if im wrong)

b) if all he had to do is a single digitalwrite() inside the isr, that works fine. but since he needs a delay, I'd set an internal timer inside the external isr...that is probably overkill for his application, but thats how my mind would do it.

c) what do you mean "blocks millis" ?

Depending on which IR components are selected and the geometry, you can still have some bouncing (due to indirect paths for the signal). You can deal with that in hardware though so it could be considered perfect.

for b) indeed that's my point - you add complexity as you need to handle two delays and need to cancel the timer if a new train comes by during the delay period or whilst the led is on.


just as a hint on complexity, assuming no bouncing, the state machine as described in post 4


could be implemented as such

const byte ledPin = 13;
const byte sensorPin = 2;

enum : uint8_t {IDLE, START_OF_TRAIN, END_OF_TRAIN, LED_ON} state = IDLE;
uint32_t chrono;
const uint32_t afterTrainDelay = 3000ul;
const uint32_t ledOnDuration = 5000ul;

void handleState() {
  switch (state) {
    case IDLE:
      if (digitalRead(sensorPin) == LOW) state = START_OF_TRAIN;
      break;

    case START_OF_TRAIN:
      if (digitalRead(sensorPin) == HIGH) {
        chrono = millis();
        state = END_OF_TRAIN;
      }
      break;

    case END_OF_TRAIN:
      if (digitalRead(sensorPin) == LOW) state = START_OF_TRAIN;
      else if (millis() - chrono >= afterTrainDelay) {
        digitalWrite(ledPin, HIGH);
        chrono = millis();
        state = LED_ON;
      }
      break;

    case LED_ON:
      if (digitalRead(sensorPin) == LOW) {
        digitalWrite(ledPin, LOW);
        state = START_OF_TRAIN;
      } else if (millis() - chrono >= ledOnDuration) {
        digitalWrite(ledPin, LOW);
        chrono = millis();
        state = IDLE;
      }
      break;
  }
}

void setup() {
  pinMode(ledPin, OUTPUT);
  pinMode(sensorPin, INPUT_PULLUP);
}

void loop() {
  handleState();
}

(typed here, totally untested)

that's easy to read by just looking at the state diagram, likely will do the job, easy to maintain and requirement changes are usually easy to implement in a state machine structure.

That's why I'm not convinced (but would be happy to see your code and become convinced) that the ISR based approach with the delays, volatile, timers etc could be "superior in every way"...