The most important thing when adding lines of code to any program is…
Understanding what those lines of code do - and why you’re putting them there.
This is why copy & paste doesn’t work for effective programming.
The most important thing when adding lines of code to any program is…
Understanding what those lines of code do - and why you’re putting them there.
This is why copy & paste doesn’t work for effective programming.
Kind-of-important:
Start with a working program (sketch) . Depending on what you are doing, There are numerous examples loaded with the ArduinoIDE:
If using a sensor purchased from Adafruit or Sparkfun, note that those vendors have sample code for Arduino.
As you work through your sketch, remember to "File-Save-As..." before you start new additions to prior working code ... every compile overwrites previous code and the old-version is lost.
USB storage "sticks" are inexpensive, keep working copies of your project off-computer for backup. Of course, USB drives, network drives, cloud drives are options. If you have none of the solutions, just Zip up your sketch and eMail to yourself.
I think that most people understand what the lines that they add do; however, they might not see the implications on the existing code.
!! So they need to understand the existing code !!
Is this supposed to be in Introductory Tutotials?
Not really.. I understand why it might be, but the people looking for novice guidance seem not to understand the idea of tutorials or pinned threads!
I program a Computer (the Arduino UNO and the like) to regulate the activities of an "Output Device".
That Programming involves orderly/sequential listing of the actions/responses in the form of a Check List.
As a novice programmer, I take an action using an Input Device, observe the corresponding response, and put Tick Mark on the Check List.
Example:
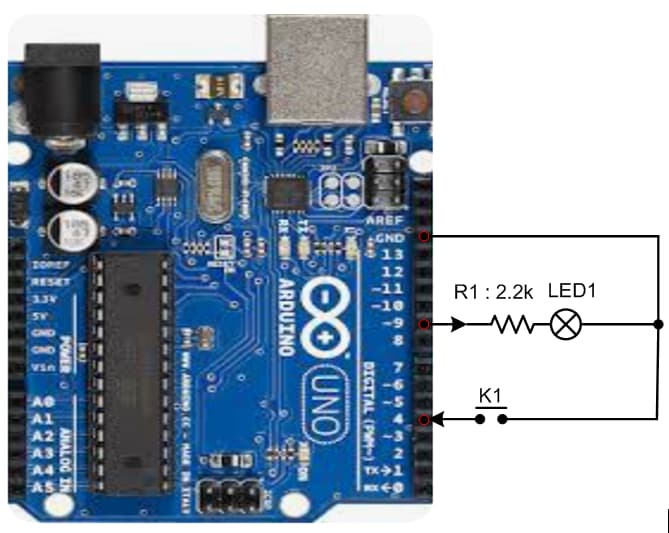
1. Collect an Arduino UNO Board (Fig-1)
2. Connect "R1 + LED1" network with DPin-9 as per Fig-1.
3. Connect "Push Button K1" with DPin-4 as per Fig-1.
4. Upload the following sketch into UNO using Arduino IDE.
void setup()
{
  Serial.begin(9600);   //activates Serial Communication Link
  pinMode(9, OUTPUT);   //DPin-9's direction is output
  pinMode(4, INPUT_PULLUP); //DPin-4's direction is input with internal pull-up
  digitalWrite(9, LOW);     //LED1 is OFF
  //----------------------------
  while (digitalRead(4) != LOW)
  {
    ;    //wait until K1 is pressed
  }
  //-----------------------------
  digitalWrite(9, HIGH);  //K1 is pressed; turn ON LED1
}

void loop() {}
5. Gently press and release K1.
6. Check that LED1 has turned ON.
Exercise:
Add codes with sketch of Step-4 to blink LED1 for five times at 1-sec interval when K1 is pressed.
A good point…
Look at the IPO model for simple program development.