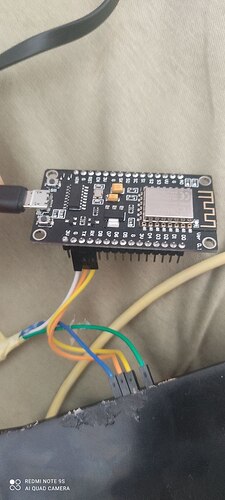
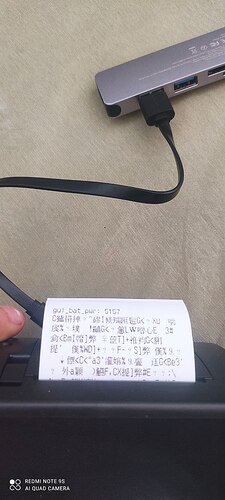
Qr701 printer with esp8266

Hi,
I'm using this code to print some text with esp8266, but the printer is not printer the right text.
I've attached some img of the result


/*------------------------------------------------------------------------
  Example sketch for Adafruit Thermal Printer library for Arduino.
  Demonstrates a few text styles & layouts, bitmap printing, etc.

  IMPORTANT: DECLARATIONS DIFFER FROM PRIOR VERSIONS OF THIS LIBRARY.
  This is to support newer & more board types, especially ones that don't
  support SoftwareSerial (e.g. Arduino Due).  You can pass any Stream
  (e.g. Serial1) to the printer constructor.  See notes below.
  ------------------------------------------------------------------------*/

#include "Adafruit_Thermal.h"
#include "adalogo.h"
#include "adaqrcode.h"

// Here's the new syntax when using SoftwareSerial (e.g. Arduino Uno) ----
// If using hardware serial instead, comment out or remove these lines:

#include "SoftwareSerial.h"
#define TX_PIN 2 // Arduino transmit  YELLOW WIRE  labeled RX on printer
#define RX_PIN 3 // Arduino receive   GREEN WIRE   labeled TX on printer

SoftwareSerial mySerial(RX_PIN, TX_PIN); // Declare SoftwareSerial obj first
Adafruit_Thermal printer(&mySerial);     // Pass addr to printer constructor
// Then see setup() function regarding serial & printer begin() calls.

// Here's the syntax for hardware serial (e.g. Arduino Due) --------------
// Un-comment the following line if using hardware serial:

//Adafruit_Thermal printer(&Serial1);      // Or Serial2, Serial3, etc.

// -----------------------------------------------------------------------

void setup() {

  // This line is for compatibility with the Adafruit IotP project pack,
  // which uses pin 7 as a spare grounding point.  You only need this if
  // wired up the same way (w/3-pin header into pins 5/6/7):
  pinMode(7, OUTPUT); digitalWrite(7, LOW);

  // NOTE: SOME PRINTERS NEED 9600 BAUD instead of 19200, check test page.
  mySerial.begin(9600);  // Initialize SoftwareSerial
  mySerial.println("hfjhgfjhgf");
  mySerial.println("hfjhgfjhgf");
  mySerial.println("hfjhgfjhgf");

  //Serial1.begin(19200); // Use this instead if using hardware serial
  printer.begin();        // Init printer (same regardless of serial type)

  // The following calls are in setup(), but don't *need* to be.  Use them
  // anywhere!  They're just here so they run one time and are not printed
  // over and over (which would happen if they were in loop() instead).
  // Some functions will feed a line when called, this is normal.

  // Font options
  printer.setFont('B');
  printer.println("FontB");
  printer.println("ABCDEFGHIJKLMNOPQRSTUVWXYZ");
  printer.setFont('A');
  printer.println("FontA (default)");
  printer.println("ABCDEFGHIJKLMNOPQRSTUVWXYZ");

  // Test inverse on & off
  printer.inverseOn();
  printer.println(F("Inverse ON"));
  printer.inverseOff();

  // Test character double-height on & off
  printer.doubleHeightOn();
  printer.println(F("Double Height ON"));
  printer.doubleHeightOff();

  // Set text justification (right, center, left) -- accepts 'L', 'C', 'R'
  printer.justify('R');
  printer.println(F("Right justified"));
  printer.justify('C');
  printer.println(F("Center justified"));
  printer.justify('L');
  printer.println(F("Left justified"));

  // Test more styles
  printer.boldOn();
  printer.println(F("Bold text"));
  printer.boldOff();

  printer.underlineOn();
  printer.println(F("Underlined text"));
  printer.underlineOff();

  printer.setSize('L');        // Set type size, accepts 'S', 'M', 'L'
  printer.println(F("Large"));
  printer.setSize('M');
  printer.println(F("Medium"));
  printer.setSize('S');
  printer.println(F("Small"));

  printer.justify('C');
  printer.println(F("normal\nline\nspacing"));
  printer.setLineHeight(50);
  printer.println(F("Taller\nline\nspacing"));
  printer.setLineHeight(); // Reset to default
  printer.justify('L');

  // Barcode examples:
  // CODE39 is the most common alphanumeric barcode:
  printer.printBarcode("ADAFRUT", CODE39);
  printer.setBarcodeHeight(100);
  // Print UPC line on product barcodes:
  printer.printBarcode("123456789123", UPC_A);

  // Print the 75x75 pixel logo in adalogo.h:
  printer.printBitmap(adalogo_width, adalogo_height, adalogo_data);

  // Print the 135x135 pixel QR code in adaqrcode.h:
  printer.printBitmap(adaqrcode_width, adaqrcode_height, adaqrcode_data);
  printer.println(F("Adafruit!"));
  printer.feed(2);

  printer.sleep();      // Tell printer to sleep
  delay(3000L);         // Sleep for 3 seconds
  printer.wake();       // MUST wake() before printing again, even if reset
  printer.setDefault(); // Restore printer to defaults
}

void loop() {
}

Your topic was MOVED to its current forum category which is more appropriate than the original as it has nothing to do with Installation and Troubleshooting of the IDE

Do you have a GND connection from your printer to esp?

the GND connection is from the power supply, and the esp takes power from the usb connection as it shown in the img

So you don't? Also, is the printer a 5V logic or 3.3V logic output?

yes I don't, and I use 5V power supply for the printer

As already mentioned, you need a common GND between the ESP and the printer.

What does your printer datasheet say about the serial interface voltage levels?

What software was running when the printer printed "hellohello"?

I made GND between the ESP and the printer, and getting the same result, I've attached photos of the result.
the code that has printed "hellohello" is the perivious code which is this:

void setup() {
  Serial.begin(9600);  
  Serial.write(0x1B); // ESC command
  Serial.write(0x4D); // Select font size
  Serial.write(0x08); // 32x32
 
}

void loop() {
  Serial.println(""); // send message with newline character  
  Serial.println("HelloHello "); // send message with newline character
  Serial.println("HelloHello "); // send message with newline character
  Serial.println("HelloHello "); // send message with newline character
  Serial.println("HelloHello "); // send message with newline character
  delay(5000);
}


but I want to use adafruit library because I can use larger font-sizes.

Is your printer compatible with the Adafruit library?

Do you have the user manual for your printer?

EDIT: The following webpage may be useful to you:

I think, yes the printer is compativle with Adafruit library, as it shown in your attached URL, it's the same model of the printer

thanks for you guys I found the solution I should select the correct board on the IDE the nodemcu and this code was working fine for me.

/*

  ThermalPrinter/QR701Basics
  Learning how to use the JP-QR701 thermal printer module with an Arduino, including QR codes generated with Python.

  For info and circuit diagrams see https://github.com/tardate/LittleArduinoProjects/tree/master/playground/ThermalPrinter/QR701Basics

 */

#include <Adafruit_Thermal.h>
#include <SoftwareSerial.h>

const byte RX_PIN = D5; // goes to TX on printer
const byte TX_PIN = D6; // goes to RX on printer

const int BAUDRATE = 9600;

SoftwareSerial printerSerial(RX_PIN, TX_PIN);
Adafruit_Thermal printer(&printerSerial);


void printerSleep(void) {
  printer.sleep();
  // delay(3000L);
}


/*
 * Command: wake up printer for action
 */
void printerWakeUp(void) {
  printer.wake();       // MUST wake() before printing again, even if reset
  printer.setDefault(); // Restore printer to defaults
}


/*
 * Command: run simple print job when button pressed
 */
void printerButtonPressed() {
  printerWakeUp();
  printer.justify('C');
  printer.println(F("Button Pressed"));
  printer.feed(2);
  printerSleep();
}


/*
 * Command: run a test print job
 */
void printerTest() {
  printerWakeUp();

  // Test inverse on & off
  printer.inverseOn();
  printer.println(F("Inverse ON"));
  printer.inverseOff();

  // Test character double-height on & off
  printer.doubleHeightOn();
  printer.println(F("Double Height ON"));
  printer.doubleHeightOff();

  // Set text justification (right, center, left) -- accepts 'L', 'C', 'R'
  printer.justify('R');
  printer.println(F("Right justified"));
  printer.justify('C');
  printer.println(F("Center justified"));
  printer.justify('L');
  printer.println(F("Left justified"));

  // Test more styles
  printer.boldOn();
  printer.println(F("Bold text"));
  printer.boldOff();

  printer.underlineOn();
  printer.println(F("Underlined text"));
  printer.underlineOff();

  printer.setSize('L');        // Set type size, accepts 'S', 'M', 'L'
  printer.println(F("Large"));
  printer.setSize('M');
  printer.println(F("Medium"));
  printer.setSize('S');
  printer.println(F("Small"));

  printer.justify('C');
  printer.println(F("normal\nline\nspacing"));
  printer.setLineHeight(50);
  printer.println(F("Taller\nline\nspacing"));
  printer.setLineHeight(); // Reset to default
  printer.justify('L');

  printer.feed(2);
  printerSleep();
}


/*
 * Command: one-time setup
 */
void setup() {
  printerSerial.begin(BAUDRATE);
  printer.begin();
  printerSleep();
}


/*
 * Command: main loop
 */
void loop() {
  
    printerTest();
    // delay(5000);
}

Yes, I find that helps a lot ... :rofl: :rofl: :rofl:

Yes, :sweat_smile: maybe someone else can pay attention to that. Also, the code that I attached might be useful too.

This topic was automatically closed 180 days after the last reply. New replies are no longer allowed.