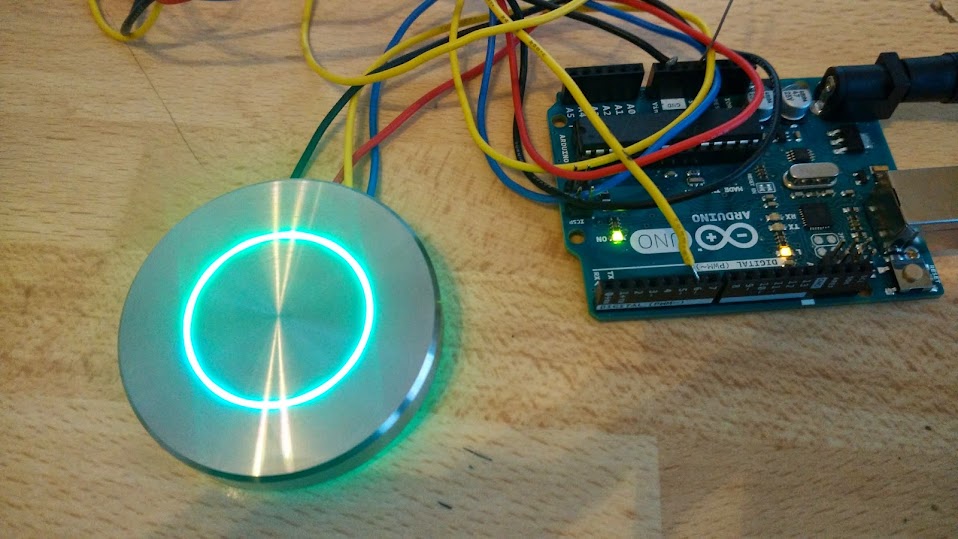
I made this stainless steel button inside is a adafruit Neopixel ledring connected with Red/yellow/black wires.
I want the led ring to change colors and the middle of the button used as a capsense button that will
Sent a signal to my Fibaro binary sensor
the led ring does not have to change color as the button is pressed it just has to keep on changing color.
#include <Adafruit_NeoPixel.h>

#define PIN 6

// Parameter 1 = number of pixels in strip
// Parameter 2 = Arduino pin number (most are valid)
// Parameter 3 = pixel type flags, add together as needed:
//   NEO_KHZ800  800 KHz bitstream (most NeoPixel products w/WS2812 LEDs)
//   NEO_KHZ400  400 KHz (classic 'v1' (not v2) FLORA pixels, WS2811 drivers)
//   NEO_GRB     Pixels are wired for GRB bitstream (most NeoPixel products)
//   NEO_RGB     Pixels are wired for RGB bitstream (v1 FLORA pixels, not v2)
Adafruit_NeoPixel strip = Adafruit_NeoPixel(60, PIN, NEO_GRB + NEO_KHZ800);

// IMPORTANT: To reduce NeoPixel burnout risk, add 1000 uF capacitor across
// pixel power leads, add 300 - 500 Ohm resistor on first pixel's data input
// and minimize distance between Arduino and first pixel.  Avoid connecting
// on a live circuit...if you must, connect GND first.

void setup() {
  strip.begin();
  strip.show(); // Initialize all pixels to 'off'
}

void loop() {
  // Some example procedures showing how to display to the pixels:


  rainbow(20);

}

// Fill the dots one after the other with a color
void colorWipe(uint32_t c, uint8_t wait) {
  for(uint16_t i=0; i<strip.numPixels(); i++) {
      strip.setPixelColor(i, c);
      strip.show();
      delay(wait);
  }
}

void rainbow(uint8_t wait) {
  uint16_t i, j;

  for(j=0; j<256; j++) {
    for(i=0; i<strip.numPixels(); i++) {
      strip.setPixelColor(i, Wheel((i+j) & 255));
    }
    strip.show();
    delay(275);
  }

}

//Theatre-style crawling lights.
void theaterChase(uint32_t c, uint8_t wait) {
  for (int j=0; j<10; j++) {  //do 10 cycles of chasing
    for (int q=0; q < 3; q++) {
      for (int i=0; i < strip.numPixels(); i=i+3) {
        strip.setPixelColor(i+q, c);    //turn every third pixel on
      }
      strip.show();

      delay(wait);

      for (int i=0; i < strip.numPixels(); i=i+3) {
        strip.setPixelColor(i+q, 0);        //turn every third pixel off
      }
    }
  }

}

// Input a value 0 to 255 to get a color value.
// The colours are a transition r - g - b - back to r.
uint32_t Wheel(byte WheelPos) {
  WheelPos = 255 - WheelPos;
  if(WheelPos < 85) {
   return strip.Color(255 - WheelPos * 3, 0, WheelPos * 3);
  } else if(WheelPos < 170) {
    WheelPos -= 85;
   return strip.Color(0, WheelPos * 3, 255 - WheelPos * 3);
  } else {
   WheelPos -= 170;
   return strip.Color(WheelPos * 3, 255 - WheelPos * 3, 0);
  }
}
You have to help me out here. I'm having troubles with your question. Is your question how to add a button ?
That Fibaro sensor is confusing !
The site of Fibaro doesn't even have a seperate page for that sensor. The sensor doesn't have a good name, it it sometimes called "universal sensor" or "binary sensor" or "universal binary sensor".
I assume it is this one ? http://domotica4all.com/video-game-review/fibaro-universal-binary-sensor/
I didn't use NeoPixels myself, but Adafruit has many examples.
Is the rainbow working ?
Did you see the example of the CapacitiveSensor Library at pjrc.com ?
Can you make a test sketch for only touching the button without leds, to see if you can make that work ?
The rainbow() and the other function use a delay. During those delays, nothing can be done.
So you have to remove those delays and rewrite some of the code.
Or replace the delay() with a function that tests also the sensor during the delay.
The best way to do a few things at once, is to use the millis() function. That way a sketch can be created without any call to the delay() function and still have a lot of timing and waiting. The waiting has however no influence on other tasks that run at the same time. It requires that a sketch is specific written for that.
The BlinkWithoutDelay shows the use of millis() : http://arduino.cc/en/Tutorial/BlinkWithoutDelay