good evening, I wonder if there is a way to do a simple pwm, or if what happens to me is normal, using the fade example code, I manage to make the embedded led work correctly by changing the pin to D13, but when doing a simple code with analogWrite (D5, 128) it gives me 3.22v in D5 and when restarting the nano, expecting it to work directly, either with external power through VIN, or by USB it simply sends 0v, if I add a line to send pwm on pin D4 and D6, sometimes D6 I have to restart the nano for the PWM in D4 to work correctly I have no problem, but D5 the same situation.
Thank you very much for your response. To measure the voltage I used a TMRS multimeter, and even when trying to do something simple like controlling a 6612, the motor turns on when I send the code to it, and I see how the speed varies, but when I press the reset button or disconnect and reconnect the Arduino, the motor stops turning on.
in addition to what @UKHeliBob posted I like to recommend that you may use an led (with a resistor to limit the current) to check the pwm output. That's easy and better than a digital multimeter for this task. An oscilloscope would be ideal ...
I have some problems to fully understand your problem description. Would you mind to post your code? (Put the code between code tags, you will find the button < code > in the editor menu).
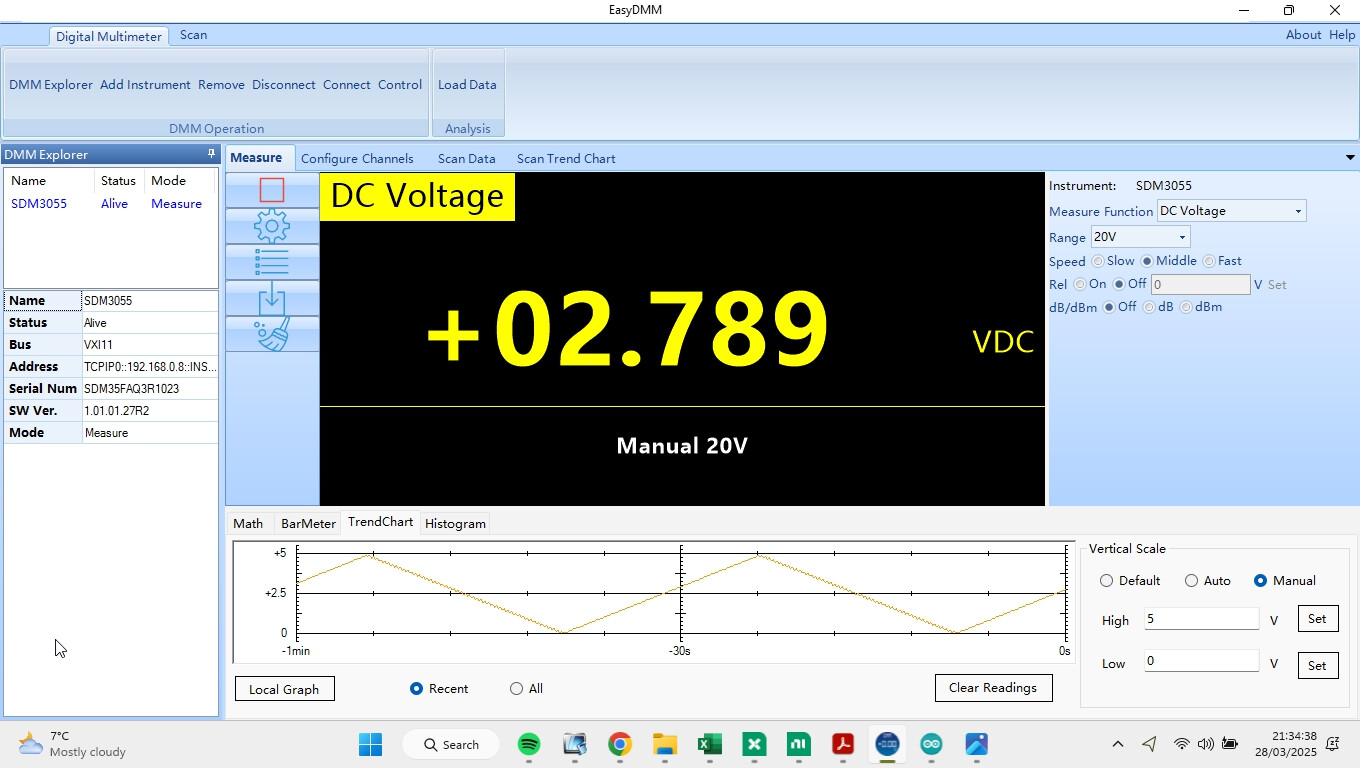
I've done some tests, and have found that you do in fact get acceptable results when measuring the voltage from a PWM pin.
I used the IDE Example 'Fade' on an Arduino Uno R3.
I altered the variable 'fadeAmount' from 5 to 1 to give a slower fade.
Fade
/*
  Fade

  This example shows how to fade an LED on pin 9 using the analogWrite()
  function.

  The analogWrite() function uses PWM, so if you want to change the pin you're
  using, be sure to use another PWM capable pin. On most Arduino, the PWM pins
  are identified with a "~" sign, like ~3, ~5, ~6, ~9, ~10 and ~11.

  This example code is in the public domain.

  https://www.arduino.cc/en/Tutorial/BuiltInExamples/Fade
*/

int led = 3;           // the PWM pin the LED is attached to
int brightness = 0;    // how bright the LED is
int fadeAmount = 1;    // how many points to fade the LED by

// the setup routine runs once when you press reset:
void setup() {
  // declare led pin to be an output:
  pinMode(led, OUTPUT);
}

// the loop routine runs over and over again forever:
void loop() {
  // set the brightness of led pin:
  analogWrite(led, brightness);

  // change the brightness for next time through the loop:
  brightness = brightness + fadeAmount;

  // reverse the direction of the fading at the ends of the fade:
  if (brightness <= 0 || brightness >= 255) {
    fadeAmount = -fadeAmount;
  }
  // wait for 30 milliseconds to see the dimming effect
  delay(30);
}
This shows the voltage captured when the duty cycle is just over 50%.
Look at the 'Trend Chart', you can clearly see the voltage being measured ramping up and down from 0V to 5V.
I repeated the tests using a different multimeter and got similar results.
If the measuring device took an instantaneous measurement (for example - using an Arduino ADC), then the voltage being measured would only be high or low. It would be very rare for a measurement to be taken during the transition from low to high or vice versa.
However a multimeter doesn't work like that, it takes a reading which is integrated over a period of time, and so reads something which is more like the average voltage.