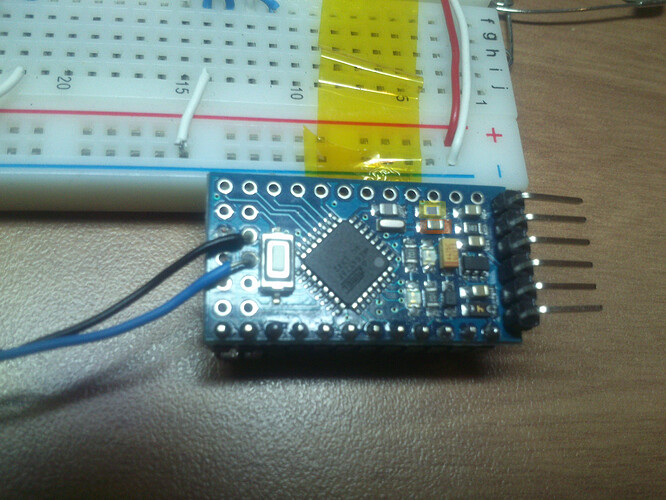
[SOLVED] Deek/Dswy Robot Mini Pro - can't upload a sketch & bootloader

Are you Using the newst Arudion IDE Version and are the ConnectionID right to the clone?

They are Different than in the Sketch! Look at the Thread roundtable about post 7-10 i'm in mobile..

For avrdude, You need to install avrdude on your pc. For me it didn't worked that was but have a try! :slight_smile:

Greets from germany

mrlowalowa:
Are you Using the newst Arudion IDE Version and are the ConnectionID right to the clone?

They are Different than in the Sketch! Look at the Thread roundtable about post 7-10 i'm in mobile..

For avrdude, You need to install avrdude on your pc. For me it didn't worked that was but have a try! :slight_smile:

Greets from germany

Thanks, I'm useing 1.5.6 version IDE, I will try the 1.05.

pls help me, I have same "mini pro"

same issue, I tryed everything you told me but it doest not work for me

I always get this messidge


this messidge I give power to mini from uno programmer

avrdude: Yikes! Invalid device signature.
Double check connections and try again, or use -F to override
this check.


this messigge I get when I give him external power 5V

avrdude: stk500_program_enable(): protocol error, expect=0x14, resp=0x50
avrdude: initialization failed, rc=-1
Double check connections and try again, or use -F to override
this check.

avrdude: stk500_disable(): protocol error, expect=0x14, resp=0x51

  1. Download the ISP-sketch to your programmer arduino (a nano in my case) +check
  2. Follow the instructions in the sketch description to wire the status leds +check
  3. Connect Nano and Mini (Nano->Mini, D13->D13, D12->D12, D11->D11, D10->Reset) +check
  4. Connect Vcc and Gnd from the USB2Serial adapter (cp12xx in my case, or any other puwer suply) to the mini +check
  5. In the IDE, choose the com port, select Board->Mini or Mini Pro, Programmer->Arduino as ISP +check
  6. IDE->Burn Bootloader +check
  7. wait for about 2 minutes... -- after 10 seconds error
  8. be happy ---------------Its not working...

I am sure its dswy robot mini pro, 5v at328

I also bought few of them, and I want get them to work, I have done 10 times all you said and with variations and I cant get it to work

how do I use -F

I tried again with IDE 1.0.5r2.
connect the UNO VCC and GND to pro mini.
reload IPS to UNO.
select COM4
select board pro mini.
burn bootloader.

below is what I get. don't know what to do next.
pls help.

C:\Users\yenan_000\Desktop\arduino-1.0.5-r2-windows\arduino-1.0.5-r2\hardware/tools/avr/bin/avrdude -CC:\Users\yenan_000\Desktop\arduino-1.0.5-r2-windows\arduino-1.0.5-r2\hardware/tools/avr/etc/avrdude.conf -v -v -v -v -patmega328p -cstk500v1 -P\\.\COM4 -b19200 -e -Ulock:w:0x3F:m -Uefuse:w:0x05:m -Uhfuse:w:0xDA:m -Ulfuse:w:0xFF:m 

avrdude: Version 5.11, compiled on Sep  2 2011 at 19:38:36
         Copyright (c) 2000-2005 Brian Dean, http://www.bdmicro.com/
         Copyright (c) 2007-2009 Joerg Wunsch

         System wide configuration file is "C:\Users\yenan_000\Desktop\arduino-1.0.5-r2-windows\arduino-1.0.5-r2\hardware/tools/avr/etc/avrdude.conf"

         Using Port                    : \\.\COM4
         Using Programmer              : stk500v1
         Overriding Baud Rate          : 19200
avrdude: Send: 0 [30]   [20] 
avrdude: Recv: . [14] 
avrdude: Recv: . [10] 
         AVR Part                      : ATMEGA328P
         Chip Erase delay              : 9000 us
         PAGEL                         : PD7
         BS2                           : PC2
         RESET disposition             : dedicated
         RETRY pulse                   : SCK
         serial program mode           : yes
         parallel program mode         : yes
         Timeout                       : 200
         StabDelay                     : 100
         CmdexeDelay                   : 25
         SyncLoops                     : 32
         ByteDelay                     : 0
         PollIndex                     : 3
         PollValue                     : 0x53
         Memory Detail                 :

                                  Block Poll               Page                       Polled
           Memory Type Mode Delay Size  Indx Paged  Size   Size #Pages MinW  MaxW   ReadBack
           ----------- ---- ----- ----- ---- ------ ------ ---- ------ ----- ----- ---------
           eeprom        65    20     4    0 no       1024    4      0  3600  3600 0xff 0xff
                                  Block Poll               Page                       Polled
           Memory Type Mode Delay Size  Indx Paged  Size   Size #Pages MinW  MaxW   ReadBack
           ----------- ---- ----- ----- ---- ------ ------ ---- ------ ----- ----- ---------
           flash         65     6   128    0 yes     32768  128    256  4500  4500 0xff 0xff
                                  Block Poll               Page                       Polled
           Memory Type Mode Delay Size  Indx Paged  Size   Size #Pages MinW  MaxW   ReadBack
           ----------- ---- ----- ----- ---- ------ ------ ---- ------ ----- ----- ---------
           lfuse          0     0     0    0 no          1    0      0  4500  4500 0x00 0x00
                                  Block Poll               Page                       Polled
           Memory Type Mode Delay Size  Indx Paged  Size   Size #Pages MinW  MaxW   ReadBack
           ----------- ---- ----- ----- ---- ------ ------ ---- ------ ----- ----- ---------
           hfuse          0     0     0    0 no          1    0      0  4500  4500 0x00 0x00
                                  Block Poll               Page                       Polled
           Memory Type Mode Delay Size  Indx Paged  Size   Size #Pages MinW  MaxW   ReadBack
           ----------- ---- ----- ----- ---- ------ ------ ---- ------ ----- ----- ---------
           efuse          0     0     0    0 no          1    0      0  4500  4500 0x00 0x00
                                  Block Poll               Page                       Polled
           Memory Type Mode Delay Size  Indx Paged  Size   Size #Pages MinW  MaxW   ReadBack
           ----------- ---- ----- ----- ---- ------ ------ ---- ------ ----- ----- ---------
           lock           0     0     0    0 no          1    0      0  4500  4500 0x00 0x00
                                  Block Poll               Page                       Polled
           Memory Type Mode Delay Size  Indx Paged  Size   Size #Pages MinW  MaxW   ReadBack
           ----------- ---- ----- ----- ---- ------ ------ ---- ------ ----- ----- ---------
           calibration    0     0     0    0 no          1    0      0     0     0 0x00 0x00
                                  Block Poll               Page                       Polled
           Memory Type Mode Delay Size  Indx Paged  Size   Size #Pages MinW  MaxW   ReadBack
           ----------- ---- ----- ----- ---- ------ ------ ---- ------ ----- ----- ---------
           signature      0     0     0    0 no          3    0      0     0     0 0x00 0x00

         Programmer Type : STK500
         Description     : Atmel STK500 Version 1.x firmware
avrdude: Send: A [41] . [80]   [20] 
avrdude: Recv: . [14] 
avrdude: Recv: . [02] 
avrdude: Recv: . [10] 
avrdude: Send: A [41] . [81]   [20] 
avrdude: Recv: . [14] 
avrdude: Recv: . [01] 
avrdude: Recv: . [10] 
avrdude: Send: A [41] . [82]   [20] 
avrdude: Recv: . [14] 
avrdude: Recv: . [12] 
avrdude: Recv: . [10] 
avrdude: Send: A [41] . [98]   [20] 
avrdude: Recv: . [14] 
avrdude: Recv: . [00] 
avrdude: Recv: . [10] 
         Hardware Version: 2
         Firmware Version: 1.18
         Topcard         : Unknown
avrdude: Send: A [41] . [84]   [20] 
avrdude: Recv: . [14] 
avrdude: Recv: . [00] 
avrdude: Recv: . [10] 
avrdude: Send: A [41] . [85]   [20] 
avrdude: Recv: . [14] 
avrdude: Recv: . [00] 
avrdude: Recv: . [10] 
avrdude: Send: A [41] . [86]   [20] 
avrdude: Recv: . [14] 
avrdude: Recv: . [00] 
avrdude: Recv: . [10] 
avrdude: Send: A [41] . [87]   [20] 
avrdude: Recv: . [14] 
avrdude: Recv: . [00] 
avrdude: Recv: . [10] 
avrdude: Send: A [41] . [89]   [20] 
avrdude: Recv: . [14] 
avrdude: Recv: . [00] 
avrdude: Recv: . [10] 
         Vtarget         : 0.0 V
         Varef           : 0.0 V
         Oscillator      : Off
         SCK period      : 0.1 us

avrdude: Send: A [41] . [81]   [20] 
avrdude: Recv: . [14] 
avrdude: Recv: . [01] 
avrdude: Recv: . [10] 
avrdude: Send: A [41] . [82]   [20] 
avrdude: Recv: . [14] 
avrdude: Recv: . [12] 
avrdude: Recv: . [10] 
avrdude: Send: B [42] . [86] . [00] . [00] . [01] . [01] . [01] . [01] . [03] . [ff] . [ff] . [ff] . [ff] . [00] . [80] . [04] . [00] . [00] . [00] . [80] . [00]   [20] 
avrdude: Recv: . [14] 
avrdude: Recv: . [10] 
avrdude: Send: E [45] . [05] . [04] . [d7] . [c2] . [00]   [20] 
avrdude: Recv: . [14] 
avrdude: Recv: . [10] 
avrdude: Send: P [50]   [20] 
avrdude: Recv: 
avrdude: stk500_program_enable(): protocol error, expect=0x14, resp=0x50
avrdude: initialization failed, rc=-1
         Double check connections and try again, or use -F to override
         this check.

avrdude: Send: Q [51]   [20] 
avrdude: Recv: 
avrdude: stk500_disable(): protocol error, expect=0x14, resp=0x51

avrdude done.  Thank you.

I finally fixed it, I am so happy right now :smiley:

I solder up all connections so I am 100% sure that maybe something isn't connected

this time I followed solution from sparkfun forum

https://forum.sparkfun.com/viewtopic.php?f=32&t=27960

  1. Connect the Arduino Uno via USB to the PC
  2. Open the Arduino IDE
  3. Arduino IDE > Tools > Serial Port > (Select port of your Arduino UNO)
  4. Arduino IDE > File > Examples > ArduinoISP
  5. Upload the sketch. once complete your Arduino Uno is now programmed to be an ISP programmer.
  6. Power the Uno off and wire the Uno to the Arduino Pro Mini in the following fashion:

Uno---------------Pro Mini
5V(VCC)-----------------------VCC
GND------------------------GND
Digital Pin 11(MOSI)----pin 11 (MOSI)
Digital Pin 12(MISO)----pin 12 (MISO)
Digital Pin 13(SCK)-----pin 13 (SCK)
Digital Pin 10----------RST

  1. Power on the Uno
  2. Arduino IDE > Tools > Board > Arduino Pro or Pro Mini (5V, 16MHz) w/ ATmega328
  3. Arduino IDE > Tools > Programmer > Arduino as ISP (this option I had checked even in step 5 while uploading IPS sketch, because of previous attempts)
  4. Arduino IDE > Tools > Burn Bootloader

also I want to give some more info, on lots of examples on internet and youtube, I saw lots of ppl removing their ATmega chip from their arduino uno to program pro mini... That looked kind a silly to me, and I manage to found solution.

http://proto-pic.com/Datasheets/pro-mini/UNO_PROMINI.pdf

Step 1.
Connect jumpers as follows
Arduino UNO --> pro mini
RESET -- GND
RX --> RXD
TX --> TXD
VCC --> VCC
GND --> GND

and yes RX goes to RX and TX to TX for sure :slight_smile:

Step 2.
Plug the arduino into the USB lead as normal

Step 3.
Arduino IDE > Tools > Board > Arduino Pro or Pro Mini (5V, 16MHz) w/ ATmega328

Step 4.
Load/Type your sketch into the IDE

Step 5.
Click the Upload Icon or Arduino IDE > File > Upload

Step 6.
When the sketch size show in the debug panel (The bottom of the IDE)
Tap the reset button on the Pro Mini - This starts the bootloader.
if you get error "avrdude: stk500_getsync(): not in sync: resp=0x00"
practice your timing with clicking reset button after seeing "Binary sketch size: 3.772 bytes (of a 30.720 byte maximum)"

If there are any error messages - Double check the wiring, The most common cause of error is
connecting the Rx and Tx lines back to front.

I hope it will help someone,
anyway those little pro minis are fantastic :smiley:

Hi,

I have a few Deek-Robot Arduino Mini's, which work fine. They originally came with the Duemilanove bootloader, but I upgraded that to the Uno one.

I then ordered 5x more, from a different seller, and what came was some of the Dswy Robot pictured in the first post in this thread - with the labelling on the bottom and extra ISP pins.

However, like the other posts in this thread, whichever board I choose from the Arduino IDE, I can not get it to upload.

I had already tried a number of times to flash a new bootloader using my USBtinyISP (which works fine with other boards, including the Deek-Robot Arduino Mini's), but I was unable to make it work on these.

I've just come across this thread, so tried using an Arduino Uno as an ArduinoISP, but that doesn't work either. I've also tried a USBasp.

I've tried using the ISP pins with a little pogo pin type adapter, or wiring direct to pins 11, 12, 13, RESET & GND. I've tried powering the board from the programmer / uno and tried powering it separately with my serial adapter.

I've tried the avrdude command posted above.

All I get with all of these methods - and all 5x boards, is "Invalid Device Signature".

What's interesting though is that when I first powered them on, I did get the green light slowly flashing like other describe. However, after trying the above, none of them give that any more....

I've tried checking with a multimeter that the relevant connections on the board (Vcc, Gnd, Reset, SPI pins, serial pins) correctly connect back to the right pins on the ATMega328P-AU, and they do.

Any ideas?

Thanks,

Ian

Further to my post above, here is the exact output:

[code]
>avrdude -p m328p -c USBtiny -P USB -e -Ulock:w:0x3F:m -Uefuse:w:0x05:m -Uhfuse:w:0xDA:m -Ulfuse:w:0xFF:m -B4

avrdude: initialization failed, rc=-1
         Double check connections and try again, or use -F to override
         this check.


avrdude done.  Thank you.

and with -F:

>avrdude -p m328p -c USBtiny -P USB -e -Ulock:w:0x3F:m -Uefuse:w:0x05:m -Uhfuse:w:0xDA:m -Ulfuse:w:0xFF:m -B4 -F

avrdude: initialization failed, rc=-1
avrdude: AVR device initialized and ready to accept instructions
avrdude: Device signature = 0x000000
avrdude: Yikes!  Invalid device signature.
avrdude: Expected signature for ATMEGA328P is 1E 95 0F

avrdude done.  Thank you.

From the Arduino IDE, doing Burn Bootloader, I get:

avrdude: initialization failed, rc=-1
         Double check connections and try again, or use -F to override
         this check.

Putting the same wires into the same pins on one of my working Derk-Robot ones, I get:

>avrdude -p m328p -c USBtiny -P USB -e -Ulock:w:0x3F:m -Uefuse:w:0x05:m -Uhfuse:w:0xDA:m -Ulfuse:w:0xFF:m -B4

avrdude: AVR device initialized and ready to accept instructions

Reading | ################################################## | 100% 0.02s

avrdude: Device signature = 0x1e950f
avrdude: erasing chip
avrdude: reading input file "0x3F"
avrdude: writing lock (1 bytes):

Writing | ################################################## | 100% 0.01s

avrdude: 1 bytes of lock written
avrdude: verifying lock memory against 0x3F:
avrdude: load data lock data from input file 0x3F:
avrdude: input file 0x3F contains 1 bytes
avrdude: reading on-chip lock data:

Reading | ################################################## | 100% 0.01s

avrdude: verifying ...
avrdude: 1 bytes of lock verified
avrdude: reading input file "0x05"
avrdude: writing efuse (1 bytes):

Writing | ################################################## | 100% 0.00s

avrdude: 1 bytes of efuse written
avrdude: verifying efuse memory against 0x05:
avrdude: load data efuse data from input file 0x05:
avrdude: input file 0x05 contains 1 bytes
avrdude: reading on-chip efuse data:

Reading | ################################################## | 100% 0.01s

avrdude: verifying ...
avrdude: 1 bytes of efuse verified
avrdude: reading input file "0xDA"
avrdude: writing hfuse (1 bytes):

Writing | ################################################## | 100% 0.02s

avrdude: 1 bytes of hfuse written
avrdude: verifying hfuse memory against 0xDA:
avrdude: load data hfuse data from input file 0xDA:
avrdude: input file 0xDA contains 1 bytes
avrdude: reading on-chip hfuse data:

Reading | ################################################## | 100% 0.00s

avrdude: verifying ...
avrdude: 1 bytes of hfuse verified
avrdude: reading input file "0xFF"
avrdude: writing lfuse (1 bytes):

Writing | ################################################## | 100% 0.00s

avrdude: 1 bytes of lfuse written
avrdude: verifying lfuse memory against 0xFF:
avrdude: load data lfuse data from input file 0xFF:
avrdude: input file 0xFF contains 1 bytes
avrdude: reading on-chip lfuse data:

Reading | ################################################## | 100% 0.01s

avrdude: verifying ...
avrdude: 1 bytes of lfuse verified

avrdude: safemode: Fuses OK

avrdude done.  Thank you.

And then when I do burn bootloader in the Arduino IDE, it completes successfully - so my programmer & cables are working fine.

I guess it's looking like these Dswy_Robot boards are faulty, but it's just odd that all 5x are the same, and that it was obviously running a sketch from the factory as I was getting the very slow flashing green LED on them all before I started trying to burn the bootloader.

Anything else I can do/try?

Thanks,

Ian
[/code]

I tried to burn the bootloader again. same error message.
one more thing I noted is that, the LED on my pro mini never blink.
not sure it is good news or bad.

Uno---------------Pro Mini
3.3v-----------------------VCC
GND------------------------GND
Digital Pin 11(MOSI)----pin 11 (MOSI)
Digital Pin 12(MISO)----pin 12 (MISO)
Digital Pin 13(SCK)-----pin 13 (SCK)
Digital Pin 10----------RST

Arduino:nightly (Windows 8), ??"Arduino Pro or Pro Mini, ATmega328 (5V, 16 MHz)"

C:\Users\yenan_000\Desktop\arduino-nightly/hardware/tools/avr/bin/avrdude -CC:\Users\yenan_000\Desktop\arduino-nightly/hardware/tools/avr/etc/avrdude.conf -v -v -v -v -patmega328p -cstk500v1 -PCOM4 -b19200 -e -Ulock:w:0x3F:m -Uefuse:w:0x05:m -Uhfuse:w:0xDA:m -Ulfuse:w:0xFF:m 


avrdude: Version 5.11, compiled on Sep  2 2011 at 19:38:36
         Copyright (c) 2000-2005 Brian Dean, http://www.bdmicro.com/
         Copyright (c) 2007-2009 Joerg Wunsch

         System wide configuration file is "C:\Users\yenan_000\Desktop\arduino-nightly/hardware/tools/avr/etc/avrdude.conf"

         Using Port                    : COM4
         Using Programmer              : stk500v1
         Overriding Baud Rate          : 19200
avrdude: Send: 0 [30]   [20] 
avrdude: Recv: . [14] 
avrdude: Recv: . [10] 
         AVR Part                      : ATMEGA328P
         Chip Erase delay              : 9000 us
         PAGEL                         : PD7
         BS2                           : PC2
         RESET disposition             : dedicated
         RETRY pulse                   : SCK
         serial program mode           : yes
         parallel program mode         : yes
         Timeout                       : 200
         StabDelay                     : 100
         CmdexeDelay                   : 25
         SyncLoops                     : 32
         ByteDelay                     : 0
         PollIndex                     : 3
         PollValue                     : 0x53
         Memory Detail                 :

                                  Block Poll               Page                       Polled
           Memory Type Mode Delay Size  Indx Paged  Size   Size #Pages MinW  MaxW   ReadBack
           ----------- ---- ----- ----- ---- ------ ------ ---- ------ ----- ----- ---------
           eeprom        65    20     4    0 no       1024    4      0  3600  3600 0xff 0xff
                                  Block Poll               Page                       Polled
           Memory Type Mode Delay Size  Indx Paged  Size   Size #Pages MinW  MaxW   ReadBack
           ----------- ---- ----- ----- ---- ------ ------ ---- ------ ----- ----- ---------
           flash         65     6   128    0 yes     32768  128    256  4500  4500 0xff 0xff
                                  Block Poll               Page                       Polled
           Memory Type Mode Delay Size  Indx Paged  Size   Size #Pages MinW  MaxW   ReadBack
           ----------- ---- ----- ----- ---- ------ ------ ---- ------ ----- ----- ---------
           lfuse          0     0     0    0 no          1    0      0  4500  4500 0x00 0x00
                                  Block Poll               Page                       Polled
           Memory Type Mode Delay Size  Indx Paged  Size   Size #Pages MinW  MaxW   ReadBack
           ----------- ---- ----- ----- ---- ------ ------ ---- ------ ----- ----- ---------
           hfuse          0     0     0    0 no          1    0      0  4500  4500 0x00 0x00
                                  Block Poll               Page                       Polled
           Memory Type Mode Delay Size  Indx Paged  Size   Size #Pages MinW  MaxW   ReadBack
           ----------- ---- ----- ----- ---- ------ ------ ---- ------ ----- ----- ---------
           efuse          0     0     0    0 no          1    0      0  4500  4500 0x00 0x00
                                  Block Poll               Page                       Polled
           Memory Type Mode Delay Size  Indx Paged  Size   Size #Pages MinW  MaxW   ReadBack
           ----------- ---- ----- ----- ---- ------ ------ ---- ------ ----- ----- ---------
           lock           0     0     0    0 no          1    0      0  4500  4500 0x00 0x00
                                  Block Poll               Page                       Polled
           Memory Type Mode Delay Size  Indx Paged  Size   Size #Pages MinW  MaxW   ReadBack
           ----------- ---- ----- ----- ---- ------ ------ ---- ------ ----- ----- ---------
           calibration    0     0     0    0 no          1    0      0     0     0 0x00 0x00
                                  Block Poll               Page                       Polled
           Memory Type Mode Delay Size  Indx Paged  Size   Size #Pages MinW  MaxW   ReadBack
           ----------- ---- ----- ----- ---- ------ ------ ---- ------ ----- ----- ---------
           signature      0     0     0    0 no          3    0      0     0     0 0x00 0x00

         Programmer Type : STK500
         Description     : Atmel STK500 Version 1.x firmware
avrdude: Send: A [41] . [80]   [20] 
avrdude: Recv: . [14] 
avrdude: Recv: . [02] 
avrdude: Recv: . [10] 
avrdude: Send: A [41] . [81]   [20] 
avrdude: Recv: . [14] 
avrdude: Recv: . [01] 
avrdude: Recv: . [10] 
avrdude: Send: A [41] . [82]   [20] 
avrdude: Recv: . [14] 
avrdude: Recv: . [12] 
avrdude: Recv: . [10] 
avrdude: Send: A [41] . [98]   [20] 
avrdude: Recv: . [14] 
avrdude: Recv: . [00] 
avrdude: Recv: . [10] 
         Hardware Version: 2
         Firmware Version: 1.18
         Topcard         : Unknown
avrdude: Send: A [41] . [84]   [20] 
avrdude: Recv: . [14] 
avrdude: Recv: . [00] 
avrdude: Recv: . [10] 
avrdude: Send: A [41] . [85]   [20] 
avrdude: Recv: . [14] 
avrdude: Recv: . [00] 
avrdude: Recv: . [10] 
avrdude: Send: A [41] . [86]   [20] 
avrdude: Recv: . [14] 
avrdude: Recv: . [00] 
avrdude: Recv: . [10] 
avrdude: Send: A [41] . [87]   [20] 
avrdude: Recv: . [14] 
avrdude: Recv: . [00] 
avrdude: Recv: . [10] 
avrdude: Send: A [41] . [89]   [20] 
avrdude: Recv: . [14] 
avrdude: Recv: . [00] 
avrdude: Recv: . [10] 
         Vtarget         : 0.0 V
         Varef           : 0.0 V
         Oscillator      : Off
         SCK period      : 0.1 us

avrdude: Send: A [41] . [81]   [20] 
avrdude: Recv: . [14] 
avrdude: Recv: . [01] 
avrdude: Recv: . [10] 
avrdude: Send: A [41] . [82]   [20] 
avrdude: Recv: . [14] 
avrdude: Recv: . [12] 
avrdude: Recv: . [10] 
avrdude: Send: B [42] . [86] . [00] . [00] . [01] . [01] . [01] . [01] . [03] . [ff] . [ff] . [ff] . [ff] . [00] . [80] . [04] . [00] . [00] . [00] . [80] . [00]   [20] 
avrdude: Recv: . [14] 
avrdude: Recv: . [10] 
avrdude: Send: E [45] . [05] . [04] . [d7] . [c2] . [00]   [20] 
avrdude: Recv: . [14] 
avrdude: Recv: . [10] 
avrdude: Send: P [50]   [20] 
avrdude: Recv: . [14] 
avrdude: Recv: . [10] 
avrdude: AVR device initialized and ready to accept instructions

Reading | avrdude: Send: V [56] 0 [30] . [00] . [00] . [00]   [20] 
avrdude: Recv: . [14] 
avrdude: Recv: . [ff] 
avrdude: Recv: . [10] 
avrdude: Send: V [56] 0 [30] . [00] . [01] . [00]   [20] 
avrdude: Recv: . [14] 
avrdude: Recv: . [ff] 
avrdude: Recv: . [10] 
################avrdude: Send: V [56] 0 [30] . [00] . [02] . [00]   [20] 
avrdude: Recv: . [14] 
avrdude: Recv: . [ff] 
avrdude: Recv: . [10] 
################################## | 100% 0.06s

avrdude: Device signature = 0xffffff
avrdude: Yikes!  Invalid device signature.
         Double check connections and try again, or use -F to override
         this check.

avrdude: Send: Q [51]   [20] 
avrdude: Recv: . [14] 
avrdude: Recv: . [10] 

avrdude done.  Thank you.

I just wanted to first thank everyone for the info on this topic. it saved my project too.

the second point I wanted to make, im not sure if it was me misreading (i am sick with the flu) or if some of the posts were incorrect. but I just want to clarify that when you are loading the bootloader by using your Uno, etc. as ISP that you need to connect your UNOs pin 10 to the Mini's reset pin, not the other way around. I was getting an error the same as a number of people were stating so i think i might not be the only one who made that error.

again, thank you. I can wait to put this mini to use in an existing project so I can free up my Uno for new projects.

I got two of these DSWY ROBOT boards and I have a problem that was previously mentioned. However, I lost track of who answered what, so I need some help.
These are the first boards I got along with a Mega 2560. I programmed the Mega as an ISP using the example code. When it is connected to the computer LED 9 pulses (I think that is supposed to be the "heartbeat" so it is working. I connected my mini as follows.
Mega------->Mini
53----------->reset
52----------->13
51------------>11
50----------->12
I also tried connecting the corresponding ICSP pins to no avail. The error is "Yikes! Invalid device signature." The Mini started with the slow blink, but after I tried to bootload, the LED does not light up.
Any help would be greatly appreciated. Thank you in advance.

jpiffr:
I got two of these DSWY ROBOT boards and I have a problem that was previously mentioned. However, I lost track of who answered what, so I need some help.
These are the first boards I got along with a Mega 2560. I programmed the Mega as an ISP using the example code. When it is connected to the computer LED 9 pulses (I think that is supposed to be the "heartbeat" so it is working. I connected my mini as follows.
Mega------->Mini
53----------->reset
52----------->13
51------------>11
50----------->12
I also tried connecting the corresponding ICSP pins to no avail. The error is "Yikes! Invalid device signature." The Mini started with the slow blink, but after I tried to bootload, the LED does not light up.
Any help would be greatly appreciated. Thank you in advance.

To reload Bootloader (from previously linked SparkFun forum)

**** note pins are different for Uno and Mega, the correct pins for both models is in the notes at beginning of sketch ****

SOLUTION Re-install the Arduino Pro Mini Bootloader using my Arduino Uno as an ISP Programmer!

To resolve the errors I burned the bootloader to the Arduino Pro Minis using my functioning Arduino Uno as an ISP. For the most part I followed the instructions here: http://www.sparkfun.com/tutorials/247 adhering to Option 1 but using the Arduino IDE to burn the bootloader. Here is what I did step by step:

  1. Connect the Arduino Uno via USB to the PC
  2. Open the Arduino IDE
  3. Select the correct COM port and board (Arduino Uno)
  4. Open the ArduinoISP sketch (File>Examples>ArduinoISP)
  5. Upload the sketch. once complete your Arduino Uno is now programmed to be an ISP programmer. This is great because I really didn't want to buy a separate programmer.
  6. Power the Uno off and wire the Uno to the Arduino Pro Mini in the following fashion:

Uno---------------Pro Mini or Mega-------------------------Pro Mini
5v-----------------------VCC 5v---------------------------vcc
GND------------------------GND Gnd-----------------------------GND
Digital Pin 11(MOSI)----pin 11 (MOSI) pin 51 ---------------------------pin 11
Digital Pin 12(MISO)----pin 12 (MISO) pin 50-----------------------------pin 12
Digital Pin 13(SCK)-----pin 13 (SCK) pin 52--------------------------------pin 13
Digital Pin 10----------RST pin 53--------------------------------reset

  1. Power on the Uno
  2. Select the correct COM port
  3. IMPORTANT: Select board Arduino Pro Mini 5v w/ATmega328 as the board we are uploading to
    10.from the Tools menu, select Burn Bootloader > w/Aduino as ISP

after you have bootloader installed, to then upload sketches onto the pro mini clone you need to rewire the connections as follows

Step 1.
Connect jumpers as follows
Arduino UNO/mega --> pro mini
RESET -- GND Connect reset to ground on the Uno or Mega
RX --> RXD
TX --> TXD
5 V --> VCC
GND --> GND

and yes RX goes to RX and TX to TX for sure

Step 2.
Plug the arduino into the USB lead as normal

Step 3.
Arduino IDE > Tools > Board > Arduino Pro or Pro Mini (5V, 16MHz) w/ ATmega328

Step 4.
Load/Type your sketch into the IDE

Step 5.
Click the Upload Icon or Arduino IDE > File > Upload

Step 6.
When the sketch size show in the debug panel (The bottom of the IDE)
Tap the reset button on the Pro Mini - This starts the bootloader.
if you get error "avrdude: stk500_getsync(): not in sync: resp=0x00"
practice your timing with clicking reset button after seeing "Binary sketch size: 3.772 bytes (of a 30.720 byte maximum)"

If there are any error messages - Double check the wiring, The most common cause of error is
connecting the Rx and Tx lines back to front.

Hello folks,

After hearing about some local folks having trouble with this board, I bought one to investigate. I wrote about it in length in my Hebrew blog - but maybe the results would be of interest to readers here too.

It turned out that the ATmega328's clock fuses were set to the (factory default?) internal oscillator (which is 8MHz) with a by-8 division; hence the 16-second blink. When I reprogrammed the fuses to the proper values (for the external crystal) the board died, because apparently the crystal itself was defunct, so now the MCU had no clock and no ability to communicate with anything.

I applied an temporary external signal, rather brutally, to the MCU's XTAL1 pin and managed to revive it; I programmed the fuses back to the internal oscillator without the division, so basically I have now a working 8MHz-Pro-Mini clone.

Important note: Trying to burn a bootloader using the Arduino IDE on a board with this specific problem is a bad idea, because apparently the burning process includes resetting of the clock fuses to the external crystal.

To summarize, there are indeed plenty of faulty boards of this kind - some may be saved by burning a new bootloader, essentially by the part where the fuses are set correctly; but if it's also a hardware problem, like I had, this will require some extra effort.

I used Atmel Studio and an AVRISP MKII programmer for this inquiry; The same can be done with other programmers and AVRDude but don't ask me how. Hope it helps!

I had several of the DSWY version with the same fault description as yours. The problem turned out to be a build error. The 100nf cap on the reset line was was swapped with one of the ~22 pf caps on the crystal pins.

I also followed your path of injecting a 1mhz clock into the processor to get it running. Once it was alive, I found the problem by simple visual examination.

avr_fred:
The problem turned out to be a build error. The 100nf cap on the reset line was was swapped with one of the ~22 pf caps on the crystal pins.

Oh! Is that the slightly thicker cap of the three in that area? I was wondering about that a little, but it didn't occur to me to investigate down that path... it would make perfect sense though. Too bad I... kind of removed the crystal during the process... ]:), but the seller promised me a new board instead of the faulty one, so maybe I'll get a chance to try and re-solder those caps correctly. Thanks!

Yes, the 100nf cap is at least twice as thick as the two crystal loading caps.

Hello,
I also encountered these problematic Pro Minis (through a friend who bought them and didn't manage to use them).
I tried to burn a new bootloader through a working Pro Mini with no luck.

I went with igendel and avr_fred assumption of the Capacitors.

and I switched the capacitors in the Picture, and then I succeded in burning a new bootloader.

Now I can load sketches through a regular USB2Serial cable (though the Reset still dosn't work well and I need to reset the Pro Mini manually with the reset button).

Hope this helps someone

to netanelf or anybody else involved: I 'm still puzzled.
A) The picture posted is before or after caps swap?
B) Which caps are for the xtal and should be equal?

Please try to repost the image and giving clear annotation.

Thanks in advance

I will try to clarify,

Here is the image of the Arduino Pro Mini I had (before any changes)

as you can see (i verified with a multimeter)
That C3 and C4 are the capacitors that go to XTAL1 and XTAL2, unfortunately, they are not the same size (-:

I think I found why the reset isn't working for me.
as you can see C1 that is connected to AREF on the ATmega should go to GND and not to RESET.
here is the Pro Mini's Schematics (from sparkfun - eagle library):

I think that:

  • C1 and C4 should be swapped (C4 should be exactly in the size of C3)
  • I didn't try this yet, but i suspect that C1 should be disconnected from the RESET pin and connected to GND instead

UPDATE
So i tried what I said and seperated C1 from C2 and now the reset works fine.
after swapping the capacitors, seperating C1 from C2 and connecting C2 back to the RESET pin my board looks like this:

Thanks to all,
I saved my Dswy_Robot this way..

  • Connect Mega2560 with USB

  • Choose Board-> Mega2560 , choose port

  • Open examples/ArduinoISP

  • Upload

  • Connect Dswy_robot and Mega2560 :
    DSWY Mega2560
    RES 53
    GND GND
    VCC VCC
    MIS 50
    MOS 51
    SCK 52

  • Select Board Arduino pro or pro mini

  • Burn bootloader.

dswy-robot.jpg

tecevit:
Thanks to all,
I saved my Dswy_Robot this way..

  • Connect Mega2560 with USB

  • Choose Board-> Mega2560 , choose port

  • Open examples/ArduinoISP

  • Upload

  • Connect Dswy_robot and Mega2560 :
    DSWY Mega2560
    RES 53
    GND GND
    VCC VCC
    MIS 50
    MOS 51
    SCK 52

  • Select Board Arduino pro or pro mini

  • Burn bootloader.

So simple, so nice :smiley:

I fight few hours trying to download something to my Deek-Robot Nano boards but with this instruction i finally succeeded :smiley: