For Button3, Pin13, I'd like to press that button, have the light stay off for 180 seconds, turn on for 10 seconds, and then turn back off, and do the same thing every time I press that button.
This implies the LED 13 is ON before you push the button3.
//+5 turns LED on
#define LEDon  HIGH
#define LEDoff LOW

//+5 turns LED off
//#define LEDon  LOW
//#define LEDoff HIGH

//=========================================
unsigned long MyTime13;
unsigned long Millis13;
const byte    ledPin13   = 13;
const byte    buttonPin3 = 3;
boolean       flag13     = false;
byte          myState    = 0;
//=========================================

int buttonState = 0; // variable for reading the pushbutton status

void setup()
{
  pinMode(ledPin13, OUTPUT);
  //LED off at RESET
  digitalWrite(ledPin13, LEDoff);
  pinMode(buttonPin3, INPUT_PULLUP);
} //END of setup()

void loop()
{
  //========================================
  // read the state of the push button value
  buttonState = digitalRead(buttonPin3);

  //if enabled and button pressed start LED timing sequence
  if (flag13 == false && buttonState == HIGH)
  {
    //enable timing
    flag13 = true;
    myState = 0;
    Millis13 = millis();
    MyTime13 = 180*1000UL; //LED OFF for 180 seconds
    digitalWrite(ledPin13, LEDoff);
    //LED will remain OFF for 180 more seconds before it comes ON for 10 sec
  }

  //Time to toggle LED?
  if(flag13 == true && millis() - Millis13 >= MyTime13)
  {
    //get ready for next iteration
    Millis13 += MyTime13;

    switch(myState)
    {
    case 0:
      digitalWrite(ledPin13, LEDon);
      myState = 1;
      MyTime13 = 10*1000UL; //LED ON for 10 seconds
      break;

    case 1:
      //we are now finished with this button press
      digitalWrite(ledPin13, LEDoff);
      flag13 = false;
      break;

    }//End of switch
  }

} //END of loop()
I really appreciate all your hard work! Thank you so much! It works great! I was thinking about getting a buzzer to play a horn kind of sound when either of the LEDs are lit up. Can I safely assume I could do this with a cheap passive buzzer? Thanks again! By the way here is the code in case someone else would like to use it:
//+5 turns LED on
#define LEDon  HIGH
#define LEDoff LOW

//+5 turns LED off
//#define LEDon  LOW
//#define LEDoff HIGH

//=========================================
const byte ledPin12 = 12;
const byte buttonPin2 = 2;
const unsigned long MyTime12 = 5000ul;
unsigned long Millis12;
boolean flag12 = false;
unsigned long MyTime13;
unsigned long Millis13;
const byte    ledPin13   = 13;
const byte    buttonPin3 = 3;
boolean       flag13     = false;
byte          myState    = 0;
//=========================================

int buttonState = 0; // variable for reading the pushbutton status

void setup()
{
  // initialize the LED pin as an output:
  pinMode(ledPin12, OUTPUT);
  //LED off at power on
  digitalWrite(ledPin12, LOW);
  // initialize the push button pin as an input:
  pinMode(buttonPin2, INPUT_PULLUP);
  pinMode(ledPin13, OUTPUT);
  //LED off at RESET
  digitalWrite(ledPin13, LEDoff);
  pinMode(buttonPin3, INPUT_PULLUP);
}

void loop()
{
  //=========================================
  // read the state of the push button value:
  buttonState = digitalRead(buttonPin2);
  // read the state of the push button value
  buttonState = digitalRead(buttonPin3);

  //if button pressed start timing LED sequence
  if (flag12 == false && buttonState == HIGH)
  {
    //enable timing
    flag12 = true;
    Millis12 = millis();
    //LED on
    digitalWrite(ledPin12, HIGH);
     //if enabled and button pressed start LED timing sequence
  if (flag13 == false && buttonState == HIGH)
  {
    //enable timing
    flag13 = true;
    myState = 0;
    Millis13 = millis();
    MyTime13 = 180*1000UL; //LED OFF for 180 seconds
    digitalWrite(ledPin13, LEDoff);
    //LED will remain OFF for 180 more seconds before it comes ON for 10 sec
  }
  }

  //Time to toggle LED?
  if(flag12 == true && millis() - Millis12 >= MyTime12)
  {
    //toggle ledPin12
    digitalWrite(ledPin12, !digitalRead(ledPin12));
    flag12 = false;
  }
   if(flag13 == true && millis() - Millis13 >= MyTime13)
  {
    //get ready for next iteration
    Millis13 += MyTime13;

    switch(myState)
    {
    case 0:
      digitalWrite(ledPin13, LEDon);
      myState = 1;
      MyTime13 = 10*1000UL; //LED ON for 10 seconds
      break;
       case 1:
      //we are now finished with this button press
      digitalWrite(ledPin13, LEDoff);
      flag13 = false;
      break;

    }//End of switch
  }


} //END of loop()
I actually just tried it out for the full three minutes and I realize that must be why it was not working just right. I thought it was odd that the three minute timer was going off about 15 seconds early even though the short timer seemed to be working fine. Pressing either button starts the timer for Pin13. How can I fix this, so each timer is totally independent of each other? Thank you again!
I think you need to change it to look like this, but I have not tried:
  // read the state of the push button value:
  buttonState = digitalRead(buttonPin2);

  //if button pressed start timing LED sequence
  if (flag12 == false && buttonState == HIGH)
  {
    //enable timing
    flag12 = true;
    Millis12 = millis();
    //LED on
    digitalWrite(ledPin12, HIGH);
  }

  // read the state of the push button value
  buttonState = digitalRead(buttonPin3);

  //if enabled and button pressed start LED timing sequence
  if (flag13 == false && buttonState == HIGH)
  {
    //enable timing
    flag13 = true;
    myState = 0;
    Millis13 = millis();
    MyTime13 = 180*1000UL; //LED OFF for 180 seconds
    digitalWrite(ledPin13, LEDoff);
    //LED will remain OFF for 180 more seconds before it comes ON for 10 sec
  }

etc.
I switched it up like that, and button 2 seems to have to be pressed up for button 3 to work. I shortened the time for button 3 to activate led 13 from 180 to 5 seconds to help test it easier. Here is that updated code. I'm not sure why it seems like the two buttons are still related.
//+5 turns LED on
#define LEDon  HIGH
#define LEDoff LOW

//+5 turns LED off
//#define LEDon  LOW
//#define LEDoff HIGH

//=========================================
const byte ledPin12 = 12;
const byte buttonPin2 = 2;
const unsigned long MyTime12 = 5000ul;
unsigned long Millis12;
boolean flag12 = false;
unsigned long MyTime13;
unsigned long Millis13;
const byte    ledPin13   = 13;
const byte    buttonPin3 = 3;
boolean       flag13     = false;
byte          myState    = 0;
//=========================================

int buttonState = 0; // variable for reading the pushbutton status

void setup()
{
  // initialize the LED pin as an output:
  pinMode(ledPin12, OUTPUT);
  //LED off at power on
  digitalWrite(ledPin12, LOW);
  // initialize the push button pin as an input:
  pinMode(buttonPin2, INPUT_PULLUP);
  pinMode(ledPin13, OUTPUT);
  //LED off at RESET
  digitalWrite(ledPin13, LEDoff);
  pinMode(buttonPin3, INPUT_PULLUP);
}

void loop()
{
  //=========================================
  // read the state of the push button value:
  buttonState = digitalRead(buttonPin2);

  //if button pressed start timing LED sequence
  if (flag12 == false && buttonState == HIGH)
  {
    //enable timing
    flag12 = true;
    Millis12 = millis();
    //LED on
    digitalWrite(ledPin12, HIGH);
  }

  // read the state of the push button value
  buttonState = digitalRead(buttonPin3);

  //if enabled and button pressed start LED timing sequence
  if (flag13 == false && buttonState == HIGH)
  {
    //enable timing
    flag13 = true;
    myState = 0;
    Millis13 = millis();
    MyTime13 = 5*1000UL; //LED OFF for 180 seconds
    digitalWrite(ledPin13, LEDoff);
    //LED will remain OFF for 180 more seconds before it comes ON for 10 sec
  }

  //Time to toggle LED?
  if(flag12 == true && millis() - Millis12 >= MyTime12)
  {
    //toggle ledPin12
    digitalWrite(ledPin12, !digitalRead(ledPin12));
    flag12 = false;

   if(flag13 == true && millis() - Millis13 >= MyTime13)
  {
    //get ready for next iteration
    Millis13 += MyTime13;

    switch(myState)
    {
    case 0:
      digitalWrite(ledPin13, LEDon);
      myState = 1;
      MyTime13 = 10*1000UL; //LED ON for 10 seconds
      break;
       case 1:
      //we are now finished with this button press
      digitalWrite(ledPin13, LEDoff);
      flag13 = false;
      break;

    }//End of switch
  }}    }


//END of loop()
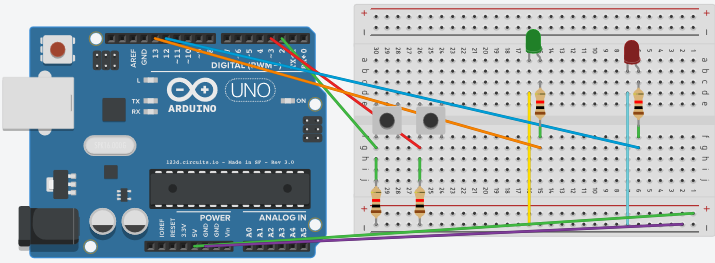
My push button is from a remote where the receiver is on my breadboard. I made a quick layout in a program. I think this is pretty much how my buttons and LEDs are wired. Are there any problems? Thanks!
LarryD:
This implies the LED 13 is ON before you push the button3.
Is this correct?
How is your LED wired?
Thank you for that info. And, sorry I did not answer this question. LED 13 would be OFF before I push button3. Is that why it hasn't been doing what I'd like it to do since I took both of your codes and put them together?
Thank you! Ahh this was driving me crazy but now I believe it is all good. I'd give you more karma points on here if I could. You are a terrific person!
I believe I understand the principles of a good part of the code. I read about boolean a little bit and that is one of the more confusing aspects as I'm still pretty lost as to what exactly that can do.
If you make a variable a boolean, you can examine it with an if statement.
It has two possible states. true/false
boolean timerEnabled = false; // 'type' = boolean apply it to variable timerEnabled, set it to false.
'false' and 'true' are understood by the compiler.
==================================
boolean enabledTimer = false;
.
.
.
// ask if the variable is currently equal to 'true'. You could also use timerEnabled == false.
if(timerEnabled == true)
{
//if it is equal, then you do some stuff here
}
==================================
You could have said:
byte enabledTimer = 0; // a byte can be anything from 0 to 255
.
.
.
if(timerEnabled == 1) //asks if the variable is currently equal to 1
{
//if it is equal, then you do some stuff
}
==================================
You could have said:
int enabledTimer = 1234; // an int can be from -32,768 to 32,767
.
.
.
if(timerEnabled == 1234) //asks if the variable is currently equal to 1234
{
//if it is equal, then you do some stuff
}