Unknown Failure in Datalogger

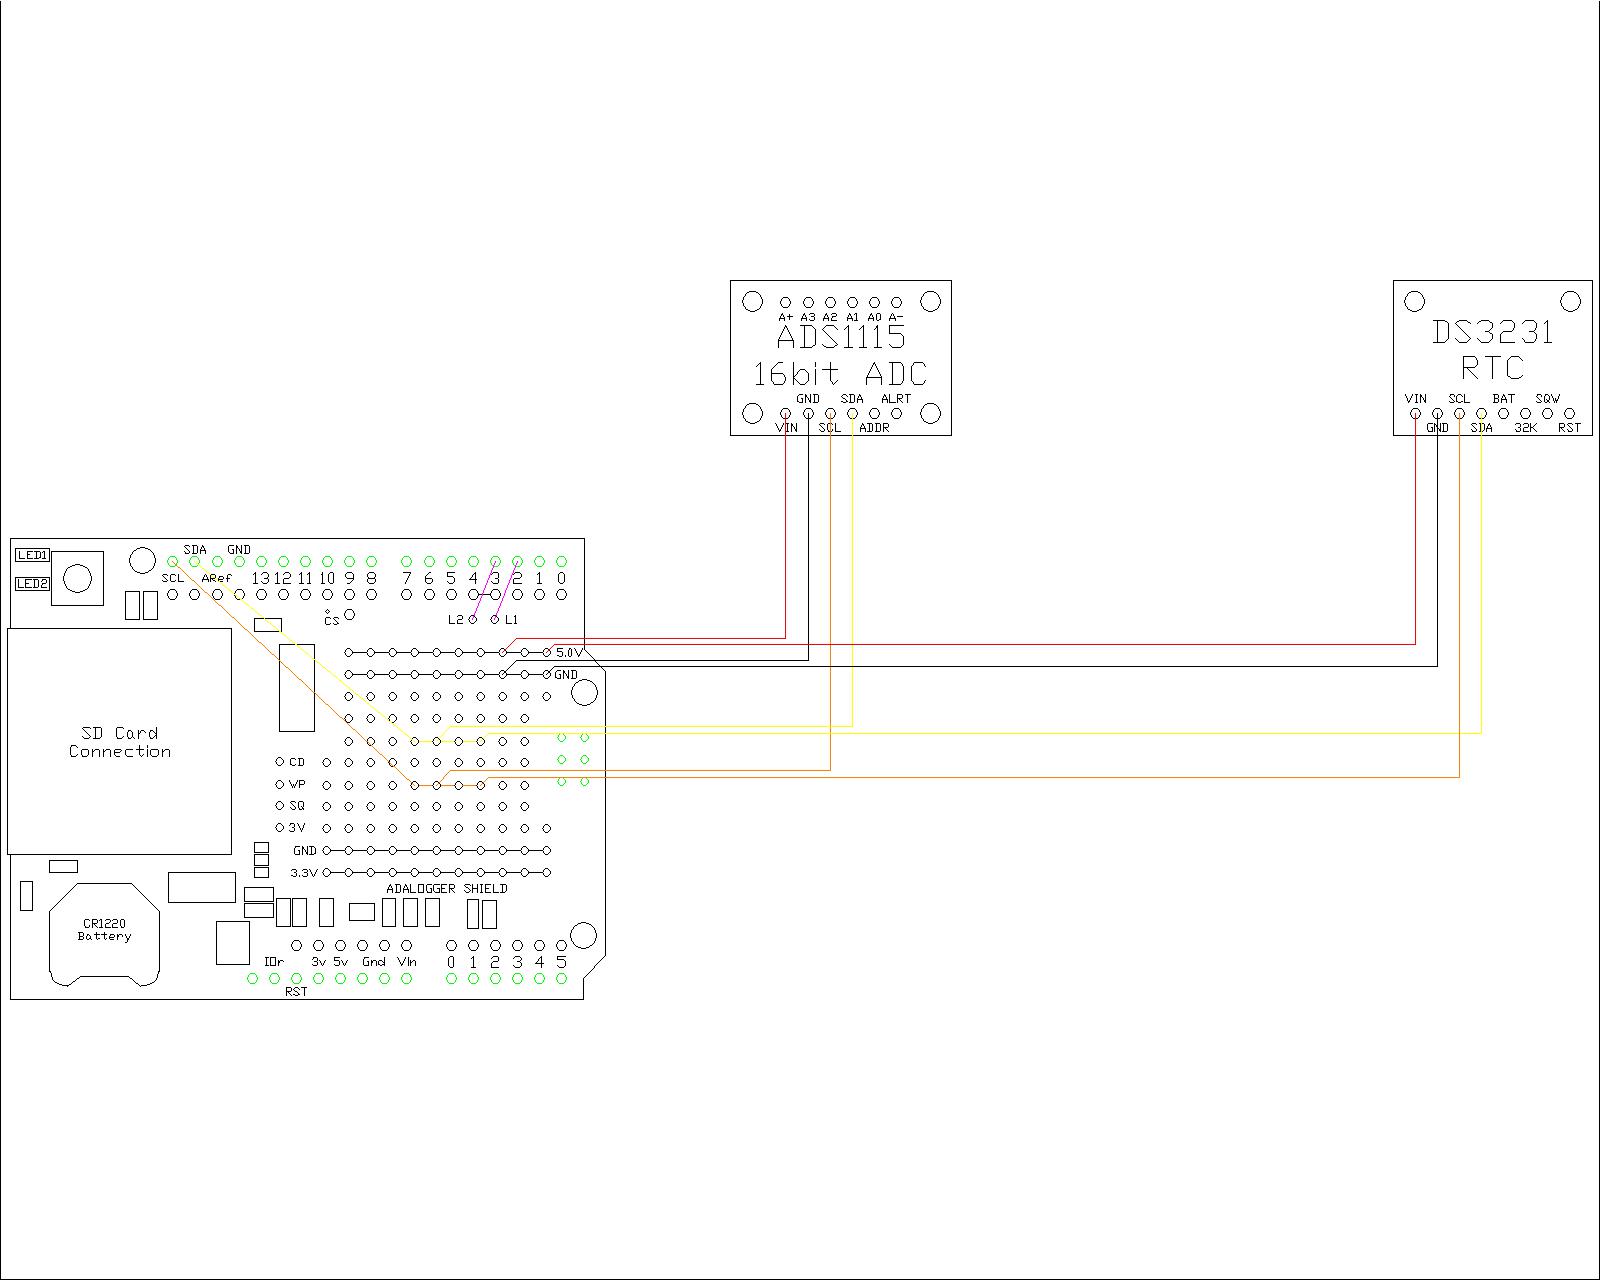
Hello. Over the last few months I have been developing a datalogger. The datalogger consists of four main components:

Here is the code I wrote for the datalogger:

#include <Adafruit_ADS1X15.h>
#include "RTClib.h"
#include <SD.h>
#include <SPI.h>
#include <Wire.h>

// The following define your basic variables: ---------------------------------------------------------------------------------------
#define LOG_INTERVAL  10000         // mills between entries (set to 10,000 for 10 seconds)
#define SYNC_INTERVAL 10000         // mills between calls to "flush()" (write data to the card)
uint32_t syncTime = 0;              // time of last "sync()"
#define LED1 2                      // Make LED1 Controlled by Pin 2 on the Arduino
#define LED2 3                      // Make LED2 Controlled by Pin 3 on the Arduino

const int chipSelect = 10;          // The Data Logging Shield uses Pin 10 to communicate with the SD Card
const int ADS1115_ADDRESS = 0x48;   // Set the I2C address of the ADS1115 ADC (Wire.h allows for multiple devices to be connected to the same SDA/SCL pins)
const int RTC_ADDRESS = 0x68;       // Set the I2C address of the DS3231 RTC

Adafruit_ADS1115 adc;               // Create an Object for the ADC
RTC_DS3231 rtc;                     // Create an Object for the RTC
File logfile;                       // Create the Variable for the File data type

// Enum to represent the four different error types----------------------------------------------------------------------------------
enum ErrorType {
  ERROR_RTC,
  ERROR_ADC,
  ERROR_SD_CARD,
  ERROR_OPEN_FILE
};

// These are the three functions that will be called upon continuously in the loop---------------------------------------------------
// They check to ensure that the RTC, ADC, and SD Card are still connected/working properly
bool isRTCConnected() {
  return rtc.begin();  // Try to initialize the RTC and return the success status
}

bool isADCConnected() {
  return adc.begin(ADS1115_ADDRESS);  // Try to initialize the ADC and return the success status
}

bool isSDCardConnected() {
  return SD.begin(chipSelect);  // Try to initialize the SD card and return the success status
}

// Used for flashing LEDS for a way of user debugging--------------------------------------------------------------------------------
void flashLED(int pin, int flashes, int onTime, int offTime) {  // This sets up a function to flash the debugging LEDs using the: pin, number of flashes, on time (ms), and off time (ms)
  for (int i = 0; i < flashes; i++) {                           // This creates the loop. For "i" amount (the number of flashes):
    digitalWrite(pin, HIGH);                                    // Turn on the LED at the pin
    delay(onTime);                                              // For however many milliseconds
    digitalWrite(pin, LOW);                                     // Turn off the LED at the pin
    delay(offTime);                                             // For however many milliseconds
  }
}

// The following section is created for debugging purposes---------------------------------------------------------------------------
void error(char *str, ErrorType errorType) {
  digitalWrite(LED1, LOW);
  Serial.println();
  Serial.print("ERROR: ");
  Serial.println(str);

  while (!isRTCConnected() || !isADCConnected() || !isSDCardConnected() || errorType == ERROR_OPEN_FILE) {
    switch (errorType) {
      case ERROR_RTC:
        flashLED(LED2, 3, 200, 200);
        delay(5000);
        break;
      case ERROR_ADC:
        flashLED(LED2, 6, 200, 200);
        delay(5000);
        break;
      case ERROR_SD_CARD:
        flashLED(LED2, 3, 500, 500);
        delay(5000);
        break;
      case ERROR_OPEN_FILE:
        flashLED(LED2, 6, 500, 500);
        delay(5000);
        break;
      default:
        break;
    }
  }
}


// Create the file's date&time signature---------------------------------------------------------------------------------------------
void dateTime(uint16_t* date, uint16_t* time) {               // This function is used to set the date of the file in your file explorer
  DateTime now = rtc.now();                                   // This initializes the RTC
  *date = FAT_DATE(now.year(), now.month(), now.day());       // This returns the date using FAT_DATE macro to format fields
  *time = FAT_TIME(now.hour(), now.minute(), now.second());   // This returns the time using FAT_TIME macro to format fields
}


// These are your initial setup parameters-------------------------------------------------------------------------------------------
void setup(void)
{
  Serial.begin(9600);                 // Begins Serial Communication b/t Arduino and Computer
  Serial.println();                   // Prints a new line

  // Set-up the Debugging LEDs
  pinMode(LED1, OUTPUT);              // Makes the pin that LED1 is connected to an output
  pinMode(LED2, OUTPUT);              // Makes the pin that LED2 is connected to an output

  digitalWrite(LED1, HIGH);           // Turns on LED1 to indicate the code is being executed with no problems
  Wire.begin();                       // Calls upon the Wire.h library to initialize

  rtc.begin();                        // Initialize the DS3231 RTC
  if (!rtc.begin()) {                 // If initializing the RTC fails:
    error("RTC failed", ERROR_RTC);   // This defines what will be typed on screen, along with what error type will be called
  }

  // Un-Comment the following Lines to Adjust the Time on the RTC (then comment them out again once it has been adjusted!)
  //DateTime adjustedTime(2023, 7, 6, 8, 22, 00); // Set the desired date and time
  //rtc.adjust(adjustedTime); // Adjust the RTC time

  adc.begin(ADS1115_ADDRESS);                             // Initialize the ADS1115 ADC with the desired I2C address
  if (!adc.begin(ADS1115_ADDRESS)) {                      // If initializing the ADC fails:
    error("ADC failed", ERROR_ADC);                       // This defines what will be typed on screen, along with what error type will be called
  }

  // Initialize the SD Card
  Serial.print("Initializing SD card...");
  pinMode(10, OUTPUT);                                    // Pin 10 is used to communicate with the SD Card
  if (!SD.begin(chipSelect)) {                            // If the SD Card cannot be connected to:
    error("Card failed or not present", ERROR_SD_CARD);   // This defines what will be typed on screen, along with what error type will be called
  }
  
  Serial.println("card initialized.");

  // Create a New File
  char filename[13];                                                                  // Buffer to hold the filename (8 characters for "YY-MM-DD", 1 for '.', 3 for "CSV", and 1 for null terminator)
  DateTime now = rtc.now();                                                           // Sets the DateTime variable to the current time
  sprintf(filename, "%02d-%02d-%02d.CSV", now.year() % 100, now.month(), now.day());  // Makes the name of the file "YY-MM-DD"
  
  SdFile::dateTimeCallback(dateTime);                                                 // This is used to set the date of the file in your file explorer 

  // Open the logfile with UTF-8 encoding. This is necessary so that there is not problem with the "°" Symbol
  logfile = SD.open(filename, FILE_WRITE | O_WRITE | O_CREAT | O_APPEND);
  if (!logfile) {                                                                     // If there is a problem with opening the file:
    error("couldnt create file", ERROR_OPEN_FILE);                                    // This defines what will be typed on screen, along with what error type will be called
  }
  logfile.print("\xEF\xBB\xBF");                                                      // Write UTF-8 BOM to indicate the encoding

  Serial.print("Logging to: ");
  Serial.println(filename);

  // Output the Labels
  Serial.println("Date Time,Oven 46 (V),Oven 47 (V),Oven 48 (V),Oven 49 (V),Oven 46 (°C),Oven 47 (°C),Oven 48 (°C),Oven 49 (°C)");
  logfile.println("Date Time,Oven 46 (V),Oven 47 (V),Oven 48 (V),Oven 49 (V),Oven 46 (°C),Oven 47 (°C),Oven 48 (°C),Oven 49 (°C)");    
}


// The following is what loops over and over again; in this case, collecting and writing data----------------------------------------
void loop()
{
  if (!isRTCConnected()) {
    error("RTC failed", ERROR_RTC);
  }
  
  if (!isADCConnected()) {
    error("ADC failed", ERROR_ADC);
  }
  
  if (!isSDCardConnected()) {
    error("Card failed or not present", ERROR_SD_CARD);
  }
  
  digitalWrite(LED1, HIGH);           // Turns on LED1 to indicate the code is executing with no problems

  // Read the Current Time from the RTC
  DateTime now = rtc.now();

  // Convert Date and Time Values to Strings with Leading Zeros
  String yearString = now.year() < 10 ? "0" + String(now.year()) : String(now.year());
  String monthString = now.month() < 10 ? "0" + String(now.month()) : String(now.month());
  String dayString = now.day() < 10 ? "0" + String(now.day()) : String(now.day());
  String hourString = now.hour() < 10 ? "0" + String(now.hour()) : String(now.hour());
  String minuteString = now.minute() < 10 ? "0" + String(now.minute()) : String(now.minute());
  String secondString = now.second() < 10 ? "0" + String(now.second()) : String(now.second());
  String ymdhms = yearString + "-" + monthString + "-" + dayString + " " + hourString + ":" + minuteString + ":" + secondString;


  // Use an Array to Store Voltage and Temperature Values for All 4 Channels
  float voltages[4];
  float temperatures[4];

  // Loop Through all 4 Channels, Read the Voltages, Convert it to Temperature
  for (uint8_t channel = 0; channel < 4; channel++)
  {
    int16_t adcValue = adc.readADC_SingleEnded(channel);  // Read from the current channel
    float voltage = adcValue * 0.0001875;                 // Convert raw value to voltage (6.144V / (2^15bits))
    voltages[channel] = voltage;                          // Sets the voltage to the voltage for each respective channel
    float temperature = voltage * (1800 / 5);             // Convert the voltage to a temperature (0-5v = 0-1800°C type of scale)
    temperatures[channel] = temperature;                  // Sets the temperature to the temperature for each respective channel
  }

  // Serial Print data
  Serial.print(ymdhms);
  Serial.print(",");
  for (uint8_t i=0; i<4; i++)
  {
    Serial.print(voltages[i], 3);
    Serial.print(",");
  }
  for (uint8_t i=0; i<4; i++)
  {
    Serial.print(temperatures[i], 0);
    Serial.print(",");
  }
  Serial.println();

  // Log data to SD Card
  logfile.print(ymdhms);
  logfile.print(",");
  for (uint8_t i=0; i<4; i++)
  {
    logfile.print(voltages[i], 3);
    logfile.print(",");
  }
    for (uint8_t i=0; i<4; i++)
  {
    logfile.print(temperatures[i], 0);
    logfile.print(",");
  }
  logfile.println();

  // Delay for the amount of time we want between readings
  delay((LOG_INTERVAL -1) - (millis() % LOG_INTERVAL));
  
  // Check Passage of Time
  if ((millis() - syncTime) < SYNC_INTERVAL) return;
  syncTime = millis();
  
  // Turn On Red LED, Write Data to SD Card, Turn Off Red LED
  digitalWrite(LED2, HIGH);
  delay(500);
  logfile.flush();
  delay(500);
  digitalWrite(LED2, LOW);

}

As you can see, I tried to implement debugging methods into the code wherever possible. I am new to coding, so I will take any advice given.

I have been running into an error over the past several times using the data logger. The datalogger will successfully start and run for hours at a time, even multiple days at the beginning. However, after a while, the datalogger will simply stop executing the code. The first couple of times using the datalogger, it ran for days on end, successfully writing data. However, after the third day when I checked on it, the datalogger would be sitting there idle showing no error codes. Most recently, the datalogger will only run for a couple of hours before it stops executing the code and sits there idle.

During my most recent datalogging session, it ran for just over 2 hours and 10 minutes. I had it connected to my laptop so that I can record the log through the Arduino serial monitor. It ran successfully, until something happened. It stopped writing the date and time, but still wrote the voltages and temperatures. Then after about 2 minutes, it stopped working completely. Here is the data I got from this most recent session:

Initializing SD card...card initialized.
Logging to: 23-08-30.CSV
Date Time,Oven 46 (V),Oven 47 (V),Oven 48 (V),Oven 49 (V),Oven 46 (°C),Oven 47 (°C),Oven 48 (°C),Oven 49 (°C)
2023-08-30 14:26:46,3.317,0.864,0.851,0.542,1194,311,306,195,
2023-08-30 14:26:56,3.313,0.860,0.851,0.541,1193,310,306,195,
2023-08-30 14:27:07,3.321,0.862,0.852,0.527,1195,310,307,190,
2023-08-30 14:27:17,3.314,0.859,0.849,0.538,1193,309,306,194,

... (all the data between was perfect) ...

2023-08-30 16:38:17,4.258,2.365,0.851,0.645,1533,851,306,232,
2023-08-30 16:38:27,4.259,2.367,0.851,0.647,1533,852,306,233,
2023-08-30 16:38:36,4.261,2.370,0.851,0.638,1534,853,307,230,
2023-08-30 16:38:47,4.263,2.370,0.851,0.647,1535,853,306,233,
,4.262,2.372,0.851,0.650,1534,854,306,234,
,4.266,2.372,0.851,0.659,1536,854,306,237,
17,4.267,2.376,0.851,0.658,1536,855,306,237,
,4.266,2.378,0.851,0.660,1536,856,306,238,
,4.269,2.381,0.851,0.657,1537,857,306,237,
,4.268,2.382,0.851,0.665,1536,857,306,239,
,4.270,2.384,0.850,0.651,1537,858,306,234,
,4.272,2.384,0.851,0.658,1538,858,306,237,
,4.273,2.388,0.851,0.663,1538,860,306,239,
,4.274,2.390,0.851,0.665,1538,861,306,239,
,4.275,2.391,0.851,0.664,1539,861,306,239,
(end of data)

From 14:26:46 (HH:MM:SS) to 16:38:47, the data was perfect. Then, for two data points, it did not write the date and time at all. Then, interestingly enough, the next data point wrote the seconds value ("17"), along with all of the voltages and temperatures. After that, it continued to only write voltages and temperatures for 8 more data points until it simply stopped recording any more data. It never output an error.

So, my question for you all is what do you think is happening? My first thought is that it is a malfunction with the RTC, but it continuously initialized with it without failure, otherwise it should have output an error.

As an added bonus, the SD Card's data became corrupted. It was not able to be read by my computer; I had to format the card after I turned off the Arduino and unplugged it.

Let me know what you all think. Thanks so much.

Hello des107

Using the String class on a board with little memory can cause memory problems if not used carefully. See the evils of arduino Strings for why.

Have a nice day and enjoy coding in C++.

Once you enter your while loop with that error you are stuck because nothing I can see in your while loop changes that error to false, unless I missed it.

The freezes you describe are characteristic of memory problems. Exceeding array bounds and use of String objects on AVR-based Arduinos are usually the cause of those.

Remove all the Strings and String operations in the code, carefully check array bound violations, and the problem should go away.

When examining the memory report published on upload, don't forget that the SD card and things like TFT displays consume large amounts of RAM memory, which is not included in the report.

This uses RAM for character strings:

 Serial.print("Initializing SD card...");

Save RAM by putting them in program memory, using the F macro on all .print() operations:

 Serial.print(F("Initializing SD card..."));

Yes! You are correct (at least, I believe so with my limited knowledge).

I did that purposefully. I was not sure if this would be an issue, and I did not know the best way to check it every iteration. For that reason, I left it so that if it was an issue, it would stay in this loop without any way for it to be corrected.

In terms of my problem, however, I do not believe that this is the root cause. If it stayed in this loop, it would continuously flash the LED. That is not the case; it does not flash the LED at all. Instead, it just seems like the program stops, not for any debugging reasons.

1 Like

Hello. I appreciate you responding with that. I read through it once. I will probably need to read through it another 10 times to fully understand it. I will come back with an update once I do understand it (or at least think I do).

I have no idea what an F macro is. I will look into it. Thanks.

I am happy to hear you think it is a memory issue, and nothing else. That is what paulpaulson commented as well.

I will try to address this in my code. I will update you when I do so. Thanks.

Did you notice the example F macro I posted? The idea is remarkably simple: F()

Nothing is simple. I tried to replace all of my serial.prints(...) with serial.print(F(...)) and it provided a huge list of errors. I am trying to figure out what I am missing.

Post the revised code and examples of the error messages, and perhaps someone can help.

One single missing or misplaced ";" ")" or "}" can invalidate thousands of lines of code.

I suggest you try changing them all back to how they were, checking they compile ok then change one and check that. When one works then change the others.

I made the mistake of trying to add the f macros to non-strings (such as "Serial.println(F(filename));")

Silly mistake. I have it working now.

I also changed the strings for yy-mm-dd hh:mm:ss into sprintf format. I think that is a more efficient way of handling this from what I read.

Please let me know if there is anything else I should be adding/changing.

#include <Adafruit_ADS1X15.h>
#include "RTClib.h"
#include <SD.h>
#include <SPI.h>
#include <Wire.h>

// The following define your basic variables: ---------------------------------------------------------------------------------------
#define LOG_INTERVAL  10000         // mills between entries (set to 10,000 for 10 seconds)
#define SYNC_INTERVAL 1000          // mills between calls to "flush()" (write data to the card)
uint32_t syncTime = 0;              // time of last "sync()"
#define LED1 2                      // Make LED1 Controlled by Pin 2 on the Arduino
#define LED2 3                      // Make LED2 Controlled by Pin 3 on the Arduino

const int chipSelect = 10;          // The Data Logging Shield uses Pin 10 to communicate with the SD Card
const int ADS1115_ADDRESS = 0x48;   // Set the I2C address of the ADS1115 ADC (Wire.h allows for multiple devices to be connected to the same SDA/SCL pins)
const int RTC_ADDRESS = 0x68;       // Set the I2C address of the DS3231 RTC

Adafruit_ADS1115 adc;               // Create an Object for the ADC
RTC_DS3231 rtc;                     // Create an Object for the RTC
File logfile;                       // Create the Variable for the File data type

// Enum to represent the four different error types----------------------------------------------------------------------------------
enum ErrorType {
  ERROR_RTC,
  ERROR_ADC,
  ERROR_SD_CARD,
  ERROR_OPEN_FILE
};

// These are the three functions that will be called upon continuously in the loop---------------------------------------------------
// They check to ensure that the RTC, ADC, and SD Card are still connected/working properly
bool isRTCConnected() {
  return rtc.begin();  // Try to initialize the RTC and return the success status
}

bool isADCConnected() {
  return adc.begin(ADS1115_ADDRESS);  // Try to initialize the ADC and return the success status
}

bool isSDCardConnected() {
  return SD.begin(chipSelect);  // Try to initialize the SD card and return the success status
}

// Used for flashing LEDS for a way of user debugging--------------------------------------------------------------------------------
void flashLED(int pin, int flashes, int onTime, int offTime) {  // This sets up a function to flash the debugging LEDs using the: pin, number of flashes, on time (ms), and off time (ms)
  for (int i = 0; i < flashes; i++) {                           // This creates the loop. For "i" amount (the number of flashes):
    digitalWrite(pin, HIGH);                                    // Turn on the LED at the pin
    delay(onTime);                                              // For however many milliseconds
    digitalWrite(pin, LOW);                                     // Turn off the LED at the pin
    delay(offTime);                                             // For however many milliseconds
  }
}

// The following section is created for debugging purposes---------------------------------------------------------------------------
void error(char *str, ErrorType errorType) {
  digitalWrite(LED1, LOW);                      // Turn off the green LED signifying there is something wrong
  Serial.println();
  Serial.print(F("ERROR: "));
  Serial.println(str);

  while (!isRTCConnected() || !isADCConnected() || !isSDCardConnected() || errorType == ERROR_OPEN_FILE) {
    switch (errorType) {
      case ERROR_RTC:
        flashLED(LED2, 3, 200, 200);
        delay(5000);
        break;
      case ERROR_ADC:
        flashLED(LED2, 6, 200, 200);
        delay(5000);
        break;
      case ERROR_SD_CARD:
        flashLED(LED2, 3, 500, 500);
        delay(5000);
        break;
      case ERROR_OPEN_FILE:
        flashLED(LED2, 6, 500, 500);
        delay(5000);
        break;
      default:
        break;
    }
  }
}


// Create the file's date&time signature---------------------------------------------------------------------------------------------
void dateTime(uint16_t* date, uint16_t* time) {               // This function is used to set the date of the file in your file explorer
  DateTime now = rtc.now();                                   // This initializes the RTC
  *date = FAT_DATE(now.year(), now.month(), now.day());       // This returns the date using FAT_DATE macro to format fields
  *time = FAT_TIME(now.hour(), now.minute(), now.second());   // This returns the time using FAT_TIME macro to format fields
}


// These are your initial setup parameters-------------------------------------------------------------------------------------------
void setup(void)
{
  Serial.begin(9600);                 // Begins Serial Communication b/t Arduino and Computer
  Serial.println();                   // Prints a new line

  // Set-up the Debugging LEDs
  pinMode(LED1, OUTPUT);              // Makes the pin that LED1 is connected to an output
  pinMode(LED2, OUTPUT);              // Makes the pin that LED2 is connected to an output

  digitalWrite(LED1, HIGH);           // Turns on LED1 to indicate the code is being executed with no problems
  Wire.begin();                       // Calls upon the Wire.h library to initialize

  rtc.begin();                        // Initialize the DS3231 RTC
  if (!rtc.begin()) {                 // If initializing the RTC fails:
    error("RTC failed", ERROR_RTC);   // This defines what will be typed on screen, along with what error type will be called
  }

  // Un-Comment the following Lines to Adjust the Time on the RTC (then comment them out again once it has been adjusted!)
  //DateTime adjustedTime(2023, 7, 6, 8, 22, 00); // Set the desired date and time
  //rtc.adjust(adjustedTime); // Adjust the RTC time

  adc.begin(ADS1115_ADDRESS);                             // Initialize the ADS1115 ADC with the desired I2C address
  if (!adc.begin(ADS1115_ADDRESS)) {                      // If initializing the ADC fails:
    error("ADC failed", ERROR_ADC);                       // This defines what will be typed on screen, along with what error type will be called
  }

  // Initialize the SD Card
  Serial.print(F("Initializing SD card..."));
  pinMode(10, OUTPUT);                                    // Pin 10 is used to communicate with the SD Card
  if (!SD.begin(chipSelect)) {                            // If the SD Card cannot be connected to:
    error("Card failed or not present", ERROR_SD_CARD);   // This defines what will be typed on screen, along with what error type will be called
  }
  
  Serial.println(F("card initialized."));

  // Create a New File
  char filename[13];                                                                  // Buffer to hold the filename (8 characters for "YY-MM-DD", 1 for '.', 3 for "CSV", and 1 for null terminator)
  DateTime now = rtc.now();                                                           // Sets the DateTime variable to the current time
  sprintf(filename, "%02d-%02d-%02d.CSV", now.year() % 100, now.month(), now.day());  // Makes the name of the file "YY-MM-DD"
  
  SdFile::dateTimeCallback(dateTime);                                                 // This is used to set the date of the file in your file explorer 

  // Open the logfile with UTF-8 encoding. This is necessary so that there is not problem with the "°" Symbol
  logfile = SD.open(filename, FILE_WRITE | O_WRITE | O_CREAT | O_APPEND);
  if (!logfile) {                                                                     // If there is a problem with opening the file:
    error("couldnt create file", ERROR_OPEN_FILE);                                    // This defines what will be typed on screen, along with what error type will be called
  }
  logfile.print(F("\xEF\xBB\xBF"));                                                      // Write UTF-8 BOM to indicate the encoding

  Serial.print(F("Logging to: "));
  Serial.println(filename);

  // Output the Labels
  Serial.println(F("Date Time,Oven 46 (V),Oven 47 (V),Oven 48 (V),Oven 49 (V),Oven 46 (°C),Oven 47 (°C),Oven 48 (°C),Oven 49 (°C)"));
  logfile.println(F("Date Time,Oven 46 (V),Oven 47 (V),Oven 48 (V),Oven 49 (V),Oven 46 (°C),Oven 47 (°C),Oven 48 (°C),Oven 49 (°C)"));    
}


// The following is what loops over and over again; in this case, collecting and writing data----------------------------------------
void loop()
{
  if (!isRTCConnected()) {
    error("RTC failed", ERROR_RTC);
  }
  
  if (!isADCConnected()) {
    error("ADC failed", ERROR_ADC);
  }
  
  if (!isSDCardConnected()) {
    error("Card failed or not present", ERROR_SD_CARD);
  }
  
  digitalWrite(LED1, HIGH);           // Turns on LED1 to indicate the code is executing with no problems

  // Read the Current Time from the RTC
  DateTime now = rtc.now();

  char ymdhms[20]; // Buffer for formatted date and time

  // Convert Date and Time Values to a Formatted String with Leading Zeros
  sprintf(ymdhms, "%02d-%02d-%02d %02d:%02d:%02d",
          now.year() % 100, now.month(), now.day(),
          now.hour(), now.minute(), now.second());


  // Use an Array to Store Voltage and Temperature Values for All 4 Channels
  float voltages[4];
  float temperatures[4];

  // Loop Through all 4 Channels, Read the Voltages, Convert it to Temperature
  for (uint8_t channel = 0; channel < 4; channel++)
  {
    int16_t adcValue = adc.readADC_SingleEnded(channel);  // Read from the current channel
    float voltage = adcValue * 0.0001875;                 // Convert raw value to voltage (6.144V / (2^15bits))
    voltages[channel] = voltage;                          // Sets the voltage to the voltage for each respective channel
    float temperature = voltage * (1800 / 5);             // Convert the voltage to a temperature (0-5v = 0-1800°C type of scale)
    temperatures[channel] = temperature;                  // Sets the temperature to the temperature for each respective channel
  }

  // Serial Print data
  Serial.print(ymdhms);
  Serial.print(F(","));
  for (uint8_t i=0; i<4; i++)
  {
    Serial.print(voltages[i], 3);
    Serial.print(F(","));
  }
  for (uint8_t i=0; i<4; i++)
  {
    Serial.print(temperatures[i], 0);
    Serial.print(F(","));
  }
  Serial.println();

  // Log data to SD Card
  logfile.print(ymdhms);
  logfile.print(F(","));
  for (uint8_t i=0; i<4; i++)
  {
    logfile.print(voltages[i], 3);
    logfile.print(F(","));
  }
    for (uint8_t i=0; i<4; i++)
  {
    logfile.print(temperatures[i], 0);
    logfile.print(F(","));
  }
  logfile.println();

  // Delay for the amount of time we want between readings
  delay((LOG_INTERVAL -1) - (millis() % LOG_INTERVAL));
  
  // Check Passage of Time
  if ((millis() - syncTime) < SYNC_INTERVAL) return;
  syncTime = millis();
  
  // Turn On Red LED, Write Data to SD Card, Turn Off Red LED
  digitalWrite(LED2, HIGH);
  delay(500);
  logfile.flush();
  delay(500);
  digitalWrite(LED2, LOW);

}
1 Like

Looks much better!

Does it work, and do what you want for long periods without freezing?

Hello,

Long weekend away. I started the datalogger on Thursday at around 5 pm. By the next morning, it had already stopped itself. It indicated no failure via the flashing LED's.

The SD Card was corrupted again. I had to format it, so I have no data to show what happened.

I did not have the Arduino connected to my computer, as I figured I had solved the issue by addressing the strings. I think I will start it right now and leave it connected to my computer so that I can look at the serial log when it fails again.

Do you have any other ideas what the issue could be? Are there any other strings I can get rid of in my code?

Thanks for everything.

ALSO - I had it connected to an uninterruptible power supply (UPS), so I know there was no issue with power being supplied to the Arduino.

I don't see anything obviously wrong, but there could still be a memory problem.

Post the statistics reported by the linker on memory usage, just before program upload.

Also, try another SD card, in case there is something wrong with the one you have.

Finally, it is always a good idea to have a button to terminate the logging, and formally close the file. That way you can check every aspect of a normal run. The close helps prevent corruption of the file system.

Is this what you mean? :

Sketch uses 20422 bytes (8%) of program storage space. Maximum is 253952 bytes.
Global variables use 1230 bytes (15%) of dynamic memory, leaving 6962 bytes for local variables. Maximum is 8192 bytes.

Regarding the SD Card, I will put a brand new one in right now.

Regarding the button to terminate the logging, I wanted to do that to begin with, but honestly I struggled with the execution of it. I gave up on it for the time being. In order to address this issue, however, I only turn off the Arduino after the red LED (LED2) turns on and off. That is the whole reason why I have the 500ms delay before and after flushing the data to the SD card where that LED is powered; this way I never turn off the Arduino while it is interfacing with any of the components. Here is that section of code I am referring to:

  // Turn On Red LED, Write Data to SD Card, Turn Off Red LED
  digitalWrite(LED2, HIGH);
  delay(500);
  logfile.flush();
  delay(500);
  digitalWrite(LED2, LOW);

OK, not a memory problem then.

It really is important to .close() a file. If you don't, pointers and flags are not properly set in the file table and you risk corrupting the entire SD card.

Yet another possibility is electrical noise in the power supply. Please post a wiring diagram (hand drawn is fine.).

I will look into it. Give me some time to come up with a solution please.

Thanks for everything.

Datalogger Wiring Diagram-Layout1.pdf (47.5 KB)

Ignore the second ADC, I never wired that in yet. Also, ignore all of the wiring to the terminal blocks, as I no longer have it connected to those. Lastly, ignore the fact that I have an Arduino Uno R3 drawn, I am currently using the Mega 2560.

The PDF does not download very quickly. Here is a JPG. This also more accurately describes what the current setup is. The PDF I showed was my own drawing I used originally when I was first coming up with the Idea. In this JPG, you can see how I have my ADC and RTC wired into my SD Card Shield. I use the prototyping portion of the SD Card Shield to connect both the ADC and RTC to the SCL and SDA pins. The SD Card Shield plugs directly into my Arduino Mega 2560. I have Pins 2 and 3 being used for LED 1 and 2.