Some background: So I'm trying to build a DIY ambilight project with the Arduino Uno, I have a WS2813 strip (cut down to 66 leds) and a 5v 10a adapter, both the strip and the adapter are from Alitove.
I've prepared the Arduino with the ColorPalette example from fastled and got it setup to light up 5 leds with 32 brightness just for testing purposes, so whenever everything is powered it will start looping that.
Scenario A: Arduino hooked up via USB (usb hub on the monitor), Arduino providing power to the strip, everything works fine ColorPalette running fine, so obviously the Arduino, the strip and the software works but this of course couldn't drive 66 leds on full brightness.
Scenario B: Arduino not connected via USB, gets VIN from the adapter, everything works fine, ColorPalette running fine, this should mean adapter works too right? But I need USB for Prismatik.
Scenario C: Arduino hooked up via USB, LED strip powered by the adapter, ground is shared to both LED strip and Arduino for common ground, this setup is not working everything is flickering like crazy. From what I read and understand it should be a grounding problem, right? I've tried different cables, I've tried connecting the GND between LED strip and Uno and I've tried connecting from the - on the adapter to the Arduino both with same result. The adapter is connected to an extension/outlet with earth.
Any ideas? Could it be a problem with the adapter? Could it be the USB hub?
Update: Turns out it was not a grounding problem, it was missing a 1000uF Capacitor between adapter and LED.
It definitely seems like a grounding problem to me.
Has the WS2813 strip and the 5v 10a adapter worked before? Did you try a new strip of LEDs? Maybe the sketch code is not compatible with the WS2813 strip? Wring issues?
Sorry if I am bombarding you with questions.
Rawnei:
The adapter is connected to an extension/outlet with earth.
So the adapter is connected to ground? Maybe the Arduino isn't connected to "earth" ground?
It definitely seems like a grounding problem to me.
Has the WS2813 strip and the 5v 10a adapter worked before? Did you try a new strip of LEDs? Maybe the sketch code is not compatible with the WS2813 strip? Wring issues?
Sorry if I am bombarding you with questions.
So the adapter is connected to ground? Maybe the Arduino isn't connected to "earth" ground?
Unsigned_Arduino:
Have you tried scenario C with the resistor? Maybe that is what it needs.
How about making scenario b but just add the usb connection?
No from what I understand WS2813 has resistors built into the LED chips so it shouldn't be needed? And also the purpose of a resistor wouldn't be to prevent this type of behavior?
And connecting VIN and USB at the same time is a big no-no from what I understand.
larryd:
Show us good image of wiring that does not work?
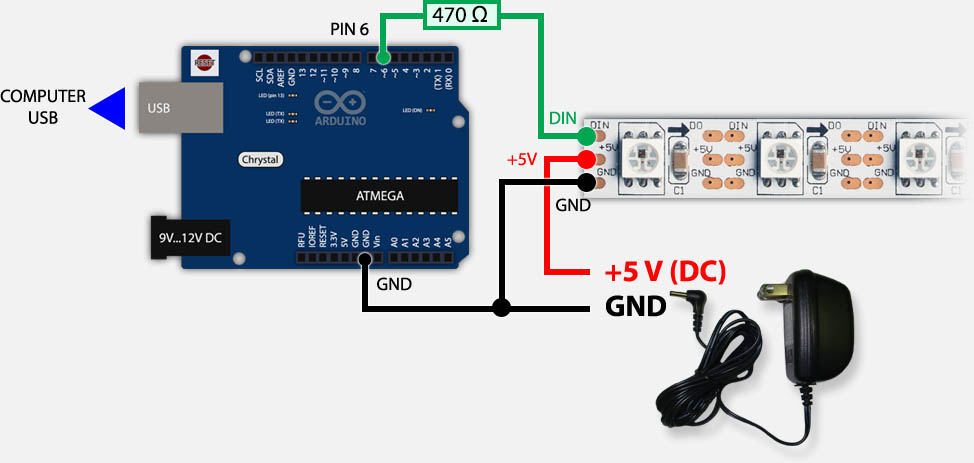
I added an image to my first post here: https://imgur.com/a/MXNplfJ those wires work great in scenario A and B.
Suggest you add the resistor as it protects the hardware, otherwise looks good.
What voltage is measured on the external supply?
What is the measured Arduino 5V?
With the power off, check that you have continuity for Arduino GND to external supply GND.
Well I'm a hobbyist just following specific guides, don't have any measurement devices, currently don't have a resistor or solderer so can't check, my next step was to ask a colleague at work who is more into these things than me work for help.
Unsigned_Arduino:
Why?
Please answer.
Might have read some conflicting statement about two powesources, just read that it should work and the Uno will prioritize VIN and switch off USB power, I will try that now.
And yes I tested the LED (same LED works fine in scenario A and B).
Well I made some progress, with both USB and VIN from adapter connected it's working better, but as soon as I increase the amount of LED's or brightness of them it will start flickering/blinking.
Rawnei:
Well I made some progress, with both USB and VIN from adapter connected it's working better, but as soon as I increase the amount of LED's or brightness of them it will start flickering/blinking.
Could be, the adapter is supposed to be 10A though but who knows might be faulty, it doesn't even work well with 20 leds on low brightness. Will see if I can borrow another adapter from someone for testing.
Rawnei:
Well I made some progress, with both USB and VIN from adapter connected it's working better, but as soon as I increase the amount of LED's or brightness of them it will start flickering/blinking.
If you followed that circuit in the first post then this sort of thing is bound to happen because there is no large capacitor across the supply at the start of the strip. The capacitor stabilises the voltage under the heavy and rapid changing of the current flow being demanded by the strip.
Grumpy_Mike:
If you followed that circuit in the first post then this sort of thing is bound to happen because there is no large capacitor across the supply at the start of the strip. The capacitor stabilises the voltage under the heavy and rapid changing of the current flow being demanded by the strip.
Oh! I will pickup a capacitor after work today then.
Grumpy_Mike:
If you followed that circuit in the first post then this sort of thing is bound to happen because there is no large capacitor across the supply at the start of the strip. The capacitor stabilises the voltage under the heavy and rapid changing of the current flow being demanded by the strip.
You were totally right, I bought and installed a 1000uF capacitor today and that did the trick! Works great now.
I also got a 470r but haven't installed that yet.
Thanks everyone for your help!
p.s. it also works fine after removing the VIN from the Arduino, no grounding problems, so this is what was missing all the time.
Note that this diagram is in itself misleading because there is a length of ground wire between the capacitor and LED strip which has been added to the ground circuit of the Arduino, so whatever dynamic voltages appear across this wire due to its inductance, will be added to the data signal.
The capacitor should actually be at the LED strip itself, and in any case the ground for the Arduino should connect directly to the start of the LED strip.
Note that consistent with this, the commercially available LED strips have two sets of red and black power wires attached to the start (and end) of the strip, one attached to the JST connector for the data source.


")
