Hi,
how do I flash a Bootloader on an ATSAMD21G18 with nothing on it (fresh from the factory)!
Is it really necesarry to use a Atmel ICE or ist there a way to use the Arduino Uno as ISP?
Thanks in advance:)
Hi,
how do I flash a Bootloader on an ATSAMD21G18 with nothing on it (fresh from the factory)!
Is it really necesarry to use a Atmel ICE or ist there a way to use the Arduino Uno as ISP?
Thanks in advance:)
Hi sifbor,
You'll need an Atmel ICE. I bought the Atmel ICE Basic, it costs about the same as an Arduino Zero.
If you're making a custom board, then you'll need to include the 10-pin SWD header, so that the Atmel ICE can connect to the SAMD21 micro-controller. Once you've connected the Atmel ICE, you can use the Arduino IDE to burn the bootloader.
There's no way to use the Arduino Uno ISP for ARM boards such as the SAMD21.
Hi MartinL,
thank you for your quick and informative reply.
Is it correct, that I can use the Arduino/Genuino Zero Bootloader?
If yes, can I programm the micro-controller using the native USB-Port?
Thanks:)
Hi sifbor,
Is it correct, that I can use the Arduino/Genuino Zero Bootloader?
If yes, can I programm the micro-controller using the native USB-Port?
The answer is yes to both questions.
Once you've uploaded the bootloader using the Atmel ICE you can remove it and thereafter program the SAMD21 using it's native port.
I've also recently managed to get the Arduino Bootloader to work successfully with the larger SAMD21J18A, that has 14 more IO pins and 2 more timers (TC6 and TC7) than the Zero's SAMD21G18A.
I just thought it might be useful to know, if you happen to be making your own custom boards and your project requires more IO than the SAMD21G can provide.
All I needed to do was to change the SAMD21G18A definition to SAMD21J18A in the Zero's "boards.txt" file and add the extra pins to its "variant.cpp". (It even worked without these changes, provided I only used the same pins as the Zero).
I'm now working on adding this custom board to the IDE's Boards Manager, as it will save me having to change these files everytime I want to go back using the Zero. All I know at the moment is that it has something to do with JSON files.
Hi Martin,
Take a look here for a samd21 core, with J18A variant and with .json file implementation :
Hi AloyseTech,
That's really useful. Looks like the source code contains everything you need to get the SAMD21J set-up and running with the Arduino IDE.
Thanks for the link.
Martin
MartinL:
Looks like the source code contains everything you need to get the SAMD21J set-up and running with the Arduino IDE.
I confirm this ![]()
Can I reflash the bootloader through the Arduino IDE with the ATMEL-ICE? I got the impression from reading somewhere, that reflashing requires resetting some fuse bits that is not possible with the Arduino IDE.
Also, in my programmers tab...
Atmel EDBG
Atmel-ICE
Atmel SAM-ICE
Appear three times. Is there any way to clean that up?
Thanks,
John
Was finally successful reflashing bootloader via AS7. First hurdle cleared.
This was what got me about 90% of the way:
But, the bootloader they use in the demo won't load on the Sparkfun SAMD21 Mini Breakout. It said the file type was incompatible. That got me confused that it was .hex vs. a .bin issue. But in the end, it must have been something else. Sparkfun doesn't have a .hex of their bootloader available and looked like I was going to have to compile my own. But, the Adafruit Feather m0 bootloader worked fine.
Hi John
Can I reflash the bootloader through the Arduino IDE with the ATMEL-ICE?
Yes you can.
But, the bootloader they use in the demo won't load on the Sparkfun SAMD21 Mini Breakout. It said the file type was incompatible. That got me confused that it was .hex vs. a .bin issue. But in the end, it must have been something else. Sparkfun doesn't have a .hex of their bootloader available and looked like I was going to have to compile my own. But, the Adafruit Feather m0 bootloader worked fine.
Your issue could be do with the fact that Arduino.cc and Arduino.org use different bootloaders. The Arduino.cc uses a modified SAM-BA bootloader for their Arduino/Genuino Zero, while Arduino.org uses the STK500v2 for their M0/M0 Pro.
The consequence is that the Zero and M0/M0 Pro are incompatible each other's IDEs unless you first burn the corresponding bootloader.
HI ,
Am new to arduino M0. We had bought the chip alone from Digikey.
I had given the Native USB connection as it in schematic.
I need to bootload the chip(ATSAMD21G18 chip).
We had soldered in the conversion board and necessary connections had been made.
Can any one help me please...
Thanks in advance.
Hi SahanaSwee,
If you've got a custom board, then you'll need to burn the bootloader using the Atmel-ICE connected to your board's 10-pin SWD port. The Atmel-ICE costs about the same as an Arduino Zero, I bought the Atmel-ICE Basic.
The procedure is as follows:
You should now be able to just connect your board's native USB port and upload sketches using the Arduino IDE, (without the Atmel-ICE).
Hi
I have a custom developed device with SAMD21G MCU and SAM-BA bootloader on top (SparkFun version)
I have experience lot of issue and instability using the Arduino IDE and the BOSSAC programmer over USB to load executable on the flash and sometimes I got error in uploading sometimes in the verification phase..sometimes the load is ok but the code is corrupted
I check USB cable , I tried different HW (windows based)…but the issue is quite random and also sparkfun report issue on the SAMD21 USB-to-Serial converter and programmer and my impression is that the tool chain (arduino IDE + bossac + SAM-BA bootloader) is quite fragile !
https://learn.sparkfun.com/tutorials/samd21-minidev-breakout-hookup-guide/troubleshooting
Don’t know if there are more “stable” and performant bootloader (native zero bootloader?) but I would like to change approach moving to a MSD (mass storage device) bootloader with just drug and drop of the .bin file in the flash memory but in the same time would like to keep a certain compatibility with Arduino IDE
Is there any way after sketch compilation via IDE to export/copy the .bin executable file in a specified folder (the emulated flash disk) ? maybe using a “custom programmer” that just copy paste the .bin generated file to the target folder
Idea is to use IDE for compilation and that use a drag and drop approach of the .bin file with a MSD bootloader
Any idea how to do or experience?
Br
Davide
Justin Mattair has ported an MSD bootloader to the Samd21 chip. You can find it here. You'll need an Atmel ICE (or any other JTAG programmer) thhough.
To "generate" the binary file from you program, click on Sketch->Export Compiled Binary. It will put the .bin file in the same folder as the Arduino program.
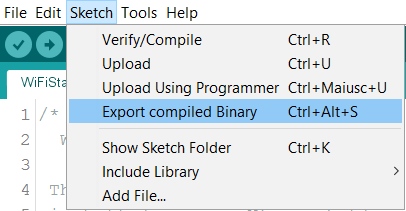
oops...it was under my nose and I don't realize this "export compiled bianry" menu for so many time ( I think is there since few IDE releases ! great simple feature
I see the great work of Mattair and I try to adapt the bootlaoder to my platform that is based on SAMD21G version and I have alredy 4 push button connected to the micro ..I will try to use one as "bootlader button" during power on (hope not to have bouncing issue)
I think this approach for sw upgrade is more easy and relaible than SAM-BA bootlaoder and bossac sw uploader...no special USB driver, no specific load applicaiton sw, nothing to install PC side
hope it's working and is stable !
one more question..if i power the board via USB without entering the boot mode I expect I can start my serial connectio (COM port) as usual right ?
Davide
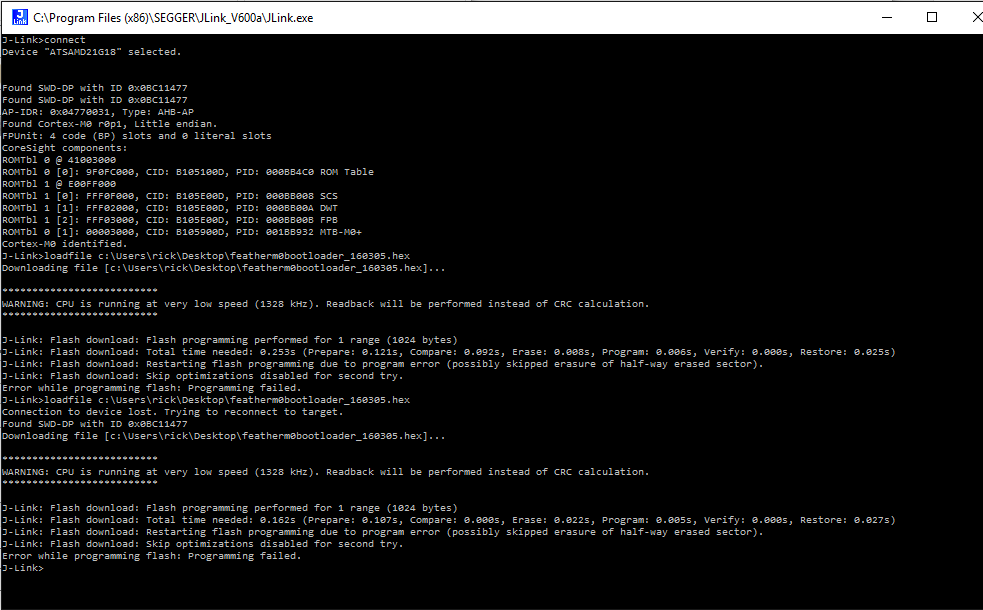
@AloyseTech I've been tearing my hair out trying to program the Adafruit Feather M0 bootloader with the Segger JLink. I have read the Adafruit debugging of ATSAMD21 processors Overview | Proper Debugging of ATSAMD21 Processors | Adafruit Learning System.
I have tried doing it via Atmel Studio 7 and directly with the JLink.exe software for the Segger JLink. I get the attached error message.
Interestingly, I can read the memory of a fresh board that still has the Adafruit burned bootloader fine, but as soon as I try to use AS7 to debug a sketch, the bootloader is overwritten with 0xFF's. I can also use the w1 command in JLink to write a byte in the M0 flash and it reads back successfully. As soon as I try to write the whole bootloader .hex file, I get the attached error. I have tried slowing the JLink speed down to 1000 kHz and even 500 kHz, but same error occurs.
I'd buy the Atmel-ICE Basic board if I have to, but the JLink should work too, shouldn't it?
Thanks for any ideas.
Rick
rickrcomm:
@AloyseTech I've been tearing my hair out trying to program the Adafruit Feather M0 bootloader with the Segger JLink............
I get the attached error. I have tried slowing the JLink speed down to 1000 kHz and even 500 kHz, but same error occurs.
Rick
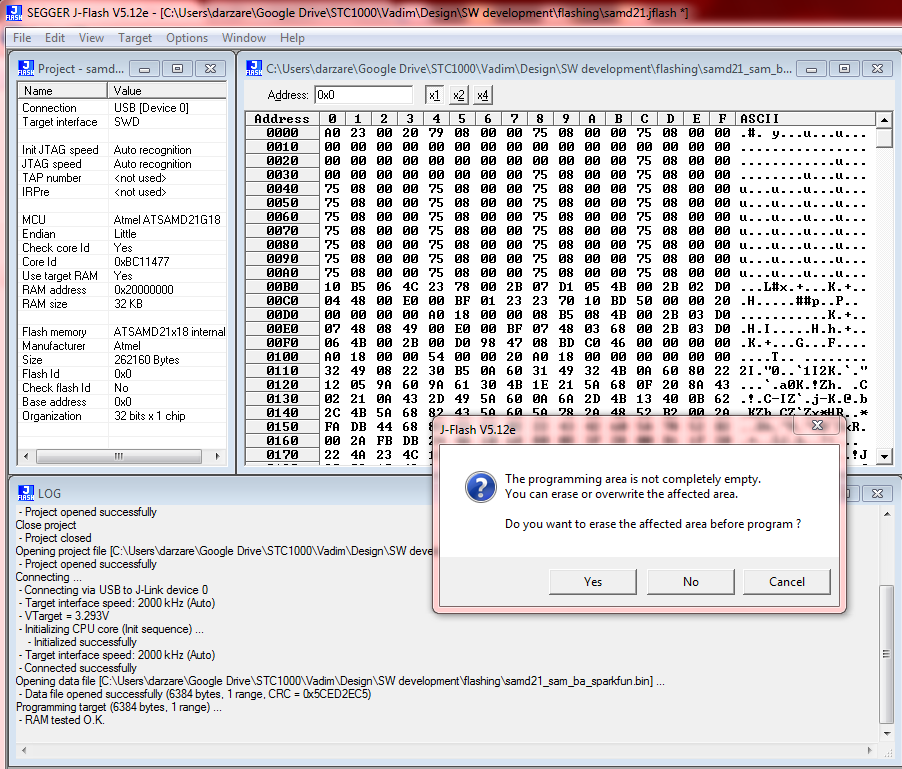
I follow up this since I have similar issue with one of my custom board with SAMD21G18
I was thinkig that could be my specifc and local issue (some HW problem or some corruption on the flash doing many experiments) but from Rick post seems a common issue
I connect SEGGER J-link via SWD interface and I try to load bootloader (modified SAM-BA from sparkfun) from location 0x000 but if I do Program&Verify I’m propted that the program area is not empty and if I select to overwrite (answer YES to pup up) the programming process fails and here is the log
If I answer no to overwriting the area the process end successfully :o
RAM tested O.K.
- Programming target (6384 bytes, 1 range) ...
But then when I load the application from address 2000 it doesn’t work at all (same binary on another board works perfectly)
If I try to erase chip I got again an error ![]()
Erasing chip ...
- Erasing 1025 sectors, 2 ranges, 0x0 - 0x3FFFF, 0x804000 - 0x80400F
- RAM tested O.K.
- Erasing bank 0, sectors 0-63
- ERROR: Blank check after erase reports: Failed to erase sectors 0-63 (0x00 - 0x3FFF) @ address 0x00
- ERROR: Failed to erase chip
Do I have something corrupted in the SAMD21? Is there any way to erase completely the flash?
I try also by command shell and command line but error are the same..
Attached some screenshots
Davide
I'm not familiar with the J-Link devices, but one line that caught my eyes is :
WARNING : CPU is running at very low speed (1328kHz).
Maybe you have an hardware issue with the clocking system. I'm not sure though. Sorry I can't really help on that matter...
The Bootloader section is fuse protected. You need to disable it first in order to be able to "erase" that seciont.
In Atmel Studio: tools -> Device Programming
Selct your J-link, Make sure it can read the device ID
Look into the FUSES section, Edit the BOOTPROT...
Section 22.6.5 http://www.atmel.com/Images/Atmel-42181-SAM-D21_Datasheet.pdf
I too postponed the ready of those 1000's pages until I could no longer avoid it !
Luckily for you, the boot prot section is the shortest ![]() 1 paragraph and 1 table
1 paragraph and 1 table
BOOTLOADER WORK:
I just finished porting my project to ASF ( including the SD card bootloader ) so I can make good use of the J-link box in "debug" mode and LOVE the ability to search function declaration in the entire project.
If you intend to keep the Arduino IDE, I would suggest you leave the original bootloader alone ( addr: 0x0000 - 0x2000 ) and implement your own bootloading requirements into 0x2000 to 0xXYZ and finally put your arduino sketch at the end ...
I do not know of many sketches that would require the "original bootlodaer 8KB" when you have 256kB available.
You could take the original arduino bootloader to burn yours ( and have a backup plan when it fails ). No need for a J-link or Atmel-ICE as the bootprot fuses are not protecting further and you would still need to learn the dreaded TOOLCHAIN by playing with the "start address".
good luck .
WARNING : when using the J-LINK ( and other debuggers ), they seem to interact with the WDT and clocking scheme. The Arduino platform on the Zero