CNC SHEILD for NON CNC PROJECT with multiple SHEILD CARDS controlled by a Windows Form (visual basic)

Evening All,

New to Arduino, so please bare with me. I have a project where I need to control multiple stepper motors at once. (I design theatre set models and want to automate the model scenery)

What I'm looking for is a solution where I could control up to 15 steppers motors (or more) via visual basic windows form. I've been looking at CNC shield which can control up to 4 steppers X/Y/Z + A. Would it be possible to link 5 of these cards as an example.

I'm not wanting to use GRBL and G_code.

Just need the stepper to perform a set a number of steps, with set speed, direction and ideally with ramp up/down acceleration. Also need to include limit switches at each end.

Before I start purchasing just want to see if it's possible.

Looking forward to your guidance.

Kind regards

James

Personally, I’d skip the shields and use stepper drivers directly.. maybe a screw shield in between.

You could not simply control 5 shields with one Uno, there are not enough pins. In addition, depending on fast the steppers need to move, you may run into issue with CPU loading.

There is a board for Mega which allows up to 6 steppers, known as RAMPS. A Mega or Due would have enough pins to control 15 steppers.

You could reduce the IO requirement by using shift registers,the drawback there is that no stepper library I know of supports that mode. As it happens I have a board which supports 8 steppers and uses SPI.

The alternative to one big CPU board is to use several CPU boards, which could be connected on the same bus. So I would suggest the simplest off the shelf hardware setup having 4/5 Unos each with a CNC shield.

Thanks Bob, appreciate your guidance.

My thoughts were multiple CNC shields/UNO R3. Would it be possible to have independent power supplies for each group of CNC/UNO? Also are you able to share some more details on the BUS and how these are connected between each group?

Kind regards

James

How would you make that visual basic windows form communicate what you desired to your one or more Arduinos?

Well this the next step. I have seen a few YouTube tutorials on setting this up, so will give it crack!

I have existing hardware and steppers that I have connected to a windows form and it works a treat. Unfortunately the company that made the hardware cards is no longer in business, so need a plan B

You could power each unit independently or in a group, I guess depending on how close the units are.

The simplest implementation would be to use USB for each unit, the disadvantage is that you would need several COM ports to access. For units that are nearby, you could designate one as a master connected to USB, and the master relays messages to other units.

A better solution might be to use an RS485 bus. The PC would use a USB-RS485 converter, and all the units connect on the same bus. That is also better suited to longer distances, you may not need that. What is the typical distance between the PC and the units?

Thanks Bob,

The PC to the first UNO would be max 10m and the distance between each subsequent uno would max 1m

Cheers

James

I wrote a program in VB.net to communicate to my 3 axis wood router, using ethernet UDP as the communication between each of the positioners. Each of the axis processors communicate the command back to the PC so that the command is verified. Writing the code took a long time, but the interface with the PC was worth it. Now I can watch the router run while I am in another room.
Unlike

1 Like

So my CNC stepper shield, uno and 3 stepper motors have arrived and I've used Chat GPT to write some code for the Arduino and Visual Basic, but can't seem to get the motors to move. VB does confirm it's connected to the Arduino. I'm using the AccelStepper Library

Below is the code for the Arduino

#include <AccelStepper.h>

// Define stepper motor connections
#define DIR_PIN_X 5
#define STEP_PIN_X 2
#define DIR_PIN_Y 6
#define STEP_PIN_Y 3

// Create stepper motor objects for X and Y
AccelStepper stepperX(AccelStepper::DRIVER, STEP_PIN_X, DIR_PIN_X);
AccelStepper stepperY(AccelStepper::DRIVER, STEP_PIN_Y, DIR_PIN_Y);

void setup() {
  // Initialize serial communication
  Serial.begin(9600);

  // Set default speed and acceleration
  stepperX.setMaxSpeed(1000);
  stepperX.setAcceleration(500);
  stepperY.setMaxSpeed(1000);
  stepperY.setAcceleration(500);
}

void loop() {
  // Check if there's data available from the serial port
  if (Serial.available()) {
    // Read the incoming data
    char command = Serial.read();
    long steps;
    int speed, accel;

    switch (command) {
      case 'X':
        steps = Serial.parseInt();
        speed = Serial.parseInt();
        accel = Serial.parseInt();
        stepperX.setMaxSpeed(speed);
        stepperX.setAcceleration(accel);
        stepperX.moveTo(steps);
        break;
        
      case 'Y':
        steps = Serial.parseInt();
        speed = Serial.parseInt();
        accel = Serial.parseInt();
        stepperY.setMaxSpeed(speed);
        stepperY.setAcceleration(accel);
        stepperY.moveTo(steps);
        break;
    }
  }

  // Run stepper motors
  stepperX.run();
  stepperY.run();
}

Yes, you could use a Mega, and multiple CNC shields by using their Shield's header to connect the signals from the Mega to the multiple shields.

Here's a simulation of 32 steppers driven independently by a Mega:

Here's the Protoneer CNC Shield V3 layout, where you'd use the 12-pin header in the upper left as inputs for the 4 motors:

The Protoneer CNC Shield V3 (and its many clones) pull the !ENABLE line HIGH on the drivers by default. You need to actively pull it LOW, either by a jumper on the EN/GND pair on the header, by writing pin8 LOW, or by configuring AccelStepper to drive the enable line LOW.

From Arduino CNC Shield – 100% GRBL Compatable | Protoneer.co.nz :


See this bit:

image

Thanks Dave,

This is great information. I just need to get one UNO and CNC shield working and then grow from there. I'm wondering if the shield I bough from China is faulty, so have just ordered another. Lets see if I can get the board working with GRBL to confirm all is working, then I'll go back and try with my VB form. I'd welcome any more guidance

I added a couple lines to your #11 setup code to enable the drivers:

void setup() {
  // Initialize serial communication
  Serial.begin(9600);

  // Set default speed and acceleration
  stepperX.setMaxSpeed(1000);
  stepperX.setAcceleration(500);
  stepperY.setMaxSpeed(1000);
  stepperY.setAcceleration(500);
  pinMode(8,OUTPUT); digitalWrite(8,LOW);
  Serial.println("forum: [XY] <steps> <speed> <acceleration>");
}

and dropped the code into this Wokwi simulation setup and it seems to work as expected:

So I've got the the CNC Shield and Arduino working perfectly with my visual basic form (thank god for chat GPT). Now I want to step a Master and Slave system using I2C. Looking at my diagram will below will this setup work? Does the Arduino slave require it's own 5v power supply or is this taken from the CNC shield? Can the SCL and SDA pins on the CNC shield be daisy chained together. I read someone that the GND may require a resistor?

The Uno's are connected to each CNC shield by the required pins. The master UNO is connected to the PC via USB.

I think you can daisy chain 5V on the CNC shield to power the slave Arduinos. Daisy chaining SCL and SDA should be fine.

No resistor is required for GND.

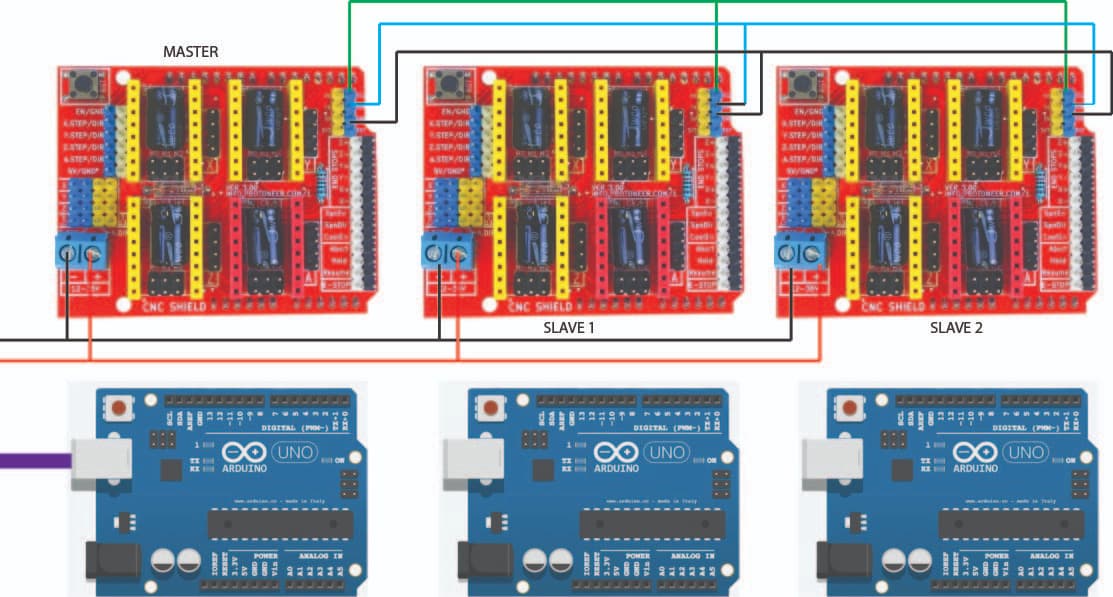
Thanks Bob I've got the Master and Slave working VIA I2C and using the 5V DC power from the master to power the slave. My next issue is I have a STOP button on the VB Form which is supposed to stop all steppers and flush the commands. This works for the master but not the slave. Chat GPT has been great to this point but it's stumped.

Below is the code for the Master

#include <AccelStepper.h>
#include <Wire.h>

// Local steppers
AccelStepper stepperX(AccelStepper::DRIVER, 2, 5);
AccelStepper stepperY(AccelStepper::DRIVER, 3, 6);
AccelStepper stepperZ(AccelStepper::DRIVER, 4, 7);

#define EN_PIN 8
#define LIMIT_X_PIN 9
#define LIMIT_Y_PIN 10
#define LIMIT_Z_PIN 11

bool movingX = false, movingY = false, movingZ = false;

void setup() {
  Serial.begin(9600);
  Wire.begin(); // Master

  pinMode(EN_PIN, OUTPUT);
  digitalWrite(EN_PIN, LOW);

  pinMode(LIMIT_X_PIN, INPUT_PULLUP);
  pinMode(LIMIT_Y_PIN, INPUT_PULLUP);
  pinMode(LIMIT_Z_PIN, INPUT_PULLUP);

  stepperX.setMaxSpeed(1000);
  stepperY.setMaxSpeed(1000);
  stepperZ.setMaxSpeed(1000);

  stepperX.setAcceleration(500);
  stepperY.setAcceleration(500);
  stepperZ.setAcceleration(500);
}

void loop() {
  if (Serial.available()) {
    String command = Serial.readStringUntil('\n');
    command.trim();

    if (command == "STOP") {
      stopAllMotion();
      Serial.println("STOPPED - CLEARED");
      return;
    }

    char axis = command.charAt(0);
    int idx1 = command.indexOf(',');
    int idx2 = command.lastIndexOf(',');

    if (idx1 == -1 || idx2 == -1 || idx1 == idx2) return;

    long steps = command.substring(1, idx1).toInt();
    int speed = command.substring(idx1 + 1, idx2).toInt();
    int accel = command.substring(idx2 + 1).toInt();

    if (axis == 'X' || axis == 'Y' || axis == 'Z') {
      handleLocalAxis(axis, steps, speed, accel);
    } else {
      sendToSlave(axis, steps, speed, accel);
    }
  }

  handleLimitsAndRun(stepperX, movingX, LIMIT_X_PIN, 'X');
  handleLimitsAndRun(stepperY, movingY, LIMIT_Y_PIN, 'Y');
  handleLimitsAndRun(stepperZ, movingZ, LIMIT_Z_PIN, 'Z');
}

void handleLocalAxis(char axis, long steps, int speed, int accel) {
  AccelStepper* target = nullptr;
  bool* moving = nullptr;

  if (axis == 'X') { target = &stepperX; moving = &movingX; }
  else if (axis == 'Y') { target = &stepperY; moving = &movingY; }
  else if (axis == 'Z') { target = &stepperZ; moving = &movingZ; }

  if (target && moving) {
    target->setMaxSpeed(speed);
    target->setAcceleration(accel);
    target->move(steps);
    *moving = true;
  }
}

void handleLimitsAndRun(AccelStepper &stepper, bool &moving, int pin, char axis) {
  if (moving && digitalRead(pin) == LOW) {
    Serial.print(axis); Serial.println(" LIMIT TRIGGERED");
    stepper.stop(); stepper.setCurrentPosition(stepper.currentPosition()); stepper.move(0);
    moving = false;
  }

  if (moving) {
    stepper.run();
    if (stepper.distanceToGo() == 0) {
      moving = false;
      Serial.print(axis); Serial.println(" DONE");
    }
  }
}

void stopAllMotion() {
  stopStepper(stepperX, movingX);
  stopStepper(stepperY, movingY);
  stopStepper(stepperZ, movingZ);
  while (Serial.available()) Serial.read();
}

void stopStepper(AccelStepper& stepper, bool& flag) {
  stepper.stop();
  stepper.setCurrentPosition(stepper.currentPosition());
  stepper.move(0);
  flag = false;
}

void sendToSlave(char axis, long steps, int speed, int accel) {
  byte address = 0;

  if (axis >= 'A' && axis <= 'C') address = 8;
  else if (axis >= 'D' && axis <= 'F') address = 9;
  else if (axis >= 'G' && axis <= 'I') address = 10;
  else {
    Serial.println("Unknown slave axis.");
    return;
  }

  Wire.beginTransmission(address);
  Wire.write(axis);
  Wire.write((byte*)&steps, sizeof(steps));
  Wire.write((byte*)&speed, sizeof(speed));
  Wire.write((byte*)&accel, sizeof(accel));
  Wire.endTransmission();

  Serial.print("Sent to Slave ");
  Serial.print(address);
  Serial.print(" -> ");
  Serial.print(axis);
  Serial.print(", ");
  Serial.print(steps);
  Serial.print(", ");
  Serial.print(speed);
  Serial.print(", ");
  Serial.println(accel);
}

Below is the code for the SLAVE

#include <Wire.h>
#include <AccelStepper.h>

// Change this for each slave
#define SLAVE_ADDRESS 8

char axisLabels[3] = {'A', 'B', 'C'};

AccelStepper steppers[3] = {
  AccelStepper(AccelStepper::DRIVER, 2, 5), // A
  AccelStepper(AccelStepper::DRIVER, 3, 6), // B
  AccelStepper(AccelStepper::DRIVER, 4, 7)  // C
};

bool moving[3] = {false, false, false};

void setup() {
  Serial.begin(9600);  // Initialize serial communication for debugging
  Wire.begin(SLAVE_ADDRESS);
  Wire.onReceive(receiveEvent);

  for (int i = 0; i < 3; i++) {
    steppers[i].setMaxSpeed(1000);
    steppers[i].setAcceleration(500);
  }
}

void loop() {
  // Run motors if they are moving
  for (int i = 0; i < 3; i++) {
    if (moving[i]) {
      steppers[i].run();
      if (steppers[i].distanceToGo() == 0) {
        moving[i] = false; // Once the movement is done, mark as not moving
      }
    }
  }
}

void receiveEvent(int howMany) {
  if (howMany < 1) return;

  // Read the command byte
  char command = Wire.read();
  Serial.print("Command received: ");
  Serial.println(command);  // Debugging line to see if command is received correctly

  if (command == 'M' && howMany >= 1 + 1 + sizeof(long) + 2 * sizeof(int)) {
    char axis = Wire.read();
    long steps;
    int speed, accel;

    Wire.readBytes((char*)&steps, sizeof(steps));
    Wire.readBytes((char*)&speed, sizeof(speed));
    Wire.readBytes((char*)&accel, sizeof(accel));

    // Debugging the received data
    Serial.print("Received: Axis ");
    Serial.print(axis);
    Serial.print(", Steps: ");
    Serial.print(steps);
    Serial.print(", Speed: ");
    Serial.print(speed);
    Serial.print(", Accel: ");
    Serial.println(accel);

    // Determine which motor to move based on the received axis
    for (int i = 0; i < 3; i++) {
      if (axis == axisLabels[i]) {
        steppers[i].setMaxSpeed(speed);
        steppers[i].setAcceleration(accel);
        steppers[i].move(steps);
        moving[i] = true;
        Serial.println("Move command executed.");
      }
    }
  }
}

But it doesn't seem to work. here is the the VB code for stop button

Private Sub btnStop_Click(sender As Object, e As EventArgs) Handles btnStop.Click
    If SerialPort1.IsOpen Then
        SerialPort1.Write("STOP" & vbLf)
    Else
        MessageBox.Show("Not connected to Arduino.")
    End If
End Sub

Dear Bob: I really want to know why four Arduino UnOs are needed? Can one UnO be used to control two walkers?

This topic was automatically closed 180 days after the last reply. New replies are no longer allowed.