This is the clone I bought online. I flashed t85_default.hex micronucleus bootloader (and did it without checking the fuse configuration so now the reset pin accidentally is disabled)
The issue is that I can't, no matter how and in what way, get Windows 11 to recognize my DigiSpark ATtiny85. I installed the drivers in Windows, tried Zadig, and whatnot.
The DigiSpark won't show on Device Manager for even a split second.
Sorry, I'm very new to Arduino and stuff. I've been searching for a solution for 3 days straight. Please help me troubleshoot this.
Edit: after burning the bootloader on the device, it doesn't blink the red light anymore, even after the 6 seconds of being plugged in to the laptop.
On the Digispark boards, and their clones, the ATtiny85 microcontroller interfaces directly with USB.
The ATtiny85 does not have hardware support for USB, so it is instead implemented in the Micronucleus bootloader to allow uploading to the board via the USB interface.
USB capabilities can also be implemented in the sketch firmware as needed.
Note that, unlike most Arduino boards, the Digispark isn't recognized as a serial port by the computer. So you won't see a device for the Digispark under the "Ports (COM & LPT)" section of the Device Manager tree as you might expect. So make sure you are looking in the right place in Device Manager.
I used Zadig to install the "libusbK" driver for my Digispark, so I see a device named "Unknown Device #1" under the "libusbK USB Devices" section of the Device Manager tree for my Digispark.
Download the Zadig driver installation tool from this website: http://zadig.akeo.ie/
Run the downloaded file to start Zadig.
The "Zadig" window will open.
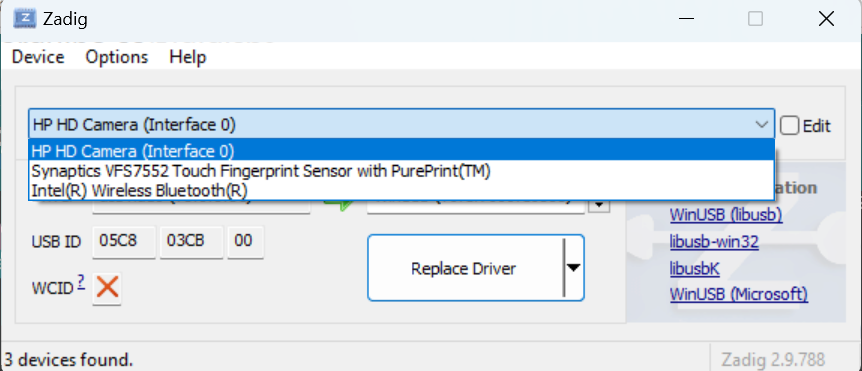
Select "Unknown Device #1" from the drop-down menu in the "Zadig" window. If it doesn't show up on the menu, then select Options > List all devices from the Zadig menus and check again.
Verify that the "USB ID" field in the Zadig window shows "16D0 0753" ⓘ This is the USB VID/PID identifier for the Digispark board.
Click the ▴ button to the right of the "Driver" selection field until you see "libusbK".
Click the "Replace Driver" button.
An "Installing Driver..." dialog will now appear.
Wait for the driver installation process to finish.
Click the "Close" button in the "Driver Installation" dialog.
Close the "Zadig" window.
After doing that, the board should be recognized by Device Manager as I described in my previous reply, and you should be able to upload Arduino sketches to the board using Arduino IDE.
Yes, I bought a USB hub with USB 2.0 and USB 3.0 support and now Digispark is recognized in Device Manager as a device under libusb-win32. I changed the driver to libusbK.
I tried uploading as is with Arduino IDE and it uploads! However it's not registering correct keystrokes when using DigiKeyboard (not relevant to this issue)
Another issue I found is with Arduino IDE 2.3.6 itself that if my windows user name (the folder inside C:\Users) has a space in it, then Arduino IDE can't correctly use the path to get tools and packages and shows error when compiling. For example:
If my Windows user folder is Ash Flashy then Arduino IDE bugs 'Error: Command C:\Users\Ash not recognized;'
Note: I'm not exactly sure of the paths i wrote here as I'm writing from phone but the error concept is the same.
Due to this problem, I installed IDE 1.8.16 for my project for now.
I suspect this is caused by the developers of the Arduino boards platform for the Digispark board not wrapping the path in quotes in the command pattern.
I believe the reason why it doesn't cause a problem on Arduino IDE 1.x is because it internally uses the Windows "8.3" style of path instead of the modern full path.
The missing quotes are in the command patterns defined by the platform.txt configuration file of the boards platform.
The bug I am aware of is in the upload command pattern:
Note the lack of quotes in the -Uflash:w:{build.path}/{build.project_name}.hex:i flag. It was reported here:
However, the Digistump boards platform is abandoned so the bug was never fixed.
The bug also propagated to the now preferred ATTinyCore platform:
It has also been reported there:
However, these specific bugs are in the upload command pattern, and so only affect uploading. @flash8007 describes the problem they encountered as occurring "when compiling", so maybe there is a different bug in addition to the well know one that affects uploading.
First, I need to make sure I understand the exact nature of the problem you are experiencing. In order to get that understanding, I'm going to ask you to provide the full verbose compilation output from Arduino IDE 2.3.6:
I'm going to ask you to provide the full verbose output from a compilation.
This procedure is not intended to solve the problem. The purpose is to gather more information.
Please do this:
Select File > Preferences... (or Arduino IDE > Settings... for macOS users) from the Arduino IDE menus.
The "Preferences" dialog will open.
Check the box next to "Show verbose output during: ☐ compile" in the "Preferences" dialog.
Click the "OK" button.
The "Preferences" dialog will close.
Select Sketch > Verify/Compile from the Arduino IDE menus.
Wait for the compilation to fail.
You will see a "Compilation error: ..." notification at the bottom right corner of the Arduino IDE window. Click the "COPY ERROR MESSAGES" button on that notification.
Open a forum reply here by clicking the "Reply" button.
Click the <CODE/> icon on the post composer toolbar.
This will add the forum's code block markup (```) to your reply to make sure the error messages are correctly formatted.
Press the Ctrl+V keyboard shortcut (Command+V for macOS users).
This will paste the compilation output into the code block.
Move the cursor outside of the code block markup before you add any additional text to your reply.
Click the "Reply" button to post the output.
In case the output is longer than the forum software will allow to be added to a post, you can instead save it to a .txt file and then attach that file to a reply here.
Select the .txt file you saved from the "Open" dialog.
Click the "Open" button.
The dialog will close.
Click the "Reply" button to publish the post.
Alternatively, instead of using the "Upload" icon on the post composer toolbar as described in steps (5) - (7) above, you can simply drag and drop the .txt file onto the post composer field to attach it.
So the basic starting point is a USB port 2.0. I dont have any 2.0 ports at the moment and am having AtTiny85 Digispark clone connection problems. The green LED and the red LED turn on but win11 doest chime when I plug the Digispark in. And I hope this is an active place to get answers as there are no others I have found.
Do you have a USB hub? I see this was reported as a solution by @flash8007:
If you have any sort of USB hub on hand, connect the Digispark board to the computer through the hub instead of connecting the Digispark directly to the USB socket on the computer. Hopefully it will be recognized by Windows after you do that.
I verified that it does trigger a device connection sound when I connect a Digispark to my Windows 11 computer.
I checked because I wasn't sure whether it was expected to trigger a noise since the Digispark only produces a low level USB device, rather than a higher level virtual com port/USB CDC device like most Arduino boards.
So the result you observe does indeed indicate a problem (assuming you have Windows system sounds enabled).
Thank you for the very quick response. The 2.0 hub arrives tomorrow and I will update this then to proceed to the IDE connection next. Thank you!
My bad on the ‘doest’ type. I meant ‘Does not’.
Also this puts the necessary 2.0 hub on internet searches as a primary initial mandatory starting point.