Attiny85 + development programmerboard

Hello,
I bought an Attiny85 and a development programmer board.
This one: https://encrypted-tbn0.gstatic.com/images?q=tbn:ANd9GcQNEv__vvOBFDDG23DRcqOFeuqJvUdD7yZ6Xg&usqp=CAU

Windows10 detect as "Unknown USB device (Device Descriptor Request Failed)".
I tried these:

Not worked to me.
Can someone help me please how can I use it?

With Arduino Nano I upload Bootloader on Attiny85 and the Blinker. I tried on breadboard, so Attiny85 working well. Only the board have no driver for Windows 10.

I have a few of these clones. The ATtiny25/45/85 series was never intended to have a bootloader, thus there is no hardware partitioning and protection of the FLASH memory for a bootloader. However, some smart folks got around that by creating the V-USB bootloader. I dabbled with this bootloader for a bit while developing ATtinyXX code for the AttoBASIC project but ended up using OptiBoot85 instead because it uses under 512 bytes of code and AVRdude supports it. OptiBoot85, like micronucleus, or any other ATtinyXX bootloader is not hardware protected from accidental overwrite from misbehaving apps. I'm not saying the micronucleus bootloader is no good, I'm just saying I prefer OptiBoot85 for ATtiny25/45/85 projects.

I don't and have not used WINDOWS since WINDOWS 2000, except for the occasions when I run a virtual WINDOWS-XP for schematic capture and PCB layout, I use Linux for my development system. All the experiments below are performed on the Linux computer ... but follow along because I think you can make this work for WINDOWS.

Having stated that disclaimer, I pulled out my clones to play with the V-USB bootloader. Its been about a decade since I worked with the bootloader. I found the GIT page and downloaded the current version of 2.6. at [GitHub - micronucleus/micronucleus: ATTiny usb bootloader with a strong emphasis on bootloader compactness.]. After compiling the CLI program called micronucleus and the bootloader firmware files, I used my Minipro TL-866 programmer to install the "t85_default.hex" bootloader firmware into the ATtiny85 and programmed the fuses (lfuse=0xe1, hfuse=0xdd, efuse=0xfe). Once loaded, I used the v2.6 micronucleus bootloader cli app to successfully upload some code (larson_85 from the SPI library). So that all works properly.

The issue I ran into was that the version of micronucleus that comes with the DigiSPark Arduino IDE package, version 1.6.7, uses version 2.0a4 of micronucleus. Since the micronucleus project's bootloader is up to version 2.6, the DigiSpark/Arduino IDE version will not recognize the v2.6 bootloader, so fails to upload. Further, the DigiSpark/Arduino IDE package does not contain the bootloader firmware files at all (I also looked in their GIT repositiory), so you can't even match the bootloader firmware files to the provided version of the micronucleus loader.

So, I set out to find the v2.0 firmware source code and compile it. If you scroll down the list of prior releases, you can find v2.0b at https://github.com/micronucleus/micronucleus/releases. I downloaded the v2.0b source code and again compiled the bootloader firmwares. I uploaded the correct firmware into the ATtiny85 using the TL-866 programmer but the v2.0b bootloader identifies itself as v2.1, so the DigiSPark Arduino IDE version of micronucleus still won't program.

The quick work-around was to make a backup of the DigiSpark/Arduino IDE version of micronucleus and copy the micronucleus v2.6 into the directory. After doing so, I was able to use the Arduino IDE to program the ATtiny85 using V-USB. On my Linux computer, the location was for the micronucleus cli app was at ~/.arduino15/packages/digistump/tools/micronucleus/2.0a4. I don't know where that directory would be located on your WINDOWS computer, so you'll have to search for it, which shouldn't be too difficult.

As for your WINDOWS driver, you can obtain the WINDOWS driver here: [micronucleus/windows_driver_installer at master · micronucleus/micronucleus · GitHub]. It looks pretty easy, so just follow the directions.

Hope that helps.

Peace and blessings,
JQ

1 Like

Hello,
First if all thank you so much.
I tried zadig./that is my first link/
It is not working to me.
It shows the driver installed, but still unknown device, and not working.
I tried on different computer /windows10 too/ and same problem. So not the pc couse the issue.
I tried different cables too . Not helped.

Did you install the libusb drivers?
Did you reboot after installing the driver(s)?

I don't see a screen-print, so can you provide a screen-print of the WINDOWS device manager showing your device as "unknown" with its ID (xxxx:yyyy)?

My Linux development computer shows the device code as 16d0:0753. Is your USB ID the same?
image

Where did you get the ATtiny85 firmware from?

If you use micronucleus v2.6 and query (--info) your device, what bootloader firmware version does it show (if possible)?

Peace and blessings,
JQ

Thank you for the replay.

  • Yes, I installed the libusb drivers.
    I tried with x86 and 64 too.
  • No, I not reboot after installation, but W10 do not need to reboot, that was XP or older which had to reboot for every driver.
    But I started, the PC and still unknown device

There is no ID.
I can upload screen image, but my OS is not english language.

1:45 how I connected the circuit.
After I upoaded the blinker, and it is working well.
This means the bootloader is on it.

I don't have WIN-10 to use but I do have WIN-XP. Current ZADIG no longer supports WIN-XP but earlier version does. Installed libusb-win32 (v1.2.6.0) successfully. WIN-XP recognizes the micronucleus bootloader as "Atmel USB Device".

I don't have ARDUINO IDE installed on WIN-XP because I use Linux for that.

Q: if your WIN-10 does not recognize the device then using the reference YOUTUBE video, how did you get the BLINK program loaded? Or did I miss something in a prior message.

Q: Have you tried to load other Tiny85 programs via the ARDUINO IDE?

Hello,
On your image, you have a driver to your usb device.
You can see in Zadig there is a driver /left side/and what it will change/right side/
I do not have driver, that is empty to me.

I uploaded bootloader with arduino nano.
As you can see on the video what I linked.

My problem is the development programmer board. Not the Attiny85.
With development programmer board I don't need arduino nano.
So I don't have to take a part another project for the arduino nano. To upload something to the Attiny85.
This is why I bought the development programmer board. But I cannot use it. It is not working.

I believe that you made my point.

If after you used the NANO-ISP to upload the micronucleus bootloader, then you used the NANO-ISP to upload the blink program then you wiped out the bootloader.

After burning the bootloader with the NANO-ISP, you would have had to insert your tiny85 into your USB board and then use micronucleus to burn the blink program into it.

I watched the YOUTUBE video you referenced but its in Hindi, which I don't speak nor comprehend. I followed the video along anyhow to see what he was doing. The author DID NOT use micronucleus to burn the blink program, he used the ARDUINO ISP, which would have over-written the bootloader. [so what was his point in ISP "burning" the bootloader if he was just going to wipe it out by ISP uploading the blink program over it?? ] If you followed his video to burn the bootloader AND then uploaded the blink program then its likely that your tiny85 does not contain the micronucleus bootloader because it was wiped out by the blink program. I really think this is your problem, you presume that the bootloader still exists on the tiny85, when in fact, it does not, hence your WIN10 "unknown USB device" problem.

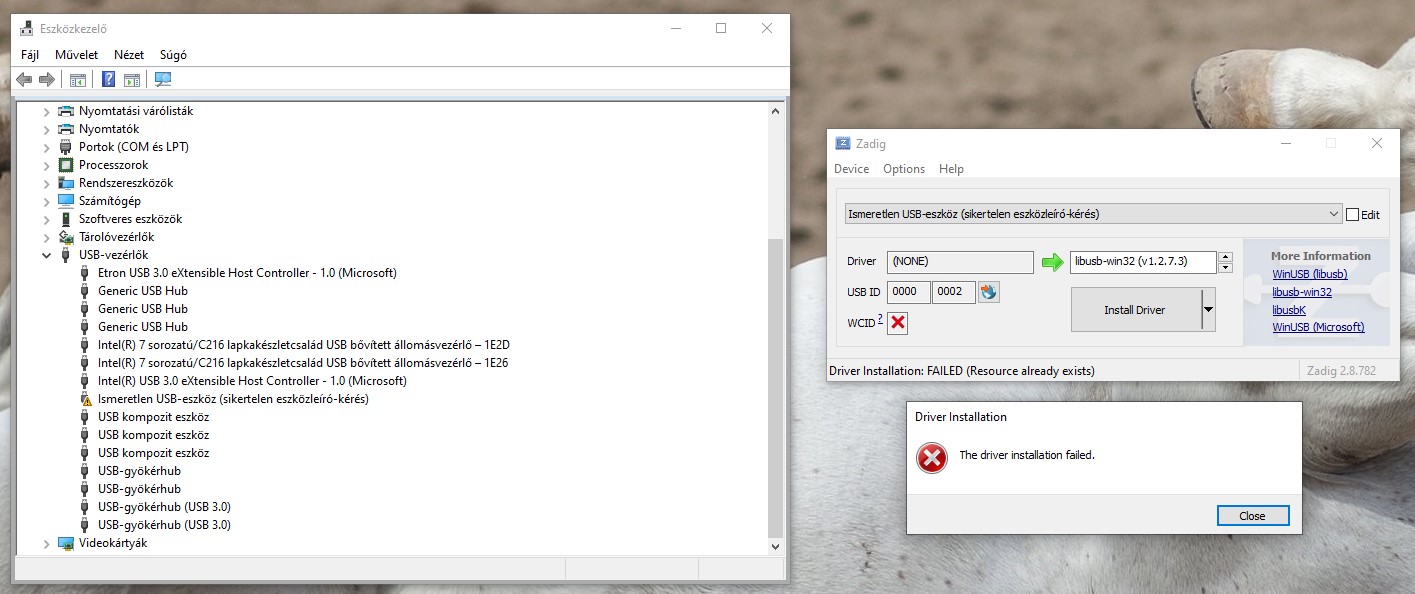
Let me explain a bit; since there are pull-up and pull-down resistors on the USB D+ and D- pins, when your device is plugged in, WIN10 is informed that there is a new USB device attached that needs to be enumerated (find out what it is) and since there is no bootloader code to respond to the enumeration request, WIN10 determines it to be an unknown device. As shown in the screen-shot below, when I plug in my tiny85 board (like yours) without an MCU (same effect as having no bootloader code), the Linux OS detects a new device was attached (due to the pull-ups/downs on the D+ and D- pins) but since there is no MCU to report the device info during enumeration, the Linux OS attempts enumeration 4 times before giving up and failing enumeration, as reported by the Linux OS in the DMESG logging file (last line of screen-shot).

As a matter of fact, I think this is exactly what WIN10 is telling you in the message:

"Unknown USB device (Device Descriptor Request Failed)"

The device failed to enumerate.

I suspect that the reason why ZADIG doesn't offer a driver to use for the device is because WIN10 couldn't enumerate it and so there is no recognizable USB device to offer a driver for.

I don't use any any ARDUINO's to program my AVR's. I use either TL-866, USBtiny, USBasp or AVR Dragon, so I don't know if your NANO-ISP programmer can read code or just write code. If you can read the FLASH contents of the tiny85 back into a HEX file, then do so and use a text file viewer or editor to look for code starting around address 0x19C0 (see screen-shot below), which is (approximately) where the micronucleus bootloader code is stored in FLASH memory.

image

If there is no code (mostly FF's) at (or near) address 0x19C0 then it would confirm that the bootloader was overwritten and not available to answer the WIN10 USB enumeration requests.

[ If you don't know how to read the contents of a HEX file, which contains record types, addresses and data, then read the INTEL HEX file WIKI page. ]

If you have not yet done so, I think you should try burning the bootloader again, insert it into your USB board then try plugging in your board and see if it gets a successful enumeration as shown in the DEVICE MANAGER. If it does then try using ZADIG to see if it will offer you a selection of drivers to install.

Suggestion: If you are going to do any program development with the AVR's, I suggest you at least obtain either a USBtiny or USBasp. They are US$3 to US$10 on eBay. The USBasp is preferred because you can select your target's supply voltage (5 or 3.3). The ONLY real issue that I have with the USBasp is that it is STILL supplied with a 10-pin IDC connector, which I have not seen used since the late 90's, instead of the 6-pin IDC connector. Make yourself a 10-pin to 6-pin adapter (see pinouts below). Learn how to use the USBasp programmer and AVRDUDE, so you can easily program your AVR's outside the ARDUINO environment if you have to, AND in this case, read your code to be sure what's in your AVR is what you think is in it.

Peace and blessings,
JQ

Thank you for response.

I do not understand Hindi too, but I can see what he is doing. So I just followed.
Now I burned bootloader again, and stopped /did not upload any else/

Same problem.

"If you are going to do any program development with the AVR's" I am learning myself for fun only.
I am a beginner. To me "intel hex file" is so difficult.
I am using arduino app, because it make easy the first steps.
Maybe later I will interesting about else, but now looks so difficult.

If you don't try to understand the machine code that is in it, it's not difficult; you will only need to understand that if you try to reverse engineer an existing code (and machine code can be converted to assembly). The format is well described in the wiki page in post #8 (Intel HEX - Wikipedia).

Reverse engineering is usually not in people's interest; if you want to learn machine code, use the relevant datasheets and programmer's manuals. You're however better off using assembly instead of machine code. Long ago I started creating binary files with machine code from scratch for a PIC microcontroller; it is fun (and painful) to create e.g. a blink application in machine code. But assembly is a lot easier to understand than machine code; and C/C++ make life a lot easier.

Can you enable logging messages in the ARDUINO IDE (preferences -> "Show verbose output during" and check upload)? Then burn the bootloader. Copy and paste the log contents (click in the log window, ctrl-A then ctrl-C), so I can see which bootloader the IDE is using. Its very possible that the IDE is using the OptiBoot85 bootloader and not the micronucleus bootloader. The OptiBoot85 bootloader is for serial port loading and contains no USB enumeration code.

Addressing "sterretje's" comment; you can't possibly hope to get anywhere on a project using someone else's code and examples until you sit down, study and (at least partially) comprehend the materials you are working with. Yes the ARDUINO IDE is easier to use ... until you start having problems and then you have to start looking "under the hood" to find the problems. This is what the debugging output is for and why having access to other tools to troubleshoot with is important.

In your case, having access to another AVR programmer and learning how to use it will be helpful in determining if its an ARDUINO IDE issue or something else, like a missing bootloader.

I know I've spent several hours with this thread (because I have the same boards and have some experience with them) and we're no further along than the 1st post. I think anyone with experience reading this thread would tell you to do your homework and show your results rather than following some one else's instructions and reporting back the results looking for more instructions to fix the problem.

Until you can verify that your tiny85 has the micronucleus bootloader installed, I cannot assist you further.

Peace and blessings,
JQ

Hello,
Here is the log text:

"
C:\Users\robag\AppData\Local\Arduino15\packages\arduino\tools\avrdude\6.3.0-arduino17/bin/avrdude -CC:\Users\robag\AppData\Local\Arduino15\packages\arduino\tools\avrdude\6.3.0-arduino17/etc/avrdude.conf -v -v -v -v -pattiny85 -cstk500v1 -PCOM3 -b19200

avrdude: Version 6.3-20190619
Copyright (c) 2000-2005 Brian Dean, http://www.bdmicro.com/
Copyright (c) 2007-2014 Joerg Wunsch

System wide configuration file is "C:\Users\robag\AppData\Local\Arduino15\packages\arduino\tools\avrdude\6.3.0-arduino17/etc/avrdude.conf"

Using Port : COM3
Using Programmer : stk500v1
Overriding Baud Rate : 19200
avrdude: Send: 0 [30] [20]
avrdude: Recv: . [14]
avrdude: Recv: . [10]
AVR Part : ATtiny85
Chip Erase delay : 400000 us
PAGEL : P00
BS2 : P00
RESET disposition : possible i/o
RETRY pulse : SCK
serial program mode : yes
parallel program mode : yes
Timeout : 200
StabDelay : 100
CmdexeDelay : 25
SyncLoops : 32
ByteDelay : 0
PollIndex : 3
PollValue : 0x53
Memory Detail :

Block Poll Page Polled
Memory Type Mode Delay Size Indx Paged Size Size #Pages MinW MaxW ReadBack


eeprom 65 12 4 0 no 512 4 0 4000 4500 0xff 0xff
Block Poll Page Polled
Memory Type Mode Delay Size Indx Paged Size Size #Pages MinW MaxW ReadBack


flash 65 6 32 0 yes 8192 64 128 30000 30000 0xff 0xff
Block Poll Page Polled
Memory Type Mode Delay Size Indx Paged Size Size #Pages MinW MaxW ReadBack


signature 0 0 0 0 no 3 0 0 0 0 0x00 0x00
Block Poll Page Polled
Memory Type Mode Delay Size Indx Paged Size Size #Pages MinW MaxW ReadBack


lock 0 0 0 0 no 1 0 0 9000 9000 0x00 0x00
Block Poll Page Polled
Memory Type Mode Delay Size Indx Paged Size Size #Pages MinW MaxW ReadBack


lfuse 0 0 0 0 no 1 0 0 9000 9000 0x00 0x00
Block Poll Page Polled
Memory Type Mode Delay Size Indx Paged Size Size #Pages MinW MaxW ReadBack


hfuse 0 0 0 0 no 1 0 0 9000 9000 0x00 0x00
Block Poll Page Polled
Memory Type Mode Delay Size Indx Paged Size Size #Pages MinW MaxW ReadBack


efuse 0 0 0 0 no 1 0 0 9000 9000 0x00 0x00
Block Poll Page Polled
Memory Type Mode Delay Size Indx Paged Size Size #Pages MinW MaxW ReadBack


calibration 0 0 0 0 no 1 0 0 0 0 0x00 0x00

Programmer Type : STK500
Description : Atmel STK500 Version 1.x firmware
avrdude: Send: A [41] . [80] [20]
avrdude: Recv: . [14]
avrdude: Recv: . [02]
avrdude: Recv: . [10]
avrdude: Send: A [41] . [81] [20]
avrdude: Recv: . [14]
avrdude: Recv: . [01]
avrdude: Recv: . [10]
avrdude: Send: A [41] . [82] [20]
avrdude: Recv: . [14]
avrdude: Recv: . [12]
avrdude: Recv: . [10]
avrdude: Send: A [41] . [98] [20]
avrdude: Recv: . [14]
avrdude: Recv: . [00]
avrdude: Recv: . [10]
Hardware Version: 2
Firmware Version: 1.18
Topcard : Unknown
avrdude: Send: A [41] . [84] [20]
avrdude: Recv: . [14]
avrdude: Recv: . [00]
avrdude: Recv: . [10]
avrdude: Send: A [41] . [85] [20]
avrdude: Recv: . [14]
avrdude: Recv: . [00]
avrdude: Recv: . [10]
avrdude: Send: A [41] . [86] [20]
avrdude: Recv: . [14]
avrdude: Recv: . [00]
avrdude: Recv: . [10]
avrdude: Send: A [41] . [87] [20]
avrdude: Recv: . [14]
avrdude: Recv: . [00]
avrdude: Recv: . [10]
avrdude: Send: A [41] . [89] [20]
avrdude: Recv: . [14]
avrdude: Recv: . [00]
avrdude: Recv: . [10]
Vtarget : 0.0 V
Varef : 0.0 V
Oscillator : Off
SCK period : 0.1 us

avrdude: Send: A [41] . [81] [20]
avrdude: Recv: . [14]
avrdude: Recv: . [01]
avrdude: Recv: . [10]
avrdude: Send: A [41] . [82] [20]
avrdude: Recv: . [14]
avrdude: Recv: . [12]
avrdude: Recv: . [10]
avrdude: Send: B [42] . [14] . [00] . [00] . [01] . [01] . [01] . [01] . [03] . [ff] . [ff] . [ff] . [ff] . [00] @ [40] . [02] . [00] . [00] . [00] [20] . [00] [20]
avrdude: Recv: . [14]
avrdude: Recv: . [10]
avrdude: PAGEL and BS2 signals not defined in the configuration file for part ATtiny85, using dummy values
avrdude: Send: E [45] . [05] . [04] . [d7] . [a0] . [01] [20]
avrdude: Recv: . [14]
avrdude: Recv: . [10]
avrdude: Send: P [50] [20]
avrdude: Recv: . [14]
avrdude: Recv: . [10]
avrdude: AVR device initialized and ready to accept instructions

Reading | avrdude: Send: V [56] 0 [30] . [00] . [00] . [00] [20]
avrdude: Recv: . [14]
avrdude: Recv: . [1e]
avrdude: Recv: . [10]
avrdude: Send: V [56] 0 [30] . [00] . [01] . [00] [20]
avrdude: Recv: . [14]
avrdude: Recv: . [93]
avrdude: Recv: . [10]
################avrdude: Send: V [56] 0 [30] . [00] . [02] . [00] [20]
avrdude: Recv: . [14]
avrdude: Recv: . [0b]
avrdude: Recv: . [10]
################################## | 100% 0.02s

avrdude: Device signature = 0x1e930b (probably t85)
avrdude: Send: Q [51] [20]
avrdude: Recv: . [14]
avrdude: Recv: . [10]

avrdude done. Thank you.
"

Well, I was hoping to see which file was uploaded to the tiny85 but it appears that the WINDOWS version of the ARDUINO IDE doesn't tell you that, which is odd because the Linux version does.

At this point, I can't tell you what bootloader was installed but it was likely OptiBoot85, which is not micronucleus and won't work with your USB board. Sigh...

Perhaps get a USBasp programmer and work from there.

Peace and blessings,
JQ

This topic was automatically closed 180 days after the last reply. New replies are no longer allowed.