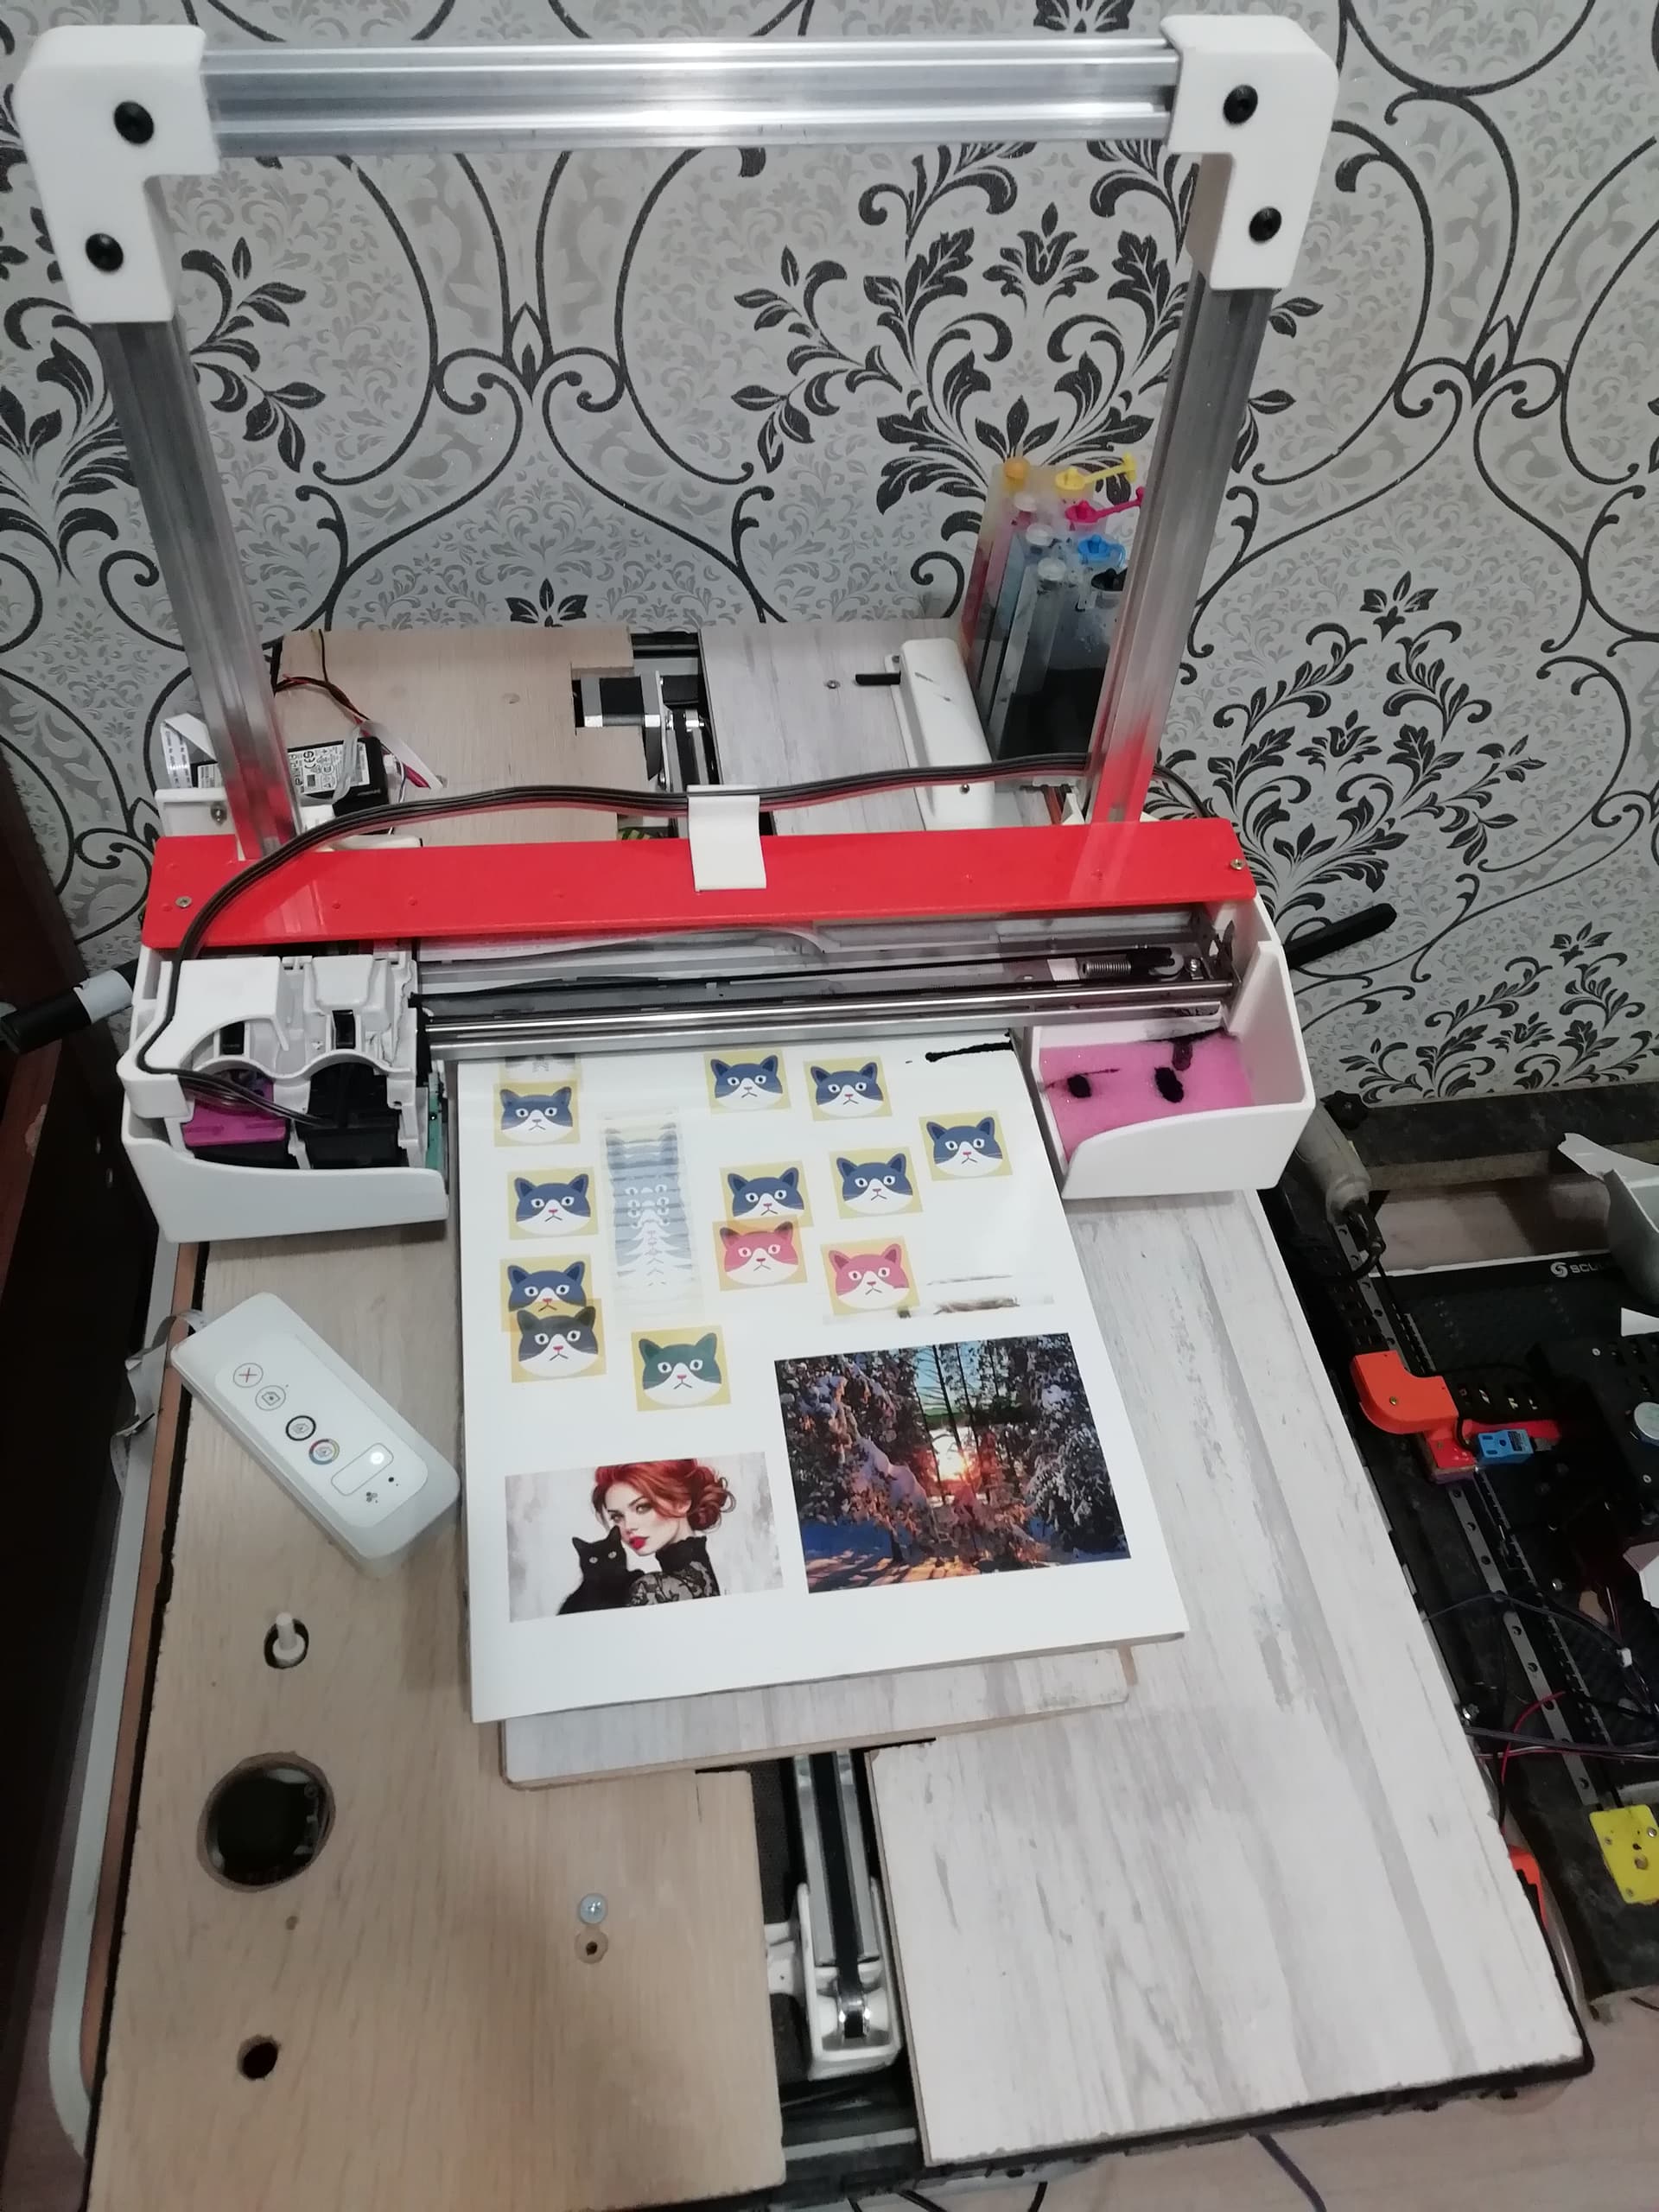
DTG prototype. flatbed printer. assembled a stand. added two buttons on the Y axis and a limit.
Need help!!!!!!!!!!! In writing code with 600 pr optical rotary encoder and nema17 stepper motor. for transmitting a signal from an optical rotary encoder to a stepper motor, taking into account the regulation of speed steps for synchronization
(upload://2ahte6dPmtx84hFVdUwDXmP3SOR.jpeg)
now nema 8 turns the rotary optical encoder 600 pw at a speed of 16000 mm min, probably like a printer engine turns
I tried 2 codes below and there is a video for them as the encoder copes with them with a bang.
Tell me how to further attach the stepper motor to this en code. step. dir, with adjustment of the number of steps in the sketch itself.

1 encoder code
volatile long temp, counter = 0; //This variable will increase or decrease depending on the rotation of encoder

void setup() {
  Serial.begin (9600);

  pinMode(6, INPUT_PULLUP); // internal pullup input pin 2

  pinMode(3, INPUT_PULLUP); // internalเป็น pullup input pin 3
   //Setting up interrupt
  //A rising pulse from encodenren activated ai0(). AttachInterrupt 0 is DigitalPin nr 2 on moust Arduino.
  attachInterrupt(0, ai0, RISING);

  //B rising pulse from encodenren activated ai1(). AttachInterrupt 1 is DigitalPin nr 3 on moust Arduino.
  attachInterrupt(1, ai1, RISING);
  }

  void loop() {
  // Send the value of counter
  if( counter != temp ){
  Serial.println (counter);
  temp = counter;
  }
  }

  void ai0() {
  // ai0 is activated if DigitalPin nr 2 is going from LOW to HIGH
  // Check pin 3 to determine the direction
  if(digitalRead(3)==LOW) {
  counter++;
  }else{
  counter--;
  }
  }

  void ai1() {
  // ai0 is activated if DigitalPin nr 3 is going from LOW to HIGH
  // Check with pin 2 to determine the direction
  if(digitalRead(6)==LOW) {
  counter--;
  }else{
  counter++;
  }
  }
2 encoder code
/* Encoder Library - TwoKnobs Example
 * http://www.pjrc.com/teensy/td_libs_Encoder.html
 *
 * This example code is in the public domain.
 */

#include <Encoder.h>

// Change these pin numbers to the pins connected to your encoder.
//   Best Performance: both pins have interrupt capability
//   Good Performance: only the first pin has interrupt capability
//   Low Performance:  neither pin has interrupt capability
Encoder knobLeft(3, 6);
//   avoid using pins with LEDs attached

void setup() {
  Serial.begin(9600);
  Serial.println("TwoKnobs Encoder Test:");
}

long positionLeft  = -999;
long positionRight = -999;

void loop() {
  long newLeft, newRight;
  newLeft = knobLeft.read();
  if (newLeft != positionLeft || newRight != positionRight) {
    Serial.print("Left = ");
    Serial.print(newLeft);
    Serial.print(", Right = ");
    Serial.print(newRight);
    Serial.println();
    positionLeft = newLeft;
    positionRight = newRight;
  }
  // if a character is sent from the serial monitor,
  // reset both back to zero.
  if (Serial.available()) {
    Serial.read();
    Serial.println("Reset both knobs to zero");
    knobLeft.write(0);
  }
}
I wrote everything in one code.
everything works but the code for the motor does not work correctly
it must take one step from every 3 ticks of the encoder, but it works like this on + or - of the encoder, the signal got there and. turns the engine while all the buttons and limit switch remain operational
I need to fix the code here
from 126 to 166 line
there I did it both by timer and by steps, the result does not change
code yes, I think a simplified version should work like this
if encoder +1 tick
That
digitalWrite(DIR_PIN , LOW);
for (take 1 step motor) {
if the encoder is -1 tick
That
digitalWrite(DIR_PIN , HIGH);
for (take 1 step motor) {
//This variable will increase or decrease depending on the rotation of the encoder.
volatile long temp, counter = 0;
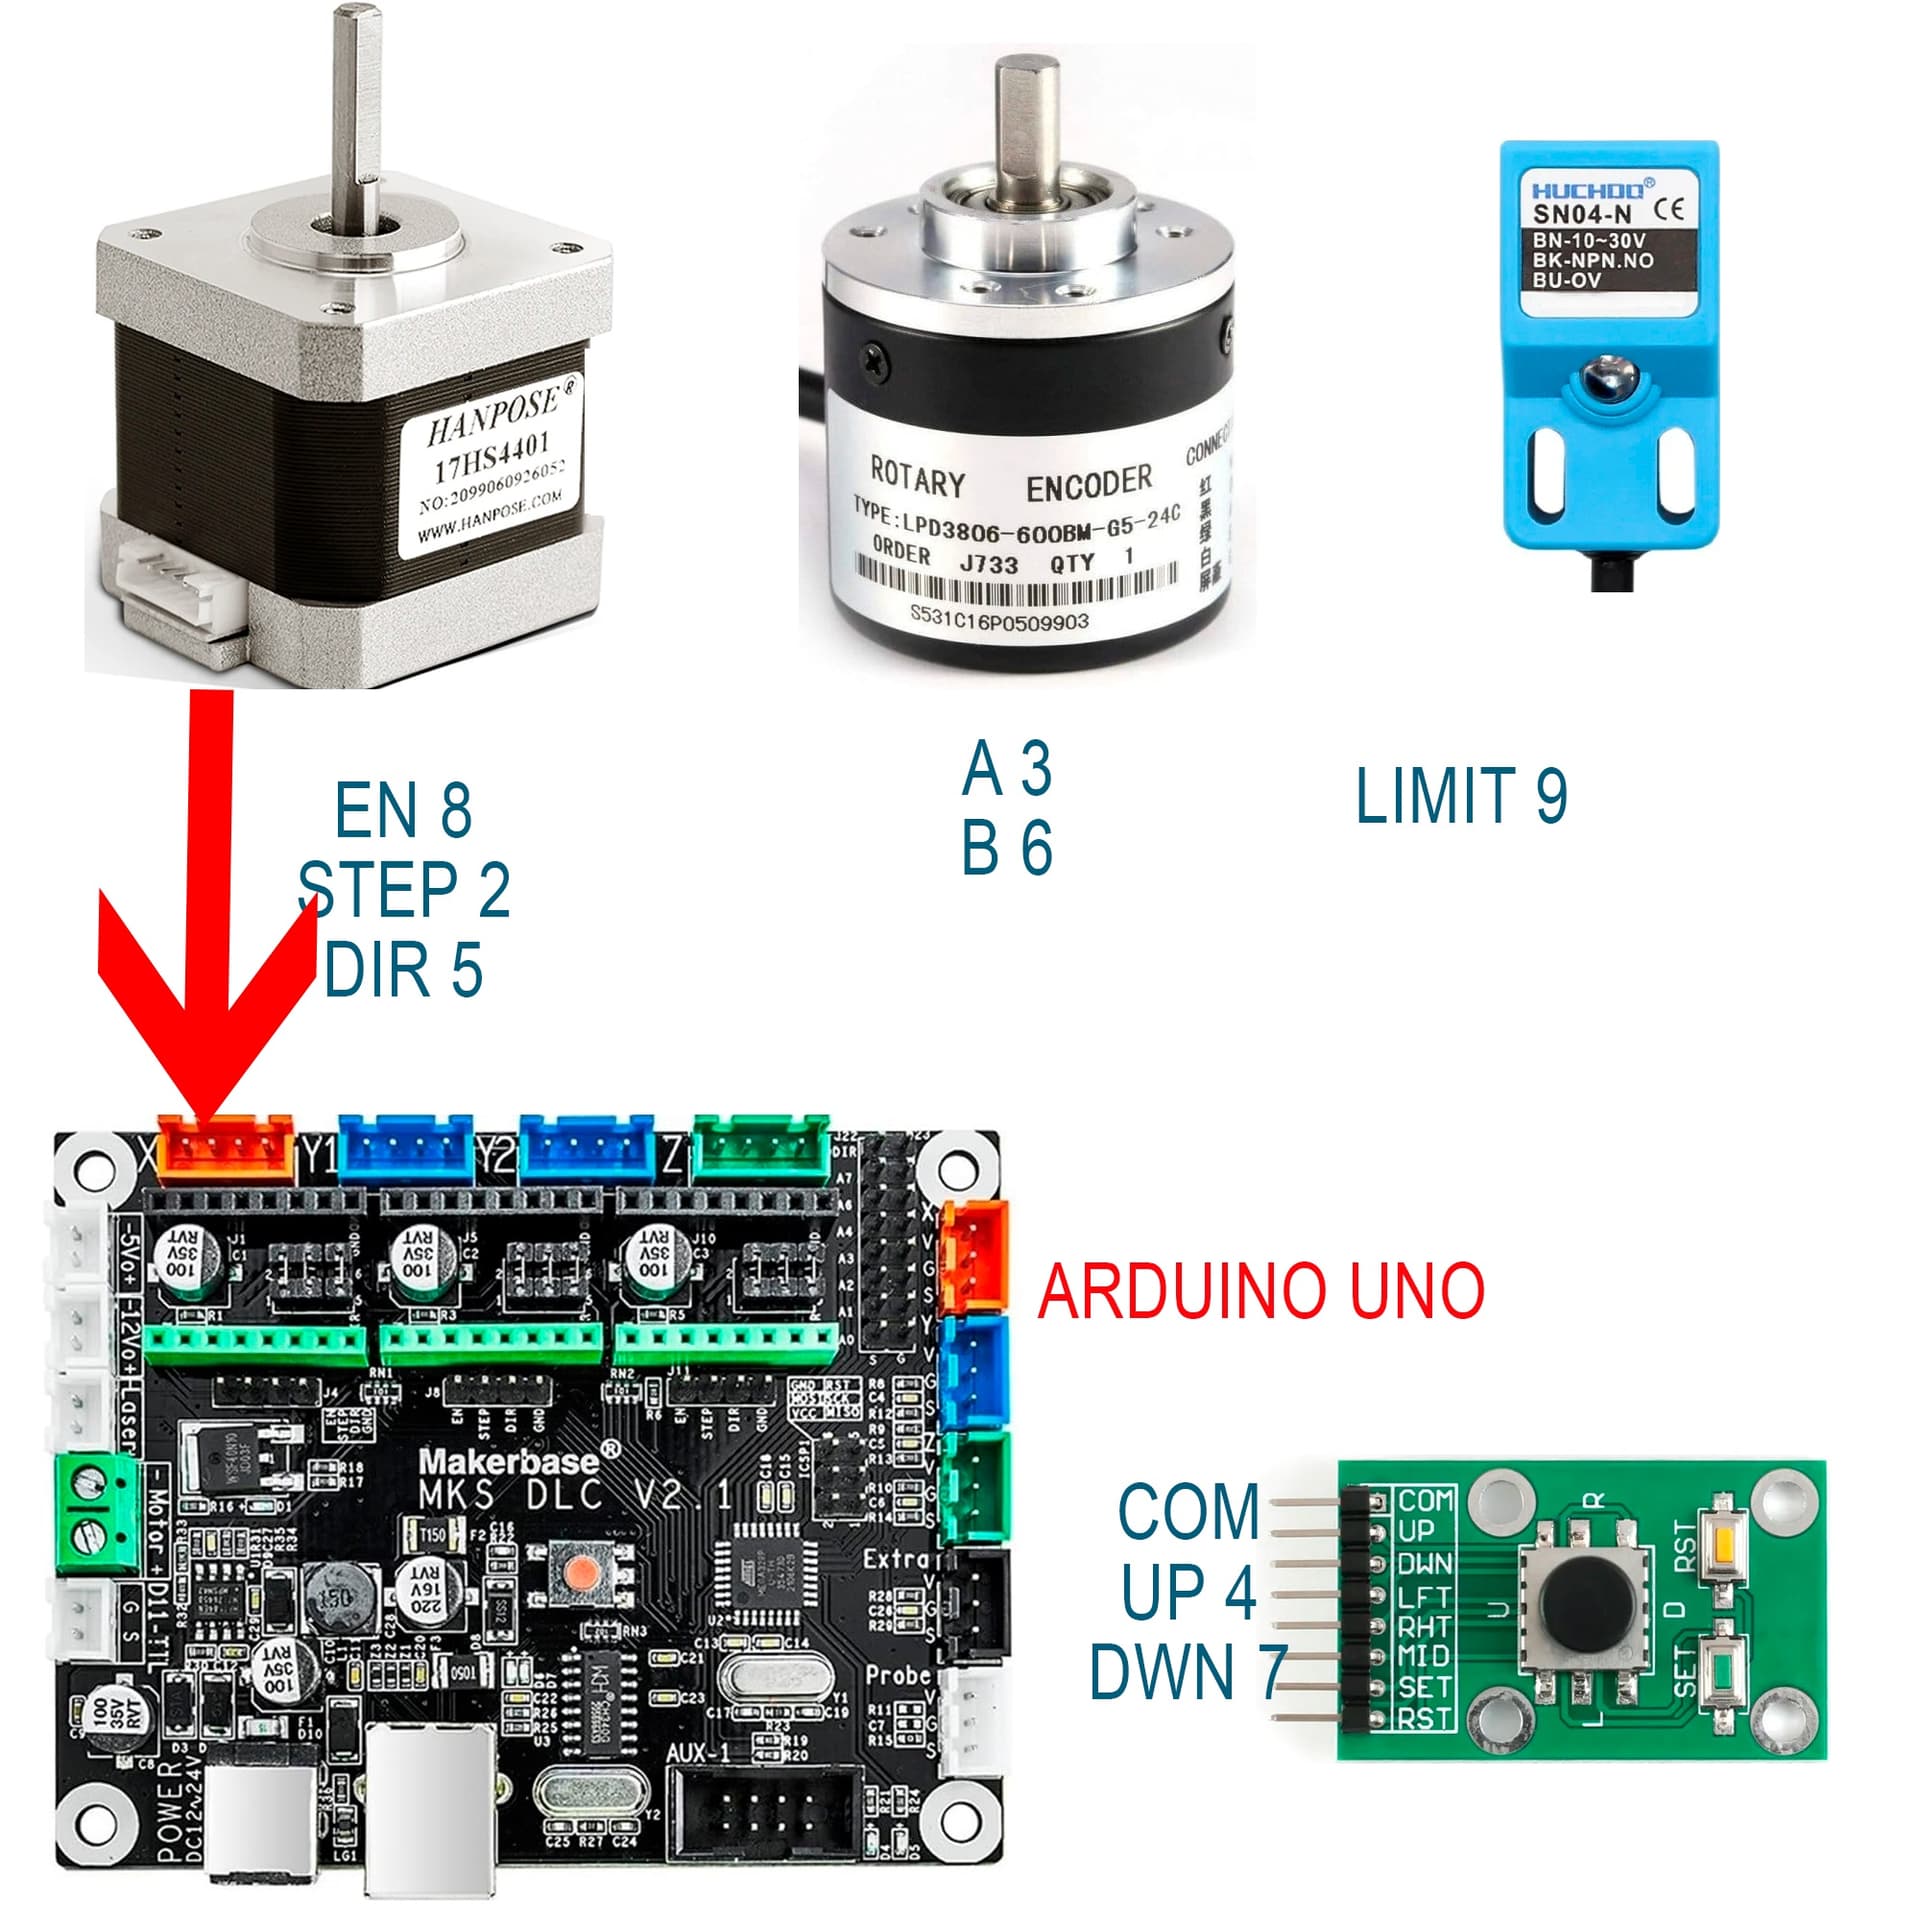
//Пины управления шаговиком
#define STEP_PIN 2
#define DIR_PIN 5
#define ENABLE_PIN 8
//Пин кнопки
#define start_button1 7
#define start_button2 4
#define limitPin 9
//Пин энкодера
#define encA 6
#define encB 3
//Здесь можно настроить время поворота и паузы
#define move_forward_time 5 //время прямого хода в мсек
#define move_back_time 5 //время обратного хода в мсек
#define pause_time 10 //время паузы в мсек
#define frequency 600 //Время между импульсами в мксек. 1000 мксек = 1 мсек = 0.001 сек.
//Частота следования импульсов 1/0.001 = 1 кГц,
//Не рекомендуется устанавливать время меньше 100 мсек,
// т.к. частота будет 10 кГц
//Таймер для millis()
uint32_t timer = 0;
//Логический флаг для рабочего режима
bool flag = 1;
void setup() {
Serial.begin (9600);
pinMode(6, INPUT_PULLUP); // внутренний входной контакт подтягивания 6
pinMode(3, INPUT_PULLUP); // внутренний входной контакт подтягивания 3
attachInterrupt(0, ai0, RISING);
attachInterrupt(1, ai1, RISING);
pinMode(start_button1, INPUT_PULLUP); //Подтягиваем кнопку к питанию
pinMode(start_button2, INPUT_PULLUP); //Подтягиваем кнопку к питанию
pinMode(limitPin, INPUT_PULLUP);
pinMode(STEP_PIN , OUTPUT); //Настраиваем пины управления
pinMode(DIR_PIN , OUTPUT);
pinMode(ENABLE_PIN , OUTPUT);
digitalWrite(ENABLE_PIN , HIGH); //Выключаем мотор, чтобы не грелся
}
void loop () {
if( counter != temp ){
Serial.println (counter);
temp = counter;
}
//КОД КОГДА КНОПКА PIN7 НАЖАТА И ПОДАЕТ СИГНАЛ НА ШАГОВЫЙ МОТОР
if (!digitalRead(start_button1)) { //Если нажали на кнопку
digitalWrite(ENABLE_PIN , LOW); //Включаем мотор
flag = 1; //Активируем флаг рабочего режима
timer = millis(); //Запускаем таймер
}
if (flag) { //Если флаг активирован
digitalWrite(DIR_PIN , HIGH); //Задаем направление вращения
for (int i = 0; i < 16; i++) { //Выполняем нужное число шагов 200*16 = 3200 шагов оборот
digitalWrite(STEP_PIN , HIGH);
delayMicroseconds(frequency);
digitalWrite(STEP_PIN , LOW);
} while (millis() - timer < move_forward_time);
flag = 0; //Гасим флаг
digitalWrite(ENABLE_PIN , HIGH); //Выключаем движок, чтобы не грелся
}
//КОД КОГДА КНОПКА PIN4 НАЖАТА И ПОДАЕТ СИГНАЛ НА ШАГОВЫЙ МОТОР
if (!digitalRead(start_button2)) { //Если нажали на кнопку
digitalWrite(ENABLE_PIN , LOW); //Включаем мотор
flag = 1; //Активируем флаг рабочего режима
timer = millis(); //Запускаем таймер
}
if (flag) { //Если флаг активирован
digitalWrite(DIR_PIN , LOW); //Задаем направление вращения
for (int i = 0; i < 16; i++) { //Выполняем нужное число шагов 200*16 = 3200 шагов оборот
digitalWrite(STEP_PIN , HIGH);
delayMicroseconds(frequency);
digitalWrite(STEP_PIN , LOW);
} while (millis() - timer < move_forward_time);
flag = 0; //Гасим флаг
digitalWrite(ENABLE_PIN , HIGH); //Выключаем движок, чтобы не грелся
}
//КОД КОГДА LIMIT PIN9 ВКЛЮЧЕН И ПОДАЕТ СИГНАЛ НА ШАГОВЫЙ МОТОР
if (!digitalRead(limitPin)) { //Если нажали на кнопку
flag = 1; //Активируем флаг рабочего режима
if (flag) { //Если флаг активирован
digitalWrite(ENABLE_PIN , HIGH); //Выключаем движок, чтобы не грелся
digitalWrite(DIR_PIN , LOW);
for (int i = 0; i < 100; i++) { //Выполняем нужное число шагов
digitalWrite(ENABLE_PIN , LOW); //Выключаем движок, чтобы не грелся;
digitalWrite(STEP_PIN , HIGH);
delayMicroseconds(frequency);
digitalWrite(STEP_PIN , LOW);
}
flag = 0; //Гасим флаг
digitalWrite(ENABLE_PIN , HIGH); //Выключаем движок, чтобы не грелся
}
}
//КОД КОГДА ЭНКОДЕР ВРАЩАЕТСЯ PIN6 И PIN3 И ПОДАЕТ СИГНАЛ НА ШАГОВЫЙ МОТОР
if(digitalRead(6)==LOW) {
flag = 1; //Активируем флаг рабочего режима
timer = millis(); //Запускаем таймер
if (flag) { //Если флаг активирован
digitalWrite(DIR_PIN , LOW);
for (int i = 0; i < 5; i++) { //Выполняем нужное число шагов
digitalWrite(ENABLE_PIN , LOW); //Включаем мотор;
digitalWrite(STEP_PIN , HIGH);
delayMicroseconds(frequency);
digitalWrite(STEP_PIN , LOW);
} while (millis() - timer < move_back_time); //ВРЕМЯ ВЫПОЛНЕНИЯ КОДА
flag = 0; //Гасим флаг
digitalWrite(ENABLE_PIN , HIGH); //Выключаем движок, чтобы не грелсяелся
}
}
if(digitalRead(3)==LOW) {
flag = 1; //Активируем флаг рабочего режима
timer = millis(); //Запускаем таймер
if (flag) { //Если флаг активирован
digitalWrite(DIR_PIN , HIGH);
for (int i = 0; i < 5; i++) { //Выполняем нужное число шагов
digitalWrite(ENABLE_PIN , LOW); //Включаем мотор
delayMicroseconds(frequency);
digitalWrite(STEP_PIN , HIGH);
delayMicroseconds(frequency);
digitalWrite(STEP_PIN , LOW);
} while (millis() - timer < move_back_time); //ВРЕМЯ ВЫПОЛНЕНИЯ КОДА
flag = 0; //Гасим флаг
digitalWrite(ENABLE_PIN , HIGH); //Выключаем движок, чтобы не грелсяелся
}
}
}
//КОД КОГДА ЭНКОДЕР ВРАЩАЕТСЯ PIN6 И PIN3 И ПОДАЕТ СИГНАЛ НА МОНИТОР
void ai0() {
if(digitalRead(3)==LOW) {
counter++;
}else{
counter--;
}
}
void ai1() {
if(digitalRead(6)==LOW) {
counter++;
}else{
counter--;
}
}