Esp32 - getting to the core of the task

Hi Guys,

This is going to be a bit of a play around with ESP32 Wroom

ADDRESSING :

  • Multi Processing
  • Multi Tasking
  • Multi Core Use
  • How to gain manipulation and Control over tasks
    While running Tasks on both core and on only 1 Core.

This starts as some interest sparked off on this thread which was supposed to be a few short questions and answers, and it became something else

Feel free to jump in and contribute - Newbies welcome to have some fun as well.
there are no stupid questions here, I mean.. there are :stuck_out_tongue:
But we're not going to tell you that , We're gonna be nice :slight_smile:

I'm interested in getting something like 20 Tasks happening simultaneously .
I'm tired of seeing the same basic internet examples, Here is a Task here is another and it stops there. I WANT TO GO TO 20 ! (At least 10)

Basically speaking , I have 2x WS2812B LED Strips
1 on Pin 18 and the other on Pin 19
I know they work, Voltage and wiring is all taken care off , We are just sticking to LEARNING about Dual Core Programming here and sharing some ideas and experimenting .

I also have a DFrobot and i would like to get to a point where i'm running a few light sequences and some sound files at the same time so they don't conflict.
I'm already very familiar with DFrobot and not starting from scratch.

So to kick it off
Here is a Hardware reference link
Hardware Reference Manual

Here is a Datasheet Link
ESP32 Datasheet

Here is the Sketch that i'm starting with, it's very Basic and we are going to play with it and see what we can learn.


/*//////////////////////////////////////////////////////////////////////////////////////////
 INITIATES THE TASKCODES FOR THE CORES
*///----------------------------------------------------------------------------------------
void TaskCode1( void *pvParameters );  //Initiates TaskCode1
void TaskCode2( void *pvParameters );  //Initiates TaskCode2
///////////////////////////////////////////////////////////////////////////////////////////

/*//////////////////////////////////////////////////////////////////////////////////////////
 POINTS THE TASK HANDLE TO THE TASK BLOCK
*///---------------------------------------------------------------------------------------
TaskHandle_t Task1;  //Assigned to Core 1
TaskHandle_t Task2;  //Assigned to Core 1
///////////////////////////////////////////////////////////////////////////////////////////

/*/////////////////////////////////////////////////////////////////////////////////////////
 BEGIN SETUP
*//////////////////////////////////////////////////////////////////////////////////////////
void setup() 
{  // OPENS the void setup
Serial.begin(115200);         // Baud Rate for Serial Monitor
/*//////////////////////////////////////////////////////////////////////////////////////////////////////////////////////////////////
//                                    TASK PARAMETERS
*///////////////////////////////////////////////////////////////////////////////////////////////////////////////////////////////////
/*/////////////////////////////////////////////////////////////////////////////////////////
------------------------------------------ TASK 1 -----------------------------------------
///////////////////////////////////////////////////////////////////////////////////////////
 TASK NAME - Task1
 TASK CREATION , CORE EXECUTION AND PRIORITY
-------------------------------------------------------------------------------------------
 Create Task1 , Executed in TaskCode1() function , On Core 0 , Priority 0
-------------------------------------------------------------------------------------------
*///  xTaskCreatePinnedToCore(TaskCode1, "Task1", 10000, NULL, 0, &Task1,  0); 
xTaskCreatePinnedToCore(
  TaskCode1,          // Task function.
    "Task1",          // name of task.
      10000,          // Stack size of task
       NULL,          // parameter of the task
          0,          // priority of the task 0 - 3
     &Task1,          // Task handle to keep track of created task
         1);          // pin task to core X                 
delay(5); 
/*/////////////////////////////////////////////////////////////////////////////////////////

///////////////////////////////////////////////////////////////////////////////////////////
------------------------------------------ TASK 2 -----------------------------------------
///////////////////////////////////////////////////////////////////////////////////////////
 TASK NAME - Task2
 TASK CREATION , CORE EXECUTION AND PRIORITY
-------------------------------------------------------------------------------------------
 Create Task2 , Executed in TaskCode2() function , On Core 0 , Priority 0
-------------------------------------------------------------------------------------------
*///  xTaskCreatePinnedToCore(TaskCode2, "Task2", 10000, NULL, 0, &Task2,  0); 
xTaskCreatePinnedToCore(
  TaskCode2,          // Task function.
    "Task2",          // name of task.
      10000,          // Stack size of task
       NULL,          // parameter of the task
          1,          // priority of the task 0 - 3
     &Task2,          // Task handle to keep track of created task
         1);          // pin task to core X                 
delay(5); 
/*/////////////////////////////////////////////////////////////////////////////////////////


*//////////////////////////////////////////////////////////////////////////////////////////
// CLOSE SETUP
///////////////////////////////////////////////////////////////////////////////////////////
} // CLOSES the void setup

///////////////////////////////////////////////////////////////////////////////////////////
//---------------------------------------- TASKCODE 1 ---------------------------------------
///////////////////////////////////////////////////////////////////////////////////////////
//  TaskCode1:  - 
//-------------------------------------------------------------------------------------------
void TaskCode1( void * pvParameters )
{ // OPENS TaskCode1
vTaskDelay(500);
  Serial.println("----------------------------------------------------------------");                         
  Serial.println("---------------------------- TaskCode1 -------------------------");
  Serial.println(" DETAILS :");
  Serial.print(" TaskCode1 - Task1       - Running On CORE ");
  Serial.println(xPortGetCoreID());
  Serial.println(" TaskCode1 - Task1       - COMPLETED");
  Serial.println("----------------------------------------------------------------");   
for(;;)
  {// OPENS TaskCode1 Main FOR Loop
  Serial.println(" Task1 - TERMINATED");
  Serial.println("");  

vTaskDelete(NULL);

  }  // CLOSES TaskCode1 Main FOR Loop
} // CLOSES TaskCode1

///////////////////////////////////////////////////////////////////////////////////////////

///////////////////////////////////////////////////////////////////////////////////////////
//---------------------------------------- TASKCODE 2 ---------------------------------------
///////////////////////////////////////////////////////////////////////////////////////////
//  TaskCode2:  - 
//-------------------------------------------------------------------------------------------
void TaskCode2( void * pvParameters )
{ // OPENS TaskCode2
vTaskDelay(500);
  Serial.println("----------------------------------------------------------------");                         
  Serial.println("---------------------------- TaskCode2 -------------------------");
  Serial.println(" DETAILS :");
  Serial.print(" TaskCode2 - Task2       - Running On CORE ");
  Serial.println(xPortGetCoreID());
  Serial.println(" TaskCode2 - Task2       - COMPLETED");
  Serial.println("----------------------------------------------------------------");   
for(;;)
  {// OPENS TaskCode2 Main FOR Loop
  Serial.println(" Task2 - TERMINATED");
  Serial.println("");  

vTaskDelete(NULL);

  }  // CLOSES TaskCode2 Main FOR Loop
} // CLOSES TaskCode2


///////////////////////////////////////////////////////////////////////////////////////////
// BEGIN LOOP -----------------------------------------------------------------------------
///////////////////////////////////////////////////////////////////////////////////////////
void loop() 
{ // OPENS void loop
delay(1);
} // CLOSES void loop
 

I'm going to initially run 4 Tests
All tests will have 2 Tasks and they will be tested across all cored ,
there will be a basic Serial Output
The Sketch has a 200ms Delay to allow for the Serial Text to appear
Also i am using vTaskDelay and not delay

TEST 1 -
TASK 1 - Core 0
TASK 2 - Core 0
Screenshot as Proof

Output...
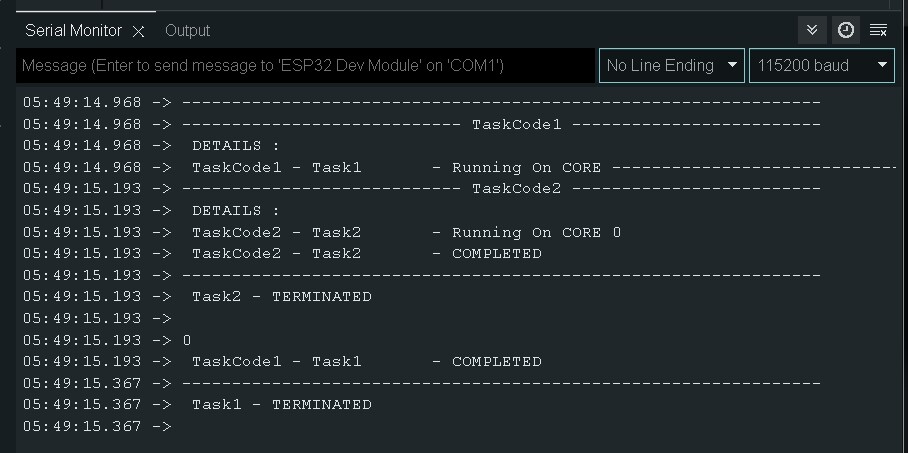

RESULT : Not as Expected

TEST 2 -
TASK 1 - Core 1
TASK 2 - Core 0
Screenshot as Proof

Output...


THIS IS WHAT WE WANT TO SEE

TEST 3 -
TASK 1 - Core 0
TASK 2 - Core 1
Screenshot as Proof

Output...
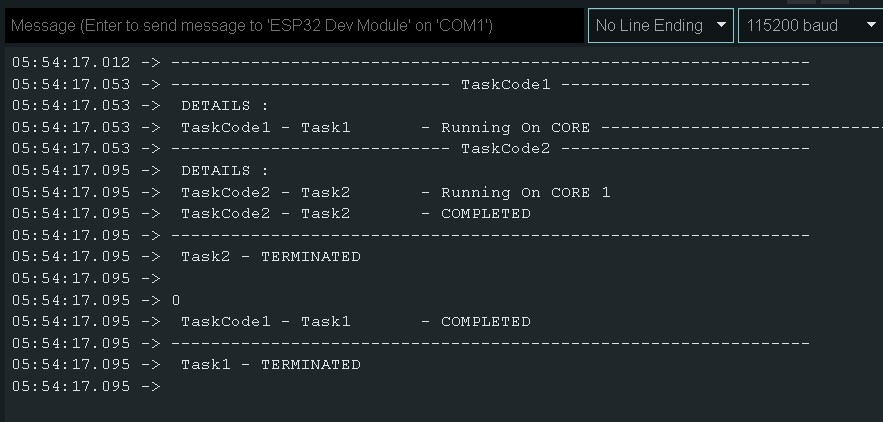
TEST 4 -
TASK 1 - Core 1
TASK 2 - Core 1
Screenshot as Proof
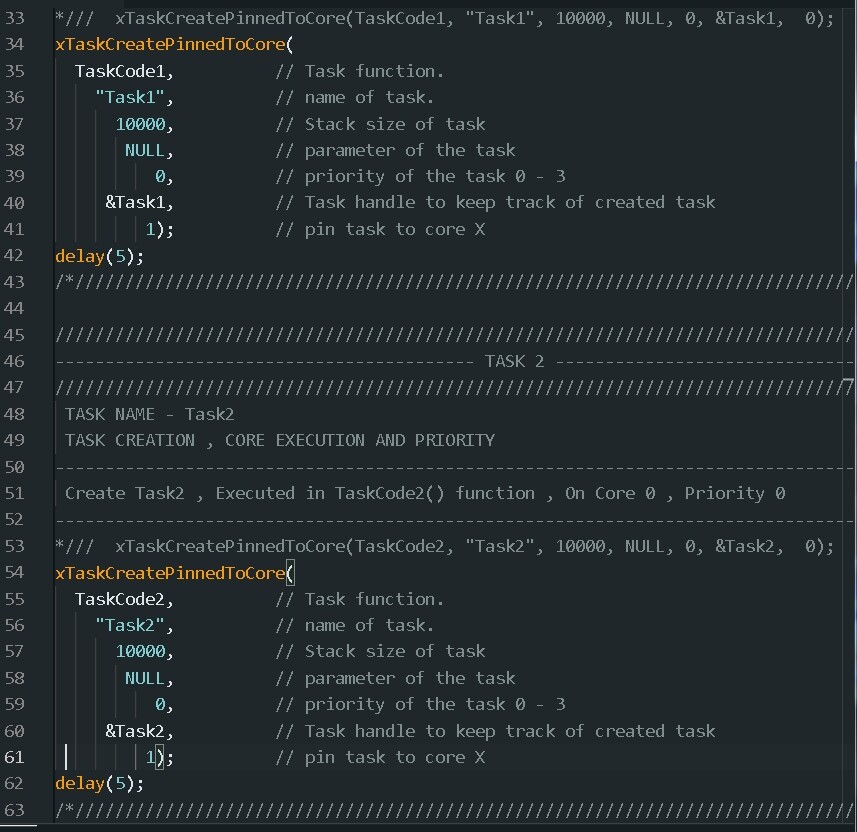
Output...


It Seems that when use Task1 on Core 0 That First line gets thrown to the end.

Anyway Let's start it there .....

To me, your code has too much noise and fluff in it to make seeing what it does easy at one glance. For your consideration, see what I consider to be a much leaner and cleaner code below. Just for fun, it spools up 4 tasks.

I suggest that you play with the tasks' relative priority and Core assignments as well as the delay between each call to xTaskCreatePinnedToCore(). I imagine you'll be able to get just about any sequence in the printing that you'd like.

But, in truth, trying to understand the exact timing between task execution in this way is a Fool's Errand as it will get very complicated and hard to explain very quickly. That's why we use the various interlocks and inter-task communications techniques to regulate the sequencing in a deterministic manner and get the code to do what we really want it to.

void TaskCode(void *pvParameters);

void setup() {
  Serial.begin(115200);
  delay(1000);

  uint8_t taskNumber1 = 1;
  xTaskCreatePinnedToCore(TaskCode, "Task1", 2000, &taskNumber1, 2, NULL, 1);
  //delay(5);

  uint8_t taskNumber2 = 2;
  xTaskCreatePinnedToCore(TaskCode, "Task2", 2000, &taskNumber2, 2, NULL, 1);
  //delay(5);

  uint8_t taskNumber3 = 3;
  xTaskCreatePinnedToCore(TaskCode, "Task3", 2000, &taskNumber3, 2, NULL, 0);
  //delay(5);

  uint8_t taskNumber4 = 4;
  xTaskCreatePinnedToCore(TaskCode, "Task4", 2000, &taskNumber4, 2, NULL, 0);
  delay(5);
}

void TaskCode(void *pvParameters) {
  uint8_t taskNumber = *static_cast<uint8_t *>(pvParameters);
  Serial.printf("---------------------------- Task #%d Started on Core %d -------------------------\n", taskNumber, xPortGetCoreID());
  Serial.printf("---------------------------- Task #%d Terminated ---------------------------------\n", taskNumber);
  vTaskDelete(NULL);
}

void loop() {
  delay(1);
}

Make Task2 show the state of Task1. It may shed some light on the reason why Task1 is stopped. Also run each test at least twice, to detect nondeterministic/random effects.

Also test unpinned Task2.

To me it is easy
However, for the sake of the forum and discussion i'm happy to do this..

void TaskCode1( void *pvParameters );  //Initiates TaskCode1
void TaskCode2( void *pvParameters );  //Initiates TaskCode2

TaskHandle_t Task1;  //Assigned to Core 1
TaskHandle_t Task2;  //Assigned to Core 1

void setup() 
{
Serial.begin(115200);

xTaskCreatePinnedToCore(TaskCode1, "Task1", 10000, NULL, 0, &Task1, 1);                      
delay(5); 
xTaskCreatePinnedToCore(TaskCode2, "Task2", 10000, NULL, 0, &Task2, 1);             
delay(5); 
} 

void TaskCode1( void * pvParameters )
{ 
vTaskDelay(500);
  Serial.println("----------------------------------------------------------------");                         
  Serial.println("---------------------------- TaskCode1 -------------------------");
  Serial.println(" DETAILS :");
  Serial.print(" TaskCode1 - Task1       - Running On CORE ");
  Serial.println(xPortGetCoreID());
  Serial.println(" TaskCode1 - Task1       - COMPLETED");
  Serial.println("----------------------------------------------------------------");   
for(;;)
  {
  Serial.println(" Task1 - TERMINATED");
  Serial.println("");  

vTaskDelete(NULL);
  }
}

void TaskCode2( void * pvParameters )
{
vTaskDelay(500);
  Serial.println("----------------------------------------------------------------");                         
  Serial.println("---------------------------- TaskCode2 -------------------------");
  Serial.println(" DETAILS :");
  Serial.print(" TaskCode2 - Task2       - Running On CORE ");
  Serial.println(xPortGetCoreID());
  Serial.println(" TaskCode2 - Task2       - COMPLETED");
  Serial.println("----------------------------------------------------------------");   
for(;;)
  {
  Serial.println(" Task2 - TERMINATED");
  Serial.println("");  

vTaskDelete(NULL);

  }
}

void loop() 
{
delay(1);
}
 

Thankyou, I've actually already played with all these, Unless there is something i don't know about them of course
I feel my next step is to get Tasks to speak to each other

And... I think you hit the nail on the head, it sounds like that's what i'm trying to learn

Of course, I actually ran them all 3 or 4 times each, 3 is my minimum.

Literally looking into that right now and how to do it.

Just found some useful FreeRTOS functions:

eTaskGetState()
vTaskGetRunTimeStats()
xTaskGetSchedulerState()

I'm Literally just reading up on eTaskGetState right now
Thanks

The main FreeRTOS mechanisms for achieving inter-task synchronization and data sharing are:

  • Notifications
  • Queues
  • Event Groups
  • Semaphores
  • Mutexes

All of these were mentioned (at least in passing) in your previous thread. I'd stay away from Critical Sections and std::atomic, at least for now.

Using these mechanisms stops the tasks from just free wheeling like they are in your current code. Used properly, they impose a deterministic order on task execution. That's true even for the case of asynchronous / non-deterministic events like interrupts and external I/O.

Yeah, i remember that.

Thanks for this

Exactly, that's what i'm trying to achieve
Granted that i also just obviously threw up this code to muck around
but once i get the concept going i'm going to throw more stuff at it

some ideas are

  • 2 Led Strips approx 10 pixels each, doesn't really matter
    I'll figure out a few light sequences, they will range from slow movement to Fast
    Movement

  • I'm definitely going to have a DFRobot playing some Audio files to the lights (but not specifically Sync'd to each other in the sense where they talk to each other) just lights over music that's all

  • I will create an Audio and Light combo sequence
    I tried this before, it works on Arduino but on Dual core the lights seem to get chopped when the light sequence goes on for longer than maybe 5 seconds or so,

Then i might add other things in to see if they get interferred or not

that's a rough outline of what i intend to achieve
Primarily it's More actually learning Dual Core Programming and task management in depth and getting good at it. and partly for projects and party because it's cool.

anyway , I'm falling asleep here, ok
I need a few hours break,
I'll be back

Example-1: (Purpose: self testing questions/answers relating to single core multi-tasking operation using ESP32 Dev Module, FreeRTOS.h Library, and Arduino IDE. I would appreciate to receive corrections from the Forum Members.)

Let us create a sketch using functions of FreeRTOS.h Library for the setup of Fig-1; where, LED will be blinking at 100 ms interval; LED10 will be blinking at 500 ms, and LED11 will be blinking at 1000 ms interval. (LED10 is pronounced as LED one zero and not LED ten.)
esp32-1led
Figure-1:

A: Sketch:

//function declarations
TaskHandle_t  Task10Handle;
TaskHandle_t  Task11Handle;

//GPIO definitions
#define LED   2
#define LED10 21
#define LED11 22

//task creation using FreeRTOS.h Librray functions
void setup()
{
  Serial.begin(9600);
  pinMode(LED, OUTPUT);
  pinMode(LED10, OUTPUT);
  pinMode(LED11, OUTPUT);

  xTaskCreatePinnedToCore(Task10, "Task-10", 2048, NULL, 1, &Task10Handle, 1);
  xTaskCreatePinnedToCore(Task11, "Task-11", 2048, NULL, 1, &Task10Handle, 1);
}

//LED blinks at 100 ms pause
void loop()
{
  digitalWrite(LED, HIGH);
  delay(100);
  digitalWrite(LED, LOW);
  delay(100);
}

//LED10 blins at 500 ms interval
void Task10(void *pvParameters)
{
  while (true)
  {
    digitalWrite(LED10, HIGH);
    delay(500);
    digitalWrite(LED10, LOW);
    delay(500);
  }
}

//LED11 blinks at 1000 ms interval
void Task11(void *pvParameters)
{
  while (true)
  {
    digitalWrite(LED11, HIGH);
    delay(1000);
    digitalWrite(LED11, LOW);
    delay(1000);
  }
}

Observation on the outcome of the sketch:

When I look only on LED (covering the other two), I observe that it keeps blinking at 100 ms interval. This is fine for me.

When I look only on LED10 (covering the other two), I observe that it keeps blinking at 500 ms interval. This is fine for me.

When I look only on LED11 (covering the other two), I observe that it keeps blinking at 10000 ms interval. This is fine for me.

When I look onto all the three LEDs, I observe that they are blinking smoothly (no random, no interleaving) maintaining their respective intervals, and it appears that they are blinking concurrently which is not possible with a sketch that runs three subprograms sequentially. Now, slowly understanding the beauty and utility of "single core multitasking operation".

B: Questions/Answers:
in post #54.

You mean "Pronounced As"
I Understand your naming convention , As per our previous conversations.
But for the sake of Newbies reading this
The Convention is

EXPRESSION ---- LED10 / LED11 / LED12 / LED0342 / LED1215
NAME OF LED --- LED / LED / LED / LED / LED
LED# -------------- 0 / 1 / 2 / 342 / 215
CORE#-------------- 1 / 1 / 1 / 0 / 1
Also by this convetion, What is "LED" the first one?

OK Lets...
Give me a little time and i WILL Answer this..

While Researching these i just wanted to mention this, I keep coming across a term

"The Watchdog"

I wasn't really sure what this was. Anyway, i found this to be a very good read and very informative.

Espressif IDF Programming Guide - WATCHDOGS
I discovered there are 2 types of watchdog timers

  • Interrupt Watchdog Timer (IWDT)
  • Task Watchdog Timer (TWDT)
    Anyway,... That was cool, Now back to it

Hi mate, As i'm going through all this i would like to quickly ask
What is the relevance of e v and x in

When i was using delay in arduino i understood how that goes through the compiler all the way to machine code and how all that works and i understand this to be a delay in the entire function
When i started used vTaskDelay i learned that this is a task specific delay
but in truth i didn't know the relevance of the "v"
now i'm seeing e and v and x
What does that signify to the compiler when it see's it

The compiler does not care about names at all.

Appendix 1 explains what human readers should know about FreeRTOS naming conventions. I'm not sure about 'e', perhaps indicates an enumerated type?

Exactly!

True, but i can't just give

My own custom names like

GetTheTaskState()
GetAndRunTheTaskTimeStatistics()
GetTheTaskSchedulerState()

Because to my understanding these names/Objects are hardcoded as part of the language
and they have a meaning to the compiler and somewhere in the main code there is an
instruction of what each of these should do.

In any case, I'll got and read that Document thank you

I'll post my results soon
I actually am making a bit of progress
Currently experimenting with

vTaskDelete();
vTaskSuspend();

Running 2 tasks and each 1 runs a counter
and i'm observing the effects of these commands for the sake of understanding control within in a function

I'm going as fast as i can, i'll try not to be too long
Also @GolamMostafa
I haven't forgotten

I just need to get a few things through my head and then i believe i'll be able to answer your question, Please be patient with me.
Thank you

Fantastic! Now, we see your brilliant contributions!!

This is the onboard (blue)LED of ESP32 Dev Module. By default, it will be blinked by loop() function using a piece of software which I would like to designate as LoopTask not created using function of FreeRTOS.h Library. So, I am unable to conceive any name for LED which follows the format LEDmn.

No, the language is C/C++. The only convention I remember is the C standard "_t" suffix for type names. So the natural place for API defined extensions is at the begin of a name.

Find out yourself:

void vFunc();
int vFunc2();
void xFunc3();

are all valid names to the compiler but not all conform to the FreeRTOS API conventions.

I am coming with Example-1 and then with Example-2 and so on. All these examples are for my self testing purposes. I would appreciate to receive corrections from Forum members. This is a Bar Sport Section of the Forum; so, there is absolutely "no rush" as to be qualified first before sitting for examination.