I'll be honest, I know absolutely nothing about electronics and this is my very first electrical project. I'm a machinist by trade and just finished building a machine and need to complete it by giving it a brain. I spent a lot of time online trying to figure out the coding but quickly realized that it is quite complex, so I ended up hiring someone on Fiverr to help me. Instead of controlling 3 solenoids, like I asked, they wrote the code to control 3 led's. I guess it is similar, so I wanted to see what you all thought of what I have so far. I just learned that the arduino wouldn't be able to power the pneumatic solenoids and that I would need a relay module so I just bought one. I will outline the entire build, to the best of my abilities, and hope that I can convey the details effectively and get some feedback.
Goal:
Step 1. Move the momentary spring-return 12vdc joystick lever to allow power into the Arduino V3 Nano.
Step 2. Solenoid#1 activates for 4 seconds, then turns off.
Step 3. Solenoid #2 waits 1 second, then it de-activates. (It's already activated but turns off after 1 second)
Step 4. Solenoid #3 waits 5 seconds after solenoid #1 activates, then it activates for 0.5 seconds and deactivates.
Step 5. Solenoid #2 activates and remains activated.
Everything repeats when the momentary switch is pressed agin.
This is the code I have so far: solenoid.txt (6.8 KB)
This is the Pneumatic Solenoid. It takes 12VDC 300ma to activate it. I tested it with a toggle switch and it works just fine. Just need to control the activation sequence and duration.
This is the breadboard and Arduino Nano V3 that I have. Don't have anything else but am willing to buy whatever I need. Wish the breadboard was smaller and had a case to protect everything.
I'm in way over my head and don't expect to be able to pull this off but will try my best to push through and see what happens. The world of microcontrollers is fascinating and I will be taking mechatronics this fall because this is definitely the future.
Thanks in advance to anyone that helps and I would be more than happy to return the favor if you need any help with engineering or fabrication.
Hi Dave,
Excellent job. All dAta there.
Most forum users will not download your code. To get help you should add the code in code tags as instructed at the top of this category.
I did the download.
Your code looks neat. It is a bit over documented, but I guess for you each step is 'new', and you want to remember why you wrote it that way.
I am on my phone now and for me the comments are a bit in the way to keep the overview. In general you should comment blocks of code, not each line of code.
Apart from that I see no problems.
To save time here is the code; I havent tested it but to me it looks well written and self documenting.
/*
 Solenoid cycle

  1) press momentary switch.
  2) solenoid #1 activates for 4 seconds then turns off.
  3) solenoid #2 waits 1 second after solenoid #1 activates, then it activates.
  4) solenoid #3 waits 5 seconds after solenoid #1 activates, then it activates for 1 second and turns off.

 The circuit:
 * pushbutton attached to the pin 2 and to the ground
 * solenoid #1 attached to pin 4
 * solenoid #2 attached to pin 5
 * solenoid #3 attached to pin 6

 created 13 August 2022
 by Automatisierung
 */

// constants won't change. They're used here to
const unsigned long solenoid_1_OffDelay = 4000; //4 seconds
const unsigned long solenoid_2_OnDelay = 1000;  //1 second
const unsigned long solenoid_2_OffDelay = 1000; //1 second
const unsigned long solenoid_3_OnDelay = 5000;  //5 seconds
const unsigned long solenoid_3_OffDelay = 1000; //1 second
// set pin numbers:
const int buttonPin = 2;        // the number of the pushbutton pin
const int solenoid1Pin = 4;     // solenoid 1 pin
const int solenoid2Pin = 5;     // solenoid 2 pin
const int solenoid3Pin = 6;     // solenoid 3 pin


// Variables will change:
unsigned long solenoid_1_Time = 0;  //time for solenoid #1
unsigned long solenoid_2_Time = 0;  //time for solenoid #2
unsigned long solenoid_3_Time = 0;  //time for solenoid #3
int buttonState = HIGH;             //the current reading from the input pin
int lastButtonState = HIGH;         //the previous reading from the input pin
int isCycleRunning = LOW;           //state of the cycle
int runSolenoid_1 = LOW;            //activate solenoid #1
int runSolenoid_2 = LOW;            //activate solenoid #2
int runSolenoid_3 = LOW;            //activate solenoid #3
int stepSolenoid_1 = 0;             //steps of solenoid #1
int stepSolenoid_2 = 0;             //steps of solenoid #2
int stepSolenoid_3 = 0;             //steps of solenoid #3
int solenoid_1_done = LOW;
int solenoid_2_done = LOW;
int solenoid_3_done = LOW;

// the following variables are unsigned long's because the time, measured in miliseconds,
// will quickly become a bigger number than can be stored in an int.
unsigned long lastDebounceTime = 0;  // the last time the output pin was toggled
unsigned long debounceDelay = 50;    // the debounce time; increase if the output flickers

void setup() {
  pinMode(buttonPin, INPUT_PULLUP);
  pinMode(solenoid1Pin, OUTPUT);
  pinMode(solenoid2Pin, OUTPUT);
  pinMode(solenoid3Pin, OUTPUT);

  // set initial outputs state
  digitalWrite(solenoid1Pin, LOW);
  digitalWrite(solenoid2Pin, LOW);
  digitalWrite(solenoid3Pin, LOW);
}

void loop() {
  // read the state of the switch into a local variable:
  int reading = digitalRead(buttonPin);

  // check to see if you just pressed the button
  // (i.e. the input went from LOW to HIGH),  and you've waited
  // long enough since the last press to ignore any noise:

  // If the switch changed, due to noise or pressing:
  if (reading != lastButtonState) {
    // reset the debouncing timer
    lastDebounceTime = millis();
  }

  if ((millis() - lastDebounceTime) > debounceDelay) {
    // whatever the reading is at, it's been there for longer
    // than the debounce delay, so take it as the actual current state:

    // if the button state has changed:
    if (reading != buttonState) {
      buttonState = reading;

      // only toggle the bit if the new button state is LOW
      if (buttonState == LOW) {
        isCycleRunning = !isCycleRunning;
        runSolenoid_1 = HIGH;
      }
    }
  }

  if(!isCycleRunning){
    // reset outputs state
    digitalWrite(solenoid1Pin, LOW);
    digitalWrite(solenoid2Pin, LOW);
    digitalWrite(solenoid3Pin, LOW);
    //reset the cycle
    stepSolenoid_1 = 0;
    stepSolenoid_2 = 0;
    stepSolenoid_3 = 0;
    runSolenoid_2 = LOW;
    runSolenoid_3 = LOW;
    solenoid_1_done = LOW;
    solenoid_2_done = LOW;
    solenoid_3_done = LOW;
  }
  //solenoid #1
  switch(stepSolenoid_1) {
  case 0: //start when the button is pressed
    if (runSolenoid_1)
      stepSolenoid_1 = 10;
    break;
  case 10: //solenoid #1 activates
    digitalWrite(solenoid1Pin, HIGH);
    runSolenoid_2 = HIGH;
    runSolenoid_3 = HIGH;
    stepSolenoid_1 = 11;
    solenoid_1_Time = millis();
    break;
  case 11: //wait 4 seconds then turns solenoid #1 off
    if(millis() - solenoid_1_Time >= solenoid_1_OffDelay)
      stepSolenoid_1 = 99;
    break;
  case 99:
    digitalWrite(solenoid1Pin, LOW);
    runSolenoid_1 = LOW;
    stepSolenoid_1 = 0;
    solenoid_1_done = HIGH;
    break;
  default:
    digitalWrite(solenoid1Pin, LOW);
    runSolenoid_1 = LOW;
    stepSolenoid_1 = 0;
    solenoid_1_done = HIGH;
}

  //solenoid #2
  switch(stepSolenoid_2){
    case 0: //run solenoid #2 cycle
    if(runSolenoid_2){
      stepSolenoid_2 = 10;
      solenoid_2_Time = millis();
    }
    break;
    case 10: //on delay
      if (millis() - solenoid_2_Time >= solenoid_2_OnDelay){
        stepSolenoid_2 = 20;
      }
    break;
    case 20:
      digitalWrite(solenoid2Pin, HIGH);
      stepSolenoid_2 = 30;
      solenoid_2_Time = millis();
    break;
    case 30:
      if (millis() - solenoid_2_Time >= solenoid_2_OffDelay){
        stepSolenoid_2 = 99;
      }
    break;
    case 99:
      digitalWrite(solenoid2Pin, LOW);
      stepSolenoid_2 = 0;
      solenoid_2_Time = millis();
      runSolenoid_2 = LOW;
      solenoid_2_done = HIGH;
    break;
    default:
      digitalWrite(solenoid2Pin, LOW);
      stepSolenoid_2 = 0;
      solenoid_2_Time = millis();
      runSolenoid_2 = LOW;
      solenoid_2_done = HIGH;
  }

 //solenoid #3
  switch(stepSolenoid_3){
    case 0: //run solenoid #2 cycle
    if(runSolenoid_3){
      stepSolenoid_3 = 10;
      solenoid_3_Time = millis();
    }
    break;
    case 10: //on delay
      if (millis() - solenoid_3_Time >= solenoid_3_OnDelay){
        stepSolenoid_3 = 20;
      }
    break;
    case 20:
      digitalWrite(solenoid3Pin, HIGH);
      stepSolenoid_3 = 30;
      solenoid_3_Time = millis();
    break;
    case 30:
      if (millis() - solenoid_3_Time >= solenoid_3_OffDelay){
        stepSolenoid_3 = 99;
      }
    break;
    case 99:
      digitalWrite(solenoid3Pin, LOW);
      stepSolenoid_3 = 0;
      solenoid_3_Time = millis();
      runSolenoid_3 = LOW;
      solenoid_3_done = HIGH;
    break;
    default:
      digitalWrite(solenoid3Pin, LOW);
      stepSolenoid_3 = 0;
      solenoid_3_Time = millis();
      runSolenoid_3 = LOW;
      solenoid_3_done = HIGH;
  }


  if (isCycleRunning && solenoid_1_done && solenoid_2_done && solenoid_3_done){
    isCycleRunning = LOW;
    solenoid_1_done = LOW;
    solenoid_2_done = LOW;
    solenoid_3_done = LOW;
  }
  // save the reading.  Next time through the loop,
  // it'll be the lastButtonState:
  lastButtonState = reading;
}
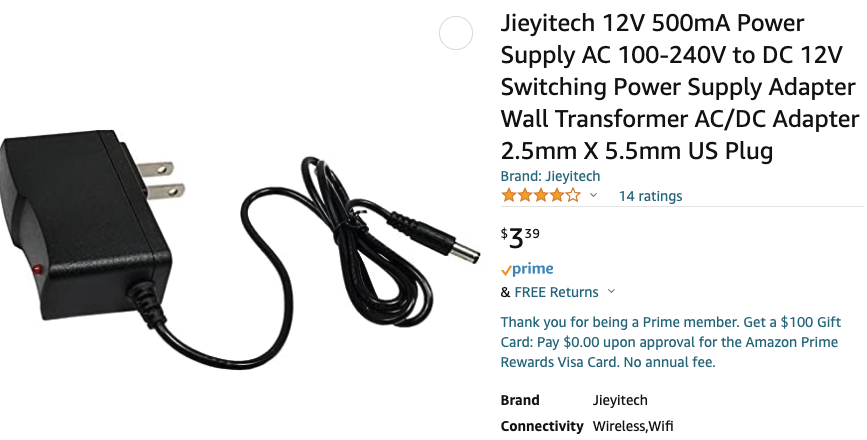
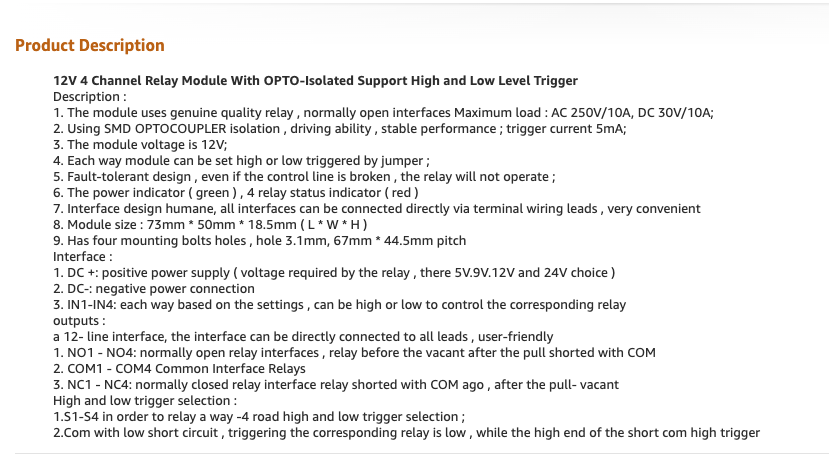
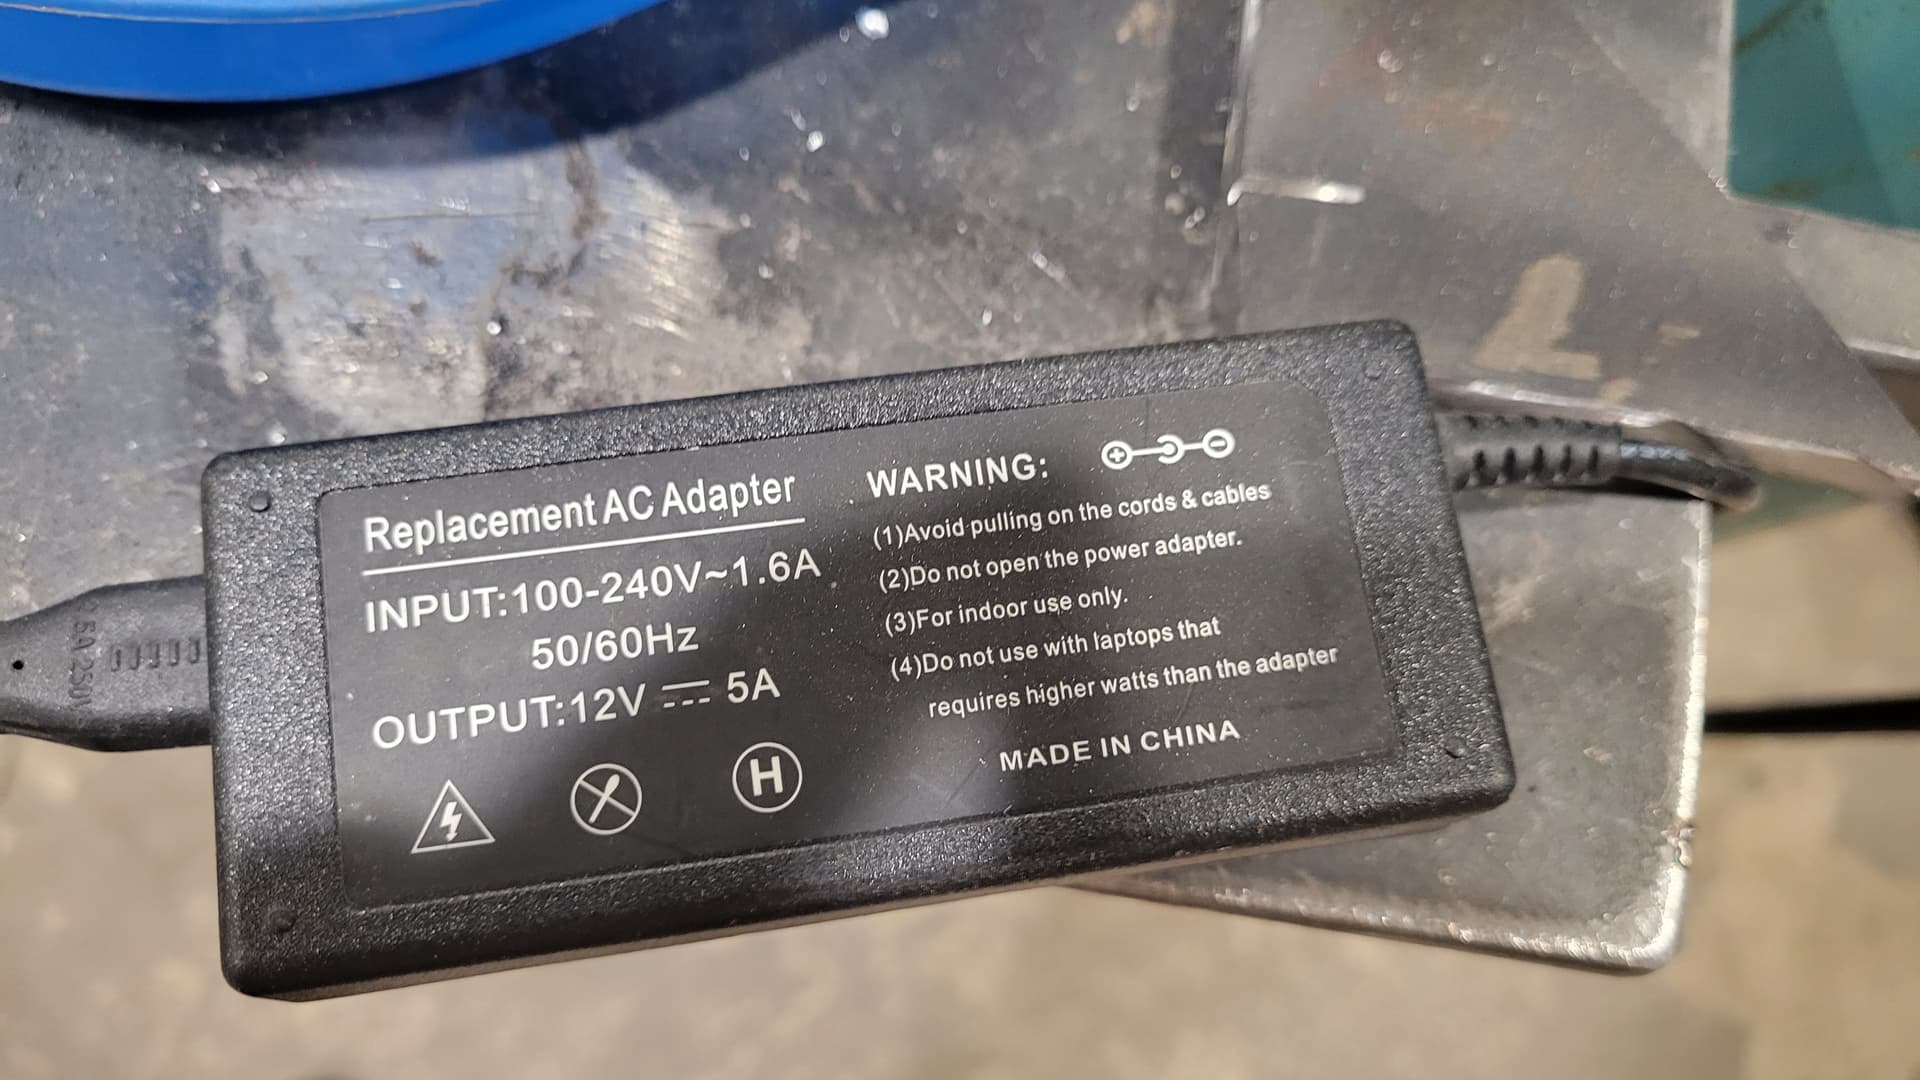
You have a 12VDC 500mA power supply and 12VDC 300mA pneumatic solenoids, with at least 2 solenoids working at the same time, which means you need a more powerful power supply.
And 12V is pretty much to feed your arduino.
7-9V will give you more max. current.
Even better would be a separate 5V supply directly connected to the 5V pin.
You will need a good 12V supply for your relay board and solenoids.
If your nano isnt handling much current you COULD also power it from the 12V, or use a converter like this to give you 5V.
My advice - test 1 stage at a time; check the relays are working before you connect the solenoids.
Thank you for that info. I just posted a few seconds before you did. Would the transformer I have work and would I direct the required voltage and amperage to the solenoid with code or transistors? Sorry, really don't know what I am talking about. Thanks
That is minimal to get the sequence you described. You could have wrote it yourself and tested your machine without any external help learning Arduino craft in the process, then employed a coder for final polishing if wanted