Help me in developing running text using p10 chiness board rgb smd 1/4 scan panel and esp32

I use P10 SMD outdoor panel and esp32 controller, and I follow the tutorial on youtube from utech "https://youtu.be/34B4FqgmSSc?si=NphyZaQfVP_f4VvG" with pin mapping as below

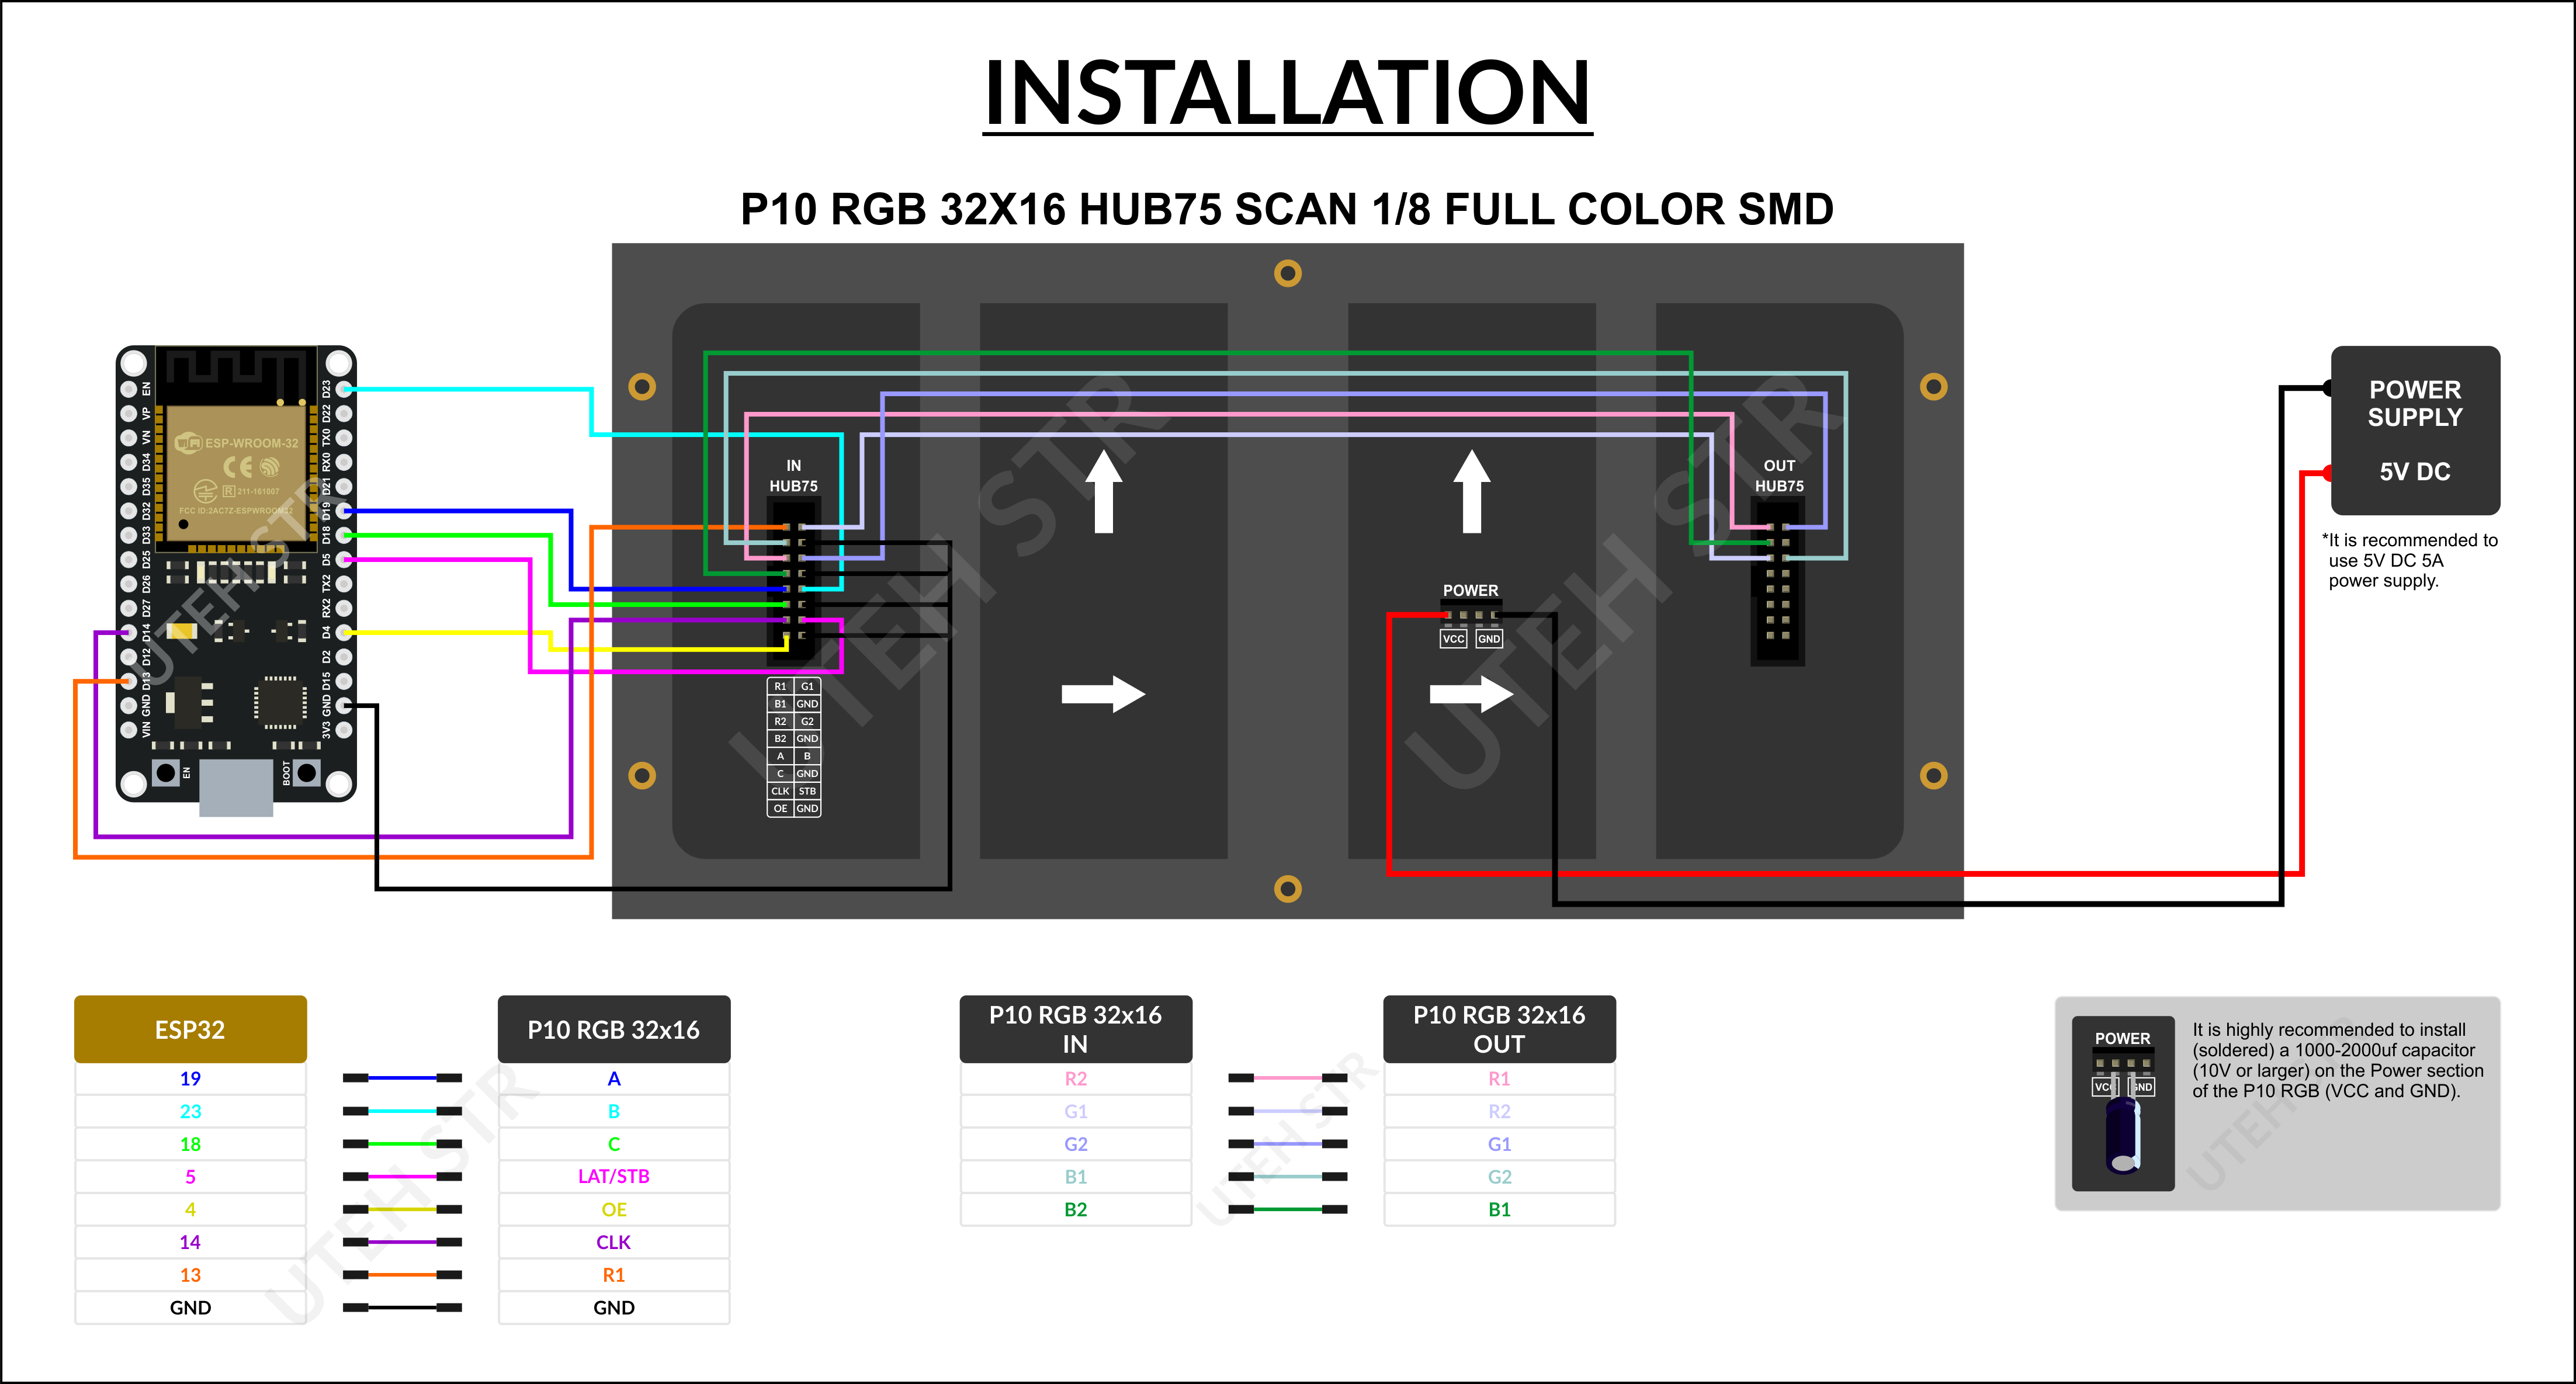
and this is the link to the P10 panel that I use P10 SMD RGB 1/4 SCAN

//>>>>>>>>>>>>>>>>>>>>>>>>>>>>>>>>>>>>>>>>>>>>>>>>>>>>>>>>>>>>>>>>>>>>>>>>>>>>>>>>>>>>>>>>> 01_Test_P10_RGB_32x16
// This is how many color levels the display shows - the more the slower the update.
//#define PxMATRIX_COLOR_DEPTH 4

// Defines the speed of the SPI bus (reducing this may help if you experience noisy images).
// The original value of PxMATRIX_SPI_FREQUENCY in the PxMatrix library example is 20000000.
// I changed the value to 10000000 because if I use the value 20000000, then "ghosting" or "noise" appears on my P10 32x16 RGB panel.
// Each panel may be a different case. If "ghosting" or "noise" appears on your P10 RGB panel, try changing the PxMATRIX_SPI_FREQUENCY value.
// You can use the values ​​20000000, 15000000, 10000000 and 8000000. Or you can also try using other values.
#define PxMATRIX_SPI_FREQUENCY 10000000

// Creates a second buffer for backround drawing (doubles the required RAM).
//#define PxMATRIX_double_buffer true

//----------------------------------------Including Libraries.
#include <PxMatrix.h>
//----------------------------------------

//----------------------------------------Pins for LED MATRIX.
#define P_LAT 5
#define P_A   19
#define P_B   23
#define P_C   18
#define P_OE  4
//----------------------------------------

// Defines the width and height of the panel in pixels.
#define matrix_width  32
#define matrix_height 16

// Timer setup.
// Create a hardware timer  of ESP32.
hw_timer_t * timer = NULL;
portMUX_TYPE timerMux = portMUX_INITIALIZER_UNLOCKED;

// This defines the 'on' time of the display is us.
// The larger this number, the brighter the display. If too large the ESP will crash.
uint8_t display_draw_time = 30; // 30-70 is usually fine.

// Declaring the "PxMATRIX" object as a "display" and its settings.
PxMATRIX display(matrix_width, matrix_height, P_LAT, P_OE, P_A, P_B, P_C);

//----------------------------------------Some standard colors.
// display.color565(R value = 0-255, G value = 0-255, B value = 0-255);
uint16_t myRED      = display.color565(255, 0, 0);
uint16_t myGREEN    = display.color565(0, 255, 0);
uint16_t myBLUE     = display.color565(0, 0, 255);
uint16_t myWHITE    = display.color565(255, 255, 255);
uint16_t myYELLOW   = display.color565(255, 255, 0);
uint16_t myCYAN     = display.color565(0, 255, 255);
uint16_t myMAGENTA  = display.color565(255, 0, 255);
uint16_t myVIOLET   = display.color565(127, 0, 255);
uint16_t myBLACK    = display.color565(0, 0, 0);

uint16_t myCOLOR_ARRAY[8] = {myRED, myGREEN, myBLUE, myWHITE, myYELLOW, myCYAN, myMAGENTA, myVIOLET};
//----------------------------------------

//________________________________________________________________________________ IRAM_ATTR display_updater()
// Interrupt handler for Timer.
void IRAM_ATTR display_updater(){
  // Increment the counter and set the time of ISR.
  portENTER_CRITICAL_ISR(&timerMux);
  display.display(display_draw_time);
  portEXIT_CRITICAL_ISR(&timerMux);
}
//________________________________________________________________________________ 

//________________________________________________________________________________ display_update_enable()
// Subroutine to enable and disable interrupt timers.
void display_update_enable(bool is_enable) {
  if (is_enable){
    timer = timerBegin(0, 80, true);
    timerAttachInterrupt(timer, &display_updater, true);
    timerAlarmWrite(timer, 1500, true);
    timerAlarmEnable(timer);
  }
  else{
    timerDetachInterrupt(timer);
    timerAlarmDisable(timer);
  }
}
//________________________________________________________________________________ 

//________________________________________________________________________________ VOID SETUP()
void setup() {
  // put your setup code here, to run once:

  delay(2000);
  Serial.begin(115200);
  Serial.println();

  // Display initialization.
  display.begin(4); //--> Value 8 for 1/8 row scan panel.
  delay(100);

  // Enable Timer Interrupts.
  display_update_enable(true);
  delay(100);

  display.clearDisplay();
  delay(1000);

  display.setBrightness(125); //--> Range from 0 to 255.
  delay(100);

  display.fillScreen(myRED);
  delay(2000);
  display.fillScreen(myGREEN);
  delay(2000);
  display.fillScreen(myBLUE);
  delay(2000);
  display.fillScreen(myWHITE);
  delay(2000);

  display.clearDisplay();
  delay(1000);

  display.setTextWrap(false);
  display.setTextSize(1);
  display.setRotation(0);
  delay(100);

  display.fillScreen(display.color565(255, 0, 0));
  display.setTextColor(display.color565(255, 255, 255));
  display.setCursor(0, 0);
  display.print("UTEH");
  display.setTextColor(display.color565(255, 255, 255));
  display.setCursor(15, 9);
  display.print("STR");
  delay(5000);

  display.clearDisplay();
  delay(1000);
}
//________________________________________________________________________________ 

//________________________________________________________________________________ VOID LOOP()
void loop() {
  // put your main code here, to run repeatedly:

  int myCOLOR_ARRAY_Length = sizeof(myCOLOR_ARRAY) / sizeof(myCOLOR_ARRAY[0]);
  
  for (byte i = 0; i < myCOLOR_ARRAY_Length; i++) {
    display.setTextColor(myCOLOR_ARRAY[i]);
    display.setCursor(0, 0);
    display.print("1234");
    display.setCursor(0, 9);
    display.print("ABCD");
    delay(2500);

    display.clearDisplay();
    delay(1000);

    display.setTextColor(myCOLOR_ARRAY[i]);
    display.setCursor(4, 0);
    display.print("1234");
    display.setCursor(4, 9);
    display.print("ABCD");
    delay(2500);

    display.clearDisplay();
    delay(1000);

    display.setCursor(9, 0);
    display.print("1234");
    display.setCursor(9, 9);
    display.print("ABCD");
    delay(2500);
  
    display.clearDisplay();
    delay(1000);
  }
}
//________________________________________________________________________________ 
//<<<<<<<<<<<<<<<<<<<<<<<<<<<<<<<<<<<<<<<<<<<<<<<<<<<<<<<<<<<<<<<<<<<<<<<<<<<<<<<<<<<<<<<<<

but the led light does not light up according to the code I made

Ask for help from utech.

Starting with where your code tells the LED to light up, add serial,Print() messages showing your logic got to that spot. If no message, then back up one step further and add a similar message. Keep backing up until you get a message and then examine the logic right there to see why it stopped there.

That is called debugging and you will make good use of it to track down problems.

What does your code say, and what do the LEDs do? Or do you mean your code shows nothing?

It’s a nice picture, but really only useful to Egyptian archaeologists.

Rather than scaled photos of the modules, you should spend some time learning about ‘annotated’ schematics - (usually in monochrome line-art), where its easy to see and follow the power, signal flow, and interconnections without added graphics to explain what each wire ‘looks’ like.

The pictures are nice for assembly guides and some users, but generally not design purposes, engineers or for debugging.

sorry.

Did you "configure the library for your panel?"

yes i use this library for my panel

The link goes directly to library configuration instructions.

I tried with the configuration from the url you gave, and this is the code I made but the text display does not match the text in the code. The panel should display the text in the loop function

//>>>>>>>>>>>>>>>>>>>>>>>>>>>>>>>>>>>>>>>>>>>>>>>>>>>>>>>>>>>>>>>>>>>>>>>>>>>>>>>>>>>>>>>>> 03_P10_RGB_32x16_Scroll_Text
// This is how many color levels the display shows - the more the slower the update.
//#define PxMATRIX_COLOR_DEPTH 4

// Defines the speed of the SPI bus (reducing this may help if you experience noisy images).
#define PxMATRIX_SPI_FREQUENCY 10000000

// Creates a second buffer for backround drawing (doubles the required RAM).
//#define PxMATRIX_double_buffer true

//----------------------------------------Including Libraries.
#include <PxMatrix.h>
#include <Fonts/FreeMonoBold9pt7b.h>
//----------------------------------------

//----------------------------------------Pins for LED MATRIX.
#define P_LAT 5
#define P_A   19
#define P_B   23
#define P_C   18
#define P_OE  4
//----------------------------------------

// Defines the width and height of the panel in pixels.
#define matrix_width  32
#define matrix_height 16

// Timer setup.
// Create a hardware timer  of ESP32.
hw_timer_t * timer = NULL;
portMUX_TYPE timerMux = portMUX_INITIALIZER_UNLOCKED;

// This defines the 'on' time of the display is us.
// The larger this number, the brighter the display. If too large the ESP will crash.
uint8_t display_draw_time = 30; // 30-70 is usually fine.

// Declaring the "PxMATRIX" object as a "display" and its settings.
PxMATRIX display(matrix_width, matrix_height, P_LAT, P_OE, P_A, P_B, P_C);

//----------------------------------------Some standard colors.
uint16_t myRED      = display.color565(255, 0, 0);
uint16_t myGREEN    = display.color565(0, 255, 0);
uint16_t myBLUE     = display.color565(0, 0, 255);
uint16_t myWHITE    = display.color565(255, 255, 255);
uint16_t myYELLOW   = display.color565(255, 255, 0);
uint16_t myCYAN     = display.color565(0, 255, 255);
uint16_t myMAGENTA  = display.color565(255, 0, 255);
uint16_t myVIOLET   = display.color565(127, 0, 255);
uint16_t myBLACK    = display.color565(0, 0, 0);
//----------------------------------------

//________________________________________________________________________________ IRAM_ATTR display_updater()
// Interrupt handler for Timer.
void IRAM_ATTR display_updater(){
  // Increment the counter and set the time of ISR.
  portENTER_CRITICAL_ISR(&timerMux);
  display.display(display_draw_time);
  portEXIT_CRITICAL_ISR(&timerMux);
}
//________________________________________________________________________________ 

//________________________________________________________________________________ display_update_enable()
// Subroutine to enable and disable interrupt timers.
void display_update_enable(bool is_enable) {
  if (is_enable){
    timer = timerBegin(0, 80, true);
    timerAttachInterrupt(timer, &display_updater, true);
    timerAlarmWrite(timer, 1500, true);
    timerAlarmEnable(timer);
  }
  else{
    timerDetachInterrupt(timer);
    timerAlarmDisable(timer);
  }
}
//________________________________________________________________________________ 

//________________________________________________________________________________ run_Scrolling_Text()
// Subroutine for scrolling text.
void run_Scrolling_Text(uint8_t scrolling_Y_Pos, unsigned long scrolling_Speed, char * scrolling_Text, uint16_t scrolling_Text_Color) {
  uint16_t text_Length_In_Pixel;
  int scrolling_X_Pos_CT;

  if (strlen(scrolling_Text) > 0) {
    text_Length_In_Pixel = getTextWidth(scrolling_Text);
  } else {
    return;
  }

  for (int scrolling_X_Pos = matrix_width; scrolling_X_Pos > -(matrix_width + text_Length_In_Pixel); scrolling_X_Pos--) {
    scrolling_X_Pos_CT = scrolling_X_Pos + 1;

    display.setTextColor(myBLACK);
    display.setCursor(scrolling_X_Pos_CT, scrolling_Y_Pos);
    display.print(scrolling_Text);
    
    display.setTextColor(scrolling_Text_Color);
    display.setCursor(scrolling_X_Pos, scrolling_Y_Pos);
    display.print(scrolling_Text);

    delay(scrolling_Speed);
  }
}
//________________________________________________________________________________ 

//________________________________________________________________________________ getTextWidth()
uint16_t getTextWidth(const char* text) {
  int16_t x1, y1;
  uint16_t w, h;
  display.getTextBounds(text, 0, 0, &x1, &y1, &w, &h);
  return w;
}
//________________________________________________________________________________ 

//________________________________________________________________________________ VOID SETUP()
void setup() {
  // put your setup code here, to run once:

  delay(2000);
  Serial.begin(115200);
  Serial.println();

  // Display initialization.
  display.begin(4);
  display.setScanPattern(ZAGGIZ);
  display.setMuxPattern(STRAIGHT);
  delay(100);

  // Enable Timer Interrupts.
  display_update_enable(true);
  delay(100);

  display.clearDisplay();
  delay(1000);

  display.setBrightness(125); //--> Range from 0 to 255.
  delay(100);

  display.fillScreen(myRED);
  delay(2000);
  display.fillScreen(myGREEN);
  delay(2000);
  display.fillScreen(myBLUE);
  delay(2000);
  display.fillScreen(myWHITE);
  delay(2000);

  display.clearDisplay();
  delay(1000);

  display.setTextWrap(false);
  display.setTextSize(1);
  display.setRotation(0);
  delay(1000);
}
//________________________________________________________________________________ 

//________________________________________________________________________________ VOID LOOP()
void loop() {
  // put your main code here, to run repeatedly:
  
  display.setTextSize(1);
  // run_Scrolling_Text(uint8_t scrolling_Y_Pos, unsigned long scrolling_Speed, char * scrolling_Text, uint16_t scrolling_Text_Color);
  // - scrolling_Y_Pos      : Y position settings for scrolling text.
  // - scrolling_Speed      : Speed ​​settings for scrolling text.
  // - scrolling_Text       : Displayed text settings for scrolling text.
  // - scrolling_Text_Color : Color settings for scrolling text. You can also use: display.color565(255, 0, 0);
  run_Scrolling_Text(0, 35, "Scrolling Text. Text Size : 1, Text Color : Red, Font : Default", myRED);

  display.setTextSize(2);
  run_Scrolling_Text(0, 35, "Scrolling Text. Text Size : 2, Text Color : Green, Font : Default", myGREEN);

  display.setTextSize(1);
  display.setFont(&FreeMonoBold9pt7b);
  run_Scrolling_Text(12, 35, "Scrolling Text. Text Size : 1, Text Color : Blue, Font : FreeMonoBold9pt7b", myBLUE);

  display.setTextSize(1);
  display.setFont();  //--> Set the font back to the default Adafruit GFX font (5x7 font).
  run_Scrolling_Text(9, 35, "Scrolling Text. Text Size : 1, Text Color : White, Font : Default", myWHITE);
}
//________________________________________________________________________________ 
//<<<<<<<<<<<<<<<<<<<<<<<<<<<<<<<<<<<<<<<<<<<<<<<<<<<<<<<<<<<<<<<<<<<<<<<<<<<<<<<<<<<<<<<<<


In the library folder, there is a sub-folder named "examples"...have you tries one of those sketches... or looked at how the sketches are written?

@ustdev
Could you show a clear photo of the panel rear side?

Thank you for your help, my LED lights are on, there are only a few lights that are on but not according to the content, for example, if I display the time 09:07 in each content, there are definitely a few lights that are on outside the numbers displayed but are dimmer than the main content.

What power supply do you have?
Are you using a capacitor across the power supply?

no, I use a power supply with a voltage of 5v 60A for 2x4 panels (2 panels to the side and 4 panels to the bottom)

See post #11.

like this?

Wast this new when started this project? Show the state of the connections. Three things that are responsible for 100% of failures: (1) humans, (2) things humans touch, and (3) things humans "fix."

This topic was automatically closed 180 days after the last reply. New replies are no longer allowed.