So actually i am just trying to combine 3 different sensor program and using button to start but i dont know how to do it
this is each of the program
this is for temperature
#include <OneWire.h>
#include <DallasTemperature.h>
// Define to which pin of the Arduino the 1-Wire bus is connected:
#define ONE_WIRE_BUS 2
// Create a new instance of the oneWire class to communicate with any OneWire device:
OneWire oneWire(ONE_WIRE_BUS);
// Pass the oneWire reference to DallasTemperature library:
DallasTemperature sensors(&oneWire);
void setup() {
  // Begin serial communication at a baud rate of 9600:
  Serial.begin(9600);
  // Start up the library:
  sensors.begin();
}
void loop() {
  // Send the command for all devices on the bus to perform a temperature conversion:
  sensors.requestTemperatures();
  // Fetch the temperature in degrees Celsius for device index:
  float tempC = sensors.getTempCByIndex(0); // the index 0 refers to the first device
  // Fetch the temperature in degrees Fahrenheit for device index:
  float tempF = sensors.getTempFByIndex(0);
  // Print the temperature in Celsius in the Serial Monitor:
  Serial.print("Temperature: ");
  Serial.print(tempC);
  Serial.print(" \xC2\xB0"); // shows degree symbol
  Serial.print("C  |  ");
  // Print the temperature in Fahrenheit
  Serial.print(tempF);
  Serial.print(" \xC2\xB0"); // shows degree symbol
  Serial.println("F");
  // Wait 1 second:
  delay(1000);
}
this is for pulse sensor
#define USE_ARDUINO_INTERRUPTS true    // Set-up low-level interrupts for most acurate BPM math
#include <PulseSensorPlayground.h>     // Includes the PulseSensorPlayground Library

const int PulseWire = 0;       // 'S' Signal pin connected to A0
const int LED13 = 13;          // The on-board Arduino LED
int Threshold = 550;           // Determine which Signal to "count as a beat" and which to ignore

PulseSensorPlayground pulseSensor;  // Creates an object

void setup() {
	Serial.begin(9600);

	// Configure the PulseSensor object, by assigning our variables to it
	pulseSensor.analogInput(PulseWire);
	pulseSensor.blinkOnPulse(LED13);       // Blink on-board LED with heartbeat
	pulseSensor.setThreshold(Threshold);

	// Double-check the "pulseSensor" object was created and began seeing a signal
	if (pulseSensor.begin()) {
		Serial.println("PulseSensor object created!");
	}
}

void loop() {
	int myBPM = pulseSensor.getBeatsPerMinute();      // Calculates BPM

	if (pulseSensor.sawStartOfBeat()) {               // Constantly test to see if a beat happened
		Serial.println("♥  A HeartBeat Happened ! "); // If true, print a message
		Serial.print("BPM: ");
		Serial.println(myBPM);                        // Print the BPM value
		}

	delay(20);
}
this is for GSR sensor
const int GSR=A0;
int sensorValue=0;
int gsr_average=0;

void setup(){
  Serial.begin(9600);
}

void loop(){
  long sum=0;
  for(int i=0;i<10;i++)           //Average the 10 measurements to remove the glitch
      {
      sensorValue=analogRead(GSR);
      sum += sensorValue;
      delay(5);
      }
   gsr_average = sum/10;
   Serial.println(gsr_average);
}
many of the problem in the posted code could have been fixed by looking at the compiler errors
GSR is also the name of a function, it can't be used twice
assume you mean LED_BUILTIN
needs to be inside a function, presumably in loop() just before
this looks like the start of a new functions, GSR. there needs to be a closing brace for if(buttonState == HIGH) {, but it's not clear what should have or that condition.
buttons are typically connected between the pin and ground, the pin configured as INPUT_PULLUP to use the internal pullup resistor which pulls the pin HIGH and when pressed, the button pulls the pin LOW.
so not sure if the test should be for buttonState == HIGH
        void loop () {
            // put your main code here, to run repeatedly:
            tempvalue=tempread ();
            lcd.setCursor (0,0);
            lcd.print (tempvalue);
            lcd.print (" ");
            lcd.write (0xDF);
            lcd.print ("C");
            delay (150);
        }
there can only be one loop(). presumably that code needs to be inside the one defined above.
presuambly the various sub-functions need to be called inside the condition when buttonState == HIGH (or LOW)
go thru the errors, understand and fix them
add a Serial.println("some text"); to see what your code is doing
it seems you copy this code from somewhere. probably chatGPT, because it is irresponsible for whether code works or not. it test even not if code compileable at all.
to be honest this is just 3 different coding that i put into 1 program but i have no idea how to do it , i am trying to make this 3 program start with a button press
i mean to combine 3 different program how do i start , like do you have any reference that i can be using like youtube or web because i cant seem to find it
in general, any program perform initialization in setup() and invokes one or more sub-function in loop(), either as part of loop() or separate functions.
when combining code, you need to understand the initialization and sub-functions in each program, decide how they might interact with one another and combine them in setup() and loop()
it would be easier to start by just combining 2 programs. but you need to understand the programs and how they are coded.
I would test each sketch with its sensor/device. That is to say, test the "temperature" sketch with the Dallas Temperature sensor, and make the sketch do what you want. Then repeat with the "pulse sensor," then the "GSR (sweat) sensor." Only after these three tests work, should you proceed.
Thank you tom three code work properly and i using Arduino
So i success to combine two codes for my program that temperature and pulse and now i am working to add button so my program work when i am pressing my button , but the problem is now if i press button its deactivate my arduino i dont know why its happen , and the code compile its success
this is my code
#define USE_ARDUINO_INTERRUPTS true    // Set-up low-level interrupts for most acurate BPM math
#include <PulseSensorPlayground.h>     // Includes the PulseSensorPlayground Library
#include <Wire.h>
#include <LiquidCrystal_I2C.h>
LiquidCrystal_I2C lcd(0x27,20,4); // set the LCD address to 0x27 for a 16 chars and 2 line display


const int PulseWire = 0;       // 'S' Signal pin connected to A0
int Threshold = 550;           // Determine which Signal to "count as a beat" and which to ignore
PulseSensorPlayground pulseSensor;  // Creates an object

#include <OneWire.h>
#include <DallasTemperature.h>
// Define to which pin of the Arduino the 1-Wire bus is connected:
#define ONE_WIRE_BUS 2
// Create a new instance of the oneWire class to communicate with any OneWire device:
OneWire oneWire(ONE_WIRE_BUS);
// Pass the oneWire reference to DallasTemperature library:
DallasTemperature sensors(&oneWire);

const int buttonPin = 2;  // the number of the pushbutton pin
int buttonState = 0;  // variable for reading the pushbutton status
void setup() {

pinMode(buttonPin, INPUT);

lcd.init(); // initialize the lcd
lcd.backlight();
lcd.setCursor(3,0);
lcd.print("Start Program");
delay (1000);
lcd.clear();

Serial.begin(9600);

  sensors.begin(); // temperature start

	// Configure the PulseSensor object, by assigning our variables to it
	pulseSensor.setThreshold(Threshold);

	// Double-check the "pulseSensor" object was created and began seeing a signal
	if (pulseSensor.begin()) {
		Serial.println("PulseSensor object created!");
	}

}

void loop() {

 buttonState = digitalRead(buttonPin);
 if (buttonState == HIGH) {
   void temp ();
   void pulse ();
 } else {
  Serial.print("tekan tombol");
  lcd.print("tekan tombol");
 }
}

void temp() {
  // Send the command for all devices on the bus to perform a temperature conversion:
  sensors.requestTemperatures();
  // Fetch the temperature in degrees Celsius for device index:
  float tempC = sensors.getTempCByIndex(0); // the index 0 refers to the first device
  // Fetch the temperature in degrees Fahrenheit for device index:
  float tempF = sensors.getTempFByIndex(0);
  // Print the temperature in Celsius in the Serial Monitor:
  Serial.print("Temperature: ");
  Serial.print(tempC);
  Serial.print(" \xC2\xB0"); // shows degree symbol
  Serial.print("C  |  ");

  lcd.setCursor(0,0);
  lcd.print("Temperature :  ");
  lcd.setCursor(0,1);
  lcd.print(tempC);
  lcd.print((char)223); // shows degree symbol
  lcd.print("C | ");
  // Print the temperature in Fahrenheit
  Serial.print(tempF);
  Serial.print(" \xC2\xB0"); // shows degree symbol
  Serial.println("F");

  lcd.print(tempF);
  lcd.print((char)223); // shows degree symbol
  lcd.print("F");
  // Wait 1 second:
  delay(1000);
}

void pulse() {


	int myBPM = pulseSensor.getBeatsPerMinute();      // Calculates BPM
  lcd.setCursor(0,2);
 lcd.print("Denyut Jantung");
 lcd.setCursor(0,3);
    lcd.print("BPM: ");

	if (pulseSensor.sawStartOfBeat()) {               // Constantly test to see if a beat happened
		Serial.println("♥  A HeartBeat Happened ! "); // If true, print a message
		Serial.print("BPM: ");
		Serial.println(myBPM);                        // Print the BPM value
    lcd.setCursor(0,2);
    lcd.print("Denyut Jantung");
    lcd.setCursor(0,3);
    lcd.print("BPM: ");
    lcd.print(myBPM);
		}

	delay(20);
}
so i success to combine 2 program into 1 program so now i am trying to use button so my program can start if i dont press the button my lcd will stay in "start program" in void setup , but the problem is if i press the button its deactivate my arduino my laptop notify that the usb its been unplug for a moment , can you help me with that
#define USE_ARDUINO_INTERRUPTS true // Set-up low-level interrupts for most acurate BPM math
#include <PulseSensorPlayground.h> // Includes the PulseSensorPlayground Library
#include <Wire.h>
#include <LiquidCrystal_I2C.h>
LiquidCrystal_I2C lcd(0x27,20,4); // set the LCD address to 0x27 for a 16 chars and 2 line display
const int PulseWire = 0; // 'S' Signal pin connected to A0
int Threshold = 550; // Determine which Signal to "count as a beat" and which to ignore
PulseSensorPlayground pulseSensor; // Creates an object
#include <OneWire.h>
#include <DallasTemperature.h>
// Define to which pin of the Arduino the 1-Wire bus is connected:
#define ONE_WIRE_BUS 2
// Create a new instance of the oneWire class to communicate with any OneWire device:
OneWire oneWire(ONE_WIRE_BUS);
// Pass the oneWire reference to DallasTemperature library:
DallasTemperature sensors(&oneWire);
const int buttonPin = 2; // the number of the pushbutton pin
int buttonState = 0; // variable for reading the pushbutton status
void setup() {
pinMode(buttonPin, INPUT);
lcd.init(); // initialize the lcd
lcd.backlight();
lcd.setCursor(3,0);
lcd.print("Start Program");
Serial.begin(9600);
sensors.begin(); // temperature start
// Configure the PulseSensor object, by assigning our variables to it
pulseSensor.setThreshold(Threshold);
// Double-check the "pulseSensor" object was created and began seeing a signal
if (pulseSensor.begin()) {
Serial.println("PulseSensor object created!");
}
}
void loop() {
buttonState = digitalRead(buttonPin);
if (buttonState == HIGH) {
void temp ();
void pulse ();
}
}
void temp() {
// Send the command for all devices on the bus to perform a temperature conversion:
sensors.requestTemperatures();
// Fetch the temperature in degrees Celsius for device index:
float tempC = sensors.getTempCByIndex(0); // the index 0 refers to the first device
// Fetch the temperature in degrees Fahrenheit for device index:
float tempF = sensors.getTempFByIndex(0);
// Print the temperature in Celsius in the Serial Monitor:
Serial.print("Temperature: ");
Serial.print(tempC);
Serial.print(" \xC2\xB0"); // shows degree symbol
Serial.print("C | ");
lcd.setCursor(0,0);
lcd.print("Temperature : ");
lcd.setCursor(0,1);
lcd.print(tempC);
lcd.print((char)223); // shows degree symbol
lcd.print("C | ");
// Print the temperature in Fahrenheit
Serial.print(tempF);
Serial.print(" \xC2\xB0"); // shows degree symbol
Serial.println("F");
lcd.print(tempF);
lcd.print((char)223); // shows degree symbol
lcd.print("F");
// Wait 1 second:
delay(1000);
}
void pulse() {
int myBPM = pulseSensor.getBeatsPerMinute(); // Calculates BPM
lcd.setCursor(0,2);
lcd.print("Denyut Jantung");
lcd.setCursor(0,3);
lcd.print("BPM: ");
if (pulseSensor.sawStartOfBeat()) { // Constantly test to see if a beat happened
Serial.println("♥ A HeartBeat Happened ! "); // If true, print a message
Serial.print("BPM: ");
Serial.println(myBPM); // Print the BPM value
lcd.setCursor(0,2);
lcd.print("Denyut Jantung");
lcd.setCursor(0,3);
lcd.print("BPM: ");
lcd.print(myBPM);
}
delay(20);
}
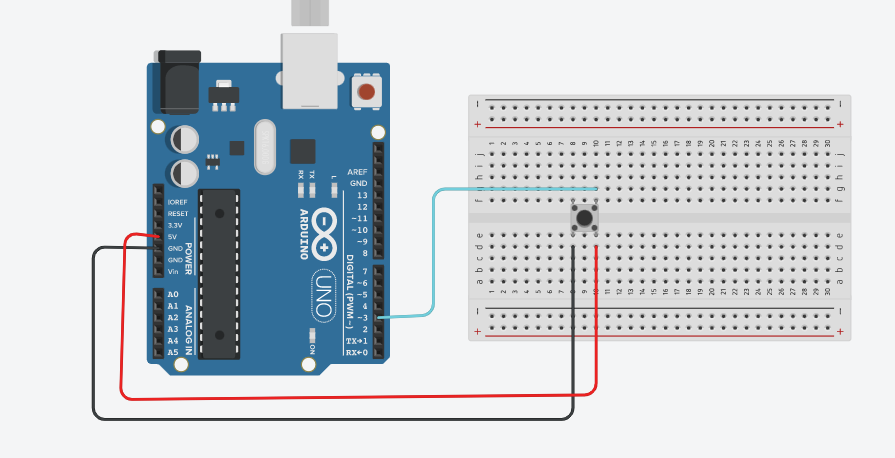
**this is the wiring of the button**

Because that is exactly what you have wired your button to do!!! IT shorts the +5 to ground and that shorts the regulator chip on the Arduino, which shorts your Arduino power supply, which stops your entire Arduino.
What did you intend for the button switch to do?